Archiwum kategorii: Web Tools

How to Make an InDesign Book Template (Cover & Layout)

Post pobrano z: How to Make an InDesign Book Template (Cover & Layout)

Final product image
What You’ll Be Creating

In this tutorial, you’ll learn how to make a book in InDesign. Once created, InDesign book templates can be adapted with your own cover design, type formatting and text content to create a unique and professional book layout designs every time. 

We’ll cover a wide range of book design techniques in this tutorial, from how to put together the inside pages to how to design a book cover.

Here we’ll put together a standard-sized paperback (softcover) book, complete with inside pages and a full wraparound cover. 

If you’re looking to self-publish your own books and sell them online, or are making your first steps into professional cover design for clients, this guide will introduce you to the essentials of creating book templates. 

Looking for a quick start? InDesign templates are great value and easy to adapt. You can find a huge range of customizable InDesign book cover templates and book layout templates on Envato Elements and GraphicRiver.

What You’ll Need to Create Your Book Template

We’ll be using Adobe InDesign to create the artwork for the cover and to typeset the inside pages. You’ll also need to download the following fonts for the inside pages template:

To reproduce the cover design pictured, you’ll also need to download the following fonts and graphics:

Install the fonts on your computer, and you’re ready to start creating your book format template. 

1. How to Create the Inside Pages for Your Book Template

Step 1

Open InDesign and go to File > New > Document. 

Choose Print from the options at the top of the New Document window.

Set the Width of the page to 5 in and Height to 8 in. Increase the Number of Pages to 16 (you can always add more later). 

Set the Top Margin to 0.72 in, Inside to 0.75 in, Bottom to 0.7 in, and Outside to 0.5 in. 

Unless you are planning to add background color to the inside pages of your book, you won’t need a bleed, so leave this at 0 in for now. 

new document

Then click Create

first page

Step 2

Expand the Pages panel (Window > Pages) and click on the A-Master icon at the top to bring it up on screen. 

Pull out two guides from the left-hand ruler (View > Show Rulers), dropping them at the two margin lines on the right-hand page. 

margin guides

Pull out a third guide to the center-point between the margins, at roughly 7.62 in. 

center guide

Step 3

From the top ruler, pull down a guide to 2.0839 in.

guide

Then pull down a second to 3.1967 in. 

guide

Step 4

Use the Type Tool (T) to create a text frame on the right-hand page, resting the top edge against the guide you’ve just created and letting the other edges meet the margins on the bottom, left, and right sides. 

text frame

Create a second text frame along the bottom of the right-hand page, centering it on the vertical guide. 

page number frame

Place your type cursor into the frame and head up to Type > Insert Special Character > Markers > Current Page Number. 

Select the text frame and, from either the top Controls panel or the Character and Paragraph panels (Window > Type & Tables > Character / Paragraph), set the Font to George Sans Regular, Size 10 pt, and Align Center. 

george sans font

Step 5

On the A-Master icon in the Pages panel, Right-Click > Master Options for “A-Master”.

master options

Adjust the Name to Opening Page of Chapter and click OK

master options

Step 6

Choose New Master from the Pages panel’s main menu. 

new master

Name this second master Body of Chapter, before clicking OK

new master

Step 7

Select the page number text frame on the A-Master and Edit > Copy it. 

Click on the B-Master icon and Edit > Paste in Place the frame onto the right page. 

page number

Paste again, and move this copy over onto the left-hand page of the B-Master. 

pasted number

Step 8

Create a text frame on the left-hand page, using the margins to guide its dimensions. 

left hand page frames

Then click on the small white square symbol at the bottom-right corner of the text frame and click once onto the facing page, to create a second linked text frame.

threaded frames

Create a text frame for a running header across the top of the left-hand page on the B-Master, setting the Font to George Sans Regular, Size 9 pt, and Align Center. 

 running header

Copy and Paste the header frame, and move over to the top of the right-hand page. 

pasted header

Step 9

Click on the Page 5 icon in the Pages panel, and Right-Click > Numbering & Section Options. 

numbering and section

Check Start Page Numbering at and set this to 1. Choose 1, 2, 3, 4… from the Style menu below, before clicking OK. When the warning message is flagged up, simply click OK. 

new section

Click on the icon for the very first page of the document and Right-Click > Numbering & Section Options. 

numbering and section

As before, check Start Page Numbering at, and set this to 1. This time, choose i, ii, iii, iv… from the Style menu, before clicking OK

numbering and section

Step 10

Right-Click on the [None] master icon at the very top of the Pages panel, and select Apply Master to Pages. 

apply master

In the To Pages box, type in 2-4, and click OK

b master

Right-Click on the B-Master icon and click on Apply Master to Pages. In the To Pages box, type in 2-4, 6-12, and click OK

apply master

Step 11

Click on Page i to bring up the first page of the book on screen. 

Use the Type Tool (T) to add text to this first page, which can list the title, author name, and publisher. Set the Font to George Sans Regular, Align Center. 

book title page

Step 12

On Page ii you can create a contents page. 

Create a list of chapters set in George Sans Regular, Size 12 pt, and rest these against the left margin. 

chapter names

Copy and Paste the text frame and switch the text to Align Right. Edit the text to read ‘X’ for now—these can be updated with page numbers later when the book is finished. 

contents page

Use the Line Tool (\) to create connecting lines between the chapter name and page number. From the Stroke panel (Window > Stroke), set the Weight to about 1.5 pt and the Type to Japanese Dots. 

dotted stroke

Step 13

Page 1 will be the first page of the main body of your book—the first page of the first chapter. 

Create a text frame with the baseline resting on the top horizontal guide. Type in ‘Chapter One’ and set the Font to George Sans Semibold, Size to 14 pt, and Align Center. 

chapter title

Step 14

Set your type cursor into the text frame below (this is carried over from the A-Master), and set the Font to Addington CF Regular, Size to 11 pt, and the Leading to 14 pt. 

From the Paragraph panel, set the First Line Left Indent to 0.125 in. 

font formatting

Now you can drop in your own text, by copying and pasting text over from a Word document, for example. Or go to Type > Fill with Placeholder Text to fill up the frame for now.

placeholder text

Set your type cursor into the first paragraph only, and, from the Paragraph panel, increase the Drop Cap Number of Lines to 2.

drop cap number of lines

Step 15

Now you can start to thread the chapter text across the succeeding pages. 

Click on the white square symbol at the bottom-right of the first text frame to pick up overflowing text (your cursor will show a few lines of text in miniature). Scroll down to the next page, and click once onto the page to continue the flow. 

InDesign will automatically fill the remaining pages with text frames, as these have already been set up on the B-Master. 

threaded frames

Step 16

With the basics of your template now set up, you can use the first chapter as a model for creating further chapters. Copy and Paste pages to tag onto your document. 

You might also want to add few pages for an index or bibliography to the end of your book template. 

With your book template complete and ready to adapt, make sure to head up to File > Save to save it for later use. 

index page

2. How to Create a Cover for Your Book Template

Step 1

In InDesign, go to File > New > Document. 

Choose Print from the options at the top of the New Document window.

Set the Width of the page to 5 in and Height to 8 in. Set the Number of Pages to 3. Deselect Facing Pages.

Set the Margins to 0.5 in. Leave the Bleed value at 0 in for now. 

Then click Create

new document

Step 2

From the Pages panel’s main menu, uncheck Allow Document Pages to Shuffle.

allow pages to shuffle

This will allow you to grab the Page 2 icon and ‘stick’ it to the right side of Page 1. 

combined pages

Then grab the Page 3 icon and ‘stick’ this to the right side of Page 2. 

complete trio of pages

Step 3

Select the Page Tool (Shift-P) and click onto Page 2 to select it. Then head up to Layout > Margins and Columns. 

Set the Left and Right Margins to 0 in and click OK

page tool

This page will form the spine of your book, and the width of this will depend on the page count of your book. For now, you can give it a default width, which can be adjusted later. 

From the top Controls panel, adjust the Width (W) of the page to 0.75 in. 

adjusted page width

Step 4

Expand the Layers panel (Window > Layers) and double-click on Layer 1. Rename it Photo and click OK

Create four more new layers: Type Behind, Retro Dots, Type in Front, and finally, Barcode

layer options

Then lock all the layers except Photo, which we’ll work on first. 

photo layer

Step 5

Expand the Swatches panel (Window > Color > Swatches), and choose New Color Swatch from the panel’s main menu. 

Set the levels to C=4 M=98 Y=88 K=0, name the swatch Red, and click Add and Done

red swatch

Step 6

Working on the Photo layer, use the Rectangle Frame Tool (F) to create an image frame across the bottom half of Page 3 (which will be the front cover). 

File > Place, choosing the woman rushing photo, and Open

woman rushing photo

With the image frame selected, go to Object > Effects > Transparency. Bring the Opacity down to 60%.

transparency

Click on Gradient Feather in the Effects window’s left-hand menu and apply a Linear gradient, at roughly a 110 Degree Angle. Click OK to exit the window. 

gradient feather

Step 7

Use the Rectangle Tool (M) to create a shape along the spine, setting the Fill to Red

spine red

Step 8

Lock the Photo layer and unlock the Type Behind layer. 

Create a large heading across the front cover using the Type Tool (T), setting the Font to Agave Brush and giving the text a Red swatch color. 

agave brush font

Add more text frames above the title, using the same Font and Color, scaling the Font Size down as the text frames get higher up the cover. 

font size reduced

Set the author’s name in the bottom left-hand corner, in George Sans Semibold.

author text

Select all the text frames on the front cover and go to Object > Effects > Transparency. Set the Mode to Multiply and bring the Opacity down to 90%. 

multiply

Step 9

Lock the Type Behind layer and unlock the layer above, Retro Dots. 

Use the Rectangle Frame Tool (F) to create an image frame over the whole of the front cover. File > Place, navigate to the pack of retro dots backgrounds you downloaded earlier, choose the first image, and Open it. 

retro dots

Select the image frame and go to Object > Effects > Transparency. Set the Mode to Hard Light and Opacity to 65%. 

effects panel

Step 10

Copy and Paste the image frame, moving it over to Page 1 (the back cover). 

Paste again, and readjust the width to fit over the top of the spine. 

Pull out the edges of all the background elements across the three pages to create a ‘fake’ bleed. This can be added later when the artwork is exported. 

spine artwork

Step 11

Expand the Type Behind layer in the Layers panel, and identify the large text title’s element. Click to select it, and then click on the Create New Layer button at the bottom of the panel to duplicate it. 

selected header

Unlock the Type in Front layer, and drag the copy of the title up, dropping it into this layer.

Then lock the Type Behind layer.

type in front layer

Step 12

Add text frames to the spine of the cover, on the Type in Front layer. 

To rotate text frames, Right-Click > Transform > Rotate 90 Degrees CW.

type in front

Step 13

Add a review or teaser text to the top of the front cover, set in George Sans Bold. 

review text

Add copies of these to the back cover too. 
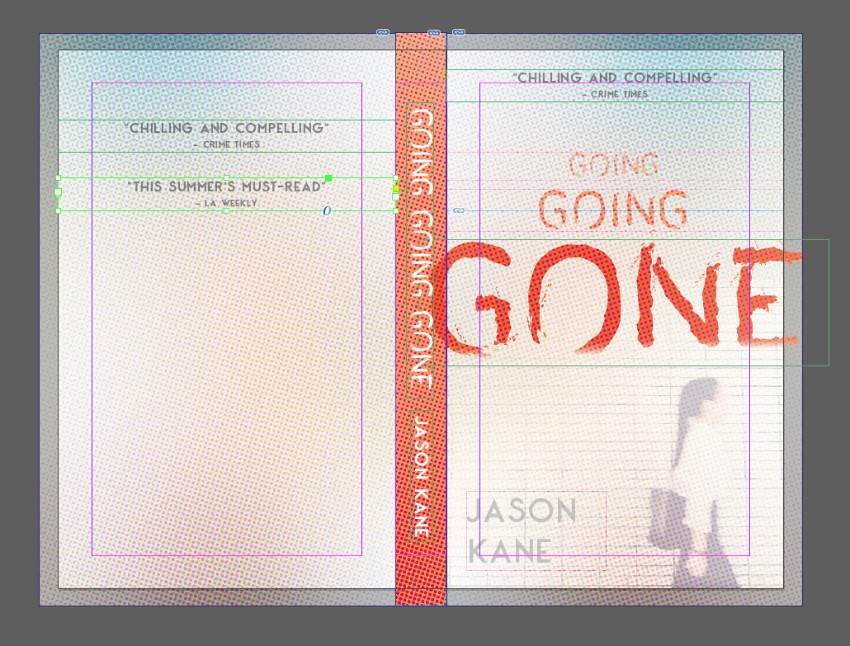
reviews on back

You can also add a blurb to the back cover, setting the Font to George Sans Bold, Size 10 pt. 

You can place an optional barcode on the bottom of the back cover, on the Barcode layer. Use the Rectangle Frame Tool (F) to create a frame, and File > Place your barcode image.

blurb on back

Conclusion: Your Finished Book Template

With the basics of your book template in place, you can now File > Save your work and use the two documents you’ve created as a foundation for creating your own unique paperback book layout designs. 

final book mockup

Still unsure about how to start with creating your own book templates? A downloadable InDesign template is a sensible place to get started, and can be great for boosting your confidence when you’re dipping a toe into book design.

You can find a wide range of customizable InDesign book templates for book covers and book layout designs on Envato Elements and GraphicRiver.

Discover our pick of the best book design tutorials for beginners below:

How to Make an InDesign Book Template (Cover & Layout)

Post pobrano z: How to Make an InDesign Book Template (Cover & Layout)

Final product image
What You’ll Be Creating

In this tutorial, you’ll learn how to make a book in InDesign. Once created, InDesign book templates can be adapted with your own cover design, type formatting and text content to create a unique and professional book layout designs every time. 

We’ll cover a wide range of book design techniques in this tutorial, from how to put together the inside pages to how to design a book cover.

Here we’ll put together a standard-sized paperback (softcover) book, complete with inside pages and a full wraparound cover. 

If you’re looking to self-publish your own books and sell them online, or are making your first steps into professional cover design for clients, this guide will introduce you to the essentials of creating book templates. 

Looking for a quick start? InDesign templates are great value and easy to adapt. You can find a huge range of customizable InDesign book cover templates and book layout templates on Envato Elements and GraphicRiver.

What You’ll Need to Create Your Book Template

We’ll be using Adobe InDesign to create the artwork for the cover and to typeset the inside pages. You’ll also need to download the following fonts for the inside pages template:

To reproduce the cover design pictured, you’ll also need to download the following fonts and graphics:

Install the fonts on your computer, and you’re ready to start creating your book format template. 

1. How to Create the Inside Pages for Your Book Template

Step 1

Open InDesign and go to File > New > Document. 

Choose Print from the options at the top of the New Document window.

Set the Width of the page to 5 in and Height to 8 in. Increase the Number of Pages to 16 (you can always add more later). 

Set the Top Margin to 0.72 in, Inside to 0.75 in, Bottom to 0.7 in, and Outside to 0.5 in. 

Unless you are planning to add background color to the inside pages of your book, you won’t need a bleed, so leave this at 0 in for now. 

new document

Then click Create

first page

Step 2

Expand the Pages panel (Window > Pages) and click on the A-Master icon at the top to bring it up on screen. 

Pull out two guides from the left-hand ruler (View > Show Rulers), dropping them at the two margin lines on the right-hand page. 

margin guides

Pull out a third guide to the center-point between the margins, at roughly 7.62 in. 

center guide

Step 3

From the top ruler, pull down a guide to 2.0839 in.

guide

Then pull down a second to 3.1967 in. 

guide

Step 4

Use the Type Tool (T) to create a text frame on the right-hand page, resting the top edge against the guide you’ve just created and letting the other edges meet the margins on the bottom, left, and right sides. 

text frame

Create a second text frame along the bottom of the right-hand page, centering it on the vertical guide. 

page number frame

Place your type cursor into the frame and head up to Type > Insert Special Character > Markers > Current Page Number. 

Select the text frame and, from either the top Controls panel or the Character and Paragraph panels (Window > Type & Tables > Character / Paragraph), set the Font to George Sans Regular, Size 10 pt, and Align Center. 

george sans font

Step 5

On the A-Master icon in the Pages panel, Right-Click > Master Options for “A-Master”.

master options

Adjust the Name to Opening Page of Chapter and click OK

master options

Step 6

Choose New Master from the Pages panel’s main menu. 

new master

Name this second master Body of Chapter, before clicking OK

new master

Step 7

Select the page number text frame on the A-Master and Edit > Copy it. 

Click on the B-Master icon and Edit > Paste in Place the frame onto the right page. 

page number

Paste again, and move this copy over onto the left-hand page of the B-Master. 

pasted number

Step 8

Create a text frame on the left-hand page, using the margins to guide its dimensions. 

left hand page frames

Then click on the small white square symbol at the bottom-right corner of the text frame and click once onto the facing page, to create a second linked text frame.

threaded frames

Create a text frame for a running header across the top of the left-hand page on the B-Master, setting the Font to George Sans Regular, Size 9 pt, and Align Center. 

 running header

Copy and Paste the header frame, and move over to the top of the right-hand page. 

pasted header

Step 9

Click on the Page 5 icon in the Pages panel, and Right-Click > Numbering & Section Options. 

numbering and section

Check Start Page Numbering at and set this to 1. Choose 1, 2, 3, 4… from the Style menu below, before clicking OK. When the warning message is flagged up, simply click OK. 

new section

Click on the icon for the very first page of the document and Right-Click > Numbering & Section Options. 

numbering and section

As before, check Start Page Numbering at, and set this to 1. This time, choose i, ii, iii, iv… from the Style menu, before clicking OK

numbering and section

Step 10

Right-Click on the [None] master icon at the very top of the Pages panel, and select Apply Master to Pages. 

apply master

In the To Pages box, type in 2-4, and click OK

b master

Right-Click on the B-Master icon and click on Apply Master to Pages. In the To Pages box, type in 2-4, 6-12, and click OK

apply master

Step 11

Click on Page i to bring up the first page of the book on screen. 

Use the Type Tool (T) to add text to this first page, which can list the title, author name, and publisher. Set the Font to George Sans Regular, Align Center. 

book title page

Step 12

On Page ii you can create a contents page. 

Create a list of chapters set in George Sans Regular, Size 12 pt, and rest these against the left margin. 

chapter names

Copy and Paste the text frame and switch the text to Align Right. Edit the text to read ‘X’ for now—these can be updated with page numbers later when the book is finished. 

contents page

Use the Line Tool (\) to create connecting lines between the chapter name and page number. From the Stroke panel (Window > Stroke), set the Weight to about 1.5 pt and the Type to Japanese Dots. 

dotted stroke

Step 13

Page 1 will be the first page of the main body of your book—the first page of the first chapter. 

Create a text frame with the baseline resting on the top horizontal guide. Type in ‘Chapter One’ and set the Font to George Sans Semibold, Size to 14 pt, and Align Center. 

chapter title

Step 14

Set your type cursor into the text frame below (this is carried over from the A-Master), and set the Font to Addington CF Regular, Size to 11 pt, and the Leading to 14 pt. 

From the Paragraph panel, set the First Line Left Indent to 0.125 in. 

font formatting

Now you can drop in your own text, by copying and pasting text over from a Word document, for example. Or go to Type > Fill with Placeholder Text to fill up the frame for now.

placeholder text

Set your type cursor into the first paragraph only, and, from the Paragraph panel, increase the Drop Cap Number of Lines to 2.

drop cap number of lines

Step 15

Now you can start to thread the chapter text across the succeeding pages. 

Click on the white square symbol at the bottom-right of the first text frame to pick up overflowing text (your cursor will show a few lines of text in miniature). Scroll down to the next page, and click once onto the page to continue the flow. 

InDesign will automatically fill the remaining pages with text frames, as these have already been set up on the B-Master. 

threaded frames

Step 16

With the basics of your template now set up, you can use the first chapter as a model for creating further chapters. Copy and Paste pages to tag onto your document. 

You might also want to add few pages for an index or bibliography to the end of your book template. 

With your book template complete and ready to adapt, make sure to head up to File > Save to save it for later use. 

index page

2. How to Create a Cover for Your Book Template

Step 1

In InDesign, go to File > New > Document. 

Choose Print from the options at the top of the New Document window.

Set the Width of the page to 5 in and Height to 8 in. Set the Number of Pages to 3. Deselect Facing Pages.

Set the Margins to 0.5 in. Leave the Bleed value at 0 in for now. 

Then click Create

new document

Step 2

From the Pages panel’s main menu, uncheck Allow Document Pages to Shuffle.

allow pages to shuffle

This will allow you to grab the Page 2 icon and ‘stick’ it to the right side of Page 1. 

combined pages

Then grab the Page 3 icon and ‘stick’ this to the right side of Page 2. 

complete trio of pages

Step 3

Select the Page Tool (Shift-P) and click onto Page 2 to select it. Then head up to Layout > Margins and Columns. 

Set the Left and Right Margins to 0 in and click OK

page tool

This page will form the spine of your book, and the width of this will depend on the page count of your book. For now, you can give it a default width, which can be adjusted later. 

From the top Controls panel, adjust the Width (W) of the page to 0.75 in. 

adjusted page width

Step 4

Expand the Layers panel (Window > Layers) and double-click on Layer 1. Rename it Photo and click OK

Create four more new layers: Type Behind, Retro Dots, Type in Front, and finally, Barcode

layer options

Then lock all the layers except Photo, which we’ll work on first. 

photo layer

Step 5

Expand the Swatches panel (Window > Color > Swatches), and choose New Color Swatch from the panel’s main menu. 

Set the levels to C=4 M=98 Y=88 K=0, name the swatch Red, and click Add and Done

red swatch

Step 6

Working on the Photo layer, use the Rectangle Frame Tool (F) to create an image frame across the bottom half of Page 3 (which will be the front cover). 

File > Place, choosing the woman rushing photo, and Open

woman rushing photo

With the image frame selected, go to Object > Effects > Transparency. Bring the Opacity down to 60%.

transparency

Click on Gradient Feather in the Effects window’s left-hand menu and apply a Linear gradient, at roughly a 110 Degree Angle. Click OK to exit the window. 

gradient feather

Step 7

Use the Rectangle Tool (M) to create a shape along the spine, setting the Fill to Red

spine red

Step 8

Lock the Photo layer and unlock the Type Behind layer. 

Create a large heading across the front cover using the Type Tool (T), setting the Font to Agave Brush and giving the text a Red swatch color. 

agave brush font

Add more text frames above the title, using the same Font and Color, scaling the Font Size down as the text frames get higher up the cover. 

font size reduced

Set the author’s name in the bottom left-hand corner, in George Sans Semibold.

author text

Select all the text frames on the front cover and go to Object > Effects > Transparency. Set the Mode to Multiply and bring the Opacity down to 90%. 

multiply

Step 9

Lock the Type Behind layer and unlock the layer above, Retro Dots. 

Use the Rectangle Frame Tool (F) to create an image frame over the whole of the front cover. File > Place, navigate to the pack of retro dots backgrounds you downloaded earlier, choose the first image, and Open it. 

retro dots

Select the image frame and go to Object > Effects > Transparency. Set the Mode to Hard Light and Opacity to 65%. 

effects panel

Step 10

Copy and Paste the image frame, moving it over to Page 1 (the back cover). 

Paste again, and readjust the width to fit over the top of the spine. 

Pull out the edges of all the background elements across the three pages to create a ‘fake’ bleed. This can be added later when the artwork is exported. 

spine artwork

Step 11

Expand the Type Behind layer in the Layers panel, and identify the large text title’s element. Click to select it, and then click on the Create New Layer button at the bottom of the panel to duplicate it. 

selected header

Unlock the Type in Front layer, and drag the copy of the title up, dropping it into this layer.

Then lock the Type Behind layer.

type in front layer

Step 12

Add text frames to the spine of the cover, on the Type in Front layer. 

To rotate text frames, Right-Click > Transform > Rotate 90 Degrees CW.

type in front

Step 13

Add a review or teaser text to the top of the front cover, set in George Sans Bold. 

review text

Add copies of these to the back cover too. 

reviews on back

You can also add a blurb to the back cover, setting the Font to George Sans Bold, Size 10 pt. 

You can place an optional barcode on the bottom of the back cover, on the Barcode layer. Use the Rectangle Frame Tool (F) to create a frame, and File > Place your barcode image.

blurb on back

Conclusion: Your Finished Book Template

With the basics of your book template in place, you can now File > Save your work and use the two documents you’ve created as a foundation for creating your own unique paperback book layout designs. 

final book mockup

Still unsure about how to start with creating your own book templates? A downloadable InDesign template is a sensible place to get started, and can be great for boosting your confidence when you’re dipping a toe into book design.

You can find a wide range of customizable InDesign book templates for book covers and book layout designs on Envato Elements and GraphicRiver.

Discover our pick of the best book design tutorials for beginners below:

How to Make an InDesign Book Template (Cover & Layout)

Post pobrano z: How to Make an InDesign Book Template (Cover & Layout)

Final product image
What You’ll Be Creating

In this tutorial, you’ll learn how to make a book in InDesign. Once created, InDesign book templates can be adapted with your own cover design, type formatting and text content to create a unique and professional book layout designs every time. 

We’ll cover a wide range of book design techniques in this tutorial, from how to put together the inside pages to how to design a book cover.

Here we’ll put together a standard-sized paperback (softcover) book, complete with inside pages and a full wraparound cover. 

If you’re looking to self-publish your own books and sell them online, or are making your first steps into professional cover design for clients, this guide will introduce you to the essentials of creating book templates. 

Looking for a quick start? InDesign templates are great value and easy to adapt. You can find a huge range of customizable InDesign book cover templates and book layout templates on Envato Elements and GraphicRiver.

What You’ll Need to Create Your Book Template

We’ll be using Adobe InDesign to create the artwork for the cover and to typeset the inside pages. You’ll also need to download the following fonts for the inside pages template:

To reproduce the cover design pictured, you’ll also need to download the following fonts and graphics:

Install the fonts on your computer, and you’re ready to start creating your book format template. 

1. How to Create the Inside Pages for Your Book Template

Step 1

Open InDesign and go to File > New > Document. 

Choose Print from the options at the top of the New Document window.

Set the Width of the page to 5 in and Height to 8 in. Increase the Number of Pages to 16 (you can always add more later). 

Set the Top Margin to 0.72 in, Inside to 0.75 in, Bottom to 0.7 in, and Outside to 0.5 in. 

Unless you are planning to add background color to the inside pages of your book, you won’t need a bleed, so leave this at 0 in for now. 

new document

Then click Create

first page

Step 2

Expand the Pages panel (Window > Pages) and click on the A-Master icon at the top to bring it up on screen. 

Pull out two guides from the left-hand ruler (View > Show Rulers), dropping them at the two margin lines on the right-hand page. 

margin guides

Pull out a third guide to the center-point between the margins, at roughly 7.62 in. 

center guide

Step 3

From the top ruler, pull down a guide to 2.0839 in.

guide

Then pull down a second to 3.1967 in. 

guide

Step 4

Use the Type Tool (T) to create a text frame on the right-hand page, resting the top edge against the guide you’ve just created and letting the other edges meet the margins on the bottom, left, and right sides. 

text frame

Create a second text frame along the bottom of the right-hand page, centering it on the vertical guide. 

page number frame

Place your type cursor into the frame and head up to Type > Insert Special Character > Markers > Current Page Number. 

Select the text frame and, from either the top Controls panel or the Character and Paragraph panels (Window > Type & Tables > Character / Paragraph), set the Font to George Sans Regular, Size 10 pt, and Align Center. 

george sans font

Step 5

On the A-Master icon in the Pages panel, Right-Click > Master Options for “A-Master”.

master options

Adjust the Name to Opening Page of Chapter and click OK

master options

Step 6

Choose New Master from the Pages panel’s main menu. 

new master

Name this second master Body of Chapter, before clicking OK

new master

Step 7

Select the page number text frame on the A-Master and Edit > Copy it. 

Click on the B-Master icon and Edit > Paste in Place the frame onto the right page. 

page number

Paste again, and move this copy over onto the left-hand page of the B-Master. 

pasted number

Step 8

Create a text frame on the left-hand page, using the margins to guide its dimensions. 

left hand page frames

Then click on the small white square symbol at the bottom-right corner of the text frame and click once onto the facing page, to create a second linked text frame.

threaded frames

Create a text frame for a running header across the top of the left-hand page on the B-Master, setting the Font to George Sans Regular, Size 9 pt, and Align Center. 

 running header

Copy and Paste the header frame, and move over to the top of the right-hand page. 

pasted header

Step 9

Click on the Page 5 icon in the Pages panel, and Right-Click > Numbering & Section Options. 

numbering and section

Check Start Page Numbering at and set this to 1. Choose 1, 2, 3, 4… from the Style menu below, before clicking OK. When the warning message is flagged up, simply click OK. 

new section

Click on the icon for the very first page of the document and Right-Click > Numbering & Section Options. 

numbering and section

As before, check Start Page Numbering at, and set this to 1. This time, choose i, ii, iii, iv… from the Style menu, before clicking OK

numbering and section

Step 10

Right-Click on the [None] master icon at the very top of the Pages panel, and select Apply Master to Pages. 

apply master

In the To Pages box, type in 2-4, and click OK

b master

Right-Click on the B-Master icon and click on Apply Master to Pages. In the To Pages box, type in 2-4, 6-12, and click OK

apply master

Step 11

Click on Page i to bring up the first page of the book on screen. 

Use the Type Tool (T) to add text to this first page, which can list the title, author name, and publisher. Set the Font to George Sans Regular, Align Center. 

book title page

Step 12

On Page ii you can create a contents page. 

Create a list of chapters set in George Sans Regular, Size 12 pt, and rest these against the left margin. 

chapter names

Copy and Paste the text frame and switch the text to Align Right. Edit the text to read ‘X’ for now—these can be updated with page numbers later when the book is finished. 

contents page

Use the Line Tool (\) to create connecting lines between the chapter name and page number. From the Stroke panel (Window > Stroke), set the Weight to about 1.5 pt and the Type to Japanese Dots. 

dotted stroke

Step 13

Page 1 will be the first page of the main body of your book—the first page of the first chapter. 

Create a text frame with the baseline resting on the top horizontal guide. Type in ‘Chapter One’ and set the Font to George Sans Semibold, Size to 14 pt, and Align Center. 

chapter title

Step 14

Set your type cursor into the text frame below (this is carried over from the A-Master), and set the Font to Addington CF Regular, Size to 11 pt, and the Leading to 14 pt. 

From the Paragraph panel, set the First Line Left Indent to 0.125 in. 

font formatting

Now you can drop in your own text, by copying and pasting text over from a Word document, for example. Or go to Type > Fill with Placeholder Text to fill up the frame for now.

placeholder text

Set your type cursor into the first paragraph only, and, from the Paragraph panel, increase the Drop Cap Number of Lines to 2.

drop cap number of lines

Step 15

Now you can start to thread the chapter text across the succeeding pages. 

Click on the white square symbol at the bottom-right of the first text frame to pick up overflowing text (your cursor will show a few lines of text in miniature). Scroll down to the next page, and click once onto the page to continue the flow. 

InDesign will automatically fill the remaining pages with text frames, as these have already been set up on the B-Master. 

threaded frames

Step 16

With the basics of your template now set up, you can use the first chapter as a model for creating further chapters. Copy and Paste pages to tag onto your document. 

You might also want to add few pages for an index or bibliography to the end of your book template. 

With your book template complete and ready to adapt, make sure to head up to File > Save to save it for later use. 

index page

2. How to Create a Cover for Your Book Template

Step 1

In InDesign, go to File > New > Document. 

Choose Print from the options at the top of the New Document window.

Set the Width of the page to 5 in and Height to 8 in. Set the Number of Pages to 3. Deselect Facing Pages.

Set the Margins to 0.5 in. Leave the Bleed value at 0 in for now. 

Then click Create

new document

Step 2

From the Pages panel’s main menu, uncheck Allow Document Pages to Shuffle.

allow pages to shuffle

This will allow you to grab the Page 2 icon and ‘stick’ it to the right side of Page 1. 

combined pages

Then grab the Page 3 icon and ‘stick’ this to the right side of Page 2. 

complete trio of pages

Step 3

Select the Page Tool (Shift-P) and click onto Page 2 to select it. Then head up to Layout > Margins and Columns. 

Set the Left and Right Margins to 0 in and click OK

page tool

This page will form the spine of your book, and the width of this will depend on the page count of your book. For now, you can give it a default width, which can be adjusted later. 

From the top Controls panel, adjust the Width (W) of the page to 0.75 in. 

adjusted page width

Step 4

Expand the Layers panel (Window > Layers) and double-click on Layer 1. Rename it Photo and click OK

Create four more new layers: Type Behind, Retro Dots, Type in Front, and finally, Barcode

layer options

Then lock all the layers except Photo, which we’ll work on first. 

photo layer

Step 5

Expand the Swatches panel (Window > Color > Swatches), and choose New Color Swatch from the panel’s main menu. 

Set the levels to C=4 M=98 Y=88 K=0, name the swatch Red, and click Add and Done

red swatch

Step 6

Working on the Photo layer, use the Rectangle Frame Tool (F) to create an image frame across the bottom half of Page 3 (which will be the front cover). 

File > Place, choosing the woman rushing photo, and Open

woman rushing photo

With the image frame selected, go to Object > Effects > Transparency. Bring the Opacity down to 60%.

transparency

Click on Gradient Feather in the Effects window’s left-hand menu and apply a Linear gradient, at roughly a 110 Degree Angle. Click OK to exit the window. 

gradient feather

Step 7

Use the Rectangle Tool (M) to create a shape along the spine, setting the Fill to Red

spine red

Step 8

Lock the Photo layer and unlock the Type Behind layer. 

Create a large heading across the front cover using the Type Tool (T), setting the Font to Agave Brush and giving the text a Red swatch color. 

agave brush font

Add more text frames above the title, using the same Font and Color, scaling the Font Size down as the text frames get higher up the cover. 

font size reduced

Set the author’s name in the bottom left-hand corner, in George Sans Semibold.

author text

Select all the text frames on the front cover and go to Object > Effects > Transparency. Set the Mode to Multiply and bring the Opacity down to 90%. 

multiply

Step 9

Lock the Type Behind layer and unlock the layer above, Retro Dots. 

Use the Rectangle Frame Tool (F) to create an image frame over the whole of the front cover. File > Place, navigate to the pack of retro dots backgrounds you downloaded earlier, choose the first image, and Open it. 

retro dots

Select the image frame and go to Object > Effects > Transparency. Set the Mode to Hard Light and Opacity to 65%. 

effects panel

Step 10

Copy and Paste the image frame, moving it over to Page 1 (the back cover). 

Paste again, and readjust the width to fit over the top of the spine. 

Pull out the edges of all the background elements across the three pages to create a ‘fake’ bleed. This can be added later when the artwork is exported. 

spine artwork

Step 11

Expand the Type Behind layer in the Layers panel, and identify the large text title’s element. Click to select it, and then click on the Create New Layer button at the bottom of the panel to duplicate it. 

selected header

Unlock the Type in Front layer, and drag the copy of the title up, dropping it into this layer.

Then lock the Type Behind layer.

type in front layer

Step 12

Add text frames to the spine of the cover, on the Type in Front layer. 

To rotate text frames, Right-Click > Transform > Rotate 90 Degrees CW.

type in front

Step 13

Add a review or teaser text to the top of the front cover, set in George Sans Bold. 

review text

Add copies of these to the back cover too. 

reviews on back

You can also add a blurb to the back cover, setting the Font to George Sans Bold, Size 10 pt. 

You can place an optional barcode on the bottom of the back cover, on the Barcode layer. Use the Rectangle Frame Tool (F) to create a frame, and File > Place your barcode image.

blurb on back

Conclusion: Your Finished Book Template

With the basics of your book template in place, you can now File > Save your work and use the two documents you’ve created as a foundation for creating your own unique paperback book layout designs. 

final book mockup

Still unsure about how to start with creating your own book templates? A downloadable InDesign template is a sensible place to get started, and can be great for boosting your confidence when you’re dipping a toe into book design.

You can find a wide range of customizable InDesign book templates for book covers and book layout designs on Envato Elements and GraphicRiver.

Discover our pick of the best book design tutorials for beginners below:

How to Make an InDesign Book Template (Cover & Layout)

Post pobrano z: How to Make an InDesign Book Template (Cover & Layout)

Final product image
What You’ll Be Creating

In this tutorial, you’ll learn how to make a book in InDesign. Once created, InDesign book templates can be adapted with your own cover design, type formatting and text content to create a unique and professional book layout designs every time. 

We’ll cover a wide range of book design techniques in this tutorial, from how to put together the inside pages to how to design a book cover.

Here we’ll put together a standard-sized paperback (softcover) book, complete with inside pages and a full wraparound cover. 

If you’re looking to self-publish your own books and sell them online, or are making your first steps into professional cover design for clients, this guide will introduce you to the essentials of creating book templates. 

Looking for a quick start? InDesign templates are great value and easy to adapt. You can find a huge range of customizable InDesign book cover templates and book layout templates on Envato Elements and GraphicRiver.

What You’ll Need to Create Your Book Template

We’ll be using Adobe InDesign to create the artwork for the cover and to typeset the inside pages. You’ll also need to download the following fonts for the inside pages template:

To reproduce the cover design pictured, you’ll also need to download the following fonts and graphics:

Install the fonts on your computer, and you’re ready to start creating your book format template. 

1. How to Create the Inside Pages for Your Book Template

Step 1

Open InDesign and go to File > New > Document. 

Choose Print from the options at the top of the New Document window.

Set the Width of the page to 5 in and Height to 8 in. Increase the Number of Pages to 16 (you can always add more later). 

Set the Top Margin to 0.72 in, Inside to 0.75 in, Bottom to 0.7 in, and Outside to 0.5 in. 

Unless you are planning to add background color to the inside pages of your book, you won’t need a bleed, so leave this at 0 in for now. 

new document

Then click Create

first page

Step 2

Expand the Pages panel (Window > Pages) and click on the A-Master icon at the top to bring it up on screen. 

Pull out two guides from the left-hand ruler (View > Show Rulers), dropping them at the two margin lines on the right-hand page. 

margin guides

Pull out a third guide to the center-point between the margins, at roughly 7.62 in. 

center guide

Step 3

From the top ruler, pull down a guide to 2.0839 in.

guide

Then pull down a second to 3.1967 in. 

guide

Step 4

Use the Type Tool (T) to create a text frame on the right-hand page, resting the top edge against the guide you’ve just created and letting the other edges meet the margins on the bottom, left, and right sides. 

text frame

Create a second text frame along the bottom of the right-hand page, centering it on the vertical guide. 

page number frame

Place your type cursor into the frame and head up to Type > Insert Special Character > Markers > Current Page Number. 

Select the text frame and, from either the top Controls panel or the Character and Paragraph panels (Window > Type & Tables > Character / Paragraph), set the Font to George Sans Regular, Size 10 pt, and Align Center. 

george sans font

Step 5

On the A-Master icon in the Pages panel, Right-Click > Master Options for “A-Master”.

master options

Adjust the Name to Opening Page of Chapter and click OK

master options

Step 6

Choose New Master from the Pages panel’s main menu. 

new master

Name this second master Body of Chapter, before clicking OK

new master

Step 7

Select the page number text frame on the A-Master and Edit > Copy it. 

Click on the B-Master icon and Edit > Paste in Place the frame onto the right page. 

page number

Paste again, and move this copy over onto the left-hand page of the B-Master. 

pasted number

Step 8

Create a text frame on the left-hand page, using the margins to guide its dimensions. 

left hand page frames

Then click on the small white square symbol at the bottom-right corner of the text frame and click once onto the facing page, to create a second linked text frame.

threaded frames

Create a text frame for a running header across the top of the left-hand page on the B-Master, setting the Font to George Sans Regular, Size 9 pt, and Align Center. 

 running header

Copy and Paste the header frame, and move over to the top of the right-hand page. 

pasted header

Step 9

Click on the Page 5 icon in the Pages panel, and Right-Click > Numbering & Section Options. 

numbering and section

Check Start Page Numbering at and set this to 1. Choose 1, 2, 3, 4… from the Style menu below, before clicking OK. When the warning message is flagged up, simply click OK. 

new section

Click on the icon for the very first page of the document and Right-Click > Numbering & Section Options. 

numbering and section

As before, check Start Page Numbering at, and set this to 1. This time, choose i, ii, iii, iv… from the Style menu, before clicking OK

numbering and section

Step 10

Right-Click on the [None] master icon at the very top of the Pages panel, and select Apply Master to Pages. 

apply master

In the To Pages box, type in 2-4, and click OK

b master

Right-Click on the B-Master icon and click on Apply Master to Pages. In the To Pages box, type in 2-4, 6-12, and click OK

apply master

Step 11

Click on Page i to bring up the first page of the book on screen. 

Use the Type Tool (T) to add text to this first page, which can list the title, author name, and publisher. Set the Font to George Sans Regular, Align Center. 

book title page

Step 12

On Page ii you can create a contents page. 

Create a list of chapters set in George Sans Regular, Size 12 pt, and rest these against the left margin. 

chapter names

Copy and Paste the text frame and switch the text to Align Right. Edit the text to read ‘X’ for now—these can be updated with page numbers later when the book is finished. 

contents page

Use the Line Tool (\) to create connecting lines between the chapter name and page number. From the Stroke panel (Window > Stroke), set the Weight to about 1.5 pt and the Type to Japanese Dots. 

dotted stroke

Step 13

Page 1 will be the first page of the main body of your book—the first page of the first chapter. 

Create a text frame with the baseline resting on the top horizontal guide. Type in ‘Chapter One’ and set the Font to George Sans Semibold, Size to 14 pt, and Align Center. 

chapter title

Step 14

Set your type cursor into the text frame below (this is carried over from the A-Master), and set the Font to Addington CF Regular, Size to 11 pt, and the Leading to 14 pt. 

From the Paragraph panel, set the First Line Left Indent to 0.125 in. 

font formatting

Now you can drop in your own text, by copying and pasting text over from a Word document, for example. Or go to Type > Fill with Placeholder Text to fill up the frame for now.

placeholder text

Set your type cursor into the first paragraph only, and, from the Paragraph panel, increase the Drop Cap Number of Lines to 2.

drop cap number of lines

Step 15

Now you can start to thread the chapter text across the succeeding pages. 

Click on the white square symbol at the bottom-right of the first text frame to pick up overflowing text (your cursor will show a few lines of text in miniature). Scroll down to the next page, and click once onto the page to continue the flow. 

InDesign will automatically fill the remaining pages with text frames, as these have already been set up on the B-Master. 

threaded frames

Step 16

With the basics of your template now set up, you can use the first chapter as a model for creating further chapters. Copy and Paste pages to tag onto your document. 

You might also want to add few pages for an index or bibliography to the end of your book template. 

With your book template complete and ready to adapt, make sure to head up to File > Save to save it for later use. 

index page

2. How to Create a Cover for Your Book Template

Step 1

In InDesign, go to File > New > Document. 

Choose Print from the options at the top of the New Document window.

Set the Width of the page to 5 in and Height to 8 in. Set the Number of Pages to 3. Deselect Facing Pages.

Set the Margins to 0.5 in. Leave the Bleed value at 0 in for now. 

Then click Create

new document

Step 2

From the Pages panel’s main menu, uncheck Allow Document Pages to Shuffle.

allow pages to shuffle

This will allow you to grab the Page 2 icon and ‘stick’ it to the right side of Page 1. 

combined pages

Then grab the Page 3 icon and ‘stick’ this to the right side of Page 2. 

complete trio of pages

Step 3

Select the Page Tool (Shift-P) and click onto Page 2 to select it. Then head up to Layout > Margins and Columns. 

Set the Left and Right Margins to 0 in and click OK

page tool

This page will form the spine of your book, and the width of this will depend on the page count of your book. For now, you can give it a default width, which can be adjusted later. 

From the top Controls panel, adjust the Width (W) of the page to 0.75 in. 

adjusted page width

Step 4

Expand the Layers panel (Window > Layers) and double-click on Layer 1. Rename it Photo and click OK

Create four more new layers: Type Behind, Retro Dots, Type in Front, and finally, Barcode

layer options

Then lock all the layers except Photo, which we’ll work on first. 

photo layer

Step 5

Expand the Swatches panel (Window > Color > Swatches), and choose New Color Swatch from the panel’s main menu. 

Set the levels to C=4 M=98 Y=88 K=0, name the swatch Red, and click Add and Done

red swatch

Step 6

Working on the Photo layer, use the Rectangle Frame Tool (F) to create an image frame across the bottom half of Page 3 (which will be the front cover). 

File > Place, choosing the woman rushing photo, and Open

woman rushing photo

With the image frame selected, go to Object > Effects > Transparency. Bring the Opacity down to 60%.

transparency

Click on Gradient Feather in the Effects window’s left-hand menu and apply a Linear gradient, at roughly a 110 Degree Angle. Click OK to exit the window. 

gradient feather

Step 7

Use the Rectangle Tool (M) to create a shape along the spine, setting the Fill to Red

spine red

Step 8

Lock the Photo layer and unlock the Type Behind layer. 

Create a large heading across the front cover using the Type Tool (T), setting the Font to Agave Brush and giving the text a Red swatch color. 

agave brush font

Add more text frames above the title, using the same Font and Color, scaling the Font Size down as the text frames get higher up the cover. 

font size reduced

Set the author’s name in the bottom left-hand corner, in George Sans Semibold.

author text

Select all the text frames on the front cover and go to Object > Effects > Transparency. Set the Mode to Multiply and bring the Opacity down to 90%. 

multiply

Step 9

Lock the Type Behind layer and unlock the layer above, Retro Dots. 

Use the Rectangle Frame Tool (F) to create an image frame over the whole of the front cover. File > Place, navigate to the pack of retro dots backgrounds you downloaded earlier, choose the first image, and Open it. 

retro dots

Select the image frame and go to Object > Effects > Transparency. Set the Mode to Hard Light and Opacity to 65%. 

effects panel

Step 10

Copy and Paste the image frame, moving it over to Page 1 (the back cover). 

Paste again, and readjust the width to fit over the top of the spine. 

Pull out the edges of all the background elements across the three pages to create a ‘fake’ bleed. This can be added later when the artwork is exported. 

spine artwork

Step 11

Expand the Type Behind layer in the Layers panel, and identify the large text title’s element. Click to select it, and then click on the Create New Layer button at the bottom of the panel to duplicate it. 

selected header

Unlock the Type in Front layer, and drag the copy of the title up, dropping it into this layer.

Then lock the Type Behind layer.

type in front layer

Step 12

Add text frames to the spine of the cover, on the Type in Front layer. 

To rotate text frames, Right-Click > Transform > Rotate 90 Degrees CW.

type in front

Step 13

Add a review or teaser text to the top of the front cover, set in George Sans Bold. 

review text

Add copies of these to the back cover too. 

reviews on back

You can also add a blurb to the back cover, setting the Font to George Sans Bold, Size 10 pt. 

You can place an optional barcode on the bottom of the back cover, on the Barcode layer. Use the Rectangle Frame Tool (F) to create a frame, and File > Place your barcode image.

blurb on back

Conclusion: Your Finished Book Template

With the basics of your book template in place, you can now File > Save your work and use the two documents you’ve created as a foundation for creating your own unique paperback book layout designs. 

final book mockup

Still unsure about how to start with creating your own book templates? A downloadable InDesign template is a sensible place to get started, and can be great for boosting your confidence when you’re dipping a toe into book design.

You can find a wide range of customizable InDesign book templates for book covers and book layout designs on Envato Elements and GraphicRiver.

Discover our pick of the best book design tutorials for beginners below:

How to Make an InDesign Book Template (Cover & Layout)

Post pobrano z: How to Make an InDesign Book Template (Cover & Layout)

Final product image
What You’ll Be Creating

In this tutorial, you’ll learn how to make a book in InDesign. Once created, InDesign book templates can be adapted with your own cover design, type formatting and text content to create a unique and professional book layout designs every time. 

We’ll cover a wide range of book design techniques in this tutorial, from how to put together the inside pages to how to design a book cover.

Here we’ll put together a standard-sized paperback (softcover) book, complete with inside pages and a full wraparound cover. 

If you’re looking to self-publish your own books and sell them online, or are making your first steps into professional cover design for clients, this guide will introduce you to the essentials of creating book templates. 

Looking for a quick start? InDesign templates are great value and easy to adapt. You can find a huge range of customizable InDesign book cover templates and book layout templates on Envato Elements and GraphicRiver.

What You’ll Need to Create Your Book Template

We’ll be using Adobe InDesign to create the artwork for the cover and to typeset the inside pages. You’ll also need to download the following fonts for the inside pages template:

To reproduce the cover design pictured, you’ll also need to download the following fonts and graphics:

Install the fonts on your computer, and you’re ready to start creating your book format template. 

1. How to Create the Inside Pages for Your Book Template

Step 1

Open InDesign and go to File > New > Document. 

Choose Print from the options at the top of the New Document window.

Set the Width of the page to 5 in and Height to 8 in. Increase the Number of Pages to 16 (you can always add more later). 

Set the Top Margin to 0.72 in, Inside to 0.75 in, Bottom to 0.7 in, and Outside to 0.5 in. 

Unless you are planning to add background color to the inside pages of your book, you won’t need a bleed, so leave this at 0 in for now. 

new document

Then click Create

first page

Step 2

Expand the Pages panel (Window > Pages) and click on the A-Master icon at the top to bring it up on screen. 

Pull out two guides from the left-hand ruler (View > Show Rulers), dropping them at the two margin lines on the right-hand page. 

margin guides

Pull out a third guide to the center-point between the margins, at roughly 7.62 in. 

center guide

Step 3

From the top ruler, pull down a guide to 2.0839 in.

guide

Then pull down a second to 3.1967 in. 

guide

Step 4

Use the Type Tool (T) to create a text frame on the right-hand page, resting the top edge against the guide you’ve just created and letting the other edges meet the margins on the bottom, left, and right sides. 

text frame

Create a second text frame along the bottom of the right-hand page, centering it on the vertical guide. 

page number frame

Place your type cursor into the frame and head up to Type > Insert Special Character > Markers > Current Page Number. 

Select the text frame and, from either the top Controls panel or the Character and Paragraph panels (Window > Type & Tables > Character / Paragraph), set the Font to George Sans Regular, Size 10 pt, and Align Center. 

george sans font

Step 5

On the A-Master icon in the Pages panel, Right-Click > Master Options for “A-Master”.

master options

Adjust the Name to Opening Page of Chapter and click OK

master options

Step 6

Choose New Master from the Pages panel’s main menu. 

new master

Name this second master Body of Chapter, before clicking OK

new master

Step 7

Select the page number text frame on the A-Master and Edit > Copy it. 

Click on the B-Master icon and Edit > Paste in Place the frame onto the right page. 

page number

Paste again, and move this copy over onto the left-hand page of the B-Master. 

pasted number

Step 8

Create a text frame on the left-hand page, using the margins to guide its dimensions. 

left hand page frames

Then click on the small white square symbol at the bottom-right corner of the text frame and click once onto the facing page, to create a second linked text frame.

threaded frames

Create a text frame for a running header across the top of the left-hand page on the B-Master, setting the Font to George Sans Regular, Size 9 pt, and Align Center. 

 running header

Copy and Paste the header frame, and move over to the top of the right-hand page. 

pasted header

Step 9

Click on the Page 5 icon in the Pages panel, and Right-Click > Numbering & Section Options. 

numbering and section

Check Start Page Numbering at and set this to 1. Choose 1, 2, 3, 4… from the Style menu below, before clicking OK. When the warning message is flagged up, simply click OK. 

new section

Click on the icon for the very first page of the document and Right-Click > Numbering & Section Options. 

numbering and section

As before, check Start Page Numbering at, and set this to 1. This time, choose i, ii, iii, iv… from the Style menu, before clicking OK

numbering and section

Step 10

Right-Click on the [None] master icon at the very top of the Pages panel, and select Apply Master to Pages. 

apply master

In the To Pages box, type in 2-4, and click OK

b master

Right-Click on the B-Master icon and click on Apply Master to Pages. In the To Pages box, type in 2-4, 6-12, and click OK

apply master

Step 11

Click on Page i to bring up the first page of the book on screen. 

Use the Type Tool (T) to add text to this first page, which can list the title, author name, and publisher. Set the Font to George Sans Regular, Align Center. 

book title page

Step 12

On Page ii you can create a contents page. 

Create a list of chapters set in George Sans Regular, Size 12 pt, and rest these against the left margin. 

chapter names

Copy and Paste the text frame and switch the text to Align Right. Edit the text to read ‘X’ for now—these can be updated with page numbers later when the book is finished. 

contents page

Use the Line Tool (\) to create connecting lines between the chapter name and page number. From the Stroke panel (Window > Stroke), set the Weight to about 1.5 pt and the Type to Japanese Dots. 

dotted stroke

Step 13

Page 1 will be the first page of the main body of your book—the first page of the first chapter. 

Create a text frame with the baseline resting on the top horizontal guide. Type in ‘Chapter One’ and set the Font to George Sans Semibold, Size to 14 pt, and Align Center. 

chapter title

Step 14

Set your type cursor into the text frame below (this is carried over from the A-Master), and set the Font to Addington CF Regular, Size to 11 pt, and the Leading to 14 pt. 

From the Paragraph panel, set the First Line Left Indent to 0.125 in. 

font formatting

Now you can drop in your own text, by copying and pasting text over from a Word document, for example. Or go to Type > Fill with Placeholder Text to fill up the frame for now.

placeholder text

Set your type cursor into the first paragraph only, and, from the Paragraph panel, increase the Drop Cap Number of Lines to 2.

drop cap number of lines

Step 15

Now you can start to thread the chapter text across the succeeding pages. 

Click on the white square symbol at the bottom-right of the first text frame to pick up overflowing text (your cursor will show a few lines of text in miniature). Scroll down to the next page, and click once onto the page to continue the flow. 

InDesign will automatically fill the remaining pages with text frames, as these have already been set up on the B-Master. 

threaded frames

Step 16

With the basics of your template now set up, you can use the first chapter as a model for creating further chapters. Copy and Paste pages to tag onto your document. 

You might also want to add few pages for an index or bibliography to the end of your book template. 

With your book template complete and ready to adapt, make sure to head up to File > Save to save it for later use. 

index page

2. How to Create a Cover for Your Book Template

Step 1

In InDesign, go to File > New > Document. 

Choose Print from the options at the top of the New Document window.

Set the Width of the page to 5 in and Height to 8 in. Set the Number of Pages to 3. Deselect Facing Pages.

Set the Margins to 0.5 in. Leave the Bleed value at 0 in for now. 

Then click Create

new document

Step 2

From the Pages panel’s main menu, uncheck Allow Document Pages to Shuffle.

allow pages to shuffle

This will allow you to grab the Page 2 icon and ‘stick’ it to the right side of Page 1. 

combined pages

Then grab the Page 3 icon and ‘stick’ this to the right side of Page 2. 

complete trio of pages

Step 3

Select the Page Tool (Shift-P) and click onto Page 2 to select it. Then head up to Layout > Margins and Columns. 

Set the Left and Right Margins to 0 in and click OK

page tool

This page will form the spine of your book, and the width of this will depend on the page count of your book. For now, you can give it a default width, which can be adjusted later. 

From the top Controls panel, adjust the Width (W) of the page to 0.75 in. 

adjusted page width

Step 4

Expand the Layers panel (Window > Layers) and double-click on Layer 1. Rename it Photo and click OK

Create four more new layers: Type Behind, Retro Dots, Type in Front, and finally, Barcode

layer options

Then lock all the layers except Photo, which we’ll work on first. 

photo layer

Step 5

Expand the Swatches panel (Window > Color > Swatches), and choose New Color Swatch from the panel’s main menu. 

Set the levels to C=4 M=98 Y=88 K=0, name the swatch Red, and click Add and Done

red swatch

Step 6

Working on the Photo layer, use the Rectangle Frame Tool (F) to create an image frame across the bottom half of Page 3 (which will be the front cover). 

File > Place, choosing the woman rushing photo, and Open

woman rushing photo

With the image frame selected, go to Object > Effects > Transparency. Bring the Opacity down to 60%.

transparency

Click on Gradient Feather in the Effects window’s left-hand menu and apply a Linear gradient, at roughly a 110 Degree Angle. Click OK to exit the window. 

gradient feather

Step 7

Use the Rectangle Tool (M) to create a shape along the spine, setting the Fill to Red

spine red

Step 8

Lock the Photo layer and unlock the Type Behind layer. 

Create a large heading across the front cover using the Type Tool (T), setting the Font to Agave Brush and giving the text a Red swatch color. 

agave brush font

Add more text frames above the title, using the same Font and Color, scaling the Font Size down as the text frames get higher up the cover. 

font size reduced

Set the author’s name in the bottom left-hand corner, in George Sans Semibold.

author text

Select all the text frames on the front cover and go to Object > Effects > Transparency. Set the Mode to Multiply and bring the Opacity down to 90%. 

multiply

Step 9

Lock the Type Behind layer and unlock the layer above, Retro Dots. 

Use the Rectangle Frame Tool (F) to create an image frame over the whole of the front cover. File > Place, navigate to the pack of retro dots backgrounds you downloaded earlier, choose the first image, and Open it. 

retro dots

Select the image frame and go to Object > Effects > Transparency. Set the Mode to Hard Light and Opacity to 65%. 

effects panel

Step 10

Copy and Paste the image frame, moving it over to Page 1 (the back cover). 

Paste again, and readjust the width to fit over the top of the spine. 

Pull out the edges of all the background elements across the three pages to create a ‘fake’ bleed. This can be added later when the artwork is exported. 

spine artwork

Step 11

Expand the Type Behind layer in the Layers panel, and identify the large text title’s element. Click to select it, and then click on the Create New Layer button at the bottom of the panel to duplicate it. 

selected header

Unlock the Type in Front layer, and drag the copy of the title up, dropping it into this layer.

Then lock the Type Behind layer.

type in front layer

Step 12

Add text frames to the spine of the cover, on the Type in Front layer. 

To rotate text frames, Right-Click > Transform > Rotate 90 Degrees CW.

type in front

Step 13

Add a review or teaser text to the top of the front cover, set in George Sans Bold. 

review text

Add copies of these to the back cover too. 

reviews on back

You can also add a blurb to the back cover, setting the Font to George Sans Bold, Size 10 pt. 

You can place an optional barcode on the bottom of the back cover, on the Barcode layer. Use the Rectangle Frame Tool (F) to create a frame, and File > Place your barcode image.

blurb on back

Conclusion: Your Finished Book Template

With the basics of your book template in place, you can now File > Save your work and use the two documents you’ve created as a foundation for creating your own unique paperback book layout designs. 

final book mockup

Still unsure about how to start with creating your own book templates? A downloadable InDesign template is a sensible place to get started, and can be great for boosting your confidence when you’re dipping a toe into book design.

You can find a wide range of customizable InDesign book templates for book covers and book layout designs on Envato Elements and GraphicRiver.

Discover our pick of the best book design tutorials for beginners below:

How to Create a Cyberpunk Photoshop Effect Action

Post pobrano z: How to Create a Cyberpunk Photoshop Effect Action

Final product image
What You’ll Be Creating

In this tutorial, you will learn how to create a cyberpunk Photoshop effect action to add amazing photo effects to your photos. I will explain everything in so much detail that everyone can create the effect, even those who have just opened Photoshop for the first time.

The effect shown above is the one I will show you how to create in this tutorial. If you would like to create the even more advanced cyberpunk Photoshop effect shown below, using just a single click and in only a few minutes, then check out my Cyberpunk Photoshop Action.

action final result

What You’ll Need

To recreate the design above, you will need the following resources:

1. How to Start Creating an Action

Step 1

First, open the photo that you want to work with. To open your photo, go to File > Open, choose your photo, and click Open. Now, before we get started, just check a couple of things:

  1. Your photo should be in RGB Color mode, 8 Bits/Channel. To check this, go to Image > Mode.
  2. For best results, your photo size should be 2000–4500 px wide/high. To check this, go to Image > Image Size.
  3. Your photo should be the Background layer. If it is not, go to Layer > New > Background from Layer.
checking image size and mode

Step 2

Now go to Window > Actions, and in the Actions panel, click on the menu icon in the top right-hand corner, choose New Set to create a new set, and name it Cyberpunk. Then, click on the same menu icon again, choose New Action to create a new action, and name it Cyberpunk.

creating new action

2. How to Create the Color Look

Step 1

In this section, we are going to create the color look. Go to Layer > New Adjustment Layer > Gradient Map to create a new gradient map adjustment layer and name it Color_Look_1.

creating new gradient map adjustment layer

Step 2

Now Double-click on this layer thumbnail, and then in the Properties panel, click on the gradient to open up the Gradient Editor panel and enter the settings below:

adjusting gradient map
The left color stop has color 0000ff, and the right color stop has color ff00ff.

Step 3

Change the Blending Mode of this layer to Soft Light and set the Opacity to 70%.

changing blending mode and opacity

Step 4

Now select the Background layer, go to Layer > New Adjustment Layer > Hue/Saturation to create a new hue/saturation adjustment layer, and name it Color_Look_2.

creating new hue and saturation adjustment layer

Step 5

Double-click on this layer thumbnail and enter the settings below in the Properties panel:

adjusting hue and saturation

Step 6

Now select the Background layer, go to Layer > New Adjustment Layer > Photo Filter to create a new photo filter adjustment layer, and name
it Color_Look_3.

creating new photo filter adjustment layer

Step 7

Double-click on this layer thumbnail and, in the Properties panel, set Filter to Cooling Filter (80), Density to 25%, and check the Preserve Luminosity option.

adjusting photo filter

3. How to Make the Final Adjustments

Step 1

In this section, we are going to make some final adjustments to the design. Select the Color_Look_1 layer and press D on your keyboard to reset the swatches. Then, go to Layer > New Adjustment Layer > Gradient Map to create a new gradient map adjustment layer and name it Overall Contrast.

creating new gradient map adjustment layer

Step 2

Now change the Blending Mode of this layer to Luminosity and set the Opacity to 80%.

changing blending mode and opacity

Step 3

Go to Layer > New Adjustment Layer > Vibrance to create a new vibrance adjustment layer and name it Overall Vibrance/Saturation.

creating new vibrance adjustment layer

Step 4

Now Double-click on this layer thumbnail and, in the Properties panel, set the Vibrance to +25 and Saturation to +10.

adjusting vibrance and saturation

Step 5

Go to Layer > New Adjustment Layer > Levels to create a new levels adjustment layer, and name it Overall Brightness.

creating new levels adjustment layer

Step 6

Now Double-click on this layer thumbnail and, in the Properties panel, enter the settings below:

adjusting levels

Step 7

Press Control-Alt-Shift-E on your keyboard to make a screenshot, and then press Control-Shift-U to desaturate this layer. Then, go to Filter > Other > High Pass and set the Radius to 2 px.

adding high pass filter

Step 8

Change the Blending Mode of this layer to Hard Light and set the Opacity to 80%. Name this layer Overall Sharpening.

changing blending mode and opacity

You Made It!

Congratulations, you have succeeded! You have now learned how to create cool photo effects in Photoshop. Here is our final result:

final result

If you would like to create the even more advanced cyberpunk Photoshop effect
shown below, using just a single click and in only a few minutes, then
check out my Cyberpunk Photoshop Action.

Using this action, you can create amazing cyberpunk photo effects
from your photos with no work at all! Simply open your photo and just play the action. It’s really that simple! The action
will do all the work for you, giving you fully layered and customizable results that you can further modify. Finally you can create cyberpunk color effects for pictures using a single click and in seconds with the first ever cyberpunk photo effects action.

The action comes with a detailed video tutorial that demonstrates how to use the action and customize the results to get the most out of the effect.

If you want to add some cyberpunk style text effect, check out Cyberpunk – 80s Retro Text Effects.

action final result

Do you like Photoshop actions? Then you may also like:

How to Create a Cyberpunk Photoshop Effect Action

Post pobrano z: How to Create a Cyberpunk Photoshop Effect Action

Final product image
What You’ll Be Creating

In this tutorial, you will learn how to create a cyberpunk Photoshop effect action to add amazing photo effects to your photos. I will explain everything in so much detail that everyone can create the effect, even those who have just opened Photoshop for the first time.

The effect shown above is the one I will show you how to create in this tutorial. If you would like to create the even more advanced cyberpunk Photoshop effect shown below, using just a single click and in only a few minutes, then check out my Cyberpunk Photoshop Action.

action final result

What You’ll Need

To recreate the design above, you will need the following resources:

1. How to Start Creating an Action

Step 1

First, open the photo that you want to work with. To open your photo, go to File > Open, choose your photo, and click Open. Now, before we get started, just check a couple of things:

  1. Your photo should be in RGB Color mode, 8 Bits/Channel. To check this, go to Image > Mode.
  2. For best results, your photo size should be 2000–4500 px wide/high. To check this, go to Image > Image Size.
  3. Your photo should be the Background layer. If it is not, go to Layer > New > Background from Layer.
checking image size and mode

Step 2

Now go to Window > Actions, and in the Actions panel, click on the menu icon in the top right-hand corner, choose New Set to create a new set, and name it Cyberpunk. Then, click on the same menu icon again, choose New Action to create a new action, and name it Cyberpunk.

creating new action

2. How to Create the Color Look

Step 1

In this section, we are going to create the color look. Go to Layer > New Adjustment Layer > Gradient Map to create a new gradient map adjustment layer and name it Color_Look_1.

creating new gradient map adjustment layer

Step 2

Now Double-click on this layer thumbnail, and then in the Properties panel, click on the gradient to open up the Gradient Editor panel and enter the settings below:

adjusting gradient map
The left color stop has color 0000ff, and the right color stop has color ff00ff.

Step 3

Change the Blending Mode of this layer to Soft Light and set the Opacity to 70%.

changing blending mode and opacity

Step 4

Now select the Background layer, go to Layer > New Adjustment Layer > Hue/Saturation to create a new hue/saturation adjustment layer, and name it Color_Look_2.

creating new hue and saturation adjustment layer

Step 5

Double-click on this layer thumbnail and enter the settings below in the Properties panel:

adjusting hue and saturation

Step 6

Now select the Background layer, go to Layer > New Adjustment Layer > Photo Filter to create a new photo filter adjustment layer, and name
it Color_Look_3.

creating new photo filter adjustment layer

Step 7

Double-click on this layer thumbnail and, in the Properties panel, set Filter to Cooling Filter (80), Density to 25%, and check the Preserve Luminosity option.

adjusting photo filter

3. How to Make the Final Adjustments

Step 1

In this section, we are going to make some final adjustments to the design. Select the Color_Look_1 layer and press D on your keyboard to reset the swatches. Then, go to Layer > New Adjustment Layer > Gradient Map to create a new gradient map adjustment layer and name it Overall Contrast.

creating new gradient map adjustment layer

Step 2

Now change the Blending Mode of this layer to Luminosity and set the Opacity to 80%.

changing blending mode and opacity

Step 3

Go to Layer > New Adjustment Layer > Vibrance to create a new vibrance adjustment layer and name it Overall Vibrance/Saturation.

creating new vibrance adjustment layer

Step 4

Now Double-click on this layer thumbnail and, in the Properties panel, set the Vibrance to +25 and Saturation to +10.

adjusting vibrance and saturation

Step 5

Go to Layer > New Adjustment Layer > Levels to create a new levels adjustment layer, and name it Overall Brightness.

creating new levels adjustment layer

Step 6

Now Double-click on this layer thumbnail and, in the Properties panel, enter the settings below:

adjusting levels

Step 7

Press Control-Alt-Shift-E on your keyboard to make a screenshot, and then press Control-Shift-U to desaturate this layer. Then, go to Filter > Other > High Pass and set the Radius to 2 px.

adding high pass filter

Step 8

Change the Blending Mode of this layer to Hard Light and set the Opacity to 80%. Name this layer Overall Sharpening.

changing blending mode and opacity

You Made It!

Congratulations, you have succeeded! You have now learned how to create cool photo effects in Photoshop. Here is our final result:

final result

If you would like to create the even more advanced cyberpunk Photoshop effect
shown below, using just a single click and in only a few minutes, then
check out my Cyberpunk Photoshop Action.

Using this action, you can create amazing cyberpunk photo effects
from your photos with no work at all! Simply open your photo and just play the action. It’s really that simple! The action
will do all the work for you, giving you fully layered and customizable results that you can further modify. Finally you can create cyberpunk color effects for pictures using a single click and in seconds with the first ever cyberpunk photo effects action.

The action comes with a detailed video tutorial that demonstrates how to use the action and customize the results to get the most out of the effect.

If you want to add some cyberpunk style text effect, check out Cyberpunk – 80s Retro Text Effects.

action final result

Do you like Photoshop actions? Then you may also like:

How to Make a Fancy Menu Template

Post pobrano z: How to Make a Fancy Menu Template

Final product image
What You’ll Be Creating

In this tutorial, you’ll learn how to create a restaurant menu template in Adobe InDesign. Complete with a luxurious color palette and a vintage style, this fancy menu template is perfect for high-end restaurants or luxury bars. 

This InDesign menu template, which consists of an A4-sized food menu and A5 drinks menu, can be easily adapted with your own text content and is set up for professional, full-color printing. 

menu food
drinks menu

Looking for a different menu style? Discover more delicious and easy-to-edit menu templates over on Envato Elements

What You’ll Need to Create Your Fancy Menu Template

We’ll be using Adobe InDesign to create the menu layout, and dipping into Adobe Illustrator to edit the vector graphics for the menu design. 

You’ll also need to download the following fonts and image files:

Once you’ve installed the fonts onto your computer and saved the graphic files to a safe place, you’re ready to get started with creating your menu design. 

1. How to Set Up the Menu Template in InDesign

Step 1

Open InDesign and go to File > New > Document. 

In the New Document window, choose Print from the options at the top of the window, and select A4 for the page size. 

To the right side of the window, uncheck Facing Pages. Increase the number of Columns to 3 and set the Gutter to 9 mm. 

Add Margins of 15 mm and a Bleed of 5 mm, before clicking Create

new document
new document indesign

Step 2

Expand the Layers panel (Window > Layers) and double-click on Layer 1, renaming it Background

Select New Layer from the panel’s main menu at the top right, and create two new layers: Material and Type

layer options

Lock all the layers except the bottom layer, Background

locked layers

Step 3

Expand the Swatches panel (Window > Color > Swatches) and choose New Color Swatch from the panel’s menu. 

Set the Color Type to Process, Mode to CMYK, and the levels below to C=10 M=2 Y=26 K=0 (Peppermint). Click Add and then OK

Repeat to create three more CMYK swatches:

  • C=100 M=83 Y=29 K=27 (Blue)
  • C=25 M=20 Y=19 K=7 (Silver Gray)
  • C=13 M=35 Y=85 K=7 (Gold)
swatch options

2. How to Add Color and Texture to Your Menu Template

Step 1

Working on the Background layer, select the Rectangle Tool (M) and drag across the whole page and up to the bleed. 

From the Swatches panel, set the Fill Color to Blue

fill color blue

Step 2

Lock the Background layer and unlock the Material layer above.

Use the Rectangle Frame Tool (F) to create an image frame across the left half of the page. File > Place, navigate to the Cloth Backgrounds folder, and choose image 25.jpg, before clicking Open

Select the image inside the frame directly by double-clicking, and Right-Click > Rotate 90 Degrees CCW.

Allow the paler half of the cloth image to fill the image frame. 

material background

Then select the image frame and Edit > Copy, Edit > Paste it. Then Right-Click > Transform > Flip Horizontal. Move it over to the right side of the page.

transform

Step 3

Select both image frames on the Material layer and go to Object > Effects > Transparency. Set the Mode to Multiply and click OK

multiply

3. How to Add Typography to Your Menu Design

Step 1

Lock the Material layer and unlock the top layer, Type

Use the Type Tool (T) to create a text frame across the center of the top of the page. 

Type in the restaurant name and, from the Character panel (Window > Type & Tables > Character), set the Font to Coellak Rad, Size 60 pt, and increase the Tracking (letter-spacing) to 40. You might want to use the Glyphs panel (Window > Type & Tables > Glyphs) to insert different variations of the characters.  

title resturant

From the Swatches panel, set the Font Color to Silver Gray. You can add an optional subtitle below, set to a 20 pt Font Size.

subtitle

Step 2

Open the Art Deco Ornament Pack illustration in Adobe Illustrator. 

Delete the background color and select the four elements of the design shown below, before going to Edit > Copy. 

art deco graphic

Return to InDesign and Edit > Paste the design directly onto the menu. 

Switch the Fill Color of the graphic to Silver Gray, and position it to the left of the restaurant name. 

pasted graphic

Step 3

Edit > Copy the graphic and then Right-Click > Transform > Flip Horizontal. 

flip graphic

Position it to the right of the restaurant name to frame the header. 

frame border

Step 4

Copy and Paste the restaurant title text frame and move it below, reducing the Font Size to 42 pt and editing the text to read the menu name, e.g. ‘A LA CARTE’ or ‘FOOD MENU’.

a la carte title

Step 5

Open the kitchenware01.ai file in Adobe Illustrator. Select the spoon graphic on the far left side and Edit > Copy it. 

copied spoon

Head back to InDesign and Edit > Paste it, switching the Fill Color to Silver Gray. Paste a spoon graphic on either side of the menu title. 

paste spoon

Step 6

Create a text frame spanning the width of the left-hand column, typing in the first subtitle (e.g. ‘STARTERS’), and setting the Font to Coellack Rad, Size 25 pt, and the Font Color to Peppermint

swatches panel

Create a text frame below this, typing in the name of the first item on the menu, followed by a series of ellipses, and the price on the right side of the text frame. Set the Font to Fiona Regular, Size 16 pt, and a Peppermint Font Color.

Copy and Paste the text frame repeatedly, creating a block of dishes under the ‘STARTERS’ title. 

text frame

Step 7

Select all the ‘STARTERS’ text frames you’ve just created and Right-Click > Group them. 

You can now use this group as a block for populating the rest of the menu design. 

body text frames

Step 8

Return to the Art Deco Ornament Pack illustration and select the elements around the edge of the graphic, as highlighted below.

art deco border

Edit > Copy this border graphic. Then head back to InDesign and Edit > Paste it onto the Type layer, rotating it to fit any large gap on the menu layout. 

Set the Fill Color to Silver Gray. 

frame on menu

Inside this border, you can feature a special dish or dish of the day. Set the header in Coellak Rad with a Gold Font Color.

special dishes title

Copy across one or a few of the dish text frames to place inside the border. 

sample dishes text

Step 9

Don’t forget to add a little key at the bottom left of the menu, for dishes with special dietary requirements.

allergies text

The final decorative touch is to add a large text frame across the bottom-right of the page, rotating it slightly and typing in a slogan or quote, before setting the Font to Rosemary Signature and a Gold Font Color.

script text frame

4. How to Create a Matching Drinks Menu 

Step 1

Expand the Pages panel (Window > Pages). 

On Page 1, Right-Click > Duplicate Spread, to create a copy of the menu. 

duplicate spread

Scroll down to Page 2 of your document. Select the Page Tool (Shift-P) and click onto the page to select it. From the top Controls panel, set the Liquid Page Rule to Scale, and then switch the Page Size to A5 from the size menu.

scale page

This scales all the elements on the page down to a smaller A5 page size, without the need to resize elements individually. 

a5 smaller card

Step 2

Working on the Background layer, select the rectangular shape and switch the Fill Color to Peppermint.

peppermint background

Lock the Background layer and unlock the layer above, Material. Delete the image frames on this layer, before creating a new one with the Rectangle Frame Tool (F) that extends across the whole page. 

File > Place, go to the Cloth Backgrounds folder and choose the 28.jpg file, before clicking Open

material green

Select the image frame and go to Object > Effects > Transparency. Switch the Mode to Screen and bring the Opacity down to 75%, before clicking OK

screen mode

Step 3

Working on the Type layer, select the restaurant name text frame(s) and switch the Font Color to Gold. Do the same for the border graphics too. 

type layer

Switch the name of the menu to ‘DRINKS MENU’ or similar, and the Font Color to Gold

gold font color

Step 4

Delete one of the columns of type from the far left or right side, leaving just two columns of text. Move these centrally onto the page, and revise the headings of each section as required (e.g. to ‘COCKTAILS’, ‘BEERS’, etc). 

Keep the decorative frame, moving it to the top right of the righthand column, and use this to frame the name of some special drinks. 

two columns

Change the Font Color of the script text at bottom right to Silver Gray. 

silver gray color

Step 5

Return to the kitchenware01.ai illustration in Adobe Illustrator. This time, select a teapot graphic and Edit > Copy it. Paste it onto your InDesign drinks menu. 

teapot

Select a teacup image separately and Copy and Paste it too. 

teacup

Adjust the Fill Color of both to Silver Gray. 

pasted graphics

5. How to Export Your Menu for Printing

When you’ve finished working on your menu and are ready to send it to print, go to File > Export.

Choose Adobe PDF (Print) from the options in the Format menu at the bottom of the window, name the file, and click Save

In the Export Adobe PDF window that opens, choose [Press Quality] for the Preset.

press quality

Then click on Marks and Bleeds in the window’s left-hand menu. Check both All Printer’s Marks and Use Document Bleed Settings.

printers marks

Click Export to create your menu PDF. You can send this document straight off to the printers—great job!

Conclusion

Your menu layout is finished and ready for sending to the printers! Congratulations!

final menus

In this tutorial, we’ve covered a range of skills and techniques which are really useful for creating print documents in Adobe InDesign. You can now feel more confident in:

  • setting up a full-color menu layout in InDesign
  • using vector graphics to add visual interest to your menu designs
  • choosing and using suitable and effective fonts for your menu layouts
  • layering color, texture, type and graphics to give your menu designs a modern, on-trend look
  • exporting your artwork to a print-ready PDF format

Menu Templates From Envato Elements

Discover more delectable InDesign menu designs over on Envato Elements. Check out our edit below of some of our favourite menu templates:

Seafood Menu Template

This restaurant menu template has a rustic style which could be adapted for seafood restaurants, cafes, or coastal pubs. Available as both a Photoshop and InDesign template, this menu template also makes use of free fonts.

seafood menu
Seafood menu template

Bakery Menu Template

A simple and stylish two-page restaurant menu template, this menu design would be a great match for bakeries, cafes, or ice-cream bars.

bakery menu
Bakery menu template

Rustic Menu Template

Complete with vintage-inspired typography and a punchy color palette, this restaurant menu template is available as Illustrator and Photoshop versions. If you’re designing for a steak restaurant or diner, this menu layout would be a perfect choice.

rustic menu
Rustic menu template

Drinks Menu Template

Looking to design a menu for a cocktail bar, nightclub, or pub? This colorful Photoshop menu template is set up to a large-scale A3 page size—perfect for doubling up as table placemats.

drinks menu
Drinks menu template

Simple Menu Template

On the hunt for a minimal, easy-to-edit restaurant menu template? This stripped-back menu design is supremely stylish and could be adapted for almost any type of restaurant or bar. 

simple menu
Simple menu template

Don’t miss these menu design tutorials:

How to Create a Japanese Brush Font Text Effect in Photoshop

Post pobrano z: How to Create a Japanese Brush Font Text Effect in Photoshop

Final product image
What You’ll Be Creating

Creating a completely custom font effect from scratch may sound like a daunting task, but it’s much less complicated than it might seem! And the task becomes even simpler when you put some high-quality resources to use—resources that you can customize and alter so you still end up with something that’s unique to you and your project!

In this quick tip, we will be taking a look at how to create a Japanese brush font text effect in Adobe Photoshop.  

Follow along with us over on our Envato Tuts+ YouTube channel:

What You’ll Need

To complete this project, we are using the following resources:

Find more resources on Envato Elements!

1. How to Create Paint Stroke Photoshop Brushes

First, let’s start by creating an ink brush Photoshop brush.

Step 1

Import an image of painted brush strokes. Ideally, you want them to be long, with tapered and textured edges.

Paint strokes

Step 2

Turn the image black and white by going to Image > Adjustments > Desaturate. 

These paint strokes are a little light, so let’s darken them by going to Image > Adjustments > Brightness/Contrast and bringing the Contrast up to 100 and the Brightness down to -150. 

Repeat this step until your paint strokes are a nice solid black. 

darken strokes

Step 3

Select your paint strokes by going to Select > Color Range and clicking on the black paint. Bring the Fuzziness all the way up to 200 and hit OK.

Step 4

Create a Color Fill layer set to black. The color fill layer will automatically take the shape of the selection! 

create color fill

Step 5

Smooth out the edges of the paint stroke by double-clicking on the color fill layer’s layer mask and choosing Select and Mask.

Set Smooth to 9, Contrast to 24%, and Shift Edge to -30%. Your settings may vary, but we don’t want to lose too much of that streaky brush texture, so be careful! 

smooth edges

Step 6

Finally, Crop down your paint stroke and go to Edit > Define Brush Preset. Name your brush, and you are done!

You will want to make as many brush strokes as possible, but alternatively, you can also download a set of premade brush strokes that come on a transparent background or a premade brush pack that is all ready to go!

create brush

Step 7

If you’re not sure how to install Photoshop brushes, you will want to select the Brush Tool, open the Brush window, click on the Gear icon found in the top right-hand corner, and then select Import Brushes. 

From there, you will want to navigate to wherever you save your brushes, select them, and that’s it!      

2. How to Create a Brush Stroke Font Effect 

Finally, let’s move on to creating our Japanese-inspired text effect. 

Step 1

This first step is optional, but it might help you out for your first few tries with this effect! 

Choose a font that’s similar to the structure you want your text to have. In this case, the Japanese brush font “Little Samurai” works perfectly.

Type out your word or phrase. Now, we can use this as a template when we are placing our brush strokes!

template text

Step 2

Import your brush stroke brushes, or have your brush stroke images (with a transparent background) in a folder nearby so you can drop or paint them in as needed.

I will be using these brush stroke PNGs found on Envato Elements.

image pack

Step 3

Now, it’s a matter of combing different brush strokes to make different letters. Let’s start with an easy one, “M.”

Drag and drop your strokes to match up with the three vertical lines that make up the lower section of the „M”, using our text as a guide. 

Make sure to use different strokes for each line. You want to avoid patterns and repetition! 

first brush strokes

Step 4

Place a fourth line going through the upper portion of all three lines. You have an “M”!

I suggest grouping all of the brush strokes into their own group and naming it according to the letter they create. 

creating an M

Step 5

You can use the Paint Brush and Eraser Tool to add or take away detail from each line to add further fine-tuning and variation.

Also, remember to Flip lines Vertically and Horizontally and adust both their height and width to avoid the look of repetition.

adjust lines by flipping

Step 6

Use the Warp Transform Mode to create and match curves, and to fit the strokes to match the shape of the template text. 

Do these steps over and over until all of your letters are created! 

adjust lines by warping
all text

Step 7

Change the color of the text by adding a Color Fill layer and clipping it into your master group—the group holding all of your letters. 

You can also go ahead and fill in any sparse spots quickly by creating a New Layer below all of your text layers and painting using a hard white brush. This will help your paint look fuller, if that’s the look you are going for!

change color

We’ve Done It!

And there you have it! You can whip up these painted letters in a matter of minutes, and if you find yourself reaching for this kind of text effect fairly often, go ahead and create the whole alphabet, save it in a PSD file, and you’ve officially created your very own template! 

So, as always, keep experimenting with different techniques and practicing, and don’t forget to post your version below, along with any questions, comments, or critiques!

create a japanese brush text effect

More Japanese Brush Fonts

Okami – Brush Font

Okami is a hand-drawn brush font with rough and bold letters. It’s great for logos, branding, print projects, and of course creating a Japanese brush font text effect! 

okami font

Petal Brush

Petal is a beautiful brush font that was handcrafted by yours truly with a Japanese brush pen. The font is full of character and personality and sits comfortably with modern trends. 

petal font

Wonderfont Brush Typeface

This font face is ideal for creating a Japanese brush font effect that comes off more rustic and unrefined! 

wonder font

30 Acrylic Brush Strokes

This collection contains 30 isolated high-resolution brush texture strokes made using yellow acrylic paint and many different paintbrushes perfect for creating a Japanese brush font effect. 

acrylic brush strokes

66 Long Ink Strokes Photoshop Stamp Brushes

Download 66 hand-painted ink Photoshop brushes that work with any Photoshop version! This ink brush Photoshop pack is high resolution and would be a great addition to any project.

long strokes

Looking to learn more? Why not check out the following tutorials:

26 Creative Microsoft Word Brochure Templates (Best for 2020!)

Post pobrano z: 26 Creative Microsoft Word Brochure Templates (Best for 2020!)

Get your business off the ground floor with a stunning brochure! Check out this list of awesome brochure templates below.

26 Creative Microsoft Word Brochure Templates

2020 is sure to be the year for your budding business. So make the most out of your proposals with incredible brochure templates.

Today, we’re bringing you a wonderful collection of brochures created by a community of professionals. And now you can design the business of your dreams with high-quality brochure templates from Envato Market and Envato Elements.

From creative trifold brochures to minimalist proposal templates, you’ll be able to find a design that fits your brand.

Or follow your gut and make one instead! Dive into this essential checklist of design tips from instructor Grace Fussell:

Barbershop Brochure Trifold

While this template features barbershop imagery, it’s highly adaptable. The pop of color and the clean, geometric inspiration are an excellent choice for a variety of projects! Easily swap the imagery and adjust the colors to match your objectives.

Barbershop Brochure Trifold

Media/Press Kit Template Brochure

This two paged template is clean, trendy, and easy to customize—in either Microsoft Word or Adobe InDesign. This template comes with both file types and two sizes too: both A4 and US letter. It’s both beginner friendly and a great foundation for the software savvy, too!

Solutions – Brochure Template

Looking for a larger brochure template with a whole host of pages to choose from? This one comes with a generous 20 pages to mix and match, in both US Letter and A4. Customize this in Microsoft Word, Adobe Photoshop, or InDesign! This is a versatile design too, with so many possibilities to work for a variety of projects!

Solutions  Brochure Template

Trifold Brochure Template

Perhaps a trifold approach is a better fit for your project—look no further! Whether you’re looking for a solid foundation to heavily customize or a complete composition ready for your content, this versatile layout is a great addition to any collection of professional assets.

Trifold Brochure Template

Company Profile Brochure Template

This stylish, professionally designed template is compatible with both Microsoft Word and Adobe InDesign. It’s ready to go, in two different sizes: both A4 and US letter. It also comes in red, yellow, and green—it’s easy to customize this one for your project’s goals.

Company Profile Brochure Template

Trifold Brochure Template

Every
entrepreneur should have at least one solid trifold brochure template.
These professional brochures make it possible for future clients to get
to know more about your company and its services. Clean and
multipurpose, this template features a corporate design that does just the trick for new
businesses!

Trifold Brochure Template

Business Profile Brochure

Design
the business you want with this amazing brochure template. Easy to
edit, this download comes with several editable templates made with
22 custom pages. Need a new font? No problem, just update the template
at your pace with any new details you need.

Business Profile Brochure

Corporate Brochure Template

Need a creative corporate brochure for your business?
Then check out this next print template created in Adobe InDesign. A
special Microsoft Word file has also been included for quick updates.
Get 36 custom pages and a premade cover layout. 

Corporate Brochure Template

The Annual Report 18 Pages

Track the findings of your business dealings with this annual report template. Create your company’s documentation quickly and easily with A4 sized templates and 18 unique layouts. Great for beginners, this template can also be edited with Microsoft Word. 

The Annual Report 18 Pages

Creative Brochure Template

Create your own opportunities with this awesome brochure template. Originally designed with Adobe InDesign, this template also comes in the latest versions available for Microsoft Word. Enjoy this sleek blue and green color scheme or update it fast with your own brand colors. 

Creative Brochure Template

Annual Report Brochure Template

Print ready and fully editable, this brochure template includes 28 pages of extraordinary design. It’s Microsoft Word-friendly and completely layered to make your work life a lot easier. So kick start 2020 with this efficient corporate brochure template. 

Annual Report Brochure Template

Minimal Proposal/Brochure Template

Get started on your next creative project with this minimalist proposal template. Designed for entrepreneurs and business professionals, this template features 24 fully layered pages in high-resolution formats. Easily access text and paragraph styles for a custom look!

Minimal ProposalBrochure Template

Brochure & Proposal Template

Tackling a new design project can be quite overwhelming! So take the headache out of proposals with this sleek and professional template. This download includes a stylish set of print-ready templates available in PDF, InDesign, and Word formats. Try it out!

Brochure  Proposal Template

Proposal Template

Our next print template includes a flexible design that’s great for proposals, invoices, and company details. The beautiful pastel color scheme is right on trend, but you can always swap out the colors to align it better with your brand. Master pages and automatic numbering are also included!

Proposal Template

Business Plan Brochure

Land the contract of your dreams with this incredible brochure template. This business template collection features 32 custom pages available in InDesign and Word formats. It was made entirely with free fonts and is a great deal for just $10!

Business Plan Brochure

Product Proposal Template

Develop your brand and business strategy with this clean, minimalist design. This product proposal template features 28 overall pages that are all easy to edit. Get started with the helpful PDF guide, which will walk you through the steps of the proposal from start to finish.

Product Proposal Template

Company Profile Brochure

Made with Adobe InDesign, this company profile brochure also comes in a handy Microsoft Word file! Enjoy the stylish, modern design with stunning pastel colors and 22 custom pages. Featuring a grid-based layout, this template also includes master pages and so much more!

Company Profile Brochure

Event Proposal Template

Color match this proposal to suit your style with ease! This event proposal template may even help you land funding for your new business. It’s fully editable and print ready, but you’ll need to update it with new pictures. So pick and use your favorites from PhotoDune

Event Proposal Template

Business Proposal Template

This clean and professional template will help you craft amazing opportunities for your business. Enjoy the stylish design which features a grid-based layout and only free fonts. Invoice and letterhead templates are also included for a well-rounded brand package. 

Business Proposal Template

Corporate Business Brochure

Take control of your business dreams with this professional corporate brochure. Available in both Adobe InDesign and Microsoft Word formats, this brochure features A4 and US Letter sizes with 16 custom pages. Just drag and drop your photos and information to get started.

Corporate Business Brochure

Facebook Advertising Proposal

Enter 2020 with the best advertising strategy possible. This Facebook ads proposal template is a smart resource for budding entrepreneurs and designers. It includes A4 and US Letter sizes, along with stylish page layouts for more inspiration. Add it to your collection!

Facebook Advertising Proposal

Corporate Business Proposal

Enjoy three stunning yet simple color schemes with this next proposal template. This no-hassle design includes a minimalist theme perfect for beginners. Break down your expense reports, project descriptions and more with one helpful set. 

Corporate Business Proposal

Business Proposal Template

Writing your business proposals takes up enough time and energy. So cut your worries in half with a professionally designed template you can customize to your needs. This helpful resource comes with fully layered documents and a custom cover design for a fast turnaround. 

Business Proposal Template

Company Profile Brochure

Highlight your company’s services with this extraordinary brochure. This template features 22 custom pages designed with intriguing layout options. Enjoy the trendy geometric-based design with beautiful colors you can update yourself. Check it out!

Company Profile Brochure

Funeral Program Template

Honor your loved one’s life through a special memorial. This memorial template not only allows you to customize it in Microsoft Word but it also gives you a helpful instructional guide for more assistance. Update it with pictures of your loved ones and their special memories.

Funeral Program Template

Business Project Proposal Template

The final resource in this collection is this inspiring Microsoft Word project proposal. This professional template includes 16 pages originally design with Adobe InDesign. Describe your company’s strategy, projections and services with an effective template available in seven color samples. 

Business Project Proposal Template

More Brochure Templates

Build the next business that will make an impact on the world. Brochure templates are just one essential resource for all creatives and designers alike. So how will you use these templates to tackle your dreams and aspirations?

Want more brochure templates? Check out these tutorials and articles for inspiration:

Tried any of these assets? Let us know! Tell us your favorites in the comments below.

This has been a selection of premium resources perfect for the avid creator. For more creative brochure templates, check out Envato Market, or enlist the help of our talented designers at Envato Studio. Happy creating!