Archiwum kategorii: Web Tools

How to Replace the Sky in a Photo in Affinity Photo

Post pobrano z: How to Replace the Sky in a Photo in Affinity Photo

Final product image
What You’ll Be Creating

Mother Nature can create stunning environments, placed on the most ideal of backdrops. But let’s face it, a lot of the time we end up stuck with a gorgeous landscape right below a bland blue or gray sky. 

What do we say to the drab skies of nature? Not today! In this Affinity Photo tutorial, we are going to be learning all about how to replace skies, and we’ll look at just how much changing out a sky can affect the overall mood of a photo.

I will be covering all the basics of replacing a sky in Affinity Photo, whether you want to add some clouds, incorporate color, or do a full-blown background swap. 

Follow along with us over on the Envato Tuts+ YouTube Channel:

What You’ll Need

To complete this project, we are using the following resources:

Find more resources on Envato Elements!

1. How to Add Clouds to a Sky

First, let’s look at the quickest way to change out a sky, which is to add clouds! This method will work best for shots where the sky is just a little too flat and could use some detail. In this example, we will be adding a bit of a twist to our clouds. But the technique is the same, whether you want a cloudy blue sky photo effect or a straight-up twister. 

Step 1

Start by dragging and dropping the Strange Stormy Sky stock image onto the canvas, over our original beach image. Crop the image to add a bit more room for the cloudy sky. 

place base image

Step 2

Make sure the horizon line of each photo matches up reasonably closely. You can temporarily bring down the Opacity of the storm clouds if needed to line everything up. 

match horizon lines

Step 3

Next, add a Layer Mask to the storm clouds. Then, with a large, soft, round Brush, mask out the bottom half of the cloud image.

As both photos have a grey hue to them, they will blend beautifully with each other. With this method, I suggest choosing a sky that is similar in tone to the original image if you’d like to save some time on blending. 

mask sky

Step 4

Finish blending the two images by adjusting the color, brightness, and contrast of both the clouds and the original image if needed.

Here, I darkened and upped the contrast of both the base image and clouds using a Brightness/Contrast layer, while also desaturating the base image using a black and white gradient map adjustment layer. 

I then committed to the „storm of the century” vibe by adding both green and blue hues to the image with a Color Balance and S curve Curves layer. 

Brightness/Contrast Settings 

  • Brightness: -38%
  • Contrast: 19%

Gradient Map Settings 

  • Black to White 
  • Opacity: 47%

Color Balance Settings 

  • Red: -33%
  • Green: 51%
  • Blue: 59%

Curves Settings 

curves
final layers

2. How to Create a Sunset Photo Effect

Next, I am going to amp it up a notch by creating a substantially more dynamic sky mixed with a reflective surface.

Step 1

First, let’s crop our beach image to increase the sky, and I’ll opt for less land, so we have an equal mix of sky, water, and earth. 

place image

Step 2

Now, I am going to drop in my sky replacement. Once again, just like in the previous image, line up the horizons! 

match horizon lines

Step 3

Add a Layer Mask just as we did with the last sky, only this time we are going to be a bit more precise with our masking.

I am still going to use a soft brush, but it’s much smaller. I am blending the horizon line almost seamlessly with the new sky. 

mask out sky

Step 4

Duplicate the sky image, delete the layer mask, and set the layer to Overlay. Bring down the layer Opacity to 50%. 

Next, add a new Layer Mask to the sky, masking out all but the top quarter of the water. 

overlay sky

Step 5

Now, repeat that same step, only this time setting the layer to Soft Light.

Again, delete and then add a new Layer Mask to the duplicated sky. Mask out any area of the sky that is touching the land or the frothy white parts of the water. 

soft light sky

Step 6

Let’s finish this beautiful beach day off by bringing the stark blue of the sky into both the water and land using a Color Balance layer.  

Color Balance Settings

  • Red: -16%
  • Blue: 53%
color balance

3. How to Extract a Mountain Range 

When quick blending and layer mode magic won’t do the trick on their own, you may have to remove one sky altogether to place the other. Compositing is also the ideal solution if you are going for something more stylistic, surreal, or fantasy inspired! 

Step 1

As with the last image, we want there to be a bit more sky than before, so crop the canvas to give us more vertical space. 

place landscape

Step 2 

Now, let’s extract the sky of the original image. The best results would come from masking out the sky by hand using just a simple Brush and Layer Mask combo. However, use your preferred method for extraction! For a quick extract job, I like to rely on the Refine Mask tool.

Use the Flood Select Tool to create a quick selection and mask of the sky.

flood select and mask

Step 3

Then, clicking on the mask, Right Click > Refine Mask to refine and smooth the mask out. 

refine mask
refine mask results

Step 4

You can use the Select > Grow/Shrink function to get rid of any pesky unwanted edges as well, if needed. Set the Radius to -1 px and then mask out the selection. 

This is an excellent method to use when your image will be more of a backdrop, as opposed to the main focus, or you need to mock something up quickly. Otherwise, zoom in real close and mask that bad boy out by hand! 

Go ahead and place the new sky behind the mountain range for now as well. 

final layers

4. How to Create Sunrise Lighting Effects

Next up, let’s lay down our highlights. You will likely do the bulk of your highlights on layers set to Screen, but you can also play with other layer modes like color dodge, soft light, or overlay. The Curves layer is also a great tool to use for creating or enhancing highlights!

Step 1

Create a new layer, set to Screen, and paint some ambient light focused on the horizon line.

Keep the brush very large with a low Flow rate so you can build up the color slowly. Color pick a color from the new sky—in my case, pale yellow and orange colors.

add screen light

Step 2

Repeat this step on a layer clipped inside your landscape to help connect and blend the two images.

The lighting on this layer will be more focused if you have a rising sun or any bright light source as I do.

ad inner screen light

Step 3

Repeat the above step behind the mountainscape as well.

Every landscape will be different, and every sky a different time of day! If you are unsure how you should paint in your lighting, look up some references of a similar environment to get a better idea!

add backdrop screen light

5. How to Create Shadow Effects

For shadows, I recommend the use of layers set to Multiply, Soft Light, and the use of Brightness/Contrast and Curves adjustment layers. 

Step 1

Let’s start with a Brightness/Contrast adjustment layer clipped into the mountains to darken everything and lower their contrast, as shaded areas will usually have less contrast than lit areas.

Brightness/Contrast Settings

  • Brightness: -84%
  • Contrast: -42%
darken mountains

Step 2

Next, go in and mask out all the areas where the light source would be hitting.

Use the original lighting to guide you—and keep in mind that you may be able to skip this step if the light in your image is not as intense as it is in this particular image!

mask shadows

Step 3

You can also paint in shadows using just a brush on a layer set to Multiply. I like to set the layer Opacity to 50%, but it depends on how deep you want your shadows to be.

When painting shadows, avoid using black as shadows are hardly ever flat black. Instead, use a darker, desaturated version of the color you are painting on. For instance, I could use dark brown on these mountains.

Blue is also an excellent color to choose in this particular scene. Blue and orange are contrast colors, so they pair very well together. 

add deeper shadows

Step 4

Now, one of my best friends when it comes to compositing landscapes is the layer Blend Options.

blend options

Here you can tell a layer how much it should show up on light or dark areas. I don’t want these shadows to cover and darken the highlights of the image beneath, so I can drag the point on the right-hand curve to control the range of light.

bring down curve point

The further I pull, the less it will show on the lighter areas of the image beneath. You can further refine this by adding more points to the curve and adjusting them. 

add second curve point

You can also use this tool to pinpoint highlights or color. It’s a tool best learned by just playing with it and seeing what it can do!

final layers

6. How to Create a Sunset Color Grade

Finally, it always helps to add a few adjustment layers over top everything to tie it all together. 

Step 1

First, let’s add an S curve for some added contrast, along with bringing up the blues and reds in the shadows.

Curves Settings

curves
curves results

Step 2

Next, create a masked Color Balance adjustment layer adding blue to the outer edges of the image and one to bring more oranges into the innermost area of the image. 

Color Balance Settings

  • Red: -25%
  • Green: -20%
  • Blue: 22%
outer color balance

Step 3

Finally, create a second masked Color Balance adjustment layer, bringing more yellows and reds into the innermost area of the image. 

Color Balance Settings

  • Red: 23%
  • Green: -28%
  • Blue: -77%
inner color balance

And There You Have It!

While sometimes adding in a few fluffy white clouds will do just the trick, don’t be afraid to try changing up the whole mood of a photo by switching from a bright blue sky to a set of ominous clouds rolling in. Or create an entirely new alien atmosphere full of stars and planets. Every photo has a story to tell, and you can change the whole narrative just by choosing one sky over another! The sky is not the limit after all!

So, as always, keep experimenting with different techniques and practicing, and don’t forget to post your version below, along with any questions, comments, or critiques!

final result

Looking to learn more? Why not check out the following photo manipulation tutorials:

How to Replace the Sky in a Photo in Affinity Photo

Post pobrano z: How to Replace the Sky in a Photo in Affinity Photo

Final product image
What You’ll Be Creating

Mother Nature can create stunning environments, placed on the most ideal of backdrops. But let’s face it, a lot of the time we end up stuck with a gorgeous landscape right below a bland blue or gray sky. 

What do we say to the drab skies of nature? Not today! In this Affinity Photo tutorial, we are going to be learning all about how to replace skies, and we’ll look at just how much changing out a sky can affect the overall mood of a photo.

I will be covering all the basics of replacing a sky in Affinity Photo, whether you want to add some clouds, incorporate color, or do a full-blown background swap. 

Follow along with us over on the Envato Tuts+ YouTube Channel:

What You’ll Need

To complete this project, we are using the following resources:

Find more resources on Envato Elements!

1. How to Add Clouds to a Sky

First, let’s look at the quickest way to change out a sky, which is to add clouds! This method will work best for shots where the sky is just a little too flat and could use some detail. In this example, we will be adding a bit of a twist to our clouds. But the technique is the same, whether you want a cloudy blue sky photo effect or a straight-up twister. 

Step 1

Start by dragging and dropping the Strange Stormy Sky stock image onto the canvas, over our original beach image. Crop the image to add a bit more room for the cloudy sky. 

place base image

Step 2

Make sure the horizon line of each photo matches up reasonably closely. You can temporarily bring down the Opacity of the storm clouds if needed to line everything up. 

match horizon lines

Step 3

Next, add a Layer Mask to the storm clouds. Then, with a large, soft, round Brush, mask out the bottom half of the cloud image.

As both photos have a grey hue to them, they will blend beautifully with each other. With this method, I suggest choosing a sky that is similar in tone to the original image if you’d like to save some time on blending. 

mask sky

Step 4

Finish blending the two images by adjusting the color, brightness, and contrast of both the clouds and the original image if needed.

Here, I darkened and upped the contrast of both the base image and clouds using a Brightness/Contrast layer, while also desaturating the base image using a black and white gradient map adjustment layer. 

I then committed to the „storm of the century” vibe by adding both green and blue hues to the image with a Color Balance and S curve Curves layer. 

Brightness/Contrast Settings 

  • Brightness: -38%
  • Contrast: 19%

Gradient Map Settings 

  • Black to White 
  • Opacity: 47%

Color Balance Settings 

  • Red: -33%
  • Green: 51%
  • Blue: 59%

Curves Settings 

curves
final layers

2. How to Create a Sunset Photo Effect

Next, I am going to amp it up a notch by creating a substantially more dynamic sky mixed with a reflective surface.

Step 1

First, let’s crop our beach image to increase the sky, and I’ll opt for less land, so we have an equal mix of sky, water, and earth. 

place image

Step 2

Now, I am going to drop in my sky replacement. Once again, just like in the previous image, line up the horizons! 

match horizon lines

Step 3

Add a Layer Mask just as we did with the last sky, only this time we are going to be a bit more precise with our masking.

I am still going to use a soft brush, but it’s much smaller. I am blending the horizon line almost seamlessly with the new sky. 

mask out sky

Step 4

Duplicate the sky image, delete the layer mask, and set the layer to Overlay. Bring down the layer Opacity to 50%. 

Next, add a new Layer Mask to the sky, masking out all but the top quarter of the water. 

overlay sky

Step 5

Now, repeat that same step, only this time setting the layer to Soft Light.

Again, delete and then add a new Layer Mask to the duplicated sky. Mask out any area of the sky that is touching the land or the frothy white parts of the water. 

soft light sky

Step 6

Let’s finish this beautiful beach day off by bringing the stark blue of the sky into both the water and land using a Color Balance layer.  

Color Balance Settings

  • Red: -16%
  • Blue: 53%
color balance

3. How to Extract a Mountain Range 

When quick blending and layer mode magic won’t do the trick on their own, you may have to remove one sky altogether to place the other. Compositing is also the ideal solution if you are going for something more stylistic, surreal, or fantasy inspired! 

Step 1

As with the last image, we want there to be a bit more sky than before, so crop the canvas to give us more vertical space. 

place landscape

Step 2 

Now, let’s extract the sky of the original image. The best results would come from masking out the sky by hand using just a simple Brush and Layer Mask combo. However, use your preferred method for extraction! For a quick extract job, I like to rely on the Refine Mask tool.

Use the Flood Select Tool to create a quick selection and mask of the sky.

flood select and mask

Step 3

Then, clicking on the mask, Right Click > Refine Mask to refine and smooth the mask out. 

refine mask
refine mask results

Step 4

You can use the Select > Grow/Shrink function to get rid of any pesky unwanted edges as well, if needed. Set the Radius to -1 px and then mask out the selection. 

This is an excellent method to use when your image will be more of a backdrop, as opposed to the main focus, or you need to mock something up quickly. Otherwise, zoom in real close and mask that bad boy out by hand! 

Go ahead and place the new sky behind the mountain range for now as well. 

final layers

4. How to Create Sunrise Lighting Effects

Next up, let’s lay down our highlights. You will likely do the bulk of your highlights on layers set to Screen, but you can also play with other layer modes like color dodge, soft light, or overlay. The Curves layer is also a great tool to use for creating or enhancing highlights!

Step 1

Create a new layer, set to Screen, and paint some ambient light focused on the horizon line.

Keep the brush very large with a low Flow rate so you can build up the color slowly. Color pick a color from the new sky—in my case, pale yellow and orange colors.

add screen light

Step 2

Repeat this step on a layer clipped inside your landscape to help connect and blend the two images.

The lighting on this layer will be more focused if you have a rising sun or any bright light source as I do.

ad inner screen light

Step 3

Repeat the above step behind the mountainscape as well.

Every landscape will be different, and every sky a different time of day! If you are unsure how you should paint in your lighting, look up some references of a similar environment to get a better idea!

add backdrop screen light

5. How to Create Shadow Effects

For shadows, I recommend the use of layers set to Multiply, Soft Light, and the use of Brightness/Contrast and Curves adjustment layers. 

Step 1

Let’s start with a Brightness/Contrast adjustment layer clipped into the mountains to darken everything and lower their contrast, as shaded areas will usually have less contrast than lit areas.

Brightness/Contrast Settings

  • Brightness: -84%
  • Contrast: -42%
darken mountains

Step 2

Next, go in and mask out all the areas where the light source would be hitting.

Use the original lighting to guide you—and keep in mind that you may be able to skip this step if the light in your image is not as intense as it is in this particular image!

mask shadows

Step 3

You can also paint in shadows using just a brush on a layer set to Multiply. I like to set the layer Opacity to 50%, but it depends on how deep you want your shadows to be.

When painting shadows, avoid using black as shadows are hardly ever flat black. Instead, use a darker, desaturated version of the color you are painting on. For instance, I could use dark brown on these mountains.

Blue is also an excellent color to choose in this particular scene. Blue and orange are contrast colors, so they pair very well together. 

add deeper shadows

Step 4

Now, one of my best friends when it comes to compositing landscapes is the layer Blend Options.

blend options

Here you can tell a layer how much it should show up on light or dark areas. I don’t want these shadows to cover and darken the highlights of the image beneath, so I can drag the point on the right-hand curve to control the range of light.

bring down curve point

The further I pull, the less it will show on the lighter areas of the image beneath. You can further refine this by adding more points to the curve and adjusting them. 

add second curve point

You can also use this tool to pinpoint highlights or color. It’s a tool best learned by just playing with it and seeing what it can do!

final layers

6. How to Create a Sunset Color Grade

Finally, it always helps to add a few adjustment layers over top everything to tie it all together. 

Step 1

First, let’s add an S curve for some added contrast, along with bringing up the blues and reds in the shadows.

Curves Settings

curves
curves results

Step 2

Next, create a masked Color Balance adjustment layer adding blue to the outer edges of the image and one to bring more oranges into the innermost area of the image. 

Color Balance Settings

  • Red: -25%
  • Green: -20%
  • Blue: 22%
outer color balance

Step 3

Finally, create a second masked Color Balance adjustment layer, bringing more yellows and reds into the innermost area of the image. 

Color Balance Settings

  • Red: 23%
  • Green: -28%
  • Blue: -77%
inner color balance

And There You Have It!

While sometimes adding in a few fluffy white clouds will do just the trick, don’t be afraid to try changing up the whole mood of a photo by switching from a bright blue sky to a set of ominous clouds rolling in. Or create an entirely new alien atmosphere full of stars and planets. Every photo has a story to tell, and you can change the whole narrative just by choosing one sky over another! The sky is not the limit after all!

So, as always, keep experimenting with different techniques and practicing, and don’t forget to post your version below, along with any questions, comments, or critiques!

final result

Looking to learn more? Why not check out the following photo manipulation tutorials:

How to Make a Pickle Pattern Brush in Illustrator
Post pobrano z: How to Make a Pickle Pattern Brush in Illustrator

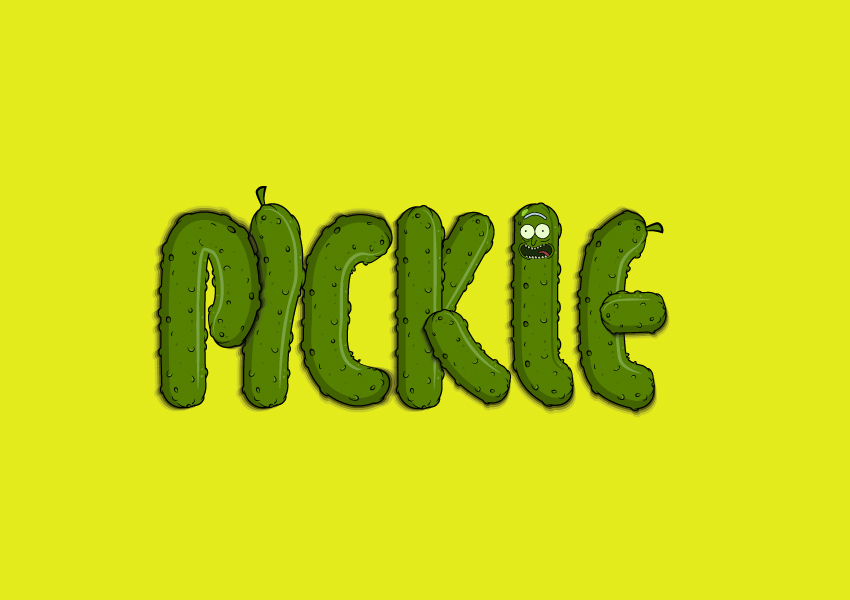
Final product image
What You’ll Be Creating

Always
wanted to create a brush, but never knew exactly how to do it?

Well,
if you love unique creative brushes and you want to learn how to make
a brush in Illustrator, then this tutorial is perfect for you. It will take you through the entire process of drawing, saving, and
applying the brush.

You
will learn how to create a pickle brush and how to save it correctly
as a new pattern brush by following a few tips and tricks that you will
be able to apply to other Adobe Illustrator brushes as well.

And
if you are a fan of the Rick and Morty animated series, we will give
this text effect a unique twist by creating a Pickle Rick Pattern
Brush as well. Both brushes are easy to use, and this fun text effect
will be ready in no time. If you are excited about this, then let’s
start!

Expand
your brushes library by going to GraphicRiver, where you’ll find a great
selection of brushes in various styles, shapes, and themes. Also,
check out the text effects section, where you’ll find plenty of
inspiration and resources for your projects.

1. How
to Open a New Document 

Launch
Illustrator
and
go to
File
> New
to
open a blank document. Type a name for your file, set the
dimensions, and then select
Pixels
as
Units
and
RGB
as
Color
Mode
.

Next,
go to
Edit
> Preferences > General
and
set the
Keyboard
Increment
to
1
px
and,
while there, go to
Units
to
make sure they are set as in the following image. I usually work with
these settings, and they will help you throughout the drawing process.

how to open a new illustrator document

2. How
to Create the Basic Pickle Shape

Step
1

Grab
the Rectangle Tool (M), click on your artboard, and enter 44 x 132 px
as the dimensions of the rectangle. Color it with green.

Keep
this shape selected and go to the Transform panel. Enter 20 px in all
four Corner Radius fields in order to create the rounded corners.

how to create the basic shape of the pickle pattern brush

Step
2

Copy
and
Paste
in Front (Control-F)

the rounded rectangle to get a copy of it (the gray shape), and then
move it 7 px to the right by pressing the Right Arrow key on your
keyboard seven times.

Copy
and
Paste
in Front (Control-F)

the green rounded rectangle again to make another copy. Keep this
copy selected along with the gray copy and press Minus Front on the
Pathfinder panel. Color the shape obtained with a darker shade of
green, and this will be the shadow on the left side of the pickle.

how to create the shadow of the pickle pattern brush

Step
3

Now,
we will add a few bumps to create that recognizable pic
kle
look. Use the Pen Tool (P) to draw a few semicircle shapes on the
edges of the pickle. Make them of different sizes to ensure a more
realistic result for the final Illustrator brush (1).

Now,
select only the pink shapes on the upper right side along with the
green rounded rectangle and press Unite in the Pathfinder panel. I
will name the resulting shape “pickle body” (2).

After
that, select the blue shapes on the left side along with the shadow,
and press Unite on the Pathfinder panel again. I will name the newly
obtained shape “pickle shadow” (3).

how to create bumps on the pickle pattern brush

Step
4

Select
the two shapes obtained in the previous step and then Copy and
Paste
in Front (Control-F)

to make copies of them. Press Unite in the Pathfinder panel to merge
them, and you will get a new pickle shape. Give it a 1 pt
Stroke
using black and select the Round Join option in the Stroke
panel. I will name this shape “pickle outline”.

how to create the outline of the pickle pattern brush

Step
5

Next,
take the Pen Tool (P) and draw two curved paths at the top of the
pickle as creases. Give them a 1 pt Stroke using black and Width
Profile 4
in the Stroke panel.

Do
the same thing at the bottom of the pickle and apply the same
settings.

how to create creases on the pickle pattern brush

Step
6

Now,
focus on one of the bumps and use the Pen Tool (P) to draw two short
paths as shown in the close-up. Give them a 1 pt Stroke using black
and Width Profile 4 in the Stroke panel.

Do
the same thing for the other bumps in order to add details, but not
necessarily for all of them.

how to add detail lines on the pickle pattern brush

3. How
to Define the Sections of the Pattern Illustrator Brush

Step
1

Creating a brush in Illustrator, especially pattern brushes, can be
easy if you take into consideration the three sections that define a pattern brush: the start, the side, and the end. If we do this ahead of time
and not just at the end, we make the process of saving the brush pain-free once we get to that stage, and we’re less likely to make
mistakes.

Take
the Rectangle Tool (M) and draw an 80 x 136 px rectangle which will
cover the pickle entirely. Leave a little more space on the left side
of the pickle for the shadow. With the rectangle still selected, go
to Object > Path > Split Into Grid and choose 3 Rows. Hit OK
and the rectangle will be divided into three equal parts.

how to create the sections of the illustrator brush

Step
2

Notice
how the separation between the start and the side of the pattern brush
goes through one of the bumps. We don’t want this. It is better to
cut the brush sections between the bumps where the pickle is
straight.

Use
the Direct Selection Tool (A) to select only the points indicated and
move them upwards, right above the bump (2).

Select
the other points indicated and move them a little downwards in order
to make the start and end sections of the brush of about the
same size (3). The side of the brush (the middle part) will be
longer.

how to adjust the sections of the illustrator brush

4. How
to Add Details to the Pickle Pattern Brush

Step
1

Use
the Pen Tool (P) to draw a path
on the right
side of the pickle,
as shown in the image below. Give it a 3 pt Stroke using a lighter shade of
green and Width Profile 6 in the Stroke panel. This will create a
main highlight on the pickle.

how to add highlight on the pickle pattern brush

Step
2

Let’s
add more details. Use the Pen Tool (P) or the Pencil Tool (N) to draw
four random ellipses on the pickle. It’s better to not place them on
the blue lines but only inside the start, side, and end sections of
the brush. Fill them with a slightly darker shade of green and apply a
1 pt black Stroke using Width Profile 6 in the Stroke panel. Two
of the ellipses have no fill color, just the black stroke applied.

how to add bump details on pickle pattern brush

Step
3

Still
using the Pen Tool (P) or the Pencil Tool (N), draw a bunch of random
curved paths on the pickle. Give them a 0.5 pt and 0.75 pt Stroke
using black and Width Profile 1 in the Stroke panel.

how to add extra details on the pickle pattern brush

Step
4

Zoom
in on one of the paths that you drew in the previous step and draw
a shorter path inside it. Give it a 0.5 pt Stroke using a lighter
shade of green and Width Profile 1 in the Stroke panel.

Repeat
the same thing for two or three more paths in order to add little
highlights on the pickle.

how to add small highlights on the pickle pattern brush

Step
5

Next,
take the Ellipse Tool (L) and draw a few small ellipses of different
sizes in the middle of the pickle. Color them with a darker green
(1).

Draw
more ellipses on the right side of the pickle and color them with a
lighter green (2). You can see the result in the image below (3).

how to add small details on the pickle pattern brush

5. How
to Create the Shadow of the Pickle Pattern Brush

Step
1

Select
the “pickle outline” shape and then Copy and Paste in Place
(Shift-Control-V)
to make a copy of it. Select a black fill and
reduce the Opacity to 40%; then move it 1 px downward and 2 px to the
left using the Arrow Keys on your keyboard. Send this copy behind
everything by going to Object > Arrange > Send to Back
(Shift-Control-[)
(1).

Copy
and Paste in Back (Control-B) the first shadow shape to make another
copy. Move it 1 px downward and 2 px to the left using the Arrow keys
on the keyboard again. Keep the black fill color but reduce the
Opacity to 25% (2).

how to create the shadow of the pickle pattern brush

Step
2

Copy
and Paste in Back (Control-B) the second shadow shape to make a third
copy. Move it 1 px downwards and 2 px to the left; then change the
fill color to dark gray and reduce the Opacity to 15% (3).

Let’s do this one more time. Make a fourth copy of the shadow shape, and this time move it 1 px to the left. Keep the gray fill color but
reduce the Opacity to 5% (4).

how to create more shadow for the pickle pattern brush

Step
3

If
the shadow shapes go over the blue rectangle, use the Direct
Selection Tool (A)
to select only the corner points at the bottom and
move them downwards a little. The entire pickle must be inside the
blue sections.

how to adjust the end section of the illustrator brush

6. How
to Finalize the Pickle Pattern Brush

Step
1

We
are getting closer to saving the new Illustrator Pattern Brush, but we
need to prepare it first by expanding it and making some final adjustments.

Select all the stroked paths next to the outline of the pickle and go to
Object > Expand Appearance in order to turn the strokes into fills
(1). Now, select the “pickle outline” and go to Object >
Expand
to turn it into a black filled shape (2).

Keep
these resulting shapes selected and press Unite in the Pathfinder
panel, followed by Object > Compound Path > Make (Control-8).
This will merge all the shapes into one (3).

how to unite the outline of the pickle pattern brush

Step
2

Now,
select the main highlight path and go to Object > Expand
Appearance
. Do the same thing for all the detail paths on the pickle in
order to expand them, and we are ready to save this brush in Illustrator.

how to expand the details on the pickle pattern brush

7. How
to Save the Pickle Pattern Brush

Step
1

Before
you continue, make a copy of the entire pickle and keep it for later
use.

Illustrator brushes can be tricky to save and may require a few tries until you are happy with the result, but let me show you how easy it is to save this brush.

Select
everything on your artboard and Rotate 90 degrees in the Transform
panel. Group (Control-G) all the shapes that make up the pickle, and
then make two copies behind. You should have three pickles on top
of each other and three blue rectangles.

how to rotate the pickle pattern brush

Step
2

Select
one of the pickles along with the first rectangle and press Crop in
the Pathfinder panel. This will cut the pickle, and you will obtain
the start section of the pattern brush. Drag it into the Swatches
panel to save it (1).

Next,
select a copy of the pickle along with the middle rectangle and press
Crop again. This will cut the side section of the pattern brush for
us (2). You don’t need to save this one in the Swatches panel.

Select
the second copy of the pickle along with the last rectangle and press
Crop again. You will obtain the end section of the pattern brush.
Drag it into the Swatches panel to save it (3).

how to create the start side and end sections of the illustrator pattern brush

Step
3

Select
the middle section of the pickle and drag it into the Brushes panel
to save it as a New Pattern Brush. In the Pattern Brush Options window,
this section will automatically appear under the Side Tile (1). Type
a name for the brush, and let’s change some settings.

As
the Start Tile (2), select New Pattern Swatch 1 from the drop-down
options, which is the first section saved in the Swatches panel.

As
the End Tile (3), select New Pattern Swatch 2 from the drop-down
options, which is the last section of the pickle saved in the Swatches
panel.

Finally,
under Inner Corner Tile (4), select Auto-Centered. Hit OK and your new Illustrator brush is now saved and ready to use.

how to save the pickle pattern brush in Illustrator

Step
4

Let’s
test the newly saved brush. Use the Pen Tool (P) or the Paintbrush
Tool (B)
to draw any path on your artboard and give it a 1 pt Stroke
using the Pickle Pattern Brush from the Brushes panel. Fun, right?

how to use the pickle illustrator pattern brush

8. How
to Create the Face of Pickle Rick

Step
1

Pickle
Rick
is
the eccentric scientist Rick Sanchez from the famous animated series
Rick and Morty, who turns himself into a pickle just as he and his
family are about to attend a therapy session.

Let’s
start his face with the eyes. Use the Ellipse Tool (L) to draw two
circles of about 40 x 40 px and arrange them next to each other. Fill
them with the color indicated and also apply a 1 pt black Stroke.
While both circles stay selected, go to Effect > Distort &
Transform > Roughen
and apply the settings shown in order to
distort the shapes slightly.

how to create the eyes of Pickle Rick

Step
2

Still
using the Ellipse Tool (L), draw a tiny black circle in the center of
each eye as the pupils. Now, take the Pen Tool (P) and draw a curved
path under each eye followed by the nose path. Give them a 1 pt black
Stroke and select the Round Cap option in the Stroke panel.

how to create the nose of Pickle Rick

Step
3

Continue
to draw the shape of the mouth filled with dark green. Also apply a 1
pt
black Stroke and select the Align Stroke to Outside option in the
Stroke panel.

For the tooth, draw a V-like path but rounded at the tip. Give it a pale
green fill color and a 1 pt black Stroke. Follow the shape of the
mouth and draw similar paths next to each other to obtain the
top teeth. Draw and apply the same appearances for the bottom teeth
as well.

how to create the mouth of Pickle Rick

Step
4

Next,
draw the shape of the tongue on the right side of the mouth. Fill it
with the color indicated and apply a 1 pt black Stroke.

Select
the shape of the mouth and then Copy and Paste in Place
(Shift-Control-V)
to make a copy of it in front of everything. Set
this copy to stroke-none and fill-none. Keep this copy selected along
with the teeth and the tongue, and go to Object > Clipping Mask >
Make (Control-7)
.

how to create the tongue of Pickle Rick

Step
5

Use
the Pen Tool (P) to draw a curved path on each side of the mouth.
Give them a 1 pt black Stroke with the Round Cap option selected in
the Stroke panel (1).

Continue
to draw a C-like shape above the eyes. Give it a blue fill color and
a 1 pt black Stroke (2). The final thing to add is a random shape on
the upper left side filled with bright green (3).

how to create the forehead of Pickle Rick

9. How
to Create the Pickle Rick Pattern Brush

Step
1

First,
grab the copy of the pickle that I said to make earlier in the
tutorial (1) and start to remove some of the details on the top half in
order to create an empty area (2).

Now,
grab Rick’s face and go to Object > Expand Appearance followed
by Object > Expand to turn all strokes into fills. Group
(Control-G)
all the shapes that make up the face and scale it down
until it fits inside the empty area you just created (3).

When
you are happy with the placement of the face, select only the indicated points of the blue rectangles with the help of the Direct Selection Tool (A) and move
them downwards, until they’re under the mouth. The entire face must be inside
the start section of the brush (4).

how to create the Pickle Rick pattern brush

Step
2

Let’s
make a few adjustments, and then we are ready to save this pattern
brush next to the other Illustrator brushes.

Focus
on the shadow shape and use the Add Anchor Point Tool (+) to add
three extra points next to the mouth. Switch to the Direct Selection
Tool (A)
and modify the shadow a little by moving these points,
following the left side of the mouth (1).

Next,
select the main highlight shape and change the fill color to a darker
shade of green; then make it a little thinner by dragging the
bounding box with the Selection Tool (V).

While
this shape stays selected, grab the Knife and cut the shape following
the right side of the mouth; then move the end points up to the black
outline of the mouth as shown in the close-up (2).

how to adjust the Pickle Rick pattern brush

10. How
to Save the Pickle Rick Pattern Brush

Step
1

The process of saving this brush is the same as before. Select
the new pickle along with the blue rectangles and Rotate them 90
degrees
in the Transform panel. Make two copies of the pickle behind
so that we have a pickle for each rectangle (1).

Now,
select the pickle along with the first rectangle and press Crop in
the Pathfinder panel. You will obtain the start section of the
pattern brush, which is the head of Pickle Rick. Drag it into the
Swatches panel to save it (2).

Follow
the same technique and cut the side section (3) and the end section
of the brush as you did for the first pattern brush earlier in the
tutorial (4).

how to create the start side and end sections of Pickle Rick illustrator brush

Step
2

Select
and drag the middle section of the pickle into the Brushes panel to
save it as a New Pattern Brush. Type a name for the brush and notice
that the middle section already appears under the Side Tile (1).

As
the Start Tile (2), select New Pattern Swatch 3 from the drop-down
options, which is the head of Pickle Rick saved earlier.

As
the End Tile (3) select New Pattern Swatch 4, and as the Inner
Corner Tile
(4) select Auto-Centered from the options available. Hit
OK to save the Pickle Rick Pattern Brush in the Brushes panel.

how to save the Pickle Rick brush in Illustrator

Step
3

Let’s
test it by applying it to a random path drawn with the Pen Tool (P)
or the Paintbrush Tool (B). Looks great!

how to use the Pickle Rick illustrator brush

11. How
to Create the Pickle Text Effect

Step
1

Now that we have the two Illustrator brushes already saved, here is how to make the text effect quickly and easily. 

Use
the Pen Tool (P) or the Pencil Tool (N) to draw paths as letters and compose the
word “PICKLE”. Stroke all of them with the Pickle Pattern Brush
and keep the Stroke Weight at 1 pt. Drag two guide lines above and
under the text effect to make sure the letters are about the same
height, making small adjustments if needed.

how to create the pickle text effect

Step
2

Replace
one (or more) of the strokes with the Pickle Rick Pattern Brush to make this
text effect more fun.

how to create the Pickle Rick letter of the text effect

Step
3

As
an extra touch, you can add a small stem to the pickle letters. Draw
the shape of the stem and color it with the same green as the pickle’s body. Also apply a
2 pt black Stroke using Width Profile 6 in order to maintain the
same outlined style.

The
stem could be a part of the pattern brush if you include it in the
Start Tile before saving it, but then all the stroked paths will have
the same stem, and this is not the look we want for the text effect.
In this case, the two stems are just extra additions.

how to add stems on the pickle text effect

Congratulations!
You’re Done

Here
is the final image of the pickle text effect with the face of Pickle Rick as a creative addition. I hope this tutorial was
fun for you and that you learned some new things today. Now you have the
knowledge to make other creative Adobe Illustrator brushes and use
them in your projects.

Don’t
forget to share your recreation of this pickle text effect
with us.
We would love to see it.

final image of pickle text effect using pattern brushes in Adobe Illustrator

Expand
Your Text-Effect Designing Skills!

Keep
drawing and learning with these recommended tutorials:

How to Make a Pickle Pattern Brush in Illustrator

Post pobrano z: How to Make a Pickle Pattern Brush in Illustrator

Final product image
What You’ll Be Creating

Always
wanted to create a brush, but never knew exactly how to do it?

Well,
if you love unique creative brushes and you want to learn how to make
a brush in Illustrator, then this tutorial is perfect for you. It will take you through the entire process of drawing, saving, and
applying the brush.

You
will learn how to create a pickle brush and how to save it correctly
as a new pattern brush by following a few tips and tricks that you will
be able to apply to other Adobe Illustrator brushes as well.

And
if you are a fan of the Rick and Morty animated series, we will give
this text effect a unique twist by creating a Pickle Rick Pattern
Brush as well. Both brushes are easy to use, and this fun text effect
will be ready in no time. If you are excited about this, then let’s
start!

Expand
your brushes library by going to GraphicRiver, where you’ll find a great
selection of brushes in various styles, shapes, and themes. Also,
check out the text effects section, where you’ll find plenty of
inspiration and resources for your projects.

1. How
to Open a New Document 

Launch
Illustrator
and
go to
File
> New
to
open a blank document. Type a name for your file, set the
dimensions, and then select
Pixels
as
Units
and
RGB
as
Color
Mode
.

Next,
go to
Edit
> Preferences > General
and
set the
Keyboard
Increment
to
1
px
and,
while there, go to
Units
to
make sure they are set as in the following image. I usually work with
these settings, and they will help you throughout the drawing process.

how to open a new illustrator document

2. How
to Create the Basic Pickle Shape

Step
1

Grab
the Rectangle Tool (M), click on your artboard, and enter 44 x 132 px
as the dimensions of the rectangle. Color it with green.

Keep
this shape selected and go to the Transform panel. Enter 20 px in all
four Corner Radius fields in order to create the rounded corners.

how to create the basic shape of the pickle pattern brush

Step
2

Copy
and
Paste
in Front (Control-F)

the rounded rectangle to get a copy of it (the gray shape), and then
move it 7 px to the right by pressing the Right Arrow key on your
keyboard seven times.

Copy
and
Paste
in Front (Control-F)

the green rounded rectangle again to make another copy. Keep this
copy selected along with the gray copy and press Minus Front on the
Pathfinder panel. Color the shape obtained with a darker shade of
green, and this will be the shadow on the left side of the pickle.

how to create the shadow of the pickle pattern brush

Step
3

Now,
we will add a few bumps to create that recognizable pic
kle
look. Use the Pen Tool (P) to draw a few semicircle shapes on the
edges of the pickle. Make them of different sizes to ensure a more
realistic result for the final Illustrator brush (1).

Now,
select only the pink shapes on the upper right side along with the
green rounded rectangle and press Unite in the Pathfinder panel. I
will name the resulting shape “pickle body” (2).

After
that, select the blue shapes on the left side along with the shadow,
and press Unite on the Pathfinder panel again. I will name the newly
obtained shape “pickle shadow” (3).

how to create bumps on the pickle pattern brush

Step
4

Select
the two shapes obtained in the previous step and then Copy and
Paste
in Front (Control-F)

to make copies of them. Press Unite in the Pathfinder panel to merge
them, and you will get a new pickle shape. Give it a 1 pt
Stroke
using black and select the Round Join option in the Stroke
panel. I will name this shape “pickle outline”.

how to create the outline of the pickle pattern brush

Step
5

Next,
take the Pen Tool (P) and draw two curved paths at the top of the
pickle as creases. Give them a 1 pt Stroke using black and Width
Profile 4
in the Stroke panel.

Do
the same thing at the bottom of the pickle and apply the same
settings.

how to create creases on the pickle pattern brush

Step
6

Now,
focus on one of the bumps and use the Pen Tool (P) to draw two short
paths as shown in the close-up. Give them a 1 pt Stroke using black
and Width Profile 4 in the Stroke panel.

Do
the same thing for the other bumps in order to add details, but not
necessarily for all of them.

how to add detail lines on the pickle pattern brush

3. How
to Define the Sections of the Pattern Illustrator Brush

Step
1

Creating a brush in Illustrator, especially pattern brushes, can be
easy if you take into consideration the three sections that define a pattern brush: the start, the side, and the end. If we do this ahead of time
and not just at the end, we make the process of saving the brush pain-free once we get to that stage, and we’re less likely to make
mistakes.

Take
the Rectangle Tool (M) and draw an 80 x 136 px rectangle which will
cover the pickle entirely. Leave a little more space on the left side
of the pickle for the shadow. With the rectangle still selected, go
to Object > Path > Split Into Grid and choose 3 Rows. Hit OK
and the rectangle will be divided into three equal parts.

how to create the sections of the illustrator brush

Step
2

Notice
how the separation between the start and the side of the pattern brush
goes through one of the bumps. We don’t want this. It is better to
cut the brush sections between the bumps where the pickle is
straight.

Use
the Direct Selection Tool (A) to select only the points indicated and
move them upwards, right above the bump (2).

Select
the other points indicated and move them a little downwards in order
to make the start and end sections of the brush of about the
same size (3). The side of the brush (the middle part) will be
longer.

how to adjust the sections of the illustrator brush

4. How
to Add Details to the Pickle Pattern Brush

Step
1

Use
the Pen Tool (P) to draw a path
on the right
side of the pickle,
as shown in the image below. Give it a 3 pt Stroke using a lighter shade of
green and Width Profile 6 in the Stroke panel. This will create a
main highlight on the pickle.

how to add highlight on the pickle pattern brush

Step
2

Let’s
add more details. Use the Pen Tool (P) or the Pencil Tool (N) to draw
four random ellipses on the pickle. It’s better to not place them on
the blue lines but only inside the start, side, and end sections of
the brush. Fill them with a slightly darker shade of green and apply a
1 pt black Stroke using Width Profile 6 in the Stroke panel. Two
of the ellipses have no fill color, just the black stroke applied.

how to add bump details on pickle pattern brush

Step
3

Still
using the Pen Tool (P) or the Pencil Tool (N), draw a bunch of random
curved paths on the pickle. Give them a 0.5 pt and 0.75 pt Stroke
using black and Width Profile 1 in the Stroke panel.

how to add extra details on the pickle pattern brush

Step
4

Zoom
in on one of the paths that you drew in the previous step and draw
a shorter path inside it. Give it a 0.5 pt Stroke using a lighter
shade of green and Width Profile 1 in the Stroke panel.

Repeat
the same thing for two or three more paths in order to add little
highlights on the pickle.

how to add small highlights on the pickle pattern brush

Step
5

Next,
take the Ellipse Tool (L) and draw a few small ellipses of different
sizes in the middle of the pickle. Color them with a darker green
(1).

Draw
more ellipses on the right side of the pickle and color them with a
lighter green (2). You can see the result in the image below (3).

how to add small details on the pickle pattern brush

5. How
to Create the Shadow of the Pickle Pattern Brush

Step
1

Select
the “pickle outline” shape and then Copy and Paste in Place
(Shift-Control-V)
to make a copy of it. Select a black fill and
reduce the Opacity to 40%; then move it 1 px downward and 2 px to the
left using the Arrow Keys on your keyboard. Send this copy behind
everything by going to Object > Arrange > Send to Back
(Shift-Control-[)
(1).

Copy
and Paste in Back (Control-B) the first shadow shape to make another
copy. Move it 1 px downward and 2 px to the left using the Arrow keys
on the keyboard again. Keep the black fill color but reduce the
Opacity to 25% (2).

how to create the shadow of the pickle pattern brush

Step
2

Copy
and Paste in Back (Control-B) the second shadow shape to make a third
copy. Move it 1 px downwards and 2 px to the left; then change the
fill color to dark gray and reduce the Opacity to 15% (3).

Let’s do this one more time. Make a fourth copy of the shadow shape, and this time move it 1 px to the left. Keep the gray fill color but
reduce the Opacity to 5% (4).

how to create more shadow for the pickle pattern brush

Step
3

If
the shadow shapes go over the blue rectangle, use the Direct
Selection Tool (A)
to select only the corner points at the bottom and
move them downwards a little. The entire pickle must be inside the
blue sections.

how to adjust the end section of the illustrator brush

6. How
to Finalize the Pickle Pattern Brush

Step
1

We
are getting closer to saving the new Illustrator Pattern Brush, but we
need to prepare it first by expanding it and making some final adjustments.

Select all the stroked paths next to the outline of the pickle and go to
Object > Expand Appearance in order to turn the strokes into fills
(1). Now, select the “pickle outline” and go to Object >
Expand
to turn it into a black filled shape (2).

Keep
these resulting shapes selected and press Unite in the Pathfinder
panel, followed by Object > Compound Path > Make (Control-8).
This will merge all the shapes into one (3).

how to unite the outline of the pickle pattern brush

Step
2

Now,
select the main highlight path and go to Object > Expand
Appearance
. Do the same thing for all the detail paths on the pickle in
order to expand them, and we are ready to save this brush in Illustrator.

how to expand the details on the pickle pattern brush

7. How
to Save the Pickle Pattern Brush

Step
1

Before
you continue, make a copy of the entire pickle and keep it for later
use.

Illustrator brushes can be tricky to save and may require a few tries until you are happy with the result, but let me show you how easy it is to save this brush.

Select
everything on your artboard and Rotate 90 degrees in the Transform
panel. Group (Control-G) all the shapes that make up the pickle, and
then make two copies behind. You should have three pickles on top
of each other and three blue rectangles.

how to rotate the pickle pattern brush

Step
2

Select
one of the pickles along with the first rectangle and press Crop in
the Pathfinder panel. This will cut the pickle, and you will obtain
the start section of the pattern brush. Drag it into the Swatches
panel to save it (1).

Next,
select a copy of the pickle along with the middle rectangle and press
Crop again. This will cut the side section of the pattern brush for
us (2). You don’t need to save this one in the Swatches panel.

Select
the second copy of the pickle along with the last rectangle and press
Crop again. You will obtain the end section of the pattern brush.
Drag it into the Swatches panel to save it (3).

how to create the start side and end sections of the illustrator pattern brush

Step
3

Select
the middle section of the pickle and drag it into the Brushes panel
to save it as a New Pattern Brush. In the Pattern Brush Options window,
this section will automatically appear under the Side Tile (1). Type
a name for the brush, and let’s change some settings.

As
the Start Tile (2), select New Pattern Swatch 1 from the drop-down
options, which is the first section saved in the Swatches panel.

As
the End Tile (3), select New Pattern Swatch 2 from the drop-down
options, which is the last section of the pickle saved in the Swatches
panel.

Finally,
under Inner Corner Tile (4), select Auto-Centered. Hit OK and your new Illustrator brush is now saved and ready to use.

how to save the pickle pattern brush in Illustrator

Step
4

Let’s
test the newly saved brush. Use the Pen Tool (P) or the Paintbrush
Tool (B)
to draw any path on your artboard and give it a 1 pt Stroke
using the Pickle Pattern Brush from the Brushes panel. Fun, right?

how to use the pickle illustrator pattern brush

8. How
to Create the Face of Pickle Rick

Step
1

Pickle
Rick
is
the eccentric scientist Rick Sanchez from the famous animated series
Rick and Morty, who turns himself into a pickle just as he and his
family are about to attend a therapy session.

Let’s
start his face with the eyes. Use the Ellipse Tool (L) to draw two
circles of about 40 x 40 px and arrange them next to each other. Fill
them with the color indicated and also apply a 1 pt black Stroke.
While both circles stay selected, go to Effect > Distort &
Transform > Roughen
and apply the settings shown in order to
distort the shapes slightly.

how to create the eyes of Pickle Rick

Step
2

Still
using the Ellipse Tool (L), draw a tiny black circle in the center of
each eye as the pupils. Now, take the Pen Tool (P) and draw a curved
path under each eye followed by the nose path. Give them a 1 pt black
Stroke and select the Round Cap option in the Stroke panel.

how to create the nose of Pickle Rick

Step
3

Continue
to draw the shape of the mouth filled with dark green. Also apply a 1
pt
black Stroke and select the Align Stroke to Outside option in the
Stroke panel.

For the tooth, draw a V-like path but rounded at the tip. Give it a pale
green fill color and a 1 pt black Stroke. Follow the shape of the
mouth and draw similar paths next to each other to obtain the
top teeth. Draw and apply the same appearances for the bottom teeth
as well.

how to create the mouth of Pickle Rick

Step
4

Next,
draw the shape of the tongue on the right side of the mouth. Fill it
with the color indicated and apply a 1 pt black Stroke.

Select
the shape of the mouth and then Copy and Paste in Place
(Shift-Control-V)
to make a copy of it in front of everything. Set
this copy to stroke-none and fill-none. Keep this copy selected along
with the teeth and the tongue, and go to Object > Clipping Mask >
Make (Control-7)
.

how to create the tongue of Pickle Rick

Step
5

Use
the Pen Tool (P) to draw a curved path on each side of the mouth.
Give them a 1 pt black Stroke with the Round Cap option selected in
the Stroke panel (1).

Continue
to draw a C-like shape above the eyes. Give it a blue fill color and
a 1 pt black Stroke (2). The final thing to add is a random shape on
the upper left side filled with bright green (3).

how to create the forehead of Pickle Rick

9. How
to Create the Pickle Rick Pattern Brush

Step
1

First,
grab the copy of the pickle that I said to make earlier in the
tutorial (1) and start to remove some of the details on the top half in
order to create an empty area (2).

Now,
grab Rick’s face and go to Object > Expand Appearance followed
by Object > Expand to turn all strokes into fills. Group
(Control-G)
all the shapes that make up the face and scale it down
until it fits inside the empty area you just created (3).

When
you are happy with the placement of the face, select only the indicated points of the blue rectangles with the help of the Direct Selection Tool (A) and move
them downwards, until they’re under the mouth. The entire face must be inside
the start section of the brush (4).

how to create the Pickle Rick pattern brush

Step
2

Let’s
make a few adjustments, and then we are ready to save this pattern
brush next to the other Illustrator brushes.

Focus
on the shadow shape and use the Add Anchor Point Tool (+) to add
three extra points next to the mouth. Switch to the Direct Selection
Tool (A)
and modify the shadow a little by moving these points,
following the left side of the mouth (1).

Next,
select the main highlight shape and change the fill color to a darker
shade of green; then make it a little thinner by dragging the
bounding box with the Selection Tool (V).

While
this shape stays selected, grab the Knife and cut the shape following
the right side of the mouth; then move the end points up to the black
outline of the mouth as shown in the close-up (2).

how to adjust the Pickle Rick pattern brush

10. How
to Save the Pickle Rick Pattern Brush

Step
1

The process of saving this brush is the same as before. Select
the new pickle along with the blue rectangles and Rotate them 90
degrees
in the Transform panel. Make two copies of the pickle behind
so that we have a pickle for each rectangle (1).

Now,
select the pickle along with the first rectangle and press Crop in
the Pathfinder panel. You will obtain the start section of the
pattern brush, which is the head of Pickle Rick. Drag it into the
Swatches panel to save it (2).

Follow
the same technique and cut the side section (3) and the end section
of the brush as you did for the first pattern brush earlier in the
tutorial (4).

how to create the start side and end sections of Pickle Rick illustrator brush

Step
2

Select
and drag the middle section of the pickle into the Brushes panel to
save it as a New Pattern Brush. Type a name for the brush and notice
that the middle section already appears under the Side Tile (1).

As
the Start Tile (2), select New Pattern Swatch 3 from the drop-down
options, which is the head of Pickle Rick saved earlier.

As
the End Tile (3) select New Pattern Swatch 4, and as the Inner
Corner Tile
(4) select Auto-Centered from the options available. Hit
OK to save the Pickle Rick Pattern Brush in the Brushes panel.

how to save the Pickle Rick brush in Illustrator

Step
3

Let’s
test it by applying it to a random path drawn with the Pen Tool (P)
or the Paintbrush Tool (B). Looks great!

how to use the Pickle Rick illustrator brush

11. How
to Create the Pickle Text Effect

Step
1

Now that we have the two Illustrator brushes already saved, here is how to make the text effect quickly and easily. 

Use
the Pen Tool (P) or the Pencil Tool (N) to draw paths as letters and compose the
word “PICKLE”. Stroke all of them with the Pickle Pattern Brush
and keep the Stroke Weight at 1 pt. Drag two guide lines above and
under the text effect to make sure the letters are about the same
height, making small adjustments if needed.

how to create the pickle text effect

Step
2

Replace
one (or more) of the strokes with the Pickle Rick Pattern Brush to make this
text effect more fun.

how to create the Pickle Rick letter of the text effect

Step
3

As
an extra touch, you can add a small stem to the pickle letters. Draw
the shape of the stem and color it with the same green as the pickle’s body. Also apply a
2 pt black Stroke using Width Profile 6 in order to maintain the
same outlined style.

The
stem could be a part of the pattern brush if you include it in the
Start Tile before saving it, but then all the stroked paths will have
the same stem, and this is not the look we want for the text effect.
In this case, the two stems are just extra additions.

how to add stems on the pickle text effect

Congratulations!
You’re Done

Here
is the final image of the pickle text effect with the face of Pickle Rick as a creative addition. I hope this tutorial was
fun for you and that you learned some new things today. Now you have the
knowledge to make other creative Adobe Illustrator brushes and use
them in your projects.

Don’t
forget to share your recreation of this pickle text effect
with us.
We would love to see it.

final image of pickle text effect using pattern brushes in Adobe Illustrator

Expand
Your Text-Effect Designing Skills!

Keep
drawing and learning with these recommended tutorials:

How to Make a Pickle Pattern Brush in Illustrator

Post pobrano z: How to Make a Pickle Pattern Brush in Illustrator

Final product image
What You’ll Be Creating

Always
wanted to create a brush, but never knew exactly how to do it?

Well,
if you love unique creative brushes and you want to learn how to make
a brush in Illustrator, then this tutorial is perfect for you. It will take you through the entire process of drawing, saving, and
applying the brush.

You
will learn how to create a pickle brush and how to save it correctly
as a new pattern brush by following a few tips and tricks that you will
be able to apply to other Adobe Illustrator brushes as well.

And
if you are a fan of the Rick and Morty animated series, we will give
this text effect a unique twist by creating a Pickle Rick Pattern
Brush as well. Both brushes are easy to use, and this fun text effect
will be ready in no time. If you are excited about this, then let’s
start!

Expand
your brushes library by going to GraphicRiver, where you’ll find a great
selection of brushes in various styles, shapes, and themes. Also,
check out the text effects section, where you’ll find plenty of
inspiration and resources for your projects.

1. How
to Open a New Document 

Launch
Illustrator
and
go to
File
> New
to
open a blank document. Type a name for your file, set the
dimensions, and then select
Pixels
as
Units
and
RGB
as
Color
Mode
.

Next,
go to
Edit
> Preferences > General
and
set the
Keyboard
Increment
to
1
px
and,
while there, go to
Units
to
make sure they are set as in the following image. I usually work with
these settings, and they will help you throughout the drawing process.

how to open a new illustrator document

2. How
to Create the Basic Pickle Shape

Step
1

Grab
the Rectangle Tool (M), click on your artboard, and enter 44 x 132 px
as the dimensions of the rectangle. Color it with green.

Keep
this shape selected and go to the Transform panel. Enter 20 px in all
four Corner Radius fields in order to create the rounded corners.

how to create the basic shape of the pickle pattern brush

Step
2

Copy
and
Paste
in Front (Control-F)

the rounded rectangle to get a copy of it (the gray shape), and then
move it 7 px to the right by pressing the Right Arrow key on your
keyboard seven times.

Copy
and
Paste
in Front (Control-F)

the green rounded rectangle again to make another copy. Keep this
copy selected along with the gray copy and press Minus Front on the
Pathfinder panel. Color the shape obtained with a darker shade of
green, and this will be the shadow on the left side of the pickle.

how to create the shadow of the pickle pattern brush

Step
3

Now,
we will add a few bumps to create that recognizable pic
kle
look. Use the Pen Tool (P) to draw a few semicircle shapes on the
edges of the pickle. Make them of different sizes to ensure a more
realistic result for the final Illustrator brush (1).

Now,
select only the pink shapes on the upper right side along with the
green rounded rectangle and press Unite in the Pathfinder panel. I
will name the resulting shape “pickle body” (2).

After
that, select the blue shapes on the left side along with the shadow,
and press Unite on the Pathfinder panel again. I will name the newly
obtained shape “pickle shadow” (3).

how to create bumps on the pickle pattern brush

Step
4

Select
the two shapes obtained in the previous step and then Copy and
Paste
in Front (Control-F)

to make copies of them. Press Unite in the Pathfinder panel to merge
them, and you will get a new pickle shape. Give it a 1 pt
Stroke
using black and select the Round Join option in the Stroke
panel. I will name this shape “pickle outline”.

how to create the outline of the pickle pattern brush

Step
5

Next,
take the Pen Tool (P) and draw two curved paths at the top of the
pickle as creases. Give them a 1 pt Stroke using black and Width
Profile 4
in the Stroke panel.

Do
the same thing at the bottom of the pickle and apply the same
settings.

how to create creases on the pickle pattern brush

Step
6

Now,
focus on one of the bumps and use the Pen Tool (P) to draw two short
paths as shown in the close-up. Give them a 1 pt Stroke using black
and Width Profile 4 in the Stroke panel.

Do
the same thing for the other bumps in order to add details, but not
necessarily for all of them.

how to add detail lines on the pickle pattern brush

3. How
to Define the Sections of the Pattern Illustrator Brush

Step
1

Creating a brush in Illustrator, especially pattern brushes, can be
easy if you take into consideration the three sections that define a pattern brush: the start, the side, and the end. If we do this ahead of time
and not just at the end, we make the process of saving the brush pain-free once we get to that stage, and we’re less likely to make
mistakes.

Take
the Rectangle Tool (M) and draw an 80 x 136 px rectangle which will
cover the pickle entirely. Leave a little more space on the left side
of the pickle for the shadow. With the rectangle still selected, go
to Object > Path > Split Into Grid and choose 3 Rows. Hit OK
and the rectangle will be divided into three equal parts.

how to create the sections of the illustrator brush

Step
2

Notice
how the separation between the start and the side of the pattern brush
goes through one of the bumps. We don’t want this. It is better to
cut the brush sections between the bumps where the pickle is
straight.

Use
the Direct Selection Tool (A) to select only the points indicated and
move them upwards, right above the bump (2).

Select
the other points indicated and move them a little downwards in order
to make the start and end sections of the brush of about the
same size (3). The side of the brush (the middle part) will be
longer.

how to adjust the sections of the illustrator brush

4. How
to Add Details to the Pickle Pattern Brush

Step
1

Use
the Pen Tool (P) to draw a path
on the right
side of the pickle,
as shown in the image below. Give it a 3 pt Stroke using a lighter shade of
green and Width Profile 6 in the Stroke panel. This will create a
main highlight on the pickle.

how to add highlight on the pickle pattern brush

Step
2

Let’s
add more details. Use the Pen Tool (P) or the Pencil Tool (N) to draw
four random ellipses on the pickle. It’s better to not place them on
the blue lines but only inside the start, side, and end sections of
the brush. Fill them with a slightly darker shade of green and apply a
1 pt black Stroke using Width Profile 6 in the Stroke panel. Two
of the ellipses have no fill color, just the black stroke applied.

how to add bump details on pickle pattern brush

Step
3

Still
using the Pen Tool (P) or the Pencil Tool (N), draw a bunch of random
curved paths on the pickle. Give them a 0.5 pt and 0.75 pt Stroke
using black and Width Profile 1 in the Stroke panel.

how to add extra details on the pickle pattern brush

Step
4

Zoom
in on one of the paths that you drew in the previous step and draw
a shorter path inside it. Give it a 0.5 pt Stroke using a lighter
shade of green and Width Profile 1 in the Stroke panel.

Repeat
the same thing for two or three more paths in order to add little
highlights on the pickle.

how to add small highlights on the pickle pattern brush

Step
5

Next,
take the Ellipse Tool (L) and draw a few small ellipses of different
sizes in the middle of the pickle. Color them with a darker green
(1).

Draw
more ellipses on the right side of the pickle and color them with a
lighter green (2). You can see the result in the image below (3).

how to add small details on the pickle pattern brush

5. How
to Create the Shadow of the Pickle Pattern Brush

Step
1

Select
the “pickle outline” shape and then Copy and Paste in Place
(Shift-Control-V)
to make a copy of it. Select a black fill and
reduce the Opacity to 40%; then move it 1 px downward and 2 px to the
left using the Arrow Keys on your keyboard. Send this copy behind
everything by going to Object > Arrange > Send to Back
(Shift-Control-[)
(1).

Copy
and Paste in Back (Control-B) the first shadow shape to make another
copy. Move it 1 px downward and 2 px to the left using the Arrow keys
on the keyboard again. Keep the black fill color but reduce the
Opacity to 25% (2).

how to create the shadow of the pickle pattern brush

Step
2

Copy
and Paste in Back (Control-B) the second shadow shape to make a third
copy. Move it 1 px downwards and 2 px to the left; then change the
fill color to dark gray and reduce the Opacity to 15% (3).

Let’s do this one more time. Make a fourth copy of the shadow shape, and this time move it 1 px to the left. Keep the gray fill color but
reduce the Opacity to 5% (4).

how to create more shadow for the pickle pattern brush

Step
3

If
the shadow shapes go over the blue rectangle, use the Direct
Selection Tool (A)
to select only the corner points at the bottom and
move them downwards a little. The entire pickle must be inside the
blue sections.

how to adjust the end section of the illustrator brush

6. How
to Finalize the Pickle Pattern Brush

Step
1

We
are getting closer to saving the new Illustrator Pattern Brush, but we
need to prepare it first by expanding it and making some final adjustments.

Select all the stroked paths next to the outline of the pickle and go to
Object > Expand Appearance in order to turn the strokes into fills
(1). Now, select the “pickle outline” and go to Object >
Expand
to turn it into a black filled shape (2).

Keep
these resulting shapes selected and press Unite in the Pathfinder
panel, followed by Object > Compound Path > Make (Control-8).
This will merge all the shapes into one (3).

how to unite the outline of the pickle pattern brush

Step
2

Now,
select the main highlight path and go to Object > Expand
Appearance
. Do the same thing for all the detail paths on the pickle in
order to expand them, and we are ready to save this brush in Illustrator.

how to expand the details on the pickle pattern brush

7. How
to Save the Pickle Pattern Brush

Step
1

Before
you continue, make a copy of the entire pickle and keep it for later
use.

Illustrator brushes can be tricky to save and may require a few tries until you are happy with the result, but let me show you how easy it is to save this brush.

Select
everything on your artboard and Rotate 90 degrees in the Transform
panel. Group (Control-G) all the shapes that make up the pickle, and
then make two copies behind. You should have three pickles on top
of each other and three blue rectangles.

how to rotate the pickle pattern brush

Step
2

Select
one of the pickles along with the first rectangle and press Crop in
the Pathfinder panel. This will cut the pickle, and you will obtain
the start section of the pattern brush. Drag it into the Swatches
panel to save it (1).

Next,
select a copy of the pickle along with the middle rectangle and press
Crop again. This will cut the side section of the pattern brush for
us (2). You don’t need to save this one in the Swatches panel.

Select
the second copy of the pickle along with the last rectangle and press
Crop again. You will obtain the end section of the pattern brush.
Drag it into the Swatches panel to save it (3).

how to create the start side and end sections of the illustrator pattern brush

Step
3

Select
the middle section of the pickle and drag it into the Brushes panel
to save it as a New Pattern Brush. In the Pattern Brush Options window,
this section will automatically appear under the Side Tile (1). Type
a name for the brush, and let’s change some settings.

As
the Start Tile (2), select New Pattern Swatch 1 from the drop-down
options, which is the first section saved in the Swatches panel.

As
the End Tile (3), select New Pattern Swatch 2 from the drop-down
options, which is the last section of the pickle saved in the Swatches
panel.

Finally,
under Inner Corner Tile (4), select Auto-Centered. Hit OK and your new Illustrator brush is now saved and ready to use.

how to save the pickle pattern brush in Illustrator

Step
4

Let’s
test the newly saved brush. Use the Pen Tool (P) or the Paintbrush
Tool (B)
to draw any path on your artboard and give it a 1 pt Stroke
using the Pickle Pattern Brush from the Brushes panel. Fun, right?

how to use the pickle illustrator pattern brush

8. How
to Create the Face of Pickle Rick

Step
1

Pickle
Rick
is
the eccentric scientist Rick Sanchez from the famous animated series
Rick and Morty, who turns himself into a pickle just as he and his
family are about to attend a therapy session.

Let’s
start his face with the eyes. Use the Ellipse Tool (L) to draw two
circles of about 40 x 40 px and arrange them next to each other. Fill
them with the color indicated and also apply a 1 pt black Stroke.
While both circles stay selected, go to Effect > Distort &
Transform > Roughen
and apply the settings shown in order to
distort the shapes slightly.

how to create the eyes of Pickle Rick

Step
2

Still
using the Ellipse Tool (L), draw a tiny black circle in the center of
each eye as the pupils. Now, take the Pen Tool (P) and draw a curved
path under each eye followed by the nose path. Give them a 1 pt black
Stroke and select the Round Cap option in the Stroke panel.

how to create the nose of Pickle Rick

Step
3

Continue
to draw the shape of the mouth filled with dark green. Also apply a 1
pt
black Stroke and select the Align Stroke to Outside option in the
Stroke panel.

For the tooth, draw a V-like path but rounded at the tip. Give it a pale
green fill color and a 1 pt black Stroke. Follow the shape of the
mouth and draw similar paths next to each other to obtain the
top teeth. Draw and apply the same appearances for the bottom teeth
as well.

how to create the mouth of Pickle Rick

Step
4

Next,
draw the shape of the tongue on the right side of the mouth. Fill it
with the color indicated and apply a 1 pt black Stroke.

Select
the shape of the mouth and then Copy and Paste in Place
(Shift-Control-V)
to make a copy of it in front of everything. Set
this copy to stroke-none and fill-none. Keep this copy selected along
with the teeth and the tongue, and go to Object > Clipping Mask >
Make (Control-7)
.

how to create the tongue of Pickle Rick

Step
5

Use
the Pen Tool (P) to draw a curved path on each side of the mouth.
Give them a 1 pt black Stroke with the Round Cap option selected in
the Stroke panel (1).

Continue
to draw a C-like shape above the eyes. Give it a blue fill color and
a 1 pt black Stroke (2). The final thing to add is a random shape on
the upper left side filled with bright green (3).

how to create the forehead of Pickle Rick

9. How
to Create the Pickle Rick Pattern Brush

Step
1

First,
grab the copy of the pickle that I said to make earlier in the
tutorial (1) and start to remove some of the details on the top half in
order to create an empty area (2).

Now,
grab Rick’s face and go to Object > Expand Appearance followed
by Object > Expand to turn all strokes into fills. Group
(Control-G)
all the shapes that make up the face and scale it down
until it fits inside the empty area you just created (3).

When
you are happy with the placement of the face, select only the indicated points of the blue rectangles with the help of the Direct Selection Tool (A) and move
them downwards, until they’re under the mouth. The entire face must be inside
the start section of the brush (4).

how to create the Pickle Rick pattern brush

Step
2

Let’s
make a few adjustments, and then we are ready to save this pattern
brush next to the other Illustrator brushes.

Focus
on the shadow shape and use the Add Anchor Point Tool (+) to add
three extra points next to the mouth. Switch to the Direct Selection
Tool (A)
and modify the shadow a little by moving these points,
following the left side of the mouth (1).

Next,
select the main highlight shape and change the fill color to a darker
shade of green; then make it a little thinner by dragging the
bounding box with the Selection Tool (V).

While
this shape stays selected, grab the Knife and cut the shape following
the right side of the mouth; then move the end points up to the black
outline of the mouth as shown in the close-up (2).

how to adjust the Pickle Rick pattern brush

10. How
to Save the Pickle Rick Pattern Brush

Step
1

The process of saving this brush is the same as before. Select
the new pickle along with the blue rectangles and Rotate them 90
degrees
in the Transform panel. Make two copies of the pickle behind
so that we have a pickle for each rectangle (1).

Now,
select the pickle along with the first rectangle and press Crop in
the Pathfinder panel. You will obtain the start section of the
pattern brush, which is the head of Pickle Rick. Drag it into the
Swatches panel to save it (2).

Follow
the same technique and cut the side section (3) and the end section
of the brush as you did for the first pattern brush earlier in the
tutorial (4).

how to create the start side and end sections of Pickle Rick illustrator brush

Step
2

Select
and drag the middle section of the pickle into the Brushes panel to
save it as a New Pattern Brush. Type a name for the brush and notice
that the middle section already appears under the Side Tile (1).

As
the Start Tile (2), select New Pattern Swatch 3 from the drop-down
options, which is the head of Pickle Rick saved earlier.

As
the End Tile (3) select New Pattern Swatch 4, and as the Inner
Corner Tile
(4) select Auto-Centered from the options available. Hit
OK to save the Pickle Rick Pattern Brush in the Brushes panel.

how to save the Pickle Rick brush in Illustrator

Step
3

Let’s
test it by applying it to a random path drawn with the Pen Tool (P)
or the Paintbrush Tool (B). Looks great!

how to use the Pickle Rick illustrator brush

11. How
to Create the Pickle Text Effect

Step
1

Now that we have the two Illustrator brushes already saved, here is how to make the text effect quickly and easily. 

Use
the Pen Tool (P) or the Pencil Tool (N) to draw paths as letters and compose the
word “PICKLE”. Stroke all of them with the Pickle Pattern Brush
and keep the Stroke Weight at 1 pt. Drag two guide lines above and
under the text effect to make sure the letters are about the same
height, making small adjustments if needed.

how to create the pickle text effect

Step
2

Replace
one (or more) of the strokes with the Pickle Rick Pattern Brush to make this
text effect more fun.

how to create the Pickle Rick letter of the text effect

Step
3

As
an extra touch, you can add a small stem to the pickle letters. Draw
the shape of the stem and color it with the same green as the pickle’s body. Also apply a
2 pt black Stroke using Width Profile 6 in order to maintain the
same outlined style.

The
stem could be a part of the pattern brush if you include it in the
Start Tile before saving it, but then all the stroked paths will have
the same stem, and this is not the look we want for the text effect.
In this case, the two stems are just extra additions.

how to add stems on the pickle text effect

Congratulations!
You’re Done

Here
is the final image of the pickle text effect with the face of Pickle Rick as a creative addition. I hope this tutorial was
fun for you and that you learned some new things today. Now you have the
knowledge to make other creative Adobe Illustrator brushes and use
them in your projects.

Don’t
forget to share your recreation of this pickle text effect
with us.
We would love to see it.

final image of pickle text effect using pattern brushes in Adobe Illustrator

Expand
Your Text-Effect Designing Skills!

Keep
drawing and learning with these recommended tutorials:

How to Make a Pickle Pattern Brush in Illustrator

Post pobrano z: How to Make a Pickle Pattern Brush in Illustrator

Final product image
What You’ll Be Creating

Always
wanted to create a brush, but never knew exactly how to do it?

Well,
if you love unique creative brushes and you want to learn how to make
a brush in Illustrator, then this tutorial is perfect for you. It will take you through the entire process of drawing, saving, and
applying the brush.

You
will learn how to create a pickle brush and how to save it correctly
as a new pattern brush by following a few tips and tricks that you will
be able to apply to other Adobe Illustrator brushes as well.

And
if you are a fan of the Rick and Morty animated series, we will give
this text effect a unique twist by creating a Pickle Rick Pattern
Brush as well. Both brushes are easy to use, and this fun text effect
will be ready in no time. If you are excited about this, then let’s
start!

Expand
your brushes library by going to GraphicRiver, where you’ll find a great
selection of brushes in various styles, shapes, and themes. Also,
check out the text effects section, where you’ll find plenty of
inspiration and resources for your projects.

1. How
to Open a New Document 

Launch
Illustrator
and
go to
File
> New
to
open a blank document. Type a name for your file, set the
dimensions, and then select
Pixels
as
Units
and
RGB
as
Color
Mode
.

Next,
go to
Edit
> Preferences > General
and
set the
Keyboard
Increment
to
1
px
and,
while there, go to
Units
to
make sure they are set as in the following image. I usually work with
these settings, and they will help you throughout the drawing process.

how to open a new illustrator document

2. How
to Create the Basic Pickle Shape

Step
1

Grab
the Rectangle Tool (M), click on your artboard, and enter 44 x 132 px
as the dimensions of the rectangle. Color it with green.

Keep
this shape selected and go to the Transform panel. Enter 20 px in all
four Corner Radius fields in order to create the rounded corners.

how to create the basic shape of the pickle pattern brush

Step
2

Copy
and
Paste
in Front (Control-F)

the rounded rectangle to get a copy of it (the gray shape), and then
move it 7 px to the right by pressing the Right Arrow key on your
keyboard seven times.

Copy
and
Paste
in Front (Control-F)

the green rounded rectangle again to make another copy. Keep this
copy selected along with the gray copy and press Minus Front on the
Pathfinder panel. Color the shape obtained with a darker shade of
green, and this will be the shadow on the left side of the pickle.

how to create the shadow of the pickle pattern brush

Step
3

Now,
we will add a few bumps to create that recognizable pic
kle
look. Use the Pen Tool (P) to draw a few semicircle shapes on the
edges of the pickle. Make them of different sizes to ensure a more
realistic result for the final Illustrator brush (1).

Now,
select only the pink shapes on the upper right side along with the
green rounded rectangle and press Unite in the Pathfinder panel. I
will name the resulting shape “pickle body” (2).

After
that, select the blue shapes on the left side along with the shadow,
and press Unite on the Pathfinder panel again. I will name the newly
obtained shape “pickle shadow” (3).

how to create bumps on the pickle pattern brush

Step
4

Select
the two shapes obtained in the previous step and then Copy and
Paste
in Front (Control-F)

to make copies of them. Press Unite in the Pathfinder panel to merge
them, and you will get a new pickle shape. Give it a 1 pt
Stroke
using black and select the Round Join option in the Stroke
panel. I will name this shape “pickle outline”.

how to create the outline of the pickle pattern brush

Step
5

Next,
take the Pen Tool (P) and draw two curved paths at the top of the
pickle as creases. Give them a 1 pt Stroke using black and Width
Profile 4
in the Stroke panel.

Do
the same thing at the bottom of the pickle and apply the same
settings.

how to create creases on the pickle pattern brush

Step
6

Now,
focus on one of the bumps and use the Pen Tool (P) to draw two short
paths as shown in the close-up. Give them a 1 pt Stroke using black
and Width Profile 4 in the Stroke panel.

Do
the same thing for the other bumps in order to add details, but not
necessarily for all of them.

how to add detail lines on the pickle pattern brush

3. How
to Define the Sections of the Pattern Illustrator Brush

Step
1

Creating a brush in Illustrator, especially pattern brushes, can be
easy if you take into consideration the three sections that define a pattern brush: the start, the side, and the end. If we do this ahead of time
and not just at the end, we make the process of saving the brush pain-free once we get to that stage, and we’re less likely to make
mistakes.

Take
the Rectangle Tool (M) and draw an 80 x 136 px rectangle which will
cover the pickle entirely. Leave a little more space on the left side
of the pickle for the shadow. With the rectangle still selected, go
to Object > Path > Split Into Grid and choose 3 Rows. Hit OK
and the rectangle will be divided into three equal parts.

how to create the sections of the illustrator brush

Step
2

Notice
how the separation between the start and the side of the pattern brush
goes through one of the bumps. We don’t want this. It is better to
cut the brush sections between the bumps where the pickle is
straight.

Use
the Direct Selection Tool (A) to select only the points indicated and
move them upwards, right above the bump (2).

Select
the other points indicated and move them a little downwards in order
to make the start and end sections of the brush of about the
same size (3). The side of the brush (the middle part) will be
longer.

how to adjust the sections of the illustrator brush

4. How
to Add Details to the Pickle Pattern Brush

Step
1

Use
the Pen Tool (P) to draw a path
on the right
side of the pickle,
as shown in the image below. Give it a 3 pt Stroke using a lighter shade of
green and Width Profile 6 in the Stroke panel. This will create a
main highlight on the pickle.

how to add highlight on the pickle pattern brush

Step
2

Let’s
add more details. Use the Pen Tool (P) or the Pencil Tool (N) to draw
four random ellipses on the pickle. It’s better to not place them on
the blue lines but only inside the start, side, and end sections of
the brush. Fill them with a slightly darker shade of green and apply a
1 pt black Stroke using Width Profile 6 in the Stroke panel. Two
of the ellipses have no fill color, just the black stroke applied.

how to add bump details on pickle pattern brush

Step
3

Still
using the Pen Tool (P) or the Pencil Tool (N), draw a bunch of random
curved paths on the pickle. Give them a 0.5 pt and 0.75 pt Stroke
using black and Width Profile 1 in the Stroke panel.

how to add extra details on the pickle pattern brush

Step
4

Zoom
in on one of the paths that you drew in the previous step and draw
a shorter path inside it. Give it a 0.5 pt Stroke using a lighter
shade of green and Width Profile 1 in the Stroke panel.

Repeat
the same thing for two or three more paths in order to add little
highlights on the pickle.

how to add small highlights on the pickle pattern brush

Step
5

Next,
take the Ellipse Tool (L) and draw a few small ellipses of different
sizes in the middle of the pickle. Color them with a darker green
(1).

Draw
more ellipses on the right side of the pickle and color them with a
lighter green (2). You can see the result in the image below (3).

how to add small details on the pickle pattern brush

5. How
to Create the Shadow of the Pickle Pattern Brush

Step
1

Select
the “pickle outline” shape and then Copy and Paste in Place
(Shift-Control-V)
to make a copy of it. Select a black fill and
reduce the Opacity to 40%; then move it 1 px downward and 2 px to the
left using the Arrow Keys on your keyboard. Send this copy behind
everything by going to Object > Arrange > Send to Back
(Shift-Control-[)
(1).

Copy
and Paste in Back (Control-B) the first shadow shape to make another
copy. Move it 1 px downward and 2 px to the left using the Arrow keys
on the keyboard again. Keep the black fill color but reduce the
Opacity to 25% (2).

how to create the shadow of the pickle pattern brush

Step
2

Copy
and Paste in Back (Control-B) the second shadow shape to make a third
copy. Move it 1 px downwards and 2 px to the left; then change the
fill color to dark gray and reduce the Opacity to 15% (3).

Let’s do this one more time. Make a fourth copy of the shadow shape, and this time move it 1 px to the left. Keep the gray fill color but
reduce the Opacity to 5% (4).

how to create more shadow for the pickle pattern brush

Step
3

If
the shadow shapes go over the blue rectangle, use the Direct
Selection Tool (A)
to select only the corner points at the bottom and
move them downwards a little. The entire pickle must be inside the
blue sections.

how to adjust the end section of the illustrator brush

6. How
to Finalize the Pickle Pattern Brush

Step
1

We
are getting closer to saving the new Illustrator Pattern Brush, but we
need to prepare it first by expanding it and making some final adjustments.

Select all the stroked paths next to the outline of the pickle and go to
Object > Expand Appearance in order to turn the strokes into fills
(1). Now, select the “pickle outline” and go to Object >
Expand
to turn it into a black filled shape (2).

Keep
these resulting shapes selected and press Unite in the Pathfinder
panel, followed by Object > Compound Path > Make (Control-8).
This will merge all the shapes into one (3).

how to unite the outline of the pickle pattern brush

Step
2

Now,
select the main highlight path and go to Object > Expand
Appearance
. Do the same thing for all the detail paths on the pickle in
order to expand them, and we are ready to save this brush in Illustrator.

how to expand the details on the pickle pattern brush

7. How
to Save the Pickle Pattern Brush

Step
1

Before
you continue, make a copy of the entire pickle and keep it for later
use.

Illustrator brushes can be tricky to save and may require a few tries until you are happy with the result, but let me show you how easy it is to save this brush.

Select
everything on your artboard and Rotate 90 degrees in the Transform
panel. Group (Control-G) all the shapes that make up the pickle, and
then make two copies behind. You should have three pickles on top
of each other and three blue rectangles.

how to rotate the pickle pattern brush

Step
2

Select
one of the pickles along with the first rectangle and press Crop in
the Pathfinder panel. This will cut the pickle, and you will obtain
the start section of the pattern brush. Drag it into the Swatches
panel to save it (1).

Next,
select a copy of the pickle along with the middle rectangle and press
Crop again. This will cut the side section of the pattern brush for
us (2). You don’t need to save this one in the Swatches panel.

Select
the second copy of the pickle along with the last rectangle and press
Crop again. You will obtain the end section of the pattern brush.
Drag it into the Swatches panel to save it (3).

how to create the start side and end sections of the illustrator pattern brush

Step
3

Select
the middle section of the pickle and drag it into the Brushes panel
to save it as a New Pattern Brush. In the Pattern Brush Options window,
this section will automatically appear under the Side Tile (1). Type
a name for the brush, and let’s change some settings.

As
the Start Tile (2), select New Pattern Swatch 1 from the drop-down
options, which is the first section saved in the Swatches panel.

As
the End Tile (3), select New Pattern Swatch 2 from the drop-down
options, which is the last section of the pickle saved in the Swatches
panel.

Finally,
under Inner Corner Tile (4), select Auto-Centered. Hit OK and your new Illustrator brush is now saved and ready to use.

how to save the pickle pattern brush in Illustrator

Step
4

Let’s
test the newly saved brush. Use the Pen Tool (P) or the Paintbrush
Tool (B)
to draw any path on your artboard and give it a 1 pt Stroke
using the Pickle Pattern Brush from the Brushes panel. Fun, right?

how to use the pickle illustrator pattern brush

8. How
to Create the Face of Pickle Rick

Step
1

Pickle
Rick
is
the eccentric scientist Rick Sanchez from the famous animated series
Rick and Morty, who turns himself into a pickle just as he and his
family are about to attend a therapy session.

Let’s
start his face with the eyes. Use the Ellipse Tool (L) to draw two
circles of about 40 x 40 px and arrange them next to each other. Fill
them with the color indicated and also apply a 1 pt black Stroke.
While both circles stay selected, go to Effect > Distort &
Transform > Roughen
and apply the settings shown in order to
distort the shapes slightly.

how to create the eyes of Pickle Rick

Step
2

Still
using the Ellipse Tool (L), draw a tiny black circle in the center of
each eye as the pupils. Now, take the Pen Tool (P) and draw a curved
path under each eye followed by the nose path. Give them a 1 pt black
Stroke and select the Round Cap option in the Stroke panel.

how to create the nose of Pickle Rick

Step
3

Continue
to draw the shape of the mouth filled with dark green. Also apply a 1
pt
black Stroke and select the Align Stroke to Outside option in the
Stroke panel.

For the tooth, draw a V-like path but rounded at the tip. Give it a pale
green fill color and a 1 pt black Stroke. Follow the shape of the
mouth and draw similar paths next to each other to obtain the
top teeth. Draw and apply the same appearances for the bottom teeth
as well.

how to create the mouth of Pickle Rick

Step
4

Next,
draw the shape of the tongue on the right side of the mouth. Fill it
with the color indicated and apply a 1 pt black Stroke.

Select
the shape of the mouth and then Copy and Paste in Place
(Shift-Control-V)
to make a copy of it in front of everything. Set
this copy to stroke-none and fill-none. Keep this copy selected along
with the teeth and the tongue, and go to Object > Clipping Mask >
Make (Control-7)
.

how to create the tongue of Pickle Rick

Step
5

Use
the Pen Tool (P) to draw a curved path on each side of the mouth.
Give them a 1 pt black Stroke with the Round Cap option selected in
the Stroke panel (1).

Continue
to draw a C-like shape above the eyes. Give it a blue fill color and
a 1 pt black Stroke (2). The final thing to add is a random shape on
the upper left side filled with bright green (3).

how to create the forehead of Pickle Rick

9. How
to Create the Pickle Rick Pattern Brush

Step
1

First,
grab the copy of the pickle that I said to make earlier in the
tutorial (1) and start to remove some of the details on the top half in
order to create an empty area (2).

Now,
grab Rick’s face and go to Object > Expand Appearance followed
by Object > Expand to turn all strokes into fills. Group
(Control-G)
all the shapes that make up the face and scale it down
until it fits inside the empty area you just created (3).

When
you are happy with the placement of the face, select only the indicated points of the blue rectangles with the help of the Direct Selection Tool (A) and move
them downwards, until they’re under the mouth. The entire face must be inside
the start section of the brush (4).

how to create the Pickle Rick pattern brush

Step
2

Let’s
make a few adjustments, and then we are ready to save this pattern
brush next to the other Illustrator brushes.

Focus
on the shadow shape and use the Add Anchor Point Tool (+) to add
three extra points next to the mouth. Switch to the Direct Selection
Tool (A)
and modify the shadow a little by moving these points,
following the left side of the mouth (1).

Next,
select the main highlight shape and change the fill color to a darker
shade of green; then make it a little thinner by dragging the
bounding box with the Selection Tool (V).

While
this shape stays selected, grab the Knife and cut the shape following
the right side of the mouth; then move the end points up to the black
outline of the mouth as shown in the close-up (2).

how to adjust the Pickle Rick pattern brush

10. How
to Save the Pickle Rick Pattern Brush

Step
1

The process of saving this brush is the same as before. Select
the new pickle along with the blue rectangles and Rotate them 90
degrees
in the Transform panel. Make two copies of the pickle behind
so that we have a pickle for each rectangle (1).

Now,
select the pickle along with the first rectangle and press Crop in
the Pathfinder panel. You will obtain the start section of the
pattern brush, which is the head of Pickle Rick. Drag it into the
Swatches panel to save it (2).

Follow
the same technique and cut the side section (3) and the end section
of the brush as you did for the first pattern brush earlier in the
tutorial (4).

how to create the start side and end sections of Pickle Rick illustrator brush

Step
2

Select
and drag the middle section of the pickle into the Brushes panel to
save it as a New Pattern Brush. Type a name for the brush and notice
that the middle section already appears under the Side Tile (1).

As
the Start Tile (2), select New Pattern Swatch 3 from the drop-down
options, which is the head of Pickle Rick saved earlier.

As
the End Tile (3) select New Pattern Swatch 4, and as the Inner
Corner Tile
(4) select Auto-Centered from the options available. Hit
OK to save the Pickle Rick Pattern Brush in the Brushes panel.

how to save the Pickle Rick brush in Illustrator

Step
3

Let’s
test it by applying it to a random path drawn with the Pen Tool (P)
or the Paintbrush Tool (B). Looks great!

how to use the Pickle Rick illustrator brush

11. How
to Create the Pickle Text Effect

Step
1

Now that we have the two Illustrator brushes already saved, here is how to make the text effect quickly and easily. 

Use
the Pen Tool (P) or the Pencil Tool (N) to draw paths as letters and compose the
word “PICKLE”. Stroke all of them with the Pickle Pattern Brush
and keep the Stroke Weight at 1 pt. Drag two guide lines above and
under the text effect to make sure the letters are about the same
height, making small adjustments if needed.

how to create the pickle text effect

Step
2

Replace
one (or more) of the strokes with the Pickle Rick Pattern Brush to make this
text effect more fun.

how to create the Pickle Rick letter of the text effect

Step
3

As
an extra touch, you can add a small stem to the pickle letters. Draw
the shape of the stem and color it with the same green as the pickle’s body. Also apply a
2 pt black Stroke using Width Profile 6 in order to maintain the
same outlined style.

The
stem could be a part of the pattern brush if you include it in the
Start Tile before saving it, but then all the stroked paths will have
the same stem, and this is not the look we want for the text effect.
In this case, the two stems are just extra additions.

how to add stems on the pickle text effect

Congratulations!
You’re Done

Here
is the final image of the pickle text effect with the face of Pickle Rick as a creative addition. I hope this tutorial was
fun for you and that you learned some new things today. Now you have the
knowledge to make other creative Adobe Illustrator brushes and use
them in your projects.

Don’t
forget to share your recreation of this pickle text effect
with us.
We would love to see it.

final image of pickle text effect using pattern brushes in Adobe Illustrator

Expand
Your Text-Effect Designing Skills!

Keep
drawing and learning with these recommended tutorials:

How to Make a Pickle Pattern Brush in Illustrator

Post pobrano z: How to Make a Pickle Pattern Brush in Illustrator

Final product image
What You’ll Be Creating

Always
wanted to create a brush, but never knew exactly how to do it?

Well,
if you love unique creative brushes and you want to learn how to make
a brush in Illustrator, then this tutorial is perfect for you. It will take you through the entire process of drawing, saving, and
applying the brush.

You
will learn how to create a pickle brush and how to save it correctly
as a new pattern brush by following a few tips and tricks that you will
be able to apply to other Adobe Illustrator brushes as well.

And
if you are a fan of the Rick and Morty animated series, we will give
this text effect a unique twist by creating a Pickle Rick Pattern
Brush as well. Both brushes are easy to use, and this fun text effect
will be ready in no time. If you are excited about this, then let’s
start!

Expand
your brushes library by going to GraphicRiver, where you’ll find a great
selection of brushes in various styles, shapes, and themes. Also,
check out the text effects section, where you’ll find plenty of
inspiration and resources for your projects.

1. How
to Open a New Document 

Launch
Illustrator
and
go to
File
> New
to
open a blank document. Type a name for your file, set the
dimensions, and then select
Pixels
as
Units
and
RGB
as
Color
Mode
.

Next,
go to
Edit
> Preferences > General
and
set the
Keyboard
Increment
to
1
px
and,
while there, go to
Units
to
make sure they are set as in the following image. I usually work with
these settings, and they will help you throughout the drawing process.

how to open a new illustrator document

2. How
to Create the Basic Pickle Shape

Step
1

Grab
the Rectangle Tool (M), click on your artboard, and enter 44 x 132 px
as the dimensions of the rectangle. Color it with green.

Keep
this shape selected and go to the Transform panel. Enter 20 px in all
four Corner Radius fields in order to create the rounded corners.

how to create the basic shape of the pickle pattern brush

Step
2

Copy
and
Paste
in Front (Control-F)

the rounded rectangle to get a copy of it (the gray shape), and then
move it 7 px to the right by pressing the Right Arrow key on your
keyboard seven times.

Copy
and
Paste
in Front (Control-F)

the green rounded rectangle again to make another copy. Keep this
copy selected along with the gray copy and press Minus Front on the
Pathfinder panel. Color the shape obtained with a darker shade of
green, and this will be the shadow on the left side of the pickle.

how to create the shadow of the pickle pattern brush

Step
3

Now,
we will add a few bumps to create that recognizable pic
kle
look. Use the Pen Tool (P) to draw a few semicircle shapes on the
edges of the pickle. Make them of different sizes to ensure a more
realistic result for the final Illustrator brush (1).

Now,
select only the pink shapes on the upper right side along with the
green rounded rectangle and press Unite in the Pathfinder panel. I
will name the resulting shape “pickle body” (2).

After
that, select the blue shapes on the left side along with the shadow,
and press Unite on the Pathfinder panel again. I will name the newly
obtained shape “pickle shadow” (3).

how to create bumps on the pickle pattern brush

Step
4

Select
the two shapes obtained in the previous step and then Copy and
Paste
in Front (Control-F)

to make copies of them. Press Unite in the Pathfinder panel to merge
them, and you will get a new pickle shape. Give it a 1 pt
Stroke
using black and select the Round Join option in the Stroke
panel. I will name this shape “pickle outline”.

how to create the outline of the pickle pattern brush

Step
5

Next,
take the Pen Tool (P) and draw two curved paths at the top of the
pickle as creases. Give them a 1 pt Stroke using black and Width
Profile 4
in the Stroke panel.

Do
the same thing at the bottom of the pickle and apply the same
settings.

how to create creases on the pickle pattern brush

Step
6

Now,
focus on one of the bumps and use the Pen Tool (P) to draw two short
paths as shown in the close-up. Give them a 1 pt Stroke using black
and Width Profile 4 in the Stroke panel.

Do
the same thing for the other bumps in order to add details, but not
necessarily for all of them.

how to add detail lines on the pickle pattern brush

3. How
to Define the Sections of the Pattern Illustrator Brush

Step
1

Creating a brush in Illustrator, especially pattern brushes, can be
easy if you take into consideration the three sections that define a pattern brush: the start, the side, and the end. If we do this ahead of time
and not just at the end, we make the process of saving the brush pain-free once we get to that stage, and we’re less likely to make
mistakes.

Take
the Rectangle Tool (M) and draw an 80 x 136 px rectangle which will
cover the pickle entirely. Leave a little more space on the left side
of the pickle for the shadow. With the rectangle still selected, go
to Object > Path > Split Into Grid and choose 3 Rows. Hit OK
and the rectangle will be divided into three equal parts.

how to create the sections of the illustrator brush

Step
2

Notice
how the separation between the start and the side of the pattern brush
goes through one of the bumps. We don’t want this. It is better to
cut the brush sections between the bumps where the pickle is
straight.

Use
the Direct Selection Tool (A) to select only the points indicated and
move them upwards, right above the bump (2).

Select
the other points indicated and move them a little downwards in order
to make the start and end sections of the brush of about the
same size (3). The side of the brush (the middle part) will be
longer.

how to adjust the sections of the illustrator brush

4. How
to Add Details to the Pickle Pattern Brush

Step
1

Use
the Pen Tool (P) to draw a path
on the right
side of the pickle,
as shown in the image below. Give it a 3 pt Stroke using a lighter shade of
green and Width Profile 6 in the Stroke panel. This will create a
main highlight on the pickle.

how to add highlight on the pickle pattern brush

Step
2

Let’s
add more details. Use the Pen Tool (P) or the Pencil Tool (N) to draw
four random ellipses on the pickle. It’s better to not place them on
the blue lines but only inside the start, side, and end sections of
the brush. Fill them with a slightly darker shade of green and apply a
1 pt black Stroke using Width Profile 6 in the Stroke panel. Two
of the ellipses have no fill color, just the black stroke applied.

how to add bump details on pickle pattern brush

Step
3

Still
using the Pen Tool (P) or the Pencil Tool (N), draw a bunch of random
curved paths on the pickle. Give them a 0.5 pt and 0.75 pt Stroke
using black and Width Profile 1 in the Stroke panel.

how to add extra details on the pickle pattern brush

Step
4

Zoom
in on one of the paths that you drew in the previous step and draw
a shorter path inside it. Give it a 0.5 pt Stroke using a lighter
shade of green and Width Profile 1 in the Stroke panel.

Repeat
the same thing for two or three more paths in order to add little
highlights on the pickle.

how to add small highlights on the pickle pattern brush

Step
5

Next,
take the Ellipse Tool (L) and draw a few small ellipses of different
sizes in the middle of the pickle. Color them with a darker green
(1).

Draw
more ellipses on the right side of the pickle and color them with a
lighter green (2). You can see the result in the image below (3).

how to add small details on the pickle pattern brush

5. How
to Create the Shadow of the Pickle Pattern Brush

Step
1

Select
the “pickle outline” shape and then Copy and Paste in Place
(Shift-Control-V)
to make a copy of it. Select a black fill and
reduce the Opacity to 40%; then move it 1 px downward and 2 px to the
left using the Arrow Keys on your keyboard. Send this copy behind
everything by going to Object > Arrange > Send to Back
(Shift-Control-[)
(1).

Copy
and Paste in Back (Control-B) the first shadow shape to make another
copy. Move it 1 px downward and 2 px to the left using the Arrow keys
on the keyboard again. Keep the black fill color but reduce the
Opacity to 25% (2).

how to create the shadow of the pickle pattern brush

Step
2

Copy
and Paste in Back (Control-B) the second shadow shape to make a third
copy. Move it 1 px downwards and 2 px to the left; then change the
fill color to dark gray and reduce the Opacity to 15% (3).

Let’s do this one more time. Make a fourth copy of the shadow shape, and this time move it 1 px to the left. Keep the gray fill color but
reduce the Opacity to 5% (4).

how to create more shadow for the pickle pattern brush

Step
3

If
the shadow shapes go over the blue rectangle, use the Direct
Selection Tool (A)
to select only the corner points at the bottom and
move them downwards a little. The entire pickle must be inside the
blue sections.

how to adjust the end section of the illustrator brush

6. How
to Finalize the Pickle Pattern Brush

Step
1

We
are getting closer to saving the new Illustrator Pattern Brush, but we
need to prepare it first by expanding it and making some final adjustments.

Select all the stroked paths next to the outline of the pickle and go to
Object > Expand Appearance in order to turn the strokes into fills
(1). Now, select the “pickle outline” and go to Object >
Expand
to turn it into a black filled shape (2).

Keep
these resulting shapes selected and press Unite in the Pathfinder
panel, followed by Object > Compound Path > Make (Control-8).
This will merge all the shapes into one (3).

how to unite the outline of the pickle pattern brush

Step
2

Now,
select the main highlight path and go to Object > Expand
Appearance
. Do the same thing for all the detail paths on the pickle in
order to expand them, and we are ready to save this brush in Illustrator.

how to expand the details on the pickle pattern brush

7. How
to Save the Pickle Pattern Brush

Step
1

Before
you continue, make a copy of the entire pickle and keep it for later
use.

Illustrator brushes can be tricky to save and may require a few tries until you are happy with the result, but let me show you how easy it is to save this brush.

Select
everything on your artboard and Rotate 90 degrees in the Transform
panel. Group (Control-G) all the shapes that make up the pickle, and
then make two copies behind. You should have three pickles on top
of each other and three blue rectangles.

how to rotate the pickle pattern brush

Step
2

Select
one of the pickles along with the first rectangle and press Crop in
the Pathfinder panel. This will cut the pickle, and you will obtain
the start section of the pattern brush. Drag it into the Swatches
panel to save it (1).

Next,
select a copy of the pickle along with the middle rectangle and press
Crop again. This will cut the side section of the pattern brush for
us (2). You don’t need to save this one in the Swatches panel.

Select
the second copy of the pickle along with the last rectangle and press
Crop again. You will obtain the end section of the pattern brush.
Drag it into the Swatches panel to save it (3).

how to create the start side and end sections of the illustrator pattern brush

Step
3

Select
the middle section of the pickle and drag it into the Brushes panel
to save it as a New Pattern Brush. In the Pattern Brush Options window,
this section will automatically appear under the Side Tile (1). Type
a name for the brush, and let’s change some settings.

As
the Start Tile (2), select New Pattern Swatch 1 from the drop-down
options, which is the first section saved in the Swatches panel.

As
the End Tile (3), select New Pattern Swatch 2 from the drop-down
options, which is the last section of the pickle saved in the Swatches
panel.

Finally,
under Inner Corner Tile (4), select Auto-Centered. Hit OK and your new Illustrator brush is now saved and ready to use.

how to save the pickle pattern brush in Illustrator

Step
4

Let’s
test the newly saved brush. Use the Pen Tool (P) or the Paintbrush
Tool (B)
to draw any path on your artboard and give it a 1 pt Stroke
using the Pickle Pattern Brush from the Brushes panel. Fun, right?

how to use the pickle illustrator pattern brush

8. How
to Create the Face of Pickle Rick

Step
1

Pickle
Rick
is
the eccentric scientist Rick Sanchez from the famous animated series
Rick and Morty, who turns himself into a pickle just as he and his
family are about to attend a therapy session.

Let’s
start his face with the eyes. Use the Ellipse Tool (L) to draw two
circles of about 40 x 40 px and arrange them next to each other. Fill
them with the color indicated and also apply a 1 pt black Stroke.
While both circles stay selected, go to Effect > Distort &
Transform > Roughen
and apply the settings shown in order to
distort the shapes slightly.

how to create the eyes of Pickle Rick

Step
2

Still
using the Ellipse Tool (L), draw a tiny black circle in the center of
each eye as the pupils. Now, take the Pen Tool (P) and draw a curved
path under each eye followed by the nose path. Give them a 1 pt black
Stroke and select the Round Cap option in the Stroke panel.

how to create the nose of Pickle Rick

Step
3

Continue
to draw the shape of the mouth filled with dark green. Also apply a 1
pt
black Stroke and select the Align Stroke to Outside option in the
Stroke panel.

For the tooth, draw a V-like path but rounded at the tip. Give it a pale
green fill color and a 1 pt black Stroke. Follow the shape of the
mouth and draw similar paths next to each other to obtain the
top teeth. Draw and apply the same appearances for the bottom teeth
as well.

how to create the mouth of Pickle Rick

Step
4

Next,
draw the shape of the tongue on the right side of the mouth. Fill it
with the color indicated and apply a 1 pt black Stroke.

Select
the shape of the mouth and then Copy and Paste in Place
(Shift-Control-V)
to make a copy of it in front of everything. Set
this copy to stroke-none and fill-none. Keep this copy selected along
with the teeth and the tongue, and go to Object > Clipping Mask >
Make (Control-7)
.

how to create the tongue of Pickle Rick

Step
5

Use
the Pen Tool (P) to draw a curved path on each side of the mouth.
Give them a 1 pt black Stroke with the Round Cap option selected in
the Stroke panel (1).

Continue
to draw a C-like shape above the eyes. Give it a blue fill color and
a 1 pt black Stroke (2). The final thing to add is a random shape on
the upper left side filled with bright green (3).

how to create the forehead of Pickle Rick

9. How
to Create the Pickle Rick Pattern Brush

Step
1

First,
grab the copy of the pickle that I said to make earlier in the
tutorial (1) and start to remove some of the details on the top half in
order to create an empty area (2).

Now,
grab Rick’s face and go to Object > Expand Appearance followed
by Object > Expand to turn all strokes into fills. Group
(Control-G)
all the shapes that make up the face and scale it down
until it fits inside the empty area you just created (3).

When
you are happy with the placement of the face, select only the indicated points of the blue rectangles with the help of the Direct Selection Tool (A) and move
them downwards, until they’re under the mouth. The entire face must be inside
the start section of the brush (4).

how to create the Pickle Rick pattern brush

Step
2

Let’s
make a few adjustments, and then we are ready to save this pattern
brush next to the other Illustrator brushes.

Focus
on the shadow shape and use the Add Anchor Point Tool (+) to add
three extra points next to the mouth. Switch to the Direct Selection
Tool (A)
and modify the shadow a little by moving these points,
following the left side of the mouth (1).

Next,
select the main highlight shape and change the fill color to a darker
shade of green; then make it a little thinner by dragging the
bounding box with the Selection Tool (V).

While
this shape stays selected, grab the Knife and cut the shape following
the right side of the mouth; then move the end points up to the black
outline of the mouth as shown in the close-up (2).

how to adjust the Pickle Rick pattern brush

10. How
to Save the Pickle Rick Pattern Brush

Step
1

The process of saving this brush is the same as before. Select
the new pickle along with the blue rectangles and Rotate them 90
degrees
in the Transform panel. Make two copies of the pickle behind
so that we have a pickle for each rectangle (1).

Now,
select the pickle along with the first rectangle and press Crop in
the Pathfinder panel. You will obtain the start section of the
pattern brush, which is the head of Pickle Rick. Drag it into the
Swatches panel to save it (2).

Follow
the same technique and cut the side section (3) and the end section
of the brush as you did for the first pattern brush earlier in the
tutorial (4).

how to create the start side and end sections of Pickle Rick illustrator brush

Step
2

Select
and drag the middle section of the pickle into the Brushes panel to
save it as a New Pattern Brush. Type a name for the brush and notice
that the middle section already appears under the Side Tile (1).

As
the Start Tile (2), select New Pattern Swatch 3 from the drop-down
options, which is the head of Pickle Rick saved earlier.

As
the End Tile (3) select New Pattern Swatch 4, and as the Inner
Corner Tile
(4) select Auto-Centered from the options available. Hit
OK to save the Pickle Rick Pattern Brush in the Brushes panel.

how to save the Pickle Rick brush in Illustrator

Step
3

Let’s
test it by applying it to a random path drawn with the Pen Tool (P)
or the Paintbrush Tool (B). Looks great!

how to use the Pickle Rick illustrator brush

11. How
to Create the Pickle Text Effect

Step
1

Now that we have the two Illustrator brushes already saved, here is how to make the text effect quickly and easily. 

Use
the Pen Tool (P) or the Pencil Tool (N) to draw paths as letters and compose the
word “PICKLE”. Stroke all of them with the Pickle Pattern Brush
and keep the Stroke Weight at 1 pt. Drag two guide lines above and
under the text effect to make sure the letters are about the same
height, making small adjustments if needed.

how to create the pickle text effect

Step
2

Replace
one (or more) of the strokes with the Pickle Rick Pattern Brush to make this
text effect more fun.

how to create the Pickle Rick letter of the text effect

Step
3

As
an extra touch, you can add a small stem to the pickle letters. Draw
the shape of the stem and color it with the same green as the pickle’s body. Also apply a
2 pt black Stroke using Width Profile 6 in order to maintain the
same outlined style.

The
stem could be a part of the pattern brush if you include it in the
Start Tile before saving it, but then all the stroked paths will have
the same stem, and this is not the look we want for the text effect.
In this case, the two stems are just extra additions.

how to add stems on the pickle text effect

Congratulations!
You’re Done

Here
is the final image of the pickle text effect with the face of Pickle Rick as a creative addition. I hope this tutorial was
fun for you and that you learned some new things today. Now you have the
knowledge to make other creative Adobe Illustrator brushes and use
them in your projects.

Don’t
forget to share your recreation of this pickle text effect
with us.
We would love to see it.

final image of pickle text effect using pattern brushes in Adobe Illustrator

Expand
Your Text-Effect Designing Skills!

Keep
drawing and learning with these recommended tutorials:

How to Make a Pickle Pattern Brush in Illustrator

Post pobrano z: How to Make a Pickle Pattern Brush in Illustrator

Final product image
What You’ll Be Creating

Always
wanted to create a brush, but never knew exactly how to do it?

Well,
if you love unique creative brushes and you want to learn how to make
a brush in Illustrator, then this tutorial is perfect for you. It will take you through the entire process of drawing, saving, and
applying the brush.

You
will learn how to create a pickle brush and how to save it correctly
as a new pattern brush by following a few tips and tricks that you will
be able to apply to other Adobe Illustrator brushes as well.

And
if you are a fan of the Rick and Morty animated series, we will give
this text effect a unique twist by creating a Pickle Rick Pattern
Brush as well. Both brushes are easy to use, and this fun text effect
will be ready in no time. If you are excited about this, then let’s
start!

Expand
your brushes library by going to GraphicRiver, where you’ll find a great
selection of brushes in various styles, shapes, and themes. Also,
check out the text effects section, where you’ll find plenty of
inspiration and resources for your projects.

1. How
to Open a New Document 

Launch
Illustrator
and
go to
File
> New
to
open a blank document. Type a name for your file, set the
dimensions, and then select
Pixels
as
Units
and
RGB
as
Color
Mode
.

Next,
go to
Edit
> Preferences > General
and
set the
Keyboard
Increment
to
1
px
and,
while there, go to
Units
to
make sure they are set as in the following image. I usually work with
these settings, and they will help you throughout the drawing process.

how to open a new illustrator document

2. How
to Create the Basic Pickle Shape

Step
1

Grab
the Rectangle Tool (M), click on your artboard, and enter 44 x 132 px
as the dimensions of the rectangle. Color it with green.

Keep
this shape selected and go to the Transform panel. Enter 20 px in all
four Corner Radius fields in order to create the rounded corners.

how to create the basic shape of the pickle pattern brush

Step
2

Copy
and
Paste
in Front (Control-F)

the rounded rectangle to get a copy of it (the gray shape), and then
move it 7 px to the right by pressing the Right Arrow key on your
keyboard seven times.

Copy
and
Paste
in Front (Control-F)

the green rounded rectangle again to make another copy. Keep this
copy selected along with the gray copy and press Minus Front on the
Pathfinder panel. Color the shape obtained with a darker shade of
green, and this will be the shadow on the left side of the pickle.

how to create the shadow of the pickle pattern brush

Step
3

Now,
we will add a few bumps to create that recognizable pic
kle
look. Use the Pen Tool (P) to draw a few semicircle shapes on the
edges of the pickle. Make them of different sizes to ensure a more
realistic result for the final Illustrator brush (1).

Now,
select only the pink shapes on the upper right side along with the
green rounded rectangle and press Unite in the Pathfinder panel. I
will name the resulting shape “pickle body” (2).

After
that, select the blue shapes on the left side along with the shadow,
and press Unite on the Pathfinder panel again. I will name the newly
obtained shape “pickle shadow” (3).

how to create bumps on the pickle pattern brush

Step
4

Select
the two shapes obtained in the previous step and then Copy and
Paste
in Front (Control-F)

to make copies of them. Press Unite in the Pathfinder panel to merge
them, and you will get a new pickle shape. Give it a 1 pt
Stroke
using black and select the Round Join option in the Stroke
panel. I will name this shape “pickle outline”.

how to create the outline of the pickle pattern brush

Step
5

Next,
take the Pen Tool (P) and draw two curved paths at the top of the
pickle as creases. Give them a 1 pt Stroke using black and Width
Profile 4
in the Stroke panel.

Do
the same thing at the bottom of the pickle and apply the same
settings.

how to create creases on the pickle pattern brush

Step
6

Now,
focus on one of the bumps and use the Pen Tool (P) to draw two short
paths as shown in the close-up. Give them a 1 pt Stroke using black
and Width Profile 4 in the Stroke panel.

Do
the same thing for the other bumps in order to add details, but not
necessarily for all of them.

how to add detail lines on the pickle pattern brush

3. How
to Define the Sections of the Pattern Illustrator Brush

Step
1

Creating a brush in Illustrator, especially pattern brushes, can be
easy if you take into consideration the three sections that define a pattern brush: the start, the side, and the end. If we do this ahead of time
and not just at the end, we make the process of saving the brush pain-free once we get to that stage, and we’re less likely to make
mistakes.

Take
the Rectangle Tool (M) and draw an 80 x 136 px rectangle which will
cover the pickle entirely. Leave a little more space on the left side
of the pickle for the shadow. With the rectangle still selected, go
to Object > Path > Split Into Grid and choose 3 Rows. Hit OK
and the rectangle will be divided into three equal parts.

how to create the sections of the illustrator brush

Step
2

Notice
how the separation between the start and the side of the pattern brush
goes through one of the bumps. We don’t want this. It is better to
cut the brush sections between the bumps where the pickle is
straight.

Use
the Direct Selection Tool (A) to select only the points indicated and
move them upwards, right above the bump (2).

Select
the other points indicated and move them a little downwards in order
to make the start and end sections of the brush of about the
same size (3). The side of the brush (the middle part) will be
longer.

how to adjust the sections of the illustrator brush

4. How
to Add Details to the Pickle Pattern Brush

Step
1

Use
the Pen Tool (P) to draw a path
on the right
side of the pickle,
as shown in the image below. Give it a 3 pt Stroke using a lighter shade of
green and Width Profile 6 in the Stroke panel. This will create a
main highlight on the pickle.

how to add highlight on the pickle pattern brush

Step
2

Let’s
add more details. Use the Pen Tool (P) or the Pencil Tool (N) to draw
four random ellipses on the pickle. It’s better to not place them on
the blue lines but only inside the start, side, and end sections of
the brush. Fill them with a slightly darker shade of green and apply a
1 pt black Stroke using Width Profile 6 in the Stroke panel. Two
of the ellipses have no fill color, just the black stroke applied.

how to add bump details on pickle pattern brush

Step
3

Still
using the Pen Tool (P) or the Pencil Tool (N), draw a bunch of random
curved paths on the pickle. Give them a 0.5 pt and 0.75 pt Stroke
using black and Width Profile 1 in the Stroke panel.

how to add extra details on the pickle pattern brush

Step
4

Zoom
in on one of the paths that you drew in the previous step and draw
a shorter path inside it. Give it a 0.5 pt Stroke using a lighter
shade of green and Width Profile 1 in the Stroke panel.

Repeat
the same thing for two or three more paths in order to add little
highlights on the pickle.

how to add small highlights on the pickle pattern brush

Step
5

Next,
take the Ellipse Tool (L) and draw a few small ellipses of different
sizes in the middle of the pickle. Color them with a darker green
(1).

Draw
more ellipses on the right side of the pickle and color them with a
lighter green (2). You can see the result in the image below (3).

how to add small details on the pickle pattern brush

5. How
to Create the Shadow of the Pickle Pattern Brush

Step
1

Select
the “pickle outline” shape and then Copy and Paste in Place
(Shift-Control-V)
to make a copy of it. Select a black fill and
reduce the Opacity to 40%; then move it 1 px downward and 2 px to the
left using the Arrow Keys on your keyboard. Send this copy behind
everything by going to Object > Arrange > Send to Back
(Shift-Control-[)
(1).

Copy
and Paste in Back (Control-B) the first shadow shape to make another
copy. Move it 1 px downward and 2 px to the left using the Arrow keys
on the keyboard again. Keep the black fill color but reduce the
Opacity to 25% (2).

how to create the shadow of the pickle pattern brush

Step
2

Copy
and Paste in Back (Control-B) the second shadow shape to make a third
copy. Move it 1 px downwards and 2 px to the left; then change the
fill color to dark gray and reduce the Opacity to 15% (3).

Let’s do this one more time. Make a fourth copy of the shadow shape, and this time move it 1 px to the left. Keep the gray fill color but
reduce the Opacity to 5% (4).

how to create more shadow for the pickle pattern brush

Step
3

If
the shadow shapes go over the blue rectangle, use the Direct
Selection Tool (A)
to select only the corner points at the bottom and
move them downwards a little. The entire pickle must be inside the
blue sections.

how to adjust the end section of the illustrator brush

6. How
to Finalize the Pickle Pattern Brush

Step
1

We
are getting closer to saving the new Illustrator Pattern Brush, but we
need to prepare it first by expanding it and making some final adjustments.

Select all the stroked paths next to the outline of the pickle and go to
Object > Expand Appearance in order to turn the strokes into fills
(1). Now, select the “pickle outline” and go to Object >
Expand
to turn it into a black filled shape (2).

Keep
these resulting shapes selected and press Unite in the Pathfinder
panel, followed by Object > Compound Path > Make (Control-8).
This will merge all the shapes into one (3).

how to unite the outline of the pickle pattern brush

Step
2

Now,
select the main highlight path and go to Object > Expand
Appearance
. Do the same thing for all the detail paths on the pickle in
order to expand them, and we are ready to save this brush in Illustrator.

how to expand the details on the pickle pattern brush

7. How
to Save the Pickle Pattern Brush

Step
1

Before
you continue, make a copy of the entire pickle and keep it for later
use.

Illustrator brushes can be tricky to save and may require a few tries until you are happy with the result, but let me show you how easy it is to save this brush.

Select
everything on your artboard and Rotate 90 degrees in the Transform
panel. Group (Control-G) all the shapes that make up the pickle, and
then make two copies behind. You should have three pickles on top
of each other and three blue rectangles.

how to rotate the pickle pattern brush

Step
2

Select
one of the pickles along with the first rectangle and press Crop in
the Pathfinder panel. This will cut the pickle, and you will obtain
the start section of the pattern brush. Drag it into the Swatches
panel to save it (1).

Next,
select a copy of the pickle along with the middle rectangle and press
Crop again. This will cut the side section of the pattern brush for
us (2). You don’t need to save this one in the Swatches panel.

Select
the second copy of the pickle along with the last rectangle and press
Crop again. You will obtain the end section of the pattern brush.
Drag it into the Swatches panel to save it (3).

how to create the start side and end sections of the illustrator pattern brush

Step
3

Select
the middle section of the pickle and drag it into the Brushes panel
to save it as a New Pattern Brush. In the Pattern Brush Options window,
this section will automatically appear under the Side Tile (1). Type
a name for the brush, and let’s change some settings.

As
the Start Tile (2), select New Pattern Swatch 1 from the drop-down
options, which is the first section saved in the Swatches panel.

As
the End Tile (3), select New Pattern Swatch 2 from the drop-down
options, which is the last section of the pickle saved in the Swatches
panel.

Finally,
under Inner Corner Tile (4), select Auto-Centered. Hit OK and your new Illustrator brush is now saved and ready to use.

how to save the pickle pattern brush in Illustrator

Step
4

Let’s
test the newly saved brush. Use the Pen Tool (P) or the Paintbrush
Tool (B)
to draw any path on your artboard and give it a 1 pt Stroke
using the Pickle Pattern Brush from the Brushes panel. Fun, right?

how to use the pickle illustrator pattern brush

8. How
to Create the Face of Pickle Rick

Step
1

Pickle
Rick
is
the eccentric scientist Rick Sanchez from the famous animated series
Rick and Morty, who turns himself into a pickle just as he and his
family are about to attend a therapy session.

Let’s
start his face with the eyes. Use the Ellipse Tool (L) to draw two
circles of about 40 x 40 px and arrange them next to each other. Fill
them with the color indicated and also apply a 1 pt black Stroke.
While both circles stay selected, go to Effect > Distort &
Transform > Roughen
and apply the settings shown in order to
distort the shapes slightly.

how to create the eyes of Pickle Rick

Step
2

Still
using the Ellipse Tool (L), draw a tiny black circle in the center of
each eye as the pupils. Now, take the Pen Tool (P) and draw a curved
path under each eye followed by the nose path. Give them a 1 pt black
Stroke and select the Round Cap option in the Stroke panel.

how to create the nose of Pickle Rick

Step
3

Continue
to draw the shape of the mouth filled with dark green. Also apply a 1
pt
black Stroke and select the Align Stroke to Outside option in the
Stroke panel.

For the tooth, draw a V-like path but rounded at the tip. Give it a pale
green fill color and a 1 pt black Stroke. Follow the shape of the
mouth and draw similar paths next to each other to obtain the
top teeth. Draw and apply the same appearances for the bottom teeth
as well.

how to create the mouth of Pickle Rick

Step
4

Next,
draw the shape of the tongue on the right side of the mouth. Fill it
with the color indicated and apply a 1 pt black Stroke.

Select
the shape of the mouth and then Copy and Paste in Place
(Shift-Control-V)
to make a copy of it in front of everything. Set
this copy to stroke-none and fill-none. Keep this copy selected along
with the teeth and the tongue, and go to Object > Clipping Mask >
Make (Control-7)
.

how to create the tongue of Pickle Rick

Step
5

Use
the Pen Tool (P) to draw a curved path on each side of the mouth.
Give them a 1 pt black Stroke with the Round Cap option selected in
the Stroke panel (1).

Continue
to draw a C-like shape above the eyes. Give it a blue fill color and
a 1 pt black Stroke (2). The final thing to add is a random shape on
the upper left side filled with bright green (3).

how to create the forehead of Pickle Rick

9. How
to Create the Pickle Rick Pattern Brush

Step
1

First,
grab the copy of the pickle that I said to make earlier in the
tutorial (1) and start to remove some of the details on the top half in
order to create an empty area (2).

Now,
grab Rick’s face and go to Object > Expand Appearance followed
by Object > Expand to turn all strokes into fills. Group
(Control-G)
all the shapes that make up the face and scale it down
until it fits inside the empty area you just created (3).

When
you are happy with the placement of the face, select only the indicated points of the blue rectangles with the help of the Direct Selection Tool (A) and move
them downwards, until they’re under the mouth. The entire face must be inside
the start section of the brush (4).

how to create the Pickle Rick pattern brush

Step
2

Let’s
make a few adjustments, and then we are ready to save this pattern
brush next to the other Illustrator brushes.

Focus
on the shadow shape and use the Add Anchor Point Tool (+) to add
three extra points next to the mouth. Switch to the Direct Selection
Tool (A)
and modify the shadow a little by moving these points,
following the left side of the mouth (1).

Next,
select the main highlight shape and change the fill color to a darker
shade of green; then make it a little thinner by dragging the
bounding box with the Selection Tool (V).

While
this shape stays selected, grab the Knife and cut the shape following
the right side of the mouth; then move the end points up to the black
outline of the mouth as shown in the close-up (2).

how to adjust the Pickle Rick pattern brush

10. How
to Save the Pickle Rick Pattern Brush

Step
1

The process of saving this brush is the same as before. Select
the new pickle along with the blue rectangles and Rotate them 90
degrees
in the Transform panel. Make two copies of the pickle behind
so that we have a pickle for each rectangle (1).

Now,
select the pickle along with the first rectangle and press Crop in
the Pathfinder panel. You will obtain the start section of the
pattern brush, which is the head of Pickle Rick. Drag it into the
Swatches panel to save it (2).

Follow
the same technique and cut the side section (3) and the end section
of the brush as you did for the first pattern brush earlier in the
tutorial (4).

how to create the start side and end sections of Pickle Rick illustrator brush

Step
2

Select
and drag the middle section of the pickle into the Brushes panel to
save it as a New Pattern Brush. Type a name for the brush and notice
that the middle section already appears under the Side Tile (1).

As
the Start Tile (2), select New Pattern Swatch 3 from the drop-down
options, which is the head of Pickle Rick saved earlier.

As
the End Tile (3) select New Pattern Swatch 4, and as the Inner
Corner Tile
(4) select Auto-Centered from the options available. Hit
OK to save the Pickle Rick Pattern Brush in the Brushes panel.

how to save the Pickle Rick brush in Illustrator

Step
3

Let’s
test it by applying it to a random path drawn with the Pen Tool (P)
or the Paintbrush Tool (B). Looks great!

how to use the Pickle Rick illustrator brush

11. How
to Create the Pickle Text Effect

Step
1

Now that we have the two Illustrator brushes already saved, here is how to make the text effect quickly and easily. 

Use
the Pen Tool (P) or the Pencil Tool (N) to draw paths as letters and compose the
word “PICKLE”. Stroke all of them with the Pickle Pattern Brush
and keep the Stroke Weight at 1 pt. Drag two guide lines above and
under the text effect to make sure the letters are about the same
height, making small adjustments if needed.

how to create the pickle text effect

Step
2

Replace
one (or more) of the strokes with the Pickle Rick Pattern Brush to make this
text effect more fun.

how to create the Pickle Rick letter of the text effect

Step
3

As
an extra touch, you can add a small stem to the pickle letters. Draw
the shape of the stem and color it with the same green as the pickle’s body. Also apply a
2 pt black Stroke using Width Profile 6 in order to maintain the
same outlined style.

The
stem could be a part of the pattern brush if you include it in the
Start Tile before saving it, but then all the stroked paths will have
the same stem, and this is not the look we want for the text effect.
In this case, the two stems are just extra additions.

how to add stems on the pickle text effect

Congratulations!
You’re Done

Here
is the final image of the pickle text effect with the face of Pickle Rick as a creative addition. I hope this tutorial was
fun for you and that you learned some new things today. Now you have the
knowledge to make other creative Adobe Illustrator brushes and use
them in your projects.

Don’t
forget to share your recreation of this pickle text effect
with us.
We would love to see it.

final image of pickle text effect using pattern brushes in Adobe Illustrator

Expand
Your Text-Effect Designing Skills!

Keep
drawing and learning with these recommended tutorials:

How to Make a Pickle Pattern Brush in Illustrator

Post pobrano z: How to Make a Pickle Pattern Brush in Illustrator

Final product image
What You’ll Be Creating

Always
wanted to create a brush, but never knew exactly how to do it?

Well,
if you love unique creative brushes and you want to learn how to make
a brush in Illustrator, then this tutorial is perfect for you. It will take you through the entire process of drawing, saving, and
applying the brush.

You
will learn how to create a pickle brush and how to save it correctly
as a new pattern brush by following a few tips and tricks that you will
be able to apply to other Adobe Illustrator brushes as well.

And
if you are a fan of the Rick and Morty animated series, we will give
this text effect a unique twist by creating a Pickle Rick Pattern
Brush as well. Both brushes are easy to use, and this fun text effect
will be ready in no time. If you are excited about this, then let’s
start!

Expand
your brushes library by going to GraphicRiver, where you’ll find a great
selection of brushes in various styles, shapes, and themes. Also,
check out the text effects section, where you’ll find plenty of
inspiration and resources for your projects.

1. How
to Open a New Document 

Launch
Illustrator
and
go to
File
> New
to
open a blank document. Type a name for your file, set the
dimensions, and then select
Pixels
as
Units
and
RGB
as
Color
Mode
.

Next,
go to
Edit
> Preferences > General
and
set the
Keyboard
Increment
to
1
px
and,
while there, go to
Units
to
make sure they are set as in the following image. I usually work with
these settings, and they will help you throughout the drawing process.

how to open a new illustrator document

2. How
to Create the Basic Pickle Shape

Step
1

Grab
the Rectangle Tool (M), click on your artboard, and enter 44 x 132 px
as the dimensions of the rectangle. Color it with green.

Keep
this shape selected and go to the Transform panel. Enter 20 px in all
four Corner Radius fields in order to create the rounded corners.

how to create the basic shape of the pickle pattern brush

Step
2

Copy
and
Paste
in Front (Control-F)

the rounded rectangle to get a copy of it (the gray shape), and then
move it 7 px to the right by pressing the Right Arrow key on your
keyboard seven times.

Copy
and
Paste
in Front (Control-F)

the green rounded rectangle again to make another copy. Keep this
copy selected along with the gray copy and press Minus Front on the
Pathfinder panel. Color the shape obtained with a darker shade of
green, and this will be the shadow on the left side of the pickle.

how to create the shadow of the pickle pattern brush

Step
3

Now,
we will add a few bumps to create that recognizable pic
kle
look. Use the Pen Tool (P) to draw a few semicircle shapes on the
edges of the pickle. Make them of different sizes to ensure a more
realistic result for the final Illustrator brush (1).

Now,
select only the pink shapes on the upper right side along with the
green rounded rectangle and press Unite in the Pathfinder panel. I
will name the resulting shape “pickle body” (2).

After
that, select the blue shapes on the left side along with the shadow,
and press Unite on the Pathfinder panel again. I will name the newly
obtained shape “pickle shadow” (3).

how to create bumps on the pickle pattern brush

Step
4

Select
the two shapes obtained in the previous step and then Copy and
Paste
in Front (Control-F)

to make copies of them. Press Unite in the Pathfinder panel to merge
them, and you will get a new pickle shape. Give it a 1 pt
Stroke
using black and select the Round Join option in the Stroke
panel. I will name this shape “pickle outline”.

how to create the outline of the pickle pattern brush

Step
5

Next,
take the Pen Tool (P) and draw two curved paths at the top of the
pickle as creases. Give them a 1 pt Stroke using black and Width
Profile 4
in the Stroke panel.

Do
the same thing at the bottom of the pickle and apply the same
settings.

how to create creases on the pickle pattern brush

Step
6

Now,
focus on one of the bumps and use the Pen Tool (P) to draw two short
paths as shown in the close-up. Give them a 1 pt Stroke using black
and Width Profile 4 in the Stroke panel.

Do
the same thing for the other bumps in order to add details, but not
necessarily for all of them.

how to add detail lines on the pickle pattern brush

3. How
to Define the Sections of the Pattern Illustrator Brush

Step
1

Creating a brush in Illustrator, especially pattern brushes, can be
easy if you take into consideration the three sections that define a pattern brush: the start, the side, and the end. If we do this ahead of time
and not just at the end, we make the process of saving the brush pain-free once we get to that stage, and we’re less likely to make
mistakes.

Take
the Rectangle Tool (M) and draw an 80 x 136 px rectangle which will
cover the pickle entirely. Leave a little more space on the left side
of the pickle for the shadow. With the rectangle still selected, go
to Object > Path > Split Into Grid and choose 3 Rows. Hit OK
and the rectangle will be divided into three equal parts.

how to create the sections of the illustrator brush

Step
2

Notice
how the separation between the start and the side of the pattern brush
goes through one of the bumps. We don’t want this. It is better to
cut the brush sections between the bumps where the pickle is
straight.

Use
the Direct Selection Tool (A) to select only the points indicated and
move them upwards, right above the bump (2).

Select
the other points indicated and move them a little downwards in order
to make the start and end sections of the brush of about the
same size (3). The side of the brush (the middle part) will be
longer.

how to adjust the sections of the illustrator brush

4. How
to Add Details to the Pickle Pattern Brush

Step
1

Use
the Pen Tool (P) to draw a path
on the right
side of the pickle,
as shown in the image below. Give it a 3 pt Stroke using a lighter shade of
green and Width Profile 6 in the Stroke panel. This will create a
main highlight on the pickle.

how to add highlight on the pickle pattern brush

Step
2

Let’s
add more details. Use the Pen Tool (P) or the Pencil Tool (N) to draw
four random ellipses on the pickle. It’s better to not place them on
the blue lines but only inside the start, side, and end sections of
the brush. Fill them with a slightly darker shade of green and apply a
1 pt black Stroke using Width Profile 6 in the Stroke panel. Two
of the ellipses have no fill color, just the black stroke applied.

how to add bump details on pickle pattern brush

Step
3

Still
using the Pen Tool (P) or the Pencil Tool (N), draw a bunch of random
curved paths on the pickle. Give them a 0.5 pt and 0.75 pt Stroke
using black and Width Profile 1 in the Stroke panel.

how to add extra details on the pickle pattern brush

Step
4

Zoom
in on one of the paths that you drew in the previous step and draw
a shorter path inside it. Give it a 0.5 pt Stroke using a lighter
shade of green and Width Profile 1 in the Stroke panel.

Repeat
the same thing for two or three more paths in order to add little
highlights on the pickle.

how to add small highlights on the pickle pattern brush

Step
5

Next,
take the Ellipse Tool (L) and draw a few small ellipses of different
sizes in the middle of the pickle. Color them with a darker green
(1).

Draw
more ellipses on the right side of the pickle and color them with a
lighter green (2). You can see the result in the image below (3).

how to add small details on the pickle pattern brush

5. How
to Create the Shadow of the Pickle Pattern Brush

Step
1

Select
the “pickle outline” shape and then Copy and Paste in Place
(Shift-Control-V)
to make a copy of it. Select a black fill and
reduce the Opacity to 40%; then move it 1 px downward and 2 px to the
left using the Arrow Keys on your keyboard. Send this copy behind
everything by going to Object > Arrange > Send to Back
(Shift-Control-[)
(1).

Copy
and Paste in Back (Control-B) the first shadow shape to make another
copy. Move it 1 px downward and 2 px to the left using the Arrow keys
on the keyboard again. Keep the black fill color but reduce the
Opacity to 25% (2).

how to create the shadow of the pickle pattern brush

Step
2

Copy
and Paste in Back (Control-B) the second shadow shape to make a third
copy. Move it 1 px downwards and 2 px to the left; then change the
fill color to dark gray and reduce the Opacity to 15% (3).

Let’s do this one more time. Make a fourth copy of the shadow shape, and this time move it 1 px to the left. Keep the gray fill color but
reduce the Opacity to 5% (4).

how to create more shadow for the pickle pattern brush

Step
3

If
the shadow shapes go over the blue rectangle, use the Direct
Selection Tool (A)
to select only the corner points at the bottom and
move them downwards a little. The entire pickle must be inside the
blue sections.

how to adjust the end section of the illustrator brush

6. How
to Finalize the Pickle Pattern Brush

Step
1

We
are getting closer to saving the new Illustrator Pattern Brush, but we
need to prepare it first by expanding it and making some final adjustments.

Select all the stroked paths next to the outline of the pickle and go to
Object > Expand Appearance in order to turn the strokes into fills
(1). Now, select the “pickle outline” and go to Object >
Expand
to turn it into a black filled shape (2).

Keep
these resulting shapes selected and press Unite in the Pathfinder
panel, followed by Object > Compound Path > Make (Control-8).
This will merge all the shapes into one (3).

how to unite the outline of the pickle pattern brush

Step
2

Now,
select the main highlight path and go to Object > Expand
Appearance
. Do the same thing for all the detail paths on the pickle in
order to expand them, and we are ready to save this brush in Illustrator.

how to expand the details on the pickle pattern brush

7. How
to Save the Pickle Pattern Brush

Step
1

Before
you continue, make a copy of the entire pickle and keep it for later
use.

Illustrator brushes can be tricky to save and may require a few tries until you are happy with the result, but let me show you how easy it is to save this brush.

Select
everything on your artboard and Rotate 90 degrees in the Transform
panel. Group (Control-G) all the shapes that make up the pickle, and
then make two copies behind. You should have three pickles on top
of each other and three blue rectangles.

how to rotate the pickle pattern brush

Step
2

Select
one of the pickles along with the first rectangle and press Crop in
the Pathfinder panel. This will cut the pickle, and you will obtain
the start section of the pattern brush. Drag it into the Swatches
panel to save it (1).

Next,
select a copy of the pickle along with the middle rectangle and press
Crop again. This will cut the side section of the pattern brush for
us (2). You don’t need to save this one in the Swatches panel.

Select
the second copy of the pickle along with the last rectangle and press
Crop again. You will obtain the end section of the pattern brush.
Drag it into the Swatches panel to save it (3).

how to create the start side and end sections of the illustrator pattern brush

Step
3

Select
the middle section of the pickle and drag it into the Brushes panel
to save it as a New Pattern Brush. In the Pattern Brush Options window,
this section will automatically appear under the Side Tile (1). Type
a name for the brush, and let’s change some settings.

As
the Start Tile (2), select New Pattern Swatch 1 from the drop-down
options, which is the first section saved in the Swatches panel.

As
the End Tile (3), select New Pattern Swatch 2 from the drop-down
options, which is the last section of the pickle saved in the Swatches
panel.

Finally,
under Inner Corner Tile (4), select Auto-Centered. Hit OK and your new Illustrator brush is now saved and ready to use.

how to save the pickle pattern brush in Illustrator

Step
4

Let’s
test the newly saved brush. Use the Pen Tool (P) or the Paintbrush
Tool (B)
to draw any path on your artboard and give it a 1 pt Stroke
using the Pickle Pattern Brush from the Brushes panel. Fun, right?

how to use the pickle illustrator pattern brush

8. How
to Create the Face of Pickle Rick

Step
1

Pickle
Rick
is
the eccentric scientist Rick Sanchez from the famous animated series
Rick and Morty, who turns himself into a pickle just as he and his
family are about to attend a therapy session.

Let’s
start his face with the eyes. Use the Ellipse Tool (L) to draw two
circles of about 40 x 40 px and arrange them next to each other. Fill
them with the color indicated and also apply a 1 pt black Stroke.
While both circles stay selected, go to Effect > Distort &
Transform > Roughen
and apply the settings shown in order to
distort the shapes slightly.

how to create the eyes of Pickle Rick

Step
2

Still
using the Ellipse Tool (L), draw a tiny black circle in the center of
each eye as the pupils. Now, take the Pen Tool (P) and draw a curved
path under each eye followed by the nose path. Give them a 1 pt black
Stroke and select the Round Cap option in the Stroke panel.

how to create the nose of Pickle Rick

Step
3

Continue
to draw the shape of the mouth filled with dark green. Also apply a 1
pt
black Stroke and select the Align Stroke to Outside option in the
Stroke panel.

For the tooth, draw a V-like path but rounded at the tip. Give it a pale
green fill color and a 1 pt black Stroke. Follow the shape of the
mouth and draw similar paths next to each other to obtain the
top teeth. Draw and apply the same appearances for the bottom teeth
as well.

how to create the mouth of Pickle Rick

Step
4

Next,
draw the shape of the tongue on the right side of the mouth. Fill it
with the color indicated and apply a 1 pt black Stroke.

Select
the shape of the mouth and then Copy and Paste in Place
(Shift-Control-V)
to make a copy of it in front of everything. Set
this copy to stroke-none and fill-none. Keep this copy selected along
with the teeth and the tongue, and go to Object > Clipping Mask >
Make (Control-7)
.

how to create the tongue of Pickle Rick

Step
5

Use
the Pen Tool (P) to draw a curved path on each side of the mouth.
Give them a 1 pt black Stroke with the Round Cap option selected in
the Stroke panel (1).

Continue
to draw a C-like shape above the eyes. Give it a blue fill color and
a 1 pt black Stroke (2). The final thing to add is a random shape on
the upper left side filled with bright green (3).

how to create the forehead of Pickle Rick

9. How
to Create the Pickle Rick Pattern Brush

Step
1

First,
grab the copy of the pickle that I said to make earlier in the
tutorial (1) and start to remove some of the details on the top half in
order to create an empty area (2).

Now,
grab Rick’s face and go to Object > Expand Appearance followed
by Object > Expand to turn all strokes into fills. Group
(Control-G)
all the shapes that make up the face and scale it down
until it fits inside the empty area you just created (3).

When
you are happy with the placement of the face, select only the indicated points of the blue rectangles with the help of the Direct Selection Tool (A) and move
them downwards, until they’re under the mouth. The entire face must be inside
the start section of the brush (4).

how to create the Pickle Rick pattern brush

Step
2

Let’s
make a few adjustments, and then we are ready to save this pattern
brush next to the other Illustrator brushes.

Focus
on the shadow shape and use the Add Anchor Point Tool (+) to add
three extra points next to the mouth. Switch to the Direct Selection
Tool (A)
and modify the shadow a little by moving these points,
following the left side of the mouth (1).

Next,
select the main highlight shape and change the fill color to a darker
shade of green; then make it a little thinner by dragging the
bounding box with the Selection Tool (V).

While
this shape stays selected, grab the Knife and cut the shape following
the right side of the mouth; then move the end points up to the black
outline of the mouth as shown in the close-up (2).

how to adjust the Pickle Rick pattern brush

10. How
to Save the Pickle Rick Pattern Brush

Step
1

The process of saving this brush is the same as before. Select
the new pickle along with the blue rectangles and Rotate them 90
degrees
in the Transform panel. Make two copies of the pickle behind
so that we have a pickle for each rectangle (1).

Now,
select the pickle along with the first rectangle and press Crop in
the Pathfinder panel. You will obtain the start section of the
pattern brush, which is the head of Pickle Rick. Drag it into the
Swatches panel to save it (2).

Follow
the same technique and cut the side section (3) and the end section
of the brush as you did for the first pattern brush earlier in the
tutorial (4).

how to create the start side and end sections of Pickle Rick illustrator brush

Step
2

Select
and drag the middle section of the pickle into the Brushes panel to
save it as a New Pattern Brush. Type a name for the brush and notice
that the middle section already appears under the Side Tile (1).

As
the Start Tile (2), select New Pattern Swatch 3 from the drop-down
options, which is the head of Pickle Rick saved earlier.

As
the End Tile (3) select New Pattern Swatch 4, and as the Inner
Corner Tile
(4) select Auto-Centered from the options available. Hit
OK to save the Pickle Rick Pattern Brush in the Brushes panel.

how to save the Pickle Rick brush in Illustrator

Step
3

Let’s
test it by applying it to a random path drawn with the Pen Tool (P)
or the Paintbrush Tool (B). Looks great!

how to use the Pickle Rick illustrator brush

11. How
to Create the Pickle Text Effect

Step
1

Now that we have the two Illustrator brushes already saved, here is how to make the text effect quickly and easily. 

Use
the Pen Tool (P) or the Pencil Tool (N) to draw paths as letters and compose the
word “PICKLE”. Stroke all of them with the Pickle Pattern Brush
and keep the Stroke Weight at 1 pt. Drag two guide lines above and
under the text effect to make sure the letters are about the same
height, making small adjustments if needed.

how to create the pickle text effect

Step
2

Replace
one (or more) of the strokes with the Pickle Rick Pattern Brush to make this
text effect more fun.

how to create the Pickle Rick letter of the text effect

Step
3

As
an extra touch, you can add a small stem to the pickle letters. Draw
the shape of the stem and color it with the same green as the pickle’s body. Also apply a
2 pt black Stroke using Width Profile 6 in order to maintain the
same outlined style.

The
stem could be a part of the pattern brush if you include it in the
Start Tile before saving it, but then all the stroked paths will have
the same stem, and this is not the look we want for the text effect.
In this case, the two stems are just extra additions.

how to add stems on the pickle text effect

Congratulations!
You’re Done

Here
is the final image of the pickle text effect with the face of Pickle Rick as a creative addition. I hope this tutorial was
fun for you and that you learned some new things today. Now you have the
knowledge to make other creative Adobe Illustrator brushes and use
them in your projects.

Don’t
forget to share your recreation of this pickle text effect
with us.
We would love to see it.

final image of pickle text effect using pattern brushes in Adobe Illustrator

Expand
Your Text-Effect Designing Skills!

Keep
drawing and learning with these recommended tutorials:

How to Make an Architecture Portfolio Template in InDesign

Post pobrano z: How to Make an Architecture Portfolio Template in InDesign

Final product image
What You’ll Be Creating

In this tutorial, we’ll create a clean, stylish InDesign portfolio template, suitable for architectural work, with lots of emphasis on imagery and geometry. These concepts will also apply to a variety of brochure design scenarios. So grab your favorite portfolio pieces, and let’s dig right in.

What You Will Need

You will need the following assets in order to complete this project:

Now, let’s get started!

1. How to Start Our Project

Step 1

First, let’s start up a New Document. We’ll need to decide the orientation and dimensions of our portfolio template.

Portfolios are particularly fun to design, because you often have a lot of freedom to decide on the best way to feature your work. You might choose to go with something traditional, or maybe you’ll go with a square shape or even a long format. Consider your options and what might be the best way to present your work.

In this example, we’re going to work in a square format, 10″ Wide by 10″ High

Document Set Up

Step 2

Before we finalize our document setup, let’s address a few additional attributes. 

I set my Margins to 0.5″ on the Top, Bottom, and Outside. On the Inside, I set my Margins to 0.75″, just a little extra, to accommodate the space that may be lost between my pages. 

Document Set Up

Step 3

I also wanted to add a 0.125″ Bleed to my document.

If an image is „Full Bleed”, it generally means that the imagery/content goes to the edge of the page, without any border or „white space”. If we want something to be full bleed, we often have to extend our work to the bleed area, to allow for trimming when our work is printed and prepared.

Once you’re happy with your settings, click Create to accept and start up your document.

If you’ve made a mistake or you change your mind, don’t worry—you can always go back and change these settings via File > Document Setup

Document Set Up

2. How to Create Our Interior

Step 1

Let’s start creating our portfolio interior within a Master Page

Master Pages are often used as a template of sorts—we can apply elements that we lay out in our Master Pages to the Active Pages in our document.

Master Pages are located within the top portion of the Pages panel. If you don’t see the Pages panel, you can open it up via Window > Pages

Master Pages

Step 2

Go „inside” of A-Master, our first Master Page, by double-clicking on it. That’s where we’ll start laying out our composition. 

Portfolio pages essentially need to show off our work—there needs to be an emphasis on the portfolio piece itself. However, we also want to do so in a visually engaging and interesting way. 

Before I started placing imagery, I decided to „block out” my composition with gray rectangles, using the Rectangle Tool. The Fill is set to 25% gray. I find this to be a simple way to experiment with your composition or create a thumbnail.

Gray Rectangles

Step 3

Once I had some rectangles placed, I created Guides, based on my layout elements. To do so, Click and Drag from the Document Rulers at the sides of your document. 

These Guides are inspired by the gray rectangles I placed. 

Placing Guides

Step 4

Next, I started placing text based on the Guides I had created. Use the Text Tool to place text. 

Keep in mind the text that you’d want featured in your portfolio. It’s generally a good idea to have the title of the piece, the date it was created, and a description. You might also want an artist’s statement of some kind, to further explain your process or intention. 

Let’s start with our title. In terms of hierarchy, it should likely be the text with the most visual importance—so I’d like it to be rather large on the page. 

Adding the Title

Step 5

I decided to add supplemental text, under the title, using the Text Tool. This felt like a great place to have key information that the viewer would need to know right away—like a brief description of what it is and the date of creation.

Again, think about hierarchy. This is more supplemental type, so I made it smaller.

Adding Supplemental Type

Step 6

Now, let’s add two spaces for some more supplemental type—this could be a great place for additional comments, insights, or statements on the work. Again, use the Text Tool. I wanted this type to be the smallest, because it is meant to be the most supplemental—it’s our body copy. 

Adding Supplemental Type

Step 7

To push the aesthetic further, I decided to add some lines using the Line Tool. Note that they are inspired by the existing layout elements. 

The Guides, in the example below, have been Hidden (via View > Grids and Guides > Hide Guides) so it’s easier to see the lines. 

Adding Lines

Step 8

The footer area could include any supplemental information you like. In the case of my composition, I decided I wanted to stick with page numbers. 

To insert page numbers, first create a Text Box using the Text Tool

Then, go to Type > Insert Special Character > Markers > Current Page Number

You’ll notice that they read „A”—this is OK! Remember, we’re working in A-Master, a Master Page, so that technically is the page number. 

I decided to make my page numbers large, but a light gray, so their low contrast helps keep them supplemental in the hierarchy. 

Inserting Page Numbers

Step 9

Finally, let’s insert some imagery. Select the Rectangle Frame that you want to place your imagery into. Then, go to File > Place, and select your image. 

Double-click on the Rectangle Frame to toggle between selecting the frame itself and the contents inside it. You’ll know you’ve selected the contents when the border around it is in red. 

Resize and adjust your imagery until you’re happy with how it’s cropped.

Inserting Images

Step 10

Repeat this process for your other rectangle frames. You could use these spaces for close-ups or other shots of your work.

Inserting Imagery

3. How to Apply Our Master Pages

Step 1

Now that we’ve created a layout within a Master Page, let’s apply our Master Pages to our Active Pages.

First, Create New Pages. Let’s make sure we have three pages in our Pages panel. Click on the New Page icon in the Pages panel to create a new page.

Creating New Pages

Step 2

Notice that your pages have an „A” Icon on them. This means they are derived from our A-Master Page.

To further illustrate this idea, select the first page in your document. Then Select [None] in your list of Master Pages and drag it to your active page. You’ll notice that it goes blank—because, now, it isn’t derived from any Master Page. 

Applying Master Pages

Step 3

Let’s go to Page 2 and 3 of our document. You’ll notice that these two pages are derived from A-Master Page

However, when you try to click on parts of your layout, nothing will happen. It’s all locked up. 

To make edits locally, within individual pages, hold down Shift-Command (on Mac) or Shift-Control (on PC) while clicking on an element of your layout. This will make it editable. 

Selecting Content

Step 4

Let’s test this premise out by inserting new portfolio imagery into pages 4 and 5 of our portfolio.

First, create two New Pages.

Creating New Pages

Step 5

Then, select the image areas by holding down Shift-Command (on Mac) or Shift-Control (on PC) while clicking. 

Double-Click to select the contents of the Rectangle Frame and Delete it.

Remember, we’re deleting the contents here—not the frame itself! 

Deleting Contents

Step 6

Now, let’s insert our imagery. Select the rectangular frame. Go to File > Place, and then select your image file. 

Now, you should have a new image in this rectangular frame—the one from our template has been replaced.

Adding Imagery

Step 7

Repeat this process in the other image areas in your layout. You could use the same image, close-up shots, or a different, applicable supplement here. Again, it’s up to you and what’s best for your portfolio presentation.

Adding Imagery

4. How to Create a Cover

Step 1

Now that we’ve created our interior pages and practiced editing them for different portfolio pieces, let’s make a cover for our work. 

Before we begin, just a note—make sure to ask your printer about any questions or file requirements that might apply to your project. For example, your cover will vary from your interior, as it has a spine. Adapt your composition as needed.

Let’s start by creating a New Master Page. It should be called B-Master, and it will likely appear as a two-page spread by default. 

New Master Page

Step 2

Delete one of the pages in B-Master, so you’re left with a one-page spread. This is going to be our front cover.

I wanted the front cover to feature some compelling imagery. A cover often has to compel the reader to open the book up—so it’s time to shine!

Place the imagery by going File > Place. Adjust the rectangle frame and Crop your work as desired.

Placing Imagery

Step 3

Then, I added a rectangle frame on top of the imagery with a White Fill

To add transparency, select the rectangle frame and Right Click (on PC) or Control Click (on Mac). From the resulting dropdown menu, select Effects > Transparency.

I set my Transparency to 90%.

Image Transparency

Step 4

Next, I added some type using the Text Tool and a line using the Line Tool

You could place any type here that you find most appropriate—but feel free to follow my example on this! Remember, there’s no wrong answer—you know what’s best for your work! This is your time to shine.

Adding Text

Step 5

I decided I wanted the back cover to be more supplemental. 

Create another New Master Page for the back cover. This one will be called C-Master.

Again, delete one of the pages in C-Master, so we have a one-page spread.

New Master Page

Step 6

Since this is the back of the booklet, I placed an image but left it small, and reused the contact info from the front cover, using the Text Tool

My goal was to create something supplemental yet uniform with the rest of the book.

Adding Supplemental Elements

Step 7

Now, just like with our other Master Pages, we can apply B-Master and C-Master by clicking and dragging them to an active page.

Create a New Page, so our document ends with Page 6.

Page 1 and Page 6 are single pages—apply the front and back cover to these pages.

Example of Applied Pages

5. How to Use Your Template

Step 1

Now that we’re wrapping up our template, how do we use it? 

You could save your work as an InDesign File (or indd file), but you could also save it as an InDesign Template file (or indt file)

When you go to save your work (by going File > Save), you can find these options under Format

Saving your Work

Step 2

What’s the difference? Unlike a „standard” InDesign file, an InDesign Template file can either be opened as an „original” (where you edit the template itself) or as a copy—where a new, untitled document is opened, based on your template. 

See how that could come in handy?

Opening a Template

And There You Have It!

Thanks so much for joining me on this InDesign portfolio walkthrough! Hopefully, you have some extra insight into how to create a portfolio or how to make a brochure design. I hope you found these techniques helpful—good luck with your portfolio, and your creative projects!

Example of Final Project

Looking for some extra inspiration, or even some extra help? Check out these InDesign templates—they’re ready to go, and they could make a great addition to anyone’s collection. Brochure templates can prove to be really versatile, too!

Architecture Portfolio Template InDesign

With 20 different pages, this InDesign template is not only a great fit for architectural work—its clean design could work for a multitude of varied projects, from illustration to graphic design. Check it out!

Architecture Portfolio Brochure InDesign

InDesign Architecture Magazine Template

This beautiful, stylish magazine layout could be easily adapted for your portfolio or other print project. If you’re looking for layout inspiration or a jump start on your project, this could fit the bill. 

InDesign Architecture Magazine Template

Portfolio Template InDesign

I love the long, horizontal orientation featured in this portfolio booklet. There’s so much space here to showcase your work in a clean and well-organized way. As far as InDesign brochure templates go, this one is a winner.

Portfolio Template InDesign

Architecture InDesign Brochure Template 

Warm colors, transparencies, and clean design—this template is ready to use. Just drop in your content, and you’re ready to go—or use it as a springboard for a new take on this composition. 

Architecture InDesign Brochure

InDesign Portfolio Template

I love all the negative space in this portfolio design! It’s a classy, timeless look that would suit almost any kind of work—architectural or not! It’s large format, at 8.5″ x 11″, and includes 16 different pages. 

InDesign Portfolio Template

If you enjoyed this tutorial, here are some others to check out!