Archiwum kategorii: Web Tools

50 Awesome Photo Effect Tutorials

Post pobrano z: 50 Awesome Photo Effect Tutorials

Photoshop is clearly our favorite photo editing software. In this article, we have listed 50 best Photoshop tutorial effects that will show you how to perform a wide range of tasks including age progression, Instagram-like effects, lomo effects, and light leaks, as well as vintage and retro effects that you can use to help improve your photo editing workflow. 

If you’re looking for a quick way to make pro photo effects, then browse through our premium Photoshop Photo Effects and Photoshop Actions, which can be purchased on GraphicRiver. There are thousands of creative options to choose from. Or find an expert designer on Envato Studio to customize graphics for you.

Now, let’s take a look at these free photo effect tutorials!

50 Best Photoshop Effects Tutorials


Learn how to do just about anything to your photos. From double exposure effects to cut-outs and so much more, dive into these amazing tutorials created just for you from Envato Tuts+.

10 Premium Photo Effects From Envato Market

The tutorials above cover a wide range of effects you can achieve through practice and persistence. But if you’re short on time, you can always turn to the amazing selection of Photoshop Actions on GraphicRiver and Envato Elements for more awesome photo effects.

Here we have a collection of ten premium Photoshop actions guaranteed to transform your photos in a few short clicks. Enjoy!

25 HDR Photo FX V.2 – Photoshop Action

HDR or High-Dynamic Range photography is an incredible technique that results in powerful imagery. And you can achieve the look of pristine HDR photography with this Photoshop action. Included in this package are 25 adjustable effects, four sharpness levels, and even a starburst generator action as a bonus!

25 HDR Photo FX V2 - Photoshop Action

Realistic Painting Effect V2 – Painting Action

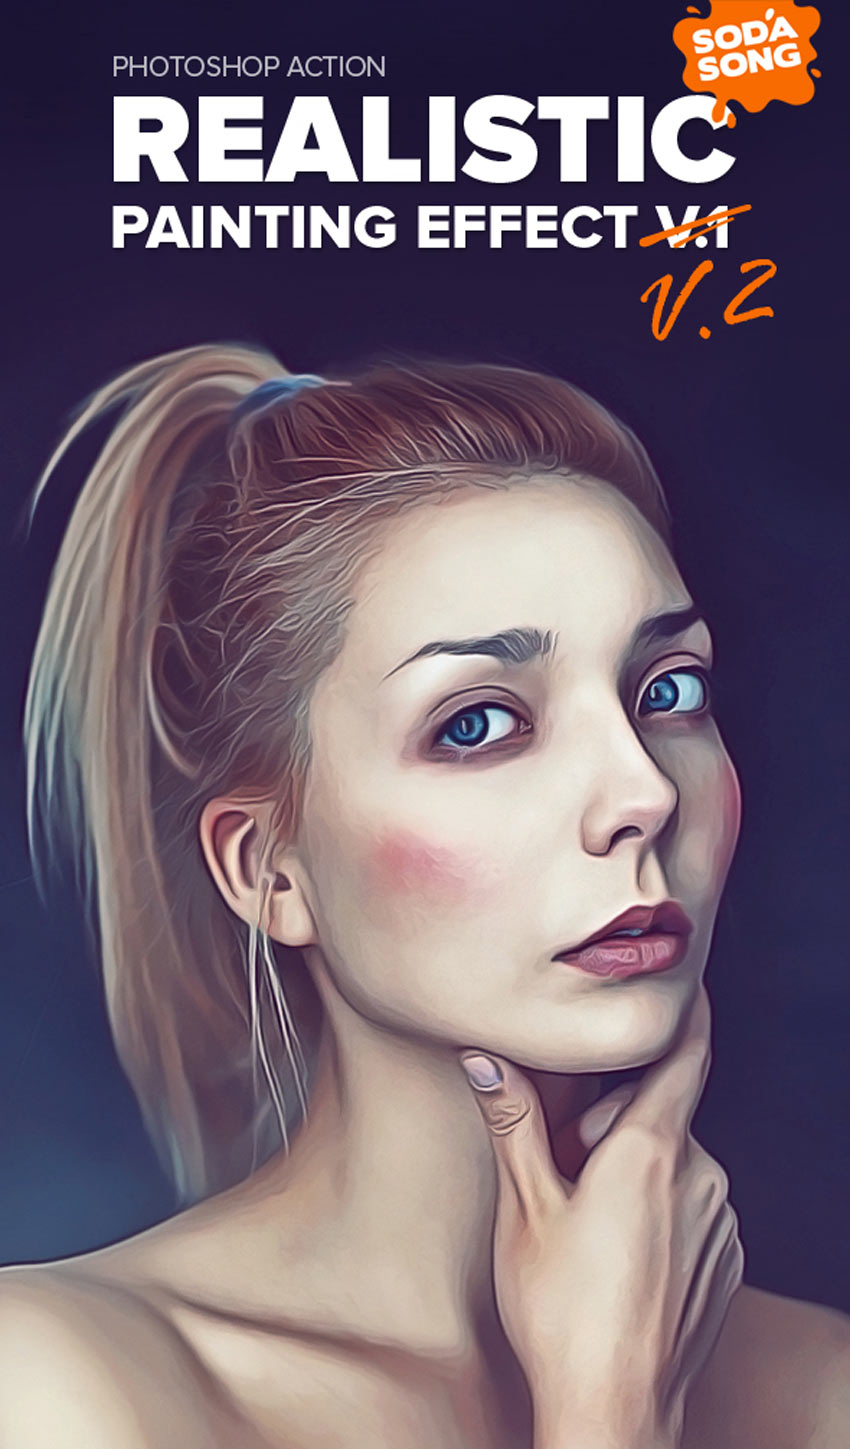
Get artsy with this realistic painting effect. Designed to simulate the look of traditional oil paintings, this set includes three Photoshop actions, fully editable layers, and 15 different color presets. Explore your creative side with just a few simple clicks!
Realistic Painting Effect V2 - Painting Action

90 Premium Actions Set

You can never have enough Photoshop actions! And with this set of amazing premium actions, you can download 90 different looks. This package comes complete with retro-vintage effects, stunning black and white results, and so much more!

90 Premium Actions Set

Cosmic Photoshop Action

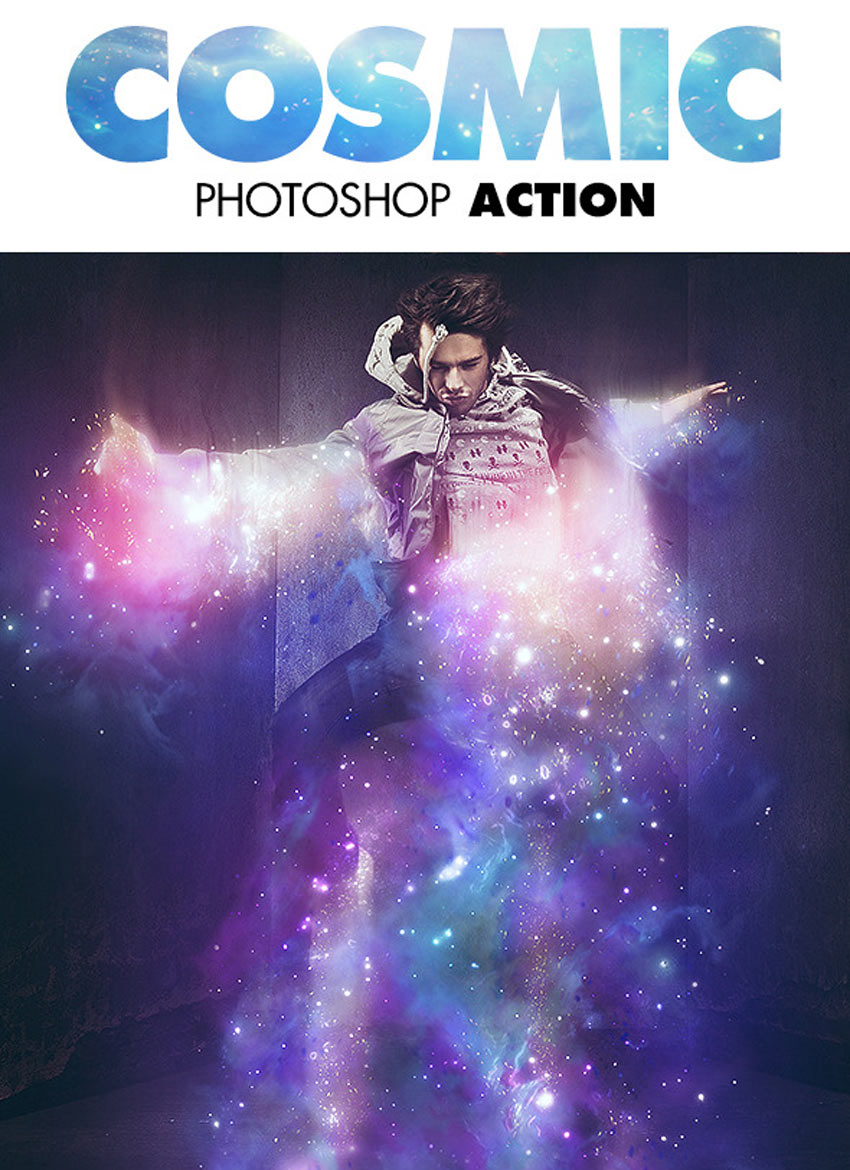
Explore the wonders of the universe with this spacey photo effect. With ten incredible color looks included, simply brush over the area you would like to apply the effect and press play. Enjoy this amazing cosmic effect in only a matter of seconds!
Cosmic Photoshop Action

Soft Focus 2 Photoshop Action

Create a legendary photo effect with this soft focus action. It has well-organized layers and simple instructions, and you’ll even find a video tutorial included for additional help. Download this action to gain access to this professional lighting effect.

Soft Focus 2 Photoshop Action

Noire Photoshop Actions Vol 1

Looking for a cinematic photo effect? Well, you can turn your photo into a glamorous movie-style image with this noir-inspired Photoshop action. This package features 12 Photoshop actions along with helpful instructions and fully adjustable effects.

Noire Photoshop Actions Vol 1

Dimension Photoshop Action

Explode your photos into a million pieces with just a few simple clicks! This incredible package includes eight different glass patterns that can be scaled to various sizes, along with ten color options for even more variety.

Dimension Photoshop Action

Matte & Faded Photoshop Actions

Love the look of vintage photography? Explore that matte and faded style with this stunning action set. This set includes 17 amazing Photoshop actions that come in a variety of subdued and faded effects. Get that professional retro look you’ll love in almost no time at all!

Matte  Faded Photoshop Actions

Fury Photoshop Action

If you’re feeling furious then you might want to express it with a powerful Photoshop action. Simply brush over the area where you would like to apply the effect and press play! It’s just that simple! Download this package to gain access to this action and additional instructional materials.

Fury Photoshop Action

Advanced Double Exposure – Photoshop Action

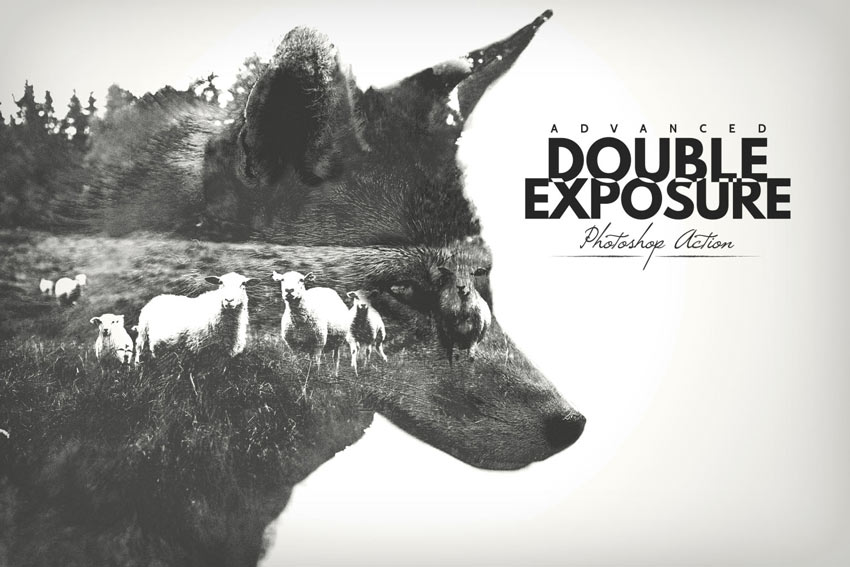
Double exposure photography is a super trendy technique that merges two photos together for an amazing effect. And you can achieve an advanced level of manipulation with this incredible Photoshop action. With 18 color presets included, the effects are outstanding and truly limitless.
Advanced Double Exposure - Photoshop Action

Conclusion

Want to see more photo effects? Browse the incredible collection of Photoshop Actions designed to transform your photos through GraphicRiver and Envato Elements.

And for even more design help, enlist the help of the wonderful folks at Envato Studio to fulfill your photo effect needs!

50 Awesome Photo Effect Tutorials

Post pobrano z: 50 Awesome Photo Effect Tutorials

Photoshop is clearly our favorite photo editing software. In this article, we have listed 50 best Photoshop tutorial effects that will show you how to perform a wide range of tasks including age progression, Instagram-like effects, lomo effects, and light leaks, as well as vintage and retro effects that you can use to help improve your photo editing workflow. 

If you’re looking for a quick way to make pro photo effects, then browse through our premium Photoshop Photo Effects and Photoshop Actions, which can be purchased on GraphicRiver. There are thousands of creative options to choose from. Or find an expert designer on Envato Studio to customize graphics for you.

Now, let’s take a look at these free photo effect tutorials!

50 Best Photoshop Effects Tutorials


Learn how to do just about anything to your photos. From double exposure effects to cut-outs and so much more, dive into these amazing tutorials created just for you from Envato Tuts+.

10 Premium Photo Effects From Envato Market

The tutorials above cover a wide range of effects you can achieve through practice and persistence. But if you’re short on time, you can always turn to the amazing selection of Photoshop Actions on GraphicRiver and Envato Elements for more awesome photo effects.

Here we have a collection of ten premium Photoshop actions guaranteed to transform your photos in a few short clicks. Enjoy!

25 HDR Photo FX V.2 – Photoshop Action

HDR or High-Dynamic Range photography is an incredible technique that results in powerful imagery. And you can achieve the look of pristine HDR photography with this Photoshop action. Included in this package are 25 adjustable effects, four sharpness levels, and even a starburst generator action as a bonus!

25 HDR Photo FX V2 - Photoshop Action

Realistic Painting Effect V2 – Painting Action

Get artsy with this realistic painting effect. Designed to simulate the look of traditional oil paintings, this set includes three Photoshop actions, fully editable layers, and 15 different color presets. Explore your creative side with just a few simple clicks!

Realistic Painting Effect V2 - Painting Action

90 Premium Actions Set

You can never have enough Photoshop actions! And with this set of amazing premium actions, you can download 90 different looks. This package comes complete with retro-vintage effects, stunning black and white results, and so much more!

90 Premium Actions Set

Cosmic Photoshop Action

Explore the wonders of the universe with this spacey photo effect. With ten incredible color looks included, simply brush over the area you would like to apply the effect and press play. Enjoy this amazing cosmic effect in only a matter of seconds!

Cosmic Photoshop Action

Soft Focus 2 Photoshop Action

Create a legendary photo effect with this soft focus action. It has well-organized layers and simple instructions, and you’ll even find a video tutorial included for additional help. Download this action to gain access to this professional lighting effect.

Soft Focus 2 Photoshop Action

Noire Photoshop Actions Vol 1

Looking for a cinematic photo effect? Well, you can turn your photo into a glamorous movie-style image with this noir-inspired Photoshop action. This package features 12 Photoshop actions along with helpful instructions and fully adjustable effects.

Noire Photoshop Actions Vol 1

Dimension Photoshop Action

Explode your photos into a million pieces with just a few simple clicks! This incredible package includes eight different glass patterns that can be scaled to various sizes, along with ten color options for even more variety.

Dimension Photoshop Action

Matte & Faded Photoshop Actions

Love the look of vintage photography? Explore that matte and faded style with this stunning action set. This set includes 17 amazing Photoshop actions that come in a variety of subdued and faded effects. Get that professional retro look you’ll love in almost no time at all!

Matte  Faded Photoshop Actions

Fury Photoshop Action

If you’re feeling furious then you might want to express it with a powerful Photoshop action. Simply brush over the area where you would like to apply the effect and press play! It’s just that simple! Download this package to gain access to this action and additional instructional materials.

Fury Photoshop Action

Advanced Double Exposure – Photoshop Action

Double exposure photography is a super trendy technique that merges two photos together for an amazing effect. And you can achieve an advanced level of manipulation with this incredible Photoshop action. With 18 color presets included, the effects are outstanding and truly limitless.

Advanced Double Exposure - Photoshop Action

Conclusion

Want to see more photo effects? Browse the incredible collection of Photoshop Actions designed to transform your photos through GraphicRiver and Envato Elements.

And for even more design help, enlist the help of the wonderful folks at Envato Studio to fulfill your photo effect needs!

50 Awesome Photo Effect Tutorials

Post pobrano z: 50 Awesome Photo Effect Tutorials

Photoshop is clearly our favorite photo editing software. In this article, we have listed 50 best Photoshop tutorial effects that will show you how to perform a wide range of tasks including age progression, Instagram-like effects, lomo effects, and light leaks, as well as vintage and retro effects that you can use to help improve your photo editing workflow. 

If you’re looking for a quick way to make pro photo effects, then browse through our premium Photoshop Photo Effects and Photoshop Actions, which can be purchased on GraphicRiver. There are thousands of creative options to choose from. Or find an expert designer on Envato Studio to customize graphics for you.

Now, let’s take a look at these free photo effect tutorials!

50 Best Photoshop Effects Tutorials


Learn how to do just about anything to your photos. From double exposure effects to cut-outs and so much more, dive into these amazing tutorials created just for you from Envato Tuts+.

10 Premium Photo Effects From Envato Market

The tutorials above cover a wide range of effects you can achieve through practice and persistence. But if you’re short on time, you can always turn to the amazing selection of Photoshop Actions on GraphicRiver and Envato Elements for more awesome photo effects.

Here we have a collection of ten premium Photoshop actions guaranteed to transform your photos in a few short clicks. Enjoy!

25 HDR Photo FX V.2 – Photoshop Action

HDR or High-Dynamic Range photography is an incredible technique that results in powerful imagery. And you can achieve the look of pristine HDR photography with this Photoshop action. Included in this package are 25 adjustable effects, four sharpness levels, and even a starburst generator action as a bonus!

25 HDR Photo FX V2 - Photoshop Action

Realistic Painting Effect V2 – Painting Action

Get artsy with this realistic painting effect. Designed to simulate the look of traditional oil paintings, this set includes three Photoshop actions, fully editable layers, and 15 different color presets. Explore your creative side with just a few simple clicks!

Realistic Painting Effect V2 - Painting Action

90 Premium Actions Set

You can never have enough Photoshop actions! And with this set of amazing premium actions, you can download 90 different looks. This package comes complete with retro-vintage effects, stunning black and white results, and so much more!

90 Premium Actions Set

Cosmic Photoshop Action

Explore the wonders of the universe with this spacey photo effect. With ten incredible color looks included, simply brush over the area you would like to apply the effect and press play. Enjoy this amazing cosmic effect in only a matter of seconds!

Cosmic Photoshop Action

Soft Focus 2 Photoshop Action

Create a legendary photo effect with this soft focus action. It has well-organized layers and simple instructions, and you’ll even find a video tutorial included for additional help. Download this action to gain access to this professional lighting effect.

Soft Focus 2 Photoshop Action

Noire Photoshop Actions Vol 1

Looking for a cinematic photo effect? Well, you can turn your photo into a glamorous movie-style image with this noir-inspired Photoshop action. This package features 12 Photoshop actions along with helpful instructions and fully adjustable effects.

Noire Photoshop Actions Vol 1

Dimension Photoshop Action

Explode your photos into a million pieces with just a few simple clicks! This incredible package includes eight different glass patterns that can be scaled to various sizes, along with ten color options for even more variety.

Dimension Photoshop Action

Matte & Faded Photoshop Actions

Love the look of vintage photography? Explore that matte and faded style with this stunning action set. This set includes 17 amazing Photoshop actions that come in a variety of subdued and faded effects. Get that professional retro look you’ll love in almost no time at all!

Matte  Faded Photoshop Actions

Fury Photoshop Action

If you’re feeling furious then you might want to express it with a powerful Photoshop action. Simply brush over the area where you would like to apply the effect and press play! It’s just that simple! Download this package to gain access to this action and additional instructional materials.

Fury Photoshop Action

Advanced Double Exposure – Photoshop Action

Double exposure photography is a super trendy technique that merges two photos together for an amazing effect. And you can achieve an advanced level of manipulation with this incredible Photoshop action. With 18 color presets included, the effects are outstanding and truly limitless.

Advanced Double Exposure - Photoshop Action

Conclusion

Want to see more photo effects? Browse the incredible collection of Photoshop Actions designed to transform your photos through GraphicRiver and Envato Elements.

And for even more design help, enlist the help of the wonderful folks at Envato Studio to fulfill your photo effect needs!

50 Awesome Photo Effect Tutorials

Post pobrano z: 50 Awesome Photo Effect Tutorials

Photoshop is clearly our favorite photo editing software. In this article, we have listed 50 best Photoshop tutorial effects that will show you how to perform a wide range of tasks including age progression, Instagram-like effects, lomo effects, and light leaks, as well as vintage and retro effects that you can use to help improve your photo editing workflow. 

If you’re looking for a quick way to make pro photo effects, then browse through our premium Photoshop Photo Effects and Photoshop Actions, which can be purchased on GraphicRiver. There are thousands of creative options to choose from. Or find an expert designer on Envato Studio to customize graphics for you.

Now, let’s take a look at these free photo effect tutorials!

50 Best Photoshop Effects Tutorials


Learn how to do just about anything to your photos. From double exposure effects to cut-outs and so much more, dive into these amazing tutorials created just for you from Envato Tuts+.

10 Premium Photo Effects From Envato Market

The tutorials above cover a wide range of effects you can achieve through practice and persistence. But if you’re short on time, you can always turn to the amazing selection of Photoshop Actions on GraphicRiver and Envato Elements for more awesome photo effects.

Here we have a collection of ten premium Photoshop actions guaranteed to transform your photos in a few short clicks. Enjoy!

25 HDR Photo FX V.2 – Photoshop Action

HDR or High-Dynamic Range photography is an incredible technique that results in powerful imagery. And you can achieve the look of pristine HDR photography with this Photoshop action. Included in this package are 25 adjustable effects, four sharpness levels, and even a starburst generator action as a bonus!

25 HDR Photo FX V2 - Photoshop Action

Realistic Painting Effect V2 – Painting Action

Get artsy with this realistic painting effect. Designed to simulate the look of traditional oil paintings, this set includes three Photoshop actions, fully editable layers, and 15 different color presets. Explore your creative side with just a few simple clicks!

Realistic Painting Effect V2 - Painting Action

90 Premium Actions Set

You can never have enough Photoshop actions! And with this set of amazing premium actions, you can download 90 different looks. This package comes complete with retro-vintage effects, stunning black and white results, and so much more!

90 Premium Actions Set

Cosmic Photoshop Action

Explore the wonders of the universe with this spacey photo effect. With ten incredible color looks included, simply brush over the area you would like to apply the effect and press play. Enjoy this amazing cosmic effect in only a matter of seconds!

Cosmic Photoshop Action

Soft Focus 2 Photoshop Action

Create a legendary photo effect with this soft focus action. It has well-organized layers and simple instructions, and you’ll even find a video tutorial included for additional help. Download this action to gain access to this professional lighting effect.

Soft Focus 2 Photoshop Action

Noire Photoshop Actions Vol 1

Looking for a cinematic photo effect? Well, you can turn your photo into a glamorous movie-style image with this noir-inspired Photoshop action. This package features 12 Photoshop actions along with helpful instructions and fully adjustable effects.

Noire Photoshop Actions Vol 1

Dimension Photoshop Action

Explode your photos into a million pieces with just a few simple clicks! This incredible package includes eight different glass patterns that can be scaled to various sizes, along with ten color options for even more variety.

Dimension Photoshop Action

Matte & Faded Photoshop Actions

Love the look of vintage photography? Explore that matte and faded style with this stunning action set. This set includes 17 amazing Photoshop actions that come in a variety of subdued and faded effects. Get that professional retro look you’ll love in almost no time at all!

Matte  Faded Photoshop Actions

Fury Photoshop Action

If you’re feeling furious then you might want to express it with a powerful Photoshop action. Simply brush over the area where you would like to apply the effect and press play! It’s just that simple! Download this package to gain access to this action and additional instructional materials.

Fury Photoshop Action

Advanced Double Exposure – Photoshop Action

Double exposure photography is a super trendy technique that merges two photos together for an amazing effect. And you can achieve an advanced level of manipulation with this incredible Photoshop action. With 18 color presets included, the effects are outstanding and truly limitless.

Advanced Double Exposure - Photoshop Action

Conclusion

Want to see more photo effects? Browse the incredible collection of Photoshop Actions designed to transform your photos through GraphicRiver and Envato Elements.

And for even more design help, enlist the help of the wonderful folks at Envato Studio to fulfill your photo effect needs!

50 Awesome Photo Effect Tutorials

Post pobrano z: 50 Awesome Photo Effect Tutorials

Photoshop is clearly our favorite photo editing software. In this article, we have listed 50 best Photoshop tutorial effects that will show you how to perform a wide range of tasks including age progression, Instagram-like effects, lomo effects, and light leaks, as well as vintage and retro effects that you can use to help improve your photo editing workflow. 

If you’re looking for a quick way to make pro photo effects, then browse through our premium Photoshop Photo Effects and Photoshop Actions, which can be purchased on GraphicRiver. There are thousands of creative options to choose from. Or find an expert designer on Envato Studio to customize graphics for you.

Now, let’s take a look at these free photo effect tutorials!

50 Best Photoshop Effects Tutorials


Learn how to do just about anything to your photos. From double exposure effects to cut-outs and so much more, dive into these amazing tutorials created just for you from Envato Tuts+.

10 Premium Photo Effects From Envato Market

The tutorials above cover a wide range of effects you can achieve through practice and persistence. But if you’re short on time, you can always turn to the amazing selection of Photoshop Actions on GraphicRiver and Envato Elements for more awesome photo effects.

Here we have a collection of ten premium Photoshop actions guaranteed to transform your photos in a few short clicks. Enjoy!

25 HDR Photo FX V.2 – Photoshop Action

HDR or High-Dynamic Range photography is an incredible technique that results in powerful imagery. And you can achieve the look of pristine HDR photography with this Photoshop action. Included in this package are 25 adjustable effects, four sharpness levels, and even a starburst generator action as a bonus!

25 HDR Photo FX V2 - Photoshop Action

Realistic Painting Effect V2 – Painting Action

Get artsy with this realistic painting effect. Designed to simulate the look of traditional oil paintings, this set includes three Photoshop actions, fully editable layers, and 15 different color presets. Explore your creative side with just a few simple clicks!

Realistic Painting Effect V2 - Painting Action

90 Premium Actions Set

You can never have enough Photoshop actions! And with this set of amazing premium actions, you can download 90 different looks. This package comes complete with retro-vintage effects, stunning black and white results, and so much more!

90 Premium Actions Set

Cosmic Photoshop Action

Explore the wonders of the universe with this spacey photo effect. With ten incredible color looks included, simply brush over the area you would like to apply the effect and press play. Enjoy this amazing cosmic effect in only a matter of seconds!

Cosmic Photoshop Action

Soft Focus 2 Photoshop Action

Create a legendary photo effect with this soft focus action. It has well-organized layers and simple instructions, and you’ll even find a video tutorial included for additional help. Download this action to gain access to this professional lighting effect.

Soft Focus 2 Photoshop Action

Noire Photoshop Actions Vol 1

Looking for a cinematic photo effect? Well, you can turn your photo into a glamorous movie-style image with this noir-inspired Photoshop action. This package features 12 Photoshop actions along with helpful instructions and fully adjustable effects.

Noire Photoshop Actions Vol 1

Dimension Photoshop Action

Explode your photos into a million pieces with just a few simple clicks! This incredible package includes eight different glass patterns that can be scaled to various sizes, along with ten color options for even more variety.

Dimension Photoshop Action

Matte & Faded Photoshop Actions

Love the look of vintage photography? Explore that matte and faded style with this stunning action set. This set includes 17 amazing Photoshop actions that come in a variety of subdued and faded effects. Get that professional retro look you’ll love in almost no time at all!

Matte  Faded Photoshop Actions

Fury Photoshop Action

If you’re feeling furious then you might want to express it with a powerful Photoshop action. Simply brush over the area where you would like to apply the effect and press play! It’s just that simple! Download this package to gain access to this action and additional instructional materials.

Fury Photoshop Action

Advanced Double Exposure – Photoshop Action

Double exposure photography is a super trendy technique that merges two photos together for an amazing effect. And you can achieve an advanced level of manipulation with this incredible Photoshop action. With 18 color presets included, the effects are outstanding and truly limitless.

Advanced Double Exposure - Photoshop Action

Conclusion

Want to see more photo effects? Browse the incredible collection of Photoshop Actions designed to transform your photos through GraphicRiver and Envato Elements.

And for even more design help, enlist the help of the wonderful folks at Envato Studio to fulfill your photo effect needs!

Affinity Publisher: Your Guide to InDesign’s New Rival

Post pobrano z: Affinity Publisher: Your Guide to InDesign’s New Rival

Adobe InDesign has long been the market leader in publishing software. But rival layout design programs are starting to make waves in the market, with Affinity Publisher being the latest to offer a competitive alternative to InDesign.

affinity logo

If you’re a seasoned print designer or are looking to dip a toe into publishing design, you’ll want to read on to discover our assessment of Affinity Publisher and whether we think it’s a decent alternative to Adobe’s publishing giant.

Discover thousands of assets to use in your layout designs, from fonts to photos, over at Envato Elements and GraphicRiver.

What Is Affinity Publisher?

Affinity Publisher is a publishing program for Mac and Windows that allows you to create single- and multi-page documents. Publishing programs are suitable for creating layout-based media, which combine typography, graphics, and photos, such as magazines, brochures, flyers, and books. Most publishing programs allow users to create content for both print and online, as well as EPUBs (eBooks). 

affinity sample layout

Serif released the full version of Affinity in June 2019 (it had previously only been available in beta format). Fans of Affinity Photo and Affinity Designer, decent and good value alternatives to Adobe Photoshop and Illustrator, will find that Publisher makes a seamless and useful addition to their collection of Affinity apps. 

Through technology called StudioLink, Publisher can be integrated with Affinity’s other apps, Photo and Designer, allowing users to seamlessly create and edit images before integrating them into Publisher layouts. 

studiolink

What’s the Difference Between Affinity Publisher and Adobe InDesign?

For budget-conscious creatives, the main advantage of Affinity Publisher is that it’s excellent value, retailing at just £48.99 (around $64 and AU$87) for the single app download. Users aren’t tied into a subscription model, an irritant for some Adobe users. 

Publisher’s competitive price will make it a serious competitor on price point with Adobe, which offers InDesign CC at a subscription price only, with the single app costing users $19.99 a month. 

In terms of usability, Affinity Publisher owes a great deal to InDesign in terms of functionality and interface. Superficially, the differences between the two are minor, and it really comes down to which program you feel most comfortable with using. 

We took Affinity Publisher for a test drive to see how it compares to InDesign and how it functions as a publishing program. Read on to discover our thoughts on Publisher, and assess whether you should make the switch from InDesign.

What’s Good About Affinity Publisher?

It’s Adaptable for Modern Web Design

The latest release of InDesign CC has certainly improved the web and ePublishing design experience for users, with better capabilities for setting up web-friendly layouts and exporting to interactive formats. However, it appears that Affinity Publisher has put the modern web design process at the heart of its design. 

You can choose from a wide range of screen size options, which include all mass-market up-to-date devices. You can also choose to design specifically for Web or Devices, each of which contains a wide range of pre-saved formats to choose from, including an updated catalog of iPhone, Apple Watch, iPad, Nexus and Kindle screen sizes. 

screen sizes

It’s More Flexible Than InDesign… in Some Ways

Because InDesign is built on foundations which preceded web design, stemming from the technology developed by Quark for the first layout publishing program, QuarkXPress, it is still a traditional print publishing program at heart. 

Publisher by contrast, though inspired by the InDesign interface, doesn’t have the same historical legacy, and there are some features of the program which feel more relevant for how designers work now. 

One example is the ability to set a facing page document to begin on a left-hand page. Sure, this isn’t what you’d want to choose for a traditional multi-page document like a print book or magazine, but there are occasions where you might want to start your document with a two-page spread, like eMagazines or interactive PDFs, for example.

left page start

It’s Speedier and Lighter Than InDesign

One of the main complaints with InDesign is the processing power of the software. It’s a very heavy program, which can have an impact on usability, particularly if you’re working on a laptop rather than a desktop. Switching the Display Performance in InDesign to Fast Display can solve the problem, but it also means you have to do the bulk of your work while looking at heavily pixelated images. 

Publisher is a heavy program too, but it certainly doesn’t feel that way. It’s whippet-quick, even when I was trying it out on my ancient laptop, which struggles to open InDesign in less than 15 minutes. 

Images in Publisher remain crisp and clear, which helps you to assess the quality of images accurately while you work. 

image quality

An extra bonus—I had no issues with stalling or crashing, which was an almost daily occurrence when I was working with InDesign CS6 and a monthly occurrence with InDesign CC. 

If You’re an InDesign User, It Feels Intuitive

Serif has mimicked the InDesign interface in Publisher for good reason, in the hope of converting committed InDesign users. 

If you’re a seasoned InDesign user, the Publisher interface will feel very familiar, with the tools panel docked to the left and the most-used panels, including Color, Swatches, and Stroke, docked in their usual position to the right. 

The Pages panel has been shifted to the left, but personally this feels like an improvement on InDesign’s default docking of the same panel to the right of the screen.

interface overview

It Has a Useful Clipboard Feature, 'Assets’

Clipboards are really useful for producing designs that use repeated visual content (such as company logos) or specific sets of icons (such as emojis or UI icons).

Affinity has a handy clipboard function called Assets, which is docked on the left side of the interface, alongside the Pages panel. 

It’s quick and easy to create your own library of asset categories, allowing you to access essential images in an instant. Particularly handy for designers working with brand identities.

assets panel

What’s Not So Good About Affinity Publisher?

Publisher has been tightened up significantly since the beta release, and Serif have obviously benefitted from inviting users to share their thoughts and feedback on the beta version.  

Generally, Publisher is a well-rounded program with all the major features InDesign users would be accustomed to. However, it is admittedly better value than InDesign for a reason—it is overall a less sophisticated program that lacks some of the advanced features InDesign users enjoy.

Here are just a few of the issues I encountered in my (albeit Publisher novice) experience with the program.

Some of the Options in Publisher Are Not Immediately Obvious

Many of Publisher’s 'flaws’ are more to do with the difference between the Publisher and InDesign interfaces. Generally I found I had to take more steps to complete the same action in Publisher, but this is unlikely to bother users who are new to InDesign and Publisher.

In the beta version of Publisher, in the New Document window, the Color Format of the document was not automatically adjusted to the corresponding document Type, but this has since been rectified in the full release.

What is a little different is that the Layout, Color, Margins and Bleed options are organised into separate tabs in the window, meaning that it could be easy to forget to set or check these settings before creating a new document.

new document

For observant (and wide awake designers) this is a minor issue, but there’s something intrinsically helpful about InDesign’s New Document window containing everything you need in one place.

Where’s the Snap?

One of the really nice, but probably under-appreciated, features of InDesign is the ability of the program to ‘snap’ the edges of frames and shapes to other objects. For example, if you’re trying to get two text frames perfectly lined up, InDesign senses what you’re trying to do and produces a ‘snap’ movement and colored line to help guide the frame into position. 

By default, InDesign introduces the snap feature, making it instantly easy-peasy to line up the edges of text and image frames.

Publisher doesn’t apply a snap automatically, but as seems to be the case with most things in Publisher, you just need to do a bit of hunting around and apply the desired effect manually. You can switch on snapping in Publisher by going to View > Snapping Manager and checking Enable snapping.

enable snapping

Affinity Publisher: Our Verdict

If you’re looking for a good value alternative to Adobe InDesign, Affinity Publisher is a no-brainer. 

For marketers needing to create certain items in-house or designers looking to pick up new publishing design skills, Publisher is a budget-friendly and intuitive way to hone your skills and create a wide range of layout media, from magazines to books. For budding web designers, there’s also plenty on offer for creating layouts for websites, apps and EPUBs too.

If you’re a committed InDesign user, you might find it initially difficult to make the switch to Affinity Publisher, as the latter lacks some of the sophistication and advanced features of the former. Publisher can feel a little clumsy in comparison, but this impression quickly diminishes the more time spent using the application.

publisher interface

All in all, Affinity Publisher is shaping up to be a serious rival for InDesign, competing on both value for money and functionality. So watch this space! 

We’d love to know your thoughts on Affinity Publisher. Are you a Publisher convert or die-hard InDesign fan? Leave your thoughts in the comments below. 

Discover thousands of assets to use in your layout designs, from fonts to photos, over at Envato Elements and GraphicRiver.

Check out more reviews of Affinity programs and suggestions for alternative design software:

Affinity Publisher: Your Guide to InDesign’s New Rival

Post pobrano z: Affinity Publisher: Your Guide to InDesign’s New Rival

Adobe InDesign has long been the market leader in publishing software. But rival layout design programs are starting to make waves in the market, with Affinity Publisher being the latest to offer a competitive alternative to InDesign.

affinity logo

If you’re a seasoned print designer or are looking to dip a toe into publishing design, you’ll want to read on to discover our assessment of Affinity Publisher and whether we think it’s a decent alternative to Adobe’s publishing giant.

Discover thousands of assets to use in your layout designs, from fonts to photos, over at Envato Elements and GraphicRiver.

What Is Affinity Publisher?

Affinity Publisher is a publishing program for Mac and Windows that allows you to create single- and multi-page documents. Publishing programs are suitable for creating layout-based media, which combine typography, graphics, and photos, such as magazines, brochures, flyers, and books. Most publishing programs allow users to create content for both print and online, as well as EPUBs (eBooks). 

affinity sample layout

Serif released the full version of Affinity in June 2019 (it had previously only been available in beta format). Fans of Affinity Photo and Affinity Designer, decent and good value alternatives to Adobe Photoshop and Illustrator, will find that Publisher makes a seamless and useful addition to their collection of Affinity apps. 

Through technology called StudioLink, Publisher can be integrated with Affinity’s other apps, Photo and Designer, allowing users to seamlessly create and edit images before integrating them into Publisher layouts. 

studiolink

What’s the Difference Between Affinity Publisher and Adobe InDesign?

For budget-conscious creatives, the main advantage of Affinity Publisher is that it’s excellent value, retailing at just £48.99 (around $64 and AU$87) for the single app download. Users aren’t tied into a subscription model, an irritant for some Adobe users. 

Publisher’s competitive price will make it a serious competitor on price point with Adobe, which offers InDesign CC at a subscription price only, with the single app costing users $19.99 a month. 

In terms of usability, Affinity Publisher owes a great deal to InDesign in terms of functionality and interface. Superficially, the differences between the two are minor, and it really comes down to which program you feel most comfortable with using. 

We took Affinity Publisher for a test drive to see how it compares to InDesign and how it functions as a publishing program. Read on to discover our thoughts on Publisher, and assess whether you should make the switch from InDesign.

What’s Good About Affinity Publisher?

It’s Adaptable for Modern Web Design

The latest release of InDesign CC has certainly improved the web and ePublishing design experience for users, with better capabilities for setting up web-friendly layouts and exporting to interactive formats. However, it appears that Affinity Publisher has put the modern web design process at the heart of its design. 

You can choose from a wide range of screen size options, which include all mass-market up-to-date devices. You can also choose to design specifically for Web or Devices, each of which contains a wide range of pre-saved formats to choose from, including an updated catalog of iPhone, Apple Watch, iPad, Nexus and Kindle screen sizes. 

screen sizes

It’s More Flexible Than InDesign… in Some Ways

Because InDesign is built on foundations which preceded web design, stemming from the technology developed by Quark for the first layout publishing program, QuarkXPress, it is still a traditional print publishing program at heart. 

Publisher by contrast, though inspired by the InDesign interface, doesn’t have the same historical legacy, and there are some features of the program which feel more relevant for how designers work now. 

One example is the ability to set a facing page document to begin on a left-hand page. Sure, this isn’t what you’d want to choose for a traditional multi-page document like a print book or magazine, but there are occasions where you might want to start your document with a two-page spread, like eMagazines or interactive PDFs, for example.

left page start

It’s Speedier and Lighter Than InDesign

One of the main complaints with InDesign is the processing power of the software. It’s a very heavy program, which can have an impact on usability, particularly if you’re working on a laptop rather than a desktop. Switching the Display Performance in InDesign to Fast Display can solve the problem, but it also means you have to do the bulk of your work while looking at heavily pixelated images. 

Publisher is a heavy program too, but it certainly doesn’t feel that way. It’s whippet-quick, even when I was trying it out on my ancient laptop, which struggles to open InDesign in less than 15 minutes. 

Images in Publisher remain crisp and clear, which helps you to assess the quality of images accurately while you work. 

image quality

An extra bonus—I had no issues with stalling or crashing, which was an almost daily occurrence when I was working with InDesign CS6 and a monthly occurrence with InDesign CC. 

If You’re an InDesign User, It Feels Intuitive

Serif has mimicked the InDesign interface in Publisher for good reason, in the hope of converting committed InDesign users. 

If you’re a seasoned InDesign user, the Publisher interface will feel very familiar, with the tools panel docked to the left and the most-used panels, including Color, Swatches, and Stroke, docked in their usual position to the right. 

The Pages panel has been shifted to the left, but personally this feels like an improvement on InDesign’s default docking of the same panel to the right of the screen.

interface overview

It Has a Useful Clipboard Feature, 'Assets’

Clipboards are really useful for producing designs that use repeated visual content (such as company logos) or specific sets of icons (such as emojis or UI icons).

Affinity has a handy clipboard function called Assets, which is docked on the left side of the interface, alongside the Pages panel. 

It’s quick and easy to create your own library of asset categories, allowing you to access essential images in an instant. Particularly handy for designers working with brand identities.

assets panel

What’s Not So Good About Affinity Publisher?

Publisher has been tightened up significantly since the beta release, and Serif have obviously benefitted from inviting users to share their thoughts and feedback on the beta version.  

Generally, Publisher is a well-rounded program with all the major features InDesign users would be accustomed to. However, it is admittedly better value than InDesign for a reason—it is overall a less sophisticated program that lacks some of the advanced features InDesign users enjoy.

Here are just a few of the issues I encountered in my (albeit Publisher novice) experience with the program.

Some of the Options in Publisher Are Not Immediately Obvious

Many of Publisher’s 'flaws’ are more to do with the difference between the Publisher and InDesign interfaces. Generally I found I had to take more steps to complete the same action in Publisher, but this is unlikely to bother users who are new to InDesign and Publisher.

In the beta version of Publisher, in the New Document window, the Color Format of the document was not automatically adjusted to the corresponding document Type, but this has since been rectified in the full release.

What is a little different is that the Layout, Color, Margins and Bleed options are organised into separate tabs in the window, meaning that it could be easy to forget to set or check these settings before creating a new document.

new document

For observant (and wide awake designers) this is a minor issue, but there’s something intrinsically helpful about InDesign’s New Document window containing everything you need in one place.

Where’s the Snap?

One of the really nice, but probably under-appreciated, features of InDesign is the ability of the program to ‘snap’ the edges of frames and shapes to other objects. For example, if you’re trying to get two text frames perfectly lined up, InDesign senses what you’re trying to do and produces a ‘snap’ movement and colored line to help guide the frame into position. 

By default, InDesign introduces the snap feature, making it instantly easy-peasy to line up the edges of text and image frames.

Publisher doesn’t apply a snap automatically, but as seems to be the case with most things in Publisher, you just need to do a bit of hunting around and apply the desired effect manually. You can switch on snapping in Publisher by going to View > Snapping Manager and checking Enable snapping.

enable snapping

Affinity Publisher: Our Verdict

If you’re looking for a good value alternative to Adobe InDesign, Affinity Publisher is a no-brainer. 

For marketers needing to create certain items in-house or designers looking to pick up new publishing design skills, Publisher is a budget-friendly and intuitive way to hone your skills and create a wide range of layout media, from magazines to books. For budding web designers, there’s also plenty on offer for creating layouts for websites, apps and EPUBs too.

If you’re a committed InDesign user, you might find it initially difficult to make the switch to Affinity Publisher, as the latter lacks some of the sophistication and advanced features of the former. Publisher can feel a little clumsy in comparison, but this impression quickly diminishes the more time spent using the application.

publisher interface

All in all, Affinity Publisher is shaping up to be a serious rival for InDesign, competing on both value for money and functionality. So watch this space! 

We’d love to know your thoughts on Affinity Publisher. Are you a Publisher convert or die-hard InDesign fan? Leave your thoughts in the comments below. 

Discover thousands of assets to use in your layout designs, from fonts to photos, over at Envato Elements and GraphicRiver.

Check out more reviews of Affinity programs and suggestions for alternative design software:

Affinity Publisher: Your Guide to InDesign’s New Rival

Post pobrano z: Affinity Publisher: Your Guide to InDesign’s New Rival

Adobe InDesign has long been the market leader in publishing software. But rival layout design programs are starting to make waves in the market, with Affinity Publisher being the latest to offer a competitive alternative to InDesign.

affinity logo

If you’re a seasoned print designer or are looking to dip a toe into publishing design, you’ll want to read on to discover our assessment of Affinity Publisher and whether we think it’s a decent alternative to Adobe’s publishing giant.

Discover thousands of assets to use in your layout designs, from fonts to photos, over at Envato Elements and GraphicRiver.

What Is Affinity Publisher?

Affinity Publisher is a publishing program for Mac and Windows that allows you to create single- and multi-page documents. Publishing programs are suitable for creating layout-based media, which combine typography, graphics, and photos, such as magazines, brochures, flyers, and books. Most publishing programs allow users to create content for both print and online, as well as EPUBs (eBooks). 

affinity sample layout

Serif released the full version of Affinity in June 2019 (it had previously only been available in beta format). Fans of Affinity Photo and Affinity Designer, decent and good value alternatives to Adobe Photoshop and Illustrator, will find that Publisher makes a seamless and useful addition to their collection of Affinity apps. 

Through technology called StudioLink, Publisher can be integrated with Affinity’s other apps, Photo and Designer, allowing users to seamlessly create and edit images before integrating them into Publisher layouts. 

studiolink

What’s the Difference Between Affinity Publisher and Adobe InDesign?

For budget-conscious creatives, the main advantage of Affinity Publisher is that it’s excellent value, retailing at just £48.99 (around $64 and AU$87) for the single app download. Users aren’t tied into a subscription model, an irritant for some Adobe users. 

Publisher’s competitive price will make it a serious competitor on price point with Adobe, which offers InDesign CC at a subscription price only, with the single app costing users $19.99 a month. 

In terms of usability, Affinity Publisher owes a great deal to InDesign in terms of functionality and interface. Superficially, the differences between the two are minor, and it really comes down to which program you feel most comfortable with using. 

We took Affinity Publisher for a test drive to see how it compares to InDesign and how it functions as a publishing program. Read on to discover our thoughts on Publisher, and assess whether you should make the switch from InDesign.

What’s Good About Affinity Publisher?

It’s Adaptable for Modern Web Design

The latest release of InDesign CC has certainly improved the web and ePublishing design experience for users, with better capabilities for setting up web-friendly layouts and exporting to interactive formats. However, it appears that Affinity Publisher has put the modern web design process at the heart of its design. 

You can choose from a wide range of screen size options, which include all mass-market up-to-date devices. You can also choose to design specifically for Web or Devices, each of which contains a wide range of pre-saved formats to choose from, including an updated catalog of iPhone, Apple Watch, iPad, Nexus and Kindle screen sizes. 

screen sizes

It’s More Flexible Than InDesign… in Some Ways

Because InDesign is built on foundations which preceded web design, stemming from the technology developed by Quark for the first layout publishing program, QuarkXPress, it is still a traditional print publishing program at heart. 

Publisher by contrast, though inspired by the InDesign interface, doesn’t have the same historical legacy, and there are some features of the program which feel more relevant for how designers work now. 

One example is the ability to set a facing page document to begin on a left-hand page. Sure, this isn’t what you’d want to choose for a traditional multi-page document like a print book or magazine, but there are occasions where you might want to start your document with a two-page spread, like eMagazines or interactive PDFs, for example.

left page start

It’s Speedier and Lighter Than InDesign

One of the main complaints with InDesign is the processing power of the software. It’s a very heavy program, which can have an impact on usability, particularly if you’re working on a laptop rather than a desktop. Switching the Display Performance in InDesign to Fast Display can solve the problem, but it also means you have to do the bulk of your work while looking at heavily pixelated images. 

Publisher is a heavy program too, but it certainly doesn’t feel that way. It’s whippet-quick, even when I was trying it out on my ancient laptop, which struggles to open InDesign in less than 15 minutes. 

Images in Publisher remain crisp and clear, which helps you to assess the quality of images accurately while you work. 

image quality

An extra bonus—I had no issues with stalling or crashing, which was an almost daily occurrence when I was working with InDesign CS6 and a monthly occurrence with InDesign CC. 

If You’re an InDesign User, It Feels Intuitive

Serif has mimicked the InDesign interface in Publisher for good reason, in the hope of converting committed InDesign users. 

If you’re a seasoned InDesign user, the Publisher interface will feel very familiar, with the tools panel docked to the left and the most-used panels, including Color, Swatches, and Stroke, docked in their usual position to the right. 

The Pages panel has been shifted to the left, but personally this feels like an improvement on InDesign’s default docking of the same panel to the right of the screen.

interface overview

It Has a Useful Clipboard Feature, 'Assets’

Clipboards are really useful for producing designs that use repeated visual content (such as company logos) or specific sets of icons (such as emojis or UI icons).

Affinity has a handy clipboard function called Assets, which is docked on the left side of the interface, alongside the Pages panel. 

It’s quick and easy to create your own library of asset categories, allowing you to access essential images in an instant. Particularly handy for designers working with brand identities.

assets panel

What’s Not So Good About Affinity Publisher?

Publisher has been tightened up significantly since the beta release, and Serif have obviously benefitted from inviting users to share their thoughts and feedback on the beta version.  

Generally, Publisher is a well-rounded program with all the major features InDesign users would be accustomed to. However, it is admittedly better value than InDesign for a reason—it is overall a less sophisticated program that lacks some of the advanced features InDesign users enjoy.

Here are just a few of the issues I encountered in my (albeit Publisher novice) experience with the program.

Some of the Options in Publisher Are Not Immediately Obvious

Many of Publisher’s 'flaws’ are more to do with the difference between the Publisher and InDesign interfaces. Generally I found I had to take more steps to complete the same action in Publisher, but this is unlikely to bother users who are new to InDesign and Publisher.

In the beta version of Publisher, in the New Document window, the Color Format of the document was not automatically adjusted to the corresponding document Type, but this has since been rectified in the full release.

What is a little different is that the Layout, Color, Margins and Bleed options are organised into separate tabs in the window, meaning that it could be easy to forget to set or check these settings before creating a new document.

new document

For observant (and wide awake designers) this is a minor issue, but there’s something intrinsically helpful about InDesign’s New Document window containing everything you need in one place.

Where’s the Snap?

One of the really nice, but probably under-appreciated, features of InDesign is the ability of the program to ‘snap’ the edges of frames and shapes to other objects. For example, if you’re trying to get two text frames perfectly lined up, InDesign senses what you’re trying to do and produces a ‘snap’ movement and colored line to help guide the frame into position. 

By default, InDesign introduces the snap feature, making it instantly easy-peasy to line up the edges of text and image frames.

Publisher doesn’t apply a snap automatically, but as seems to be the case with most things in Publisher, you just need to do a bit of hunting around and apply the desired effect manually. You can switch on snapping in Publisher by going to View > Snapping Manager and checking Enable snapping.

enable snapping

Affinity Publisher: Our Verdict

If you’re looking for a good value alternative to Adobe InDesign, Affinity Publisher is a no-brainer. 

For marketers needing to create certain items in-house or designers looking to pick up new publishing design skills, Publisher is a budget-friendly and intuitive way to hone your skills and create a wide range of layout media, from magazines to books. For budding web designers, there’s also plenty on offer for creating layouts for websites, apps and EPUBs too.

If you’re a committed InDesign user, you might find it initially difficult to make the switch to Affinity Publisher, as the latter lacks some of the sophistication and advanced features of the former. Publisher can feel a little clumsy in comparison, but this impression quickly diminishes the more time spent using the application.

publisher interface

All in all, Affinity Publisher is shaping up to be a serious rival for InDesign, competing on both value for money and functionality. So watch this space! 

We’d love to know your thoughts on Affinity Publisher. Are you a Publisher convert or die-hard InDesign fan? Leave your thoughts in the comments below. 

Discover thousands of assets to use in your layout designs, from fonts to photos, over at Envato Elements and GraphicRiver.

Check out more reviews of Affinity programs and suggestions for alternative design software:

Affinity Publisher: Your Guide to InDesign’s New Rival

Post pobrano z: Affinity Publisher: Your Guide to InDesign’s New Rival

Adobe InDesign has long been the market leader in publishing software. But rival layout design programs are starting to make waves in the market, with Affinity Publisher being the latest to offer a competitive alternative to InDesign.

affinity logo

If you’re a seasoned print designer or are looking to dip a toe into publishing design, you’ll want to read on to discover our assessment of Affinity Publisher and whether we think it’s a decent alternative to Adobe’s publishing giant.

Discover thousands of assets to use in your layout designs, from fonts to photos, over at Envato Elements and GraphicRiver.

What Is Affinity Publisher?

Affinity Publisher is a publishing program for Mac and Windows that allows you to create single- and multi-page documents. Publishing programs are suitable for creating layout-based media, which combine typography, graphics, and photos, such as magazines, brochures, flyers, and books. Most publishing programs allow users to create content for both print and online, as well as EPUBs (eBooks). 

affinity sample layout

Serif released the full version of Affinity in June 2019 (it had previously only been available in beta format). Fans of Affinity Photo and Affinity Designer, decent and good value alternatives to Adobe Photoshop and Illustrator, will find that Publisher makes a seamless and useful addition to their collection of Affinity apps. 

Through technology called StudioLink, Publisher can be integrated with Affinity’s other apps, Photo and Designer, allowing users to seamlessly create and edit images before integrating them into Publisher layouts. 

studiolink

What’s the Difference Between Affinity Publisher and Adobe InDesign?

For budget-conscious creatives, the main advantage of Affinity Publisher is that it’s excellent value, retailing at just £48.99 (around $64 and AU$87) for the single app download. Users aren’t tied into a subscription model, an irritant for some Adobe users. 

Publisher’s competitive price will make it a serious competitor on price point with Adobe, which offers InDesign CC at a subscription price only, with the single app costing users $19.99 a month. 

In terms of usability, Affinity Publisher owes a great deal to InDesign in terms of functionality and interface. Superficially, the differences between the two are minor, and it really comes down to which program you feel most comfortable with using. 

We took Affinity Publisher for a test drive to see how it compares to InDesign and how it functions as a publishing program. Read on to discover our thoughts on Publisher, and assess whether you should make the switch from InDesign.

What’s Good About Affinity Publisher?

It’s Adaptable for Modern Web Design

The latest release of InDesign CC has certainly improved the web and ePublishing design experience for users, with better capabilities for setting up web-friendly layouts and exporting to interactive formats. However, it appears that Affinity Publisher has put the modern web design process at the heart of its design. 

You can choose from a wide range of screen size options, which include all mass-market up-to-date devices. You can also choose to design specifically for Web or Devices, each of which contains a wide range of pre-saved formats to choose from, including an updated catalog of iPhone, Apple Watch, iPad, Nexus and Kindle screen sizes. 

screen sizes

It’s More Flexible Than InDesign… in Some Ways

Because InDesign is built on foundations which preceded web design, stemming from the technology developed by Quark for the first layout publishing program, QuarkXPress, it is still a traditional print publishing program at heart. 

Publisher by contrast, though inspired by the InDesign interface, doesn’t have the same historical legacy, and there are some features of the program which feel more relevant for how designers work now. 

One example is the ability to set a facing page document to begin on a left-hand page. Sure, this isn’t what you’d want to choose for a traditional multi-page document like a print book or magazine, but there are occasions where you might want to start your document with a two-page spread, like eMagazines or interactive PDFs, for example.

left page start

It’s Speedier and Lighter Than InDesign

One of the main complaints with InDesign is the processing power of the software. It’s a very heavy program, which can have an impact on usability, particularly if you’re working on a laptop rather than a desktop. Switching the Display Performance in InDesign to Fast Display can solve the problem, but it also means you have to do the bulk of your work while looking at heavily pixelated images. 

Publisher is a heavy program too, but it certainly doesn’t feel that way. It’s whippet-quick, even when I was trying it out on my ancient laptop, which struggles to open InDesign in less than 15 minutes. 

Images in Publisher remain crisp and clear, which helps you to assess the quality of images accurately while you work. 

image quality

An extra bonus—I had no issues with stalling or crashing, which was an almost daily occurrence when I was working with InDesign CS6 and a monthly occurrence with InDesign CC. 

If You’re an InDesign User, It Feels Intuitive

Serif has mimicked the InDesign interface in Publisher for good reason, in the hope of converting committed InDesign users. 

If you’re a seasoned InDesign user, the Publisher interface will feel very familiar, with the tools panel docked to the left and the most-used panels, including Color, Swatches, and Stroke, docked in their usual position to the right. 

The Pages panel has been shifted to the left, but personally this feels like an improvement on InDesign’s default docking of the same panel to the right of the screen.

interface overview

It Has a Useful Clipboard Feature, 'Assets’

Clipboards are really useful for producing designs that use repeated visual content (such as company logos) or specific sets of icons (such as emojis or UI icons).

Affinity has a handy clipboard function called Assets, which is docked on the left side of the interface, alongside the Pages panel. 

It’s quick and easy to create your own library of asset categories, allowing you to access essential images in an instant. Particularly handy for designers working with brand identities.

assets panel

What’s Not So Good About Affinity Publisher?

Publisher has been tightened up significantly since the beta release, and Serif have obviously benefitted from inviting users to share their thoughts and feedback on the beta version.  

Generally, Publisher is a well-rounded program with all the major features InDesign users would be accustomed to. However, it is admittedly better value than InDesign for a reason—it is overall a less sophisticated program that lacks some of the advanced features InDesign users enjoy.

Here are just a few of the issues I encountered in my (albeit Publisher novice) experience with the program.

Some of the Options in Publisher Are Not Immediately Obvious

Many of Publisher’s 'flaws’ are more to do with the difference between the Publisher and InDesign interfaces. Generally I found I had to take more steps to complete the same action in Publisher, but this is unlikely to bother users who are new to InDesign and Publisher.

In the beta version of Publisher, in the New Document window, the Color Format of the document was not automatically adjusted to the corresponding document Type, but this has since been rectified in the full release.

What is a little different is that the Layout, Color, Margins and Bleed options are organised into separate tabs in the window, meaning that it could be easy to forget to set or check these settings before creating a new document.

new document

For observant (and wide awake designers) this is a minor issue, but there’s something intrinsically helpful about InDesign’s New Document window containing everything you need in one place.

Where’s the Snap?

One of the really nice, but probably under-appreciated, features of InDesign is the ability of the program to ‘snap’ the edges of frames and shapes to other objects. For example, if you’re trying to get two text frames perfectly lined up, InDesign senses what you’re trying to do and produces a ‘snap’ movement and colored line to help guide the frame into position. 

By default, InDesign introduces the snap feature, making it instantly easy-peasy to line up the edges of text and image frames.

Publisher doesn’t apply a snap automatically, but as seems to be the case with most things in Publisher, you just need to do a bit of hunting around and apply the desired effect manually. You can switch on snapping in Publisher by going to View > Snapping Manager and checking Enable snapping.

enable snapping

Affinity Publisher: Our Verdict

If you’re looking for a good value alternative to Adobe InDesign, Affinity Publisher is a no-brainer. 

For marketers needing to create certain items in-house or designers looking to pick up new publishing design skills, Publisher is a budget-friendly and intuitive way to hone your skills and create a wide range of layout media, from magazines to books. For budding web designers, there’s also plenty on offer for creating layouts for websites, apps and EPUBs too.

If you’re a committed InDesign user, you might find it initially difficult to make the switch to Affinity Publisher, as the latter lacks some of the sophistication and advanced features of the former. Publisher can feel a little clumsy in comparison, but this impression quickly diminishes the more time spent using the application.

publisher interface

All in all, Affinity Publisher is shaping up to be a serious rival for InDesign, competing on both value for money and functionality. So watch this space! 

We’d love to know your thoughts on Affinity Publisher. Are you a Publisher convert or die-hard InDesign fan? Leave your thoughts in the comments below. 

Discover thousands of assets to use in your layout designs, from fonts to photos, over at Envato Elements and GraphicRiver.

Check out more reviews of Affinity programs and suggestions for alternative design software:

Affinity Publisher: Your Guide to InDesign’s New Rival

Post pobrano z: Affinity Publisher: Your Guide to InDesign’s New Rival

Adobe InDesign has long been the market leader in publishing software. But rival layout design programs are starting to make waves in the market, with Affinity Publisher being the latest to offer a competitive alternative to InDesign.

affinity logo

If you’re a seasoned print designer or are looking to dip a toe into publishing design, you’ll want to read on to discover our assessment of Affinity Publisher and whether we think it’s a decent alternative to Adobe’s publishing giant.

Discover thousands of assets to use in your layout designs, from fonts to photos, over at Envato Elements and GraphicRiver.

What Is Affinity Publisher?

Affinity Publisher is a publishing program for Mac and Windows that allows you to create single- and multi-page documents. Publishing programs are suitable for creating layout-based media, which combine typography, graphics, and photos, such as magazines, brochures, flyers, and books. Most publishing programs allow users to create content for both print and online, as well as EPUBs (eBooks). 

affinity sample layout

Serif released the full version of Affinity in June 2019 (it had previously only been available in beta format). Fans of Affinity Photo and Affinity Designer, decent and good value alternatives to Adobe Photoshop and Illustrator, will find that Publisher makes a seamless and useful addition to their collection of Affinity apps. 

Through technology called StudioLink, Publisher can be integrated with Affinity’s other apps, Photo and Designer, allowing users to seamlessly create and edit images before integrating them into Publisher layouts. 

studiolink

What’s the Difference Between Affinity Publisher and Adobe InDesign?

For budget-conscious creatives, the main advantage of Affinity Publisher is that it’s excellent value, retailing at just £48.99 (around $64 and AU$87) for the single app download. Users aren’t tied into a subscription model, an irritant for some Adobe users. 

Publisher’s competitive price will make it a serious competitor on price point with Adobe, which offers InDesign CC at a subscription price only, with the single app costing users $19.99 a month. 

In terms of usability, Affinity Publisher owes a great deal to InDesign in terms of functionality and interface. Superficially, the differences between the two are minor, and it really comes down to which program you feel most comfortable with using. 

We took Affinity Publisher for a test drive to see how it compares to InDesign and how it functions as a publishing program. Read on to discover our thoughts on Publisher, and assess whether you should make the switch from InDesign.

What’s Good About Affinity Publisher?

It’s Adaptable for Modern Web Design

The latest release of InDesign CC has certainly improved the web and ePublishing design experience for users, with better capabilities for setting up web-friendly layouts and exporting to interactive formats. However, it appears that Affinity Publisher has put the modern web design process at the heart of its design. 

You can choose from a wide range of screen size options, which include all mass-market up-to-date devices. You can also choose to design specifically for Web or Devices, each of which contains a wide range of pre-saved formats to choose from, including an updated catalog of iPhone, Apple Watch, iPad, Nexus and Kindle screen sizes. 

screen sizes

It’s More Flexible Than InDesign… in Some Ways

Because InDesign is built on foundations which preceded web design, stemming from the technology developed by Quark for the first layout publishing program, QuarkXPress, it is still a traditional print publishing program at heart. 

Publisher by contrast, though inspired by the InDesign interface, doesn’t have the same historical legacy, and there are some features of the program which feel more relevant for how designers work now. 

One example is the ability to set a facing page document to begin on a left-hand page. Sure, this isn’t what you’d want to choose for a traditional multi-page document like a print book or magazine, but there are occasions where you might want to start your document with a two-page spread, like eMagazines or interactive PDFs, for example.

left page start

It’s Speedier and Lighter Than InDesign

One of the main complaints with InDesign is the processing power of the software. It’s a very heavy program, which can have an impact on usability, particularly if you’re working on a laptop rather than a desktop. Switching the Display Performance in InDesign to Fast Display can solve the problem, but it also means you have to do the bulk of your work while looking at heavily pixelated images. 

Publisher is a heavy program too, but it certainly doesn’t feel that way. It’s whippet-quick, even when I was trying it out on my ancient laptop, which struggles to open InDesign in less than 15 minutes. 

Images in Publisher remain crisp and clear, which helps you to assess the quality of images accurately while you work. 

image quality

An extra bonus—I had no issues with stalling or crashing, which was an almost daily occurrence when I was working with InDesign CS6 and a monthly occurrence with InDesign CC. 

If You’re an InDesign User, It Feels Intuitive

Serif has mimicked the InDesign interface in Publisher for good reason, in the hope of converting committed InDesign users. 

If you’re a seasoned InDesign user, the Publisher interface will feel very familiar, with the tools panel docked to the left and the most-used panels, including Color, Swatches, and Stroke, docked in their usual position to the right. 

The Pages panel has been shifted to the left, but personally this feels like an improvement on InDesign’s default docking of the same panel to the right of the screen.

interface overview

It Has a Useful Clipboard Feature, 'Assets’

Clipboards are really useful for producing designs that use repeated visual content (such as company logos) or specific sets of icons (such as emojis or UI icons).

Affinity has a handy clipboard function called Assets, which is docked on the left side of the interface, alongside the Pages panel. 

It’s quick and easy to create your own library of asset categories, allowing you to access essential images in an instant. Particularly handy for designers working with brand identities.

assets panel

What’s Not So Good About Affinity Publisher?

Publisher has been tightened up significantly since the beta release, and Serif have obviously benefitted from inviting users to share their thoughts and feedback on the beta version.  

Generally, Publisher is a well-rounded program with all the major features InDesign users would be accustomed to. However, it is admittedly better value than InDesign for a reason—it is overall a less sophisticated program that lacks some of the advanced features InDesign users enjoy.

Here are just a few of the issues I encountered in my (albeit Publisher novice) experience with the program.

Some of the Options in Publisher Are Not Immediately Obvious

Many of Publisher’s 'flaws’ are more to do with the difference between the Publisher and InDesign interfaces. Generally I found I had to take more steps to complete the same action in Publisher, but this is unlikely to bother users who are new to InDesign and Publisher.

In the beta version of Publisher, in the New Document window, the Color Format of the document was not automatically adjusted to the corresponding document Type, but this has since been rectified in the full release.

What is a little different is that the Layout, Color, Margins and Bleed options are organised into separate tabs in the window, meaning that it could be easy to forget to set or check these settings before creating a new document.

new document

For observant (and wide awake designers) this is a minor issue, but there’s something intrinsically helpful about InDesign’s New Document window containing everything you need in one place.

Where’s the Snap?

One of the really nice, but probably under-appreciated, features of InDesign is the ability of the program to ‘snap’ the edges of frames and shapes to other objects. For example, if you’re trying to get two text frames perfectly lined up, InDesign senses what you’re trying to do and produces a ‘snap’ movement and colored line to help guide the frame into position. 

By default, InDesign introduces the snap feature, making it instantly easy-peasy to line up the edges of text and image frames.

Publisher doesn’t apply a snap automatically, but as seems to be the case with most things in Publisher, you just need to do a bit of hunting around and apply the desired effect manually. You can switch on snapping in Publisher by going to View > Snapping Manager and checking Enable snapping.

enable snapping

Affinity Publisher: Our Verdict

If you’re looking for a good value alternative to Adobe InDesign, Affinity Publisher is a no-brainer. 

For marketers needing to create certain items in-house or designers looking to pick up new publishing design skills, Publisher is a budget-friendly and intuitive way to hone your skills and create a wide range of layout media, from magazines to books. For budding web designers, there’s also plenty on offer for creating layouts for websites, apps and EPUBs too.

If you’re a committed InDesign user, you might find it initially difficult to make the switch to Affinity Publisher, as the latter lacks some of the sophistication and advanced features of the former. Publisher can feel a little clumsy in comparison, but this impression quickly diminishes the more time spent using the application.

publisher interface

All in all, Affinity Publisher is shaping up to be a serious rival for InDesign, competing on both value for money and functionality. So watch this space! 

We’d love to know your thoughts on Affinity Publisher. Are you a Publisher convert or die-hard InDesign fan? Leave your thoughts in the comments below. 

Discover thousands of assets to use in your layout designs, from fonts to photos, over at Envato Elements and GraphicRiver.

Check out more reviews of Affinity programs and suggestions for alternative design software: