Every new year’ss eve, we make wishes. This year, FRANZ&RENÉ had a crazy one. That everyone walks together, not over each other in 2019.
To help the world to do so, the agency produced mismatching socks, forcing symbolically public enemies to walk together.
We sent these socks to our partners, but also to our competitors and to the 4 „heroes” that made this campaign together.
Every new year’ss eve, we make wishes. This year, FRANZ&RENÉ had a crazy one. That everyone walks together, not over each other in 2019.
To help the world to do so, the agency produced mismatching socks, forcing symbolically public enemies to walk together.
We sent these socks to our partners, but also to our competitors and to the 4 „heroes” that made this campaign together.
The Background Mental illness knows no borders. And in the UAE, it’s no different. In fact, 2 of the top 3 causes of ill-health are anxiety and depression. And nearly 4% of the population is estimated to be clinically depressed, while mild depression affects up to 15%.
The fact that there’s not enough information about mental health statistics points to a pertinent issue that sufferers are unlikely to be forthcoming with regards to asking for treatment, or even disclosing their struggles to friends, family or employers. Now, workplace-related mental health is a primary issue affecting people. Long working hours. Financial pressures.
Lack of work-life balance. Lack of physical activity. Social pressures. 60% of UAE employees who identified as stressed, described their offices and employment as the main cause. The unique structure of the workforce in the UAE with over 80% expats, living away from home, is also a factor. Now, the region isn’t a place where uncomfortable topics like mental health are not discussed openly. Any issues relating to mental health are seen as a weakness and shameful, especially in the workplace. Having these types of conversations openly is incredibly difficult.
With life being tough, leaving those who are struggling with stress, depression and anxiety to feel confused, overwhelmed and alone. The feelings and the emotions that they’d want to express to those around them including their employers, often remain ‘unspoken’. Truth is, sharing one’s feelings, as tough as it can be, does help.
The Lighthouse Centre for Well-Being is a leading community mental health and wellness clinic in the UAE, providing quality psychological care to children, adults, couples and families. And the clinic wanted to help play a meaningful role when it came to the topic of mental health in the UAE. The Idea Owing to the stigma and perception around mental health, through concept testing, McCann Health Dubai discovered that mental health communications, prevalent in Western markets, were not going to be appropriate or effective in the UAE, especially in the workplaces, where not sharing one’s feelings or emotions helps people look strong and in control.
A completely different way to achieve the goals of creating awareness for mental health was needed. So, a selection of unspoken and untold feelings was collected from those under the care of Lighthouse who were dealing with mental health issues but hadn’t spoken to anyone about their issues earlier. With over 20 artists, from all over the region, unique visual illustrations were created, depicting those unspoken feelings of those struggling with mental health issues.
Those illustrations were then compiled, along with the relevant quotations, and a book, titled ‘unspoken, uae’, was published and distributed to workplaces, speaking to employees across companies in their own words. By simplifying the message and connecting it to impactful visuals, Lighthouse has created a piece of communication that has enabled people in workplaces to identify with the thoughts and feelings in the book in an environment that was private and self-introspective.
All the quotes that people read in book are the real words of people who have been fighting life’s everyday challenges. And by having an open and honest dialogue with those who have wanted to listen and support, things have gotten better This book has been circulated and is being circulated across workplaces and companies in the UAE. It has a contact page at the end that encourages those resonating with the feelings and emotions in the book, to remember that they are not alone, and prompts them to reach out and contact Lighthouse should they feel the need to talk.
Advertising Agency:McCann Health, Dubai, United Arab Emirates Advertising Agency:FP7/McCann, Dubai, United Arab Emirates
The Background Mental illness knows no borders. And in the UAE, it’s no different. In fact, 2 of the top 3 causes of ill-health are anxiety and depression. And nearly 4% of the population is estimated to be clinically depressed, while mild depression affects up to 15%.
The fact that there’s not enough information about mental health statistics points to a pertinent issue that sufferers are unlikely to be forthcoming with regards to asking for treatment, or even disclosing their struggles to friends, family or employers. Now, workplace-related mental health is a primary issue affecting people. Long working hours. Financial pressures.
Lack of work-life balance. Lack of physical activity. Social pressures. 60% of UAE employees who identified as stressed, described their offices and employment as the main cause. The unique structure of the workforce in the UAE with over 80% expats, living away from home, is also a factor. Now, the region isn’t a place where uncomfortable topics like mental health are not discussed openly. Any issues relating to mental health are seen as a weakness and shameful, especially in the workplace. Having these types of conversations openly is incredibly difficult.
With life being tough, leaving those who are struggling with stress, depression and anxiety to feel confused, overwhelmed and alone. The feelings and the emotions that they’d want to express to those around them including their employers, often remain ‘unspoken’. Truth is, sharing one’s feelings, as tough as it can be, does help.
The Lighthouse Centre for Well-Being is a leading community mental health and wellness clinic in the UAE, providing quality psychological care to children, adults, couples and families. And the clinic wanted to help play a meaningful role when it came to the topic of mental health in the UAE. The Idea Owing to the stigma and perception around mental health, through concept testing, McCann Health Dubai discovered that mental health communications, prevalent in Western markets, were not going to be appropriate or effective in the UAE, especially in the workplaces, where not sharing one’s feelings or emotions helps people look strong and in control.
A completely different way to achieve the goals of creating awareness for mental health was needed. So, a selection of unspoken and untold feelings was collected from those under the care of Lighthouse who were dealing with mental health issues but hadn’t spoken to anyone about their issues earlier. With over 20 artists, from all over the region, unique visual illustrations were created, depicting those unspoken feelings of those struggling with mental health issues.
Those illustrations were then compiled, along with the relevant quotations, and a book, titled ‘unspoken, uae’, was published and distributed to workplaces, speaking to employees across companies in their own words. By simplifying the message and connecting it to impactful visuals, Lighthouse has created a piece of communication that has enabled people in workplaces to identify with the thoughts and feelings in the book in an environment that was private and self-introspective.
All the quotes that people read in book are the real words of people who have been fighting life’s everyday challenges. And by having an open and honest dialogue with those who have wanted to listen and support, things have gotten better This book has been circulated and is being circulated across workplaces and companies in the UAE. It has a contact page at the end that encourages those resonating with the feelings and emotions in the book, to remember that they are not alone, and prompts them to reach out and contact Lighthouse should they feel the need to talk.
Advertising Agency:McCann Health, Dubai, United Arab Emirates Advertising Agency:FP7/McCann, Dubai, United Arab Emirates
The Background Mental illness knows no borders. And in the UAE, it’s no different. In fact, 2 of the top 3 causes of ill-health are anxiety and depression. And nearly 4% of the population is estimated to be clinically depressed, while mild depression affects up to 15%.
The fact that there’s not enough information about mental health statistics points to a pertinent issue that sufferers are unlikely to be forthcoming with regards to asking for treatment, or even disclosing their struggles to friends, family or employers. Now, workplace-related mental health is a primary issue affecting people. Long working hours. Financial pressures.
Lack of work-life balance. Lack of physical activity. Social pressures. 60% of UAE employees who identified as stressed, described their offices and employment as the main cause. The unique structure of the workforce in the UAE with over 80% expats, living away from home, is also a factor. Now, the region isn’t a place where uncomfortable topics like mental health are not discussed openly. Any issues relating to mental health are seen as a weakness and shameful, especially in the workplace. Having these types of conversations openly is incredibly difficult.
With life being tough, leaving those who are struggling with stress, depression and anxiety to feel confused, overwhelmed and alone. The feelings and the emotions that they’d want to express to those around them including their employers, often remain ‘unspoken’. Truth is, sharing one’s feelings, as tough as it can be, does help.
The Lighthouse Centre for Well-Being is a leading community mental health and wellness clinic in the UAE, providing quality psychological care to children, adults, couples and families. And the clinic wanted to help play a meaningful role when it came to the topic of mental health in the UAE. The Idea Owing to the stigma and perception around mental health, through concept testing, McCann Health Dubai discovered that mental health communications, prevalent in Western markets, were not going to be appropriate or effective in the UAE, especially in the workplaces, where not sharing one’s feelings or emotions helps people look strong and in control.
A completely different way to achieve the goals of creating awareness for mental health was needed. So, a selection of unspoken and untold feelings was collected from those under the care of Lighthouse who were dealing with mental health issues but hadn’t spoken to anyone about their issues earlier. With over 20 artists, from all over the region, unique visual illustrations were created, depicting those unspoken feelings of those struggling with mental health issues.
Those illustrations were then compiled, along with the relevant quotations, and a book, titled ‘unspoken, uae’, was published and distributed to workplaces, speaking to employees across companies in their own words. By simplifying the message and connecting it to impactful visuals, Lighthouse has created a piece of communication that has enabled people in workplaces to identify with the thoughts and feelings in the book in an environment that was private and self-introspective.
All the quotes that people read in book are the real words of people who have been fighting life’s everyday challenges. And by having an open and honest dialogue with those who have wanted to listen and support, things have gotten better This book has been circulated and is being circulated across workplaces and companies in the UAE. It has a contact page at the end that encourages those resonating with the feelings and emotions in the book, to remember that they are not alone, and prompts them to reach out and contact Lighthouse should they feel the need to talk.
Advertising Agency:McCann Health, Dubai, United Arab Emirates Advertising Agency:FP7/McCann, Dubai, United Arab Emirates
In this article, you’ll learn how to make a book cover. Here, you’ll pick up tips on how to make a book in InDesign and create your own InDesign book template, from using InDesign templates to putting together your cover artwork.
If you’re looking to self-publish your own books and sell them online, or you are making your first steps into professional cover design for clients, this guide will introduce you to the essentials of creating book cover templates.
Read on to discover eight key steps for helping you create a book cover design that’s guaranteed to draw in readers.
1. Pick Your Software Wisely
If you’re dipping a toe into the publishing design world, it can be tricky to know which software you should use to create your book cover.
You can use almost any design software to create a cover, but some programs are more specialised for creating professional-quality covers.
Adobe Photoshop isn’t suited for creating inside layouts, but it works perfectly well for creating covers, which are drafted as one page (with the back cover, spine and front cover as one image).
Professional cover designers tend to opt for publishing software as standard, as these tend to give you more control over print specs and typography. Adobe InDesign is the most popular choice, with QuarkXPress a good, if more simplified, alternative.
With Affinity Publisher’s full launch just around the corner as well, this is likely to be a good-value alternative for cover designers in the future.
Perhaps a client has given you an unusual brief, and you’ve got no idea where to start! In this series of Quick Tips I’ll share a couple of common design…
Adobe InDesign has long been the market leader in publishing software. But rival layout design programs are starting to make waves in the market, with…
If you’re a beginner to Adobe InDesign, it can be intimidating knowing how to get started and what tasks the software is suitable for. Here, you’ll find a…
Ever wanted to easily convert your InDesign layouts to eBooks? With the right know-how, it’s super-simple to do. In this tutorial we’ll look at three…
2. Make a Confident Start With a Book Cover Template
If you don’t know how to make a book in InDesign, starting with a downloadable InDesign template can be a sensible and reassuring place to begin designing your cover. Ready-made InDesign book templates can be downloaded from sites like GraphicRiver and can be updated with your own content.
By adapting an existing template, you can learn more about cover design by observing the work a designer has put into a template. Look at how the document has been set up in InDesign to pick up tips for designing your own covers in the future.
Go to File > Document Setup to view the page size and bleed specs, and Layout > Margins and Columns will show you more details about how the cover has been structured. Has the designer included a flexible spine? Noting these key details will help you understand how professional cover designers work and give you pointers for your own custom book covers.
Maker apps like Placeit can also provide a helpful solution for new cover designers wanting to build confidence. In these apps, you can choose an existing cover design and adapt it quickly, tailoring the size for multiple print formats or adapting it as an eBook cover.
Launch your next eBook with a helpful book cover maker. Find your favorite designs with this amazing list of resources from Placeit and Envato Elements.
Ready to take the next step and create a cover in InDesign? Check out these book cover templates which are quick and easy to customize with your own text and images:
Book cover design is one of the most creative areas of print design. Why? Compared to more commercial print media, like flyers and business cards, book covers are intrinsically linked to art—the connection between a book and a potential reader is emotionally charged.
Although we are told not to judge a book by its cover, we can’t help doing just that when we browse a bookshelf. By making your cover as creative and striking as possible, you can hope to win the hearts and minds of your readership and convert browsing to sales.
Professional cover designers know the power of treating a cover like an art canvas. So look to inspirational sources like the fantastic Book Cover Archive and Pinterest to really get your creative juices flowing.
Book Cover ArchiveBy clicking on cover designs which catch your eye on Pinterest, you can browse hundreds of related images, which might spark your next cover idea.
It’s also important to not allow your creativity to outpace your judgement about making the cover genre- and audience-appropriate.
So crime thrillers have a certain design language (large sans serif fonts in punchy colors like red and blue), as do historical romance novels (which tend towards script fonts and pastel colors).
If you’re self-publishing an eBook, it pays to be aware of the sorts of design styles which are trending on eBook stores, like the Kindle Store and Google Play.
Do your research by browsing trending cover designs on the Kindle Store.
Check out these tutorials and courses which show you how to design covers tailored to specific audiences, from young adults to thriller fans:
Do you want to know how to create a fantastic children’s book cover? Our new course, Designing Covers for Children’s Books, will teach you the essential…
Becoming a self-published author is no mean feat. On top of coming up with a great idea, creating an engaging plot and inventing memorable characters, you…
Walk into any bookshop and you’ll notice that each genre of fiction has its own general ‘style’ for cover designs. Though each cover is different, elements…
Young Adult Fiction is an ever-growing sector of the publishing industry, and a popular genre for self-publishers. Here, we’ll look at how handwritten…
4. Get the Essentials Right
When you start to design your book cover, you should take a bit of time to carefully prepare your artwork before you begin designing.
Carefully consider page size, bleed and guides before you put together your cover artwork in InDesign.
Consider the format and size of the cover—will you print the book as a paperback (softcover) or hardback, or create a digital eBook? Do you have a standard size in mind such as Pocket Book, Demy, or Royal? Look up industry-recommended book sizes, and don’t be tempted to stray from the norm.
Top tip: If you want to adjust the size of your cover artwork without starting over in a new document, you can use the Free Transform Tool (E) in InDesign to scale the artwork.
You’ll also need to add a bleed to your cover artwork, which allows background elements and color to extend past the page (trim) edge, making for a more seamless printed result. In InDesign, go to File > Document Setup to add a bleed width to your artwork.
Consider also the expected spine width of your cover, which will have a knock-on effect on the overall width of the cover artwork (which includes the back cover, spine and front cover, from left to right). You can work out the width of the spine once you know the final page count of your book and the paper stock the inside pages will be printed on (which will affect how bulky the book is, and therefore how wide the spine is).
Looking for a more in-depth walk-through on how to create a book cover? This book cover design course shows you how to comprehensively design a cover for a paperback book, from setting up the artwork all the way through to exporting the design for professional printing.
If you want your book to reach more readers, you’ll need a professional cover design. Learn how to make one in our short course, How to Design a Book Cover.
5. For the Front Cover, Focus on Balance, Impact, and Legibility
When designing your front cover, it’s a good tip to let yourself be creative and experiment with different layouts, styles, and themes. The more eye-catching and imaginative you can make your book cover, the better!
However, you do tend to find that covers still follow some rules of layout. After all, you will always need to include some essential information, including the book title and author name. The publisher might also want to include a review or short blurb on the front of the book.
Some cover designers choose to make a feature of the title, creating covers which prioritise typographic design. Alternatively, a single strong photo or graphic can be the dominant feature, with type taking a secondary role.
Above all, you want to foster balance on your cover, and because covers tend to be relatively small it usually looks best if either type or graphic are highlighted more than the other. This also contributes to the improved legibility of the cover, which is also incredibly important when a cover is viewed from a distance away.
This tutorial shows you how to create a cover design which balances an absorbing image with legible text:
Who knew you could create Photoshop-standard effects in Adobe InDesign? Learn how to recreate this dramatic image-inside-image effect, and give your book…
6. Use the Back Cover to Seal the Deal
While the front cover should be designed to advertise the book and provoke an immediate reaction from a reader, the back cover should be used to ‘seal the deal’, providing more enticing information about the book.
Here is the place to include a blurb (a short, interesting summary of the narrative), and possibly reviews (it goes without saying to only include positive ones!).
You will also need to place a barcode (use a barcode generator once you have an ISBN to hand) and optional pricing information on the back cover too. The publisher may also want to include their logo and website, which is usually placed at the bottom of the back cover.
Readers won’t always come into contact with your book through looking at the front cover. The sheer volume of books in stores can mean retailers can choose to stack your book alongside thousands of other competing titles, with only the spine visible. So this small area of spine can spell the difference between someone picking up your book or dismissing it in an instant.
Take the time to consider the design of your spine. You can lift elements from the front cover, such as the title and author name, but you can also add extra quirky details.
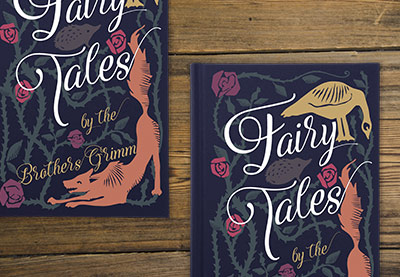
In this example, I designed a vintage-inspired cover for a book of fairy tales. The artwork on the front cover is intricate and fantastical, and I wanted to translate this mood to the spine of the book.
The spine has trailing vines and a rose detail, which frame the script type and make the spine just as romantic and ethereal as the front cover.
To celebrate the start of our Fairy Tale Week here at Envato Tuts+, I’ll show you how to create a cover design for a book of fairy tales with a…
8. Export Your Cover for Printing
When you’ve finished the artwork for your cover, you’ll need to export your design as a press-ready PDF file to be printed.
To do this, head up to File > Export in InDesign, and choose Adobe PDF (Print) from the Format menu. Choose Press Quality from the Preset options to ensure your artwork is exported at very high quality.
Top tip: The cover should be exported as one whole image (including back cover, front cover, and spine).
Find out more about the essentials of preparing your book artwork for print with this must-read tutorial:
Your layouts might be tip-top and your typography skills may well be 'awesome’, but all of these skills will mean next-to-nothing if the printed result comes…
Take Your Publishing Design Skills to the Next Level…
Still unsure about how to start creating your own book templates? A downloadable InDesign template is a sensible place to get started, and can be great for boosting your confidence when you’re dipping a toe into book design.
In this tutorial I’ll show you how to create a striking cover as well as creative page layouts for a children’s book (in this case a modernized version of…
If you’re looking to design your own children’s book, this tutorial will show you how to create a high-quality template for the cover and inside pages, and…
Redesigning covers for classic and beloved novels is big business in publishing. A well-tuned redesign can help a book reach new audiences across different…
In this tutorial, you’ll learn how to set up the artwork for a clothbound book cover in Adobe InDesign and Adobe Illustrator, and look at how to maximise the…
In this article, you’ll learn how to make a book cover. Here, you’ll pick up tips on how to make a book in InDesign and create your own InDesign book template, from using InDesign templates to putting together your cover artwork.
If you’re looking to self-publish your own books and sell them online, or you are making your first steps into professional cover design for clients, this guide will introduce you to the essentials of creating book cover templates.
Read on to discover eight key steps for helping you create a book cover design that’s guaranteed to draw in readers.
1. Pick Your Software Wisely
If you’re dipping a toe into the publishing design world, it can be tricky to know which software you should use to create your book cover.
You can use almost any design software to create a cover, but some programs are more specialised for creating professional-quality covers.
Adobe Photoshop isn’t suited for creating inside layouts, but it works perfectly well for creating covers, which are drafted as one page (with the back cover, spine and front cover as one image).
Professional cover designers tend to opt for publishing software as standard, as these tend to give you more control over print specs and typography. Adobe InDesign is the most popular choice, with QuarkXPress a good, if more simplified, alternative.
With Affinity Publisher’s full launch just around the corner as well, this is likely to be a good-value alternative for cover designers in the future.
Perhaps a client has given you an unusual brief, and you’ve got no idea where to start! In this series of Quick Tips I’ll share a couple of common design…
Adobe InDesign has long been the market leader in publishing software. But rival layout design programs are starting to make waves in the market, with…
If you’re a beginner to Adobe InDesign, it can be intimidating knowing how to get started and what tasks the software is suitable for. Here, you’ll find a…
Ever wanted to easily convert your InDesign layouts to eBooks? With the right know-how, it’s super-simple to do. In this tutorial we’ll look at three…
2. Make a Confident Start With a Book Cover Template
If you don’t know how to make a book in InDesign, starting with a downloadable InDesign template can be a sensible and reassuring place to begin designing your cover. Ready-made InDesign book templates can be downloaded from sites like GraphicRiver and can be updated with your own content.
By adapting an existing template, you can learn more about cover design by observing the work a designer has put into a template. Look at how the document has been set up in InDesign to pick up tips for designing your own covers in the future.
Go to File > Document Setup to view the page size and bleed specs, and Layout > Margins and Columns will show you more details about how the cover has been structured. Has the designer included a flexible spine? Noting these key details will help you understand how professional cover designers work and give you pointers for your own custom book covers.
Maker apps like Placeit can also provide a helpful solution for new cover designers wanting to build confidence. In these apps, you can choose an existing cover design and adapt it quickly, tailoring the size for multiple print formats or adapting it as an eBook cover.
Launch your next eBook with a helpful book cover maker. Find your favorite designs with this amazing list of resources from Placeit and Envato Elements.
Ready to take the next step and create a cover in InDesign? Check out these book cover templates which are quick and easy to customize with your own text and images:
Book cover design is one of the most creative areas of print design. Why? Compared to more commercial print media, like flyers and business cards, book covers are intrinsically linked to art—the connection between a book and a potential reader is emotionally charged.
Although we are told not to judge a book by its cover, we can’t help doing just that when we browse a bookshelf. By making your cover as creative and striking as possible, you can hope to win the hearts and minds of your readership and convert browsing to sales.
Professional cover designers know the power of treating a cover like an art canvas. So look to inspirational sources like the fantastic Book Cover Archive and Pinterest to really get your creative juices flowing.
Book Cover ArchiveBy clicking on cover designs which catch your eye on Pinterest, you can browse hundreds of related images, which might spark your next cover idea.
It’s also important to not allow your creativity to outpace your judgement about making the cover genre- and audience-appropriate.
So crime thrillers have a certain design language (large sans serif fonts in punchy colors like red and blue), as do historical romance novels (which tend towards script fonts and pastel colors).
If you’re self-publishing an eBook, it pays to be aware of the sorts of design styles which are trending on eBook stores, like the Kindle Store and Google Play.
Do your research by browsing trending cover designs on the Kindle Store.
Check out these tutorials and courses which show you how to design covers tailored to specific audiences, from young adults to thriller fans:
Do you want to know how to create a fantastic children’s book cover? Our new course, Designing Covers for Children’s Books, will teach you the essential…
Becoming a self-published author is no mean feat. On top of coming up with a great idea, creating an engaging plot and inventing memorable characters, you…
Walk into any bookshop and you’ll notice that each genre of fiction has its own general ‘style’ for cover designs. Though each cover is different, elements…
Young Adult Fiction is an ever-growing sector of the publishing industry, and a popular genre for self-publishers. Here, we’ll look at how handwritten…
4. Get the Essentials Right
When you start to design your book cover, you should take a bit of time to carefully prepare your artwork before you begin designing.
Carefully consider page size, bleed and guides before you put together your cover artwork in InDesign.
Consider the format and size of the cover—will you print the book as a paperback (softcover) or hardback, or create a digital eBook? Do you have a standard size in mind such as Pocket Book, Demy, or Royal? Look up industry-recommended book sizes, and don’t be tempted to stray from the norm.
Top tip: If you want to adjust the size of your cover artwork without starting over in a new document, you can use the Free Transform Tool (E) in InDesign to scale the artwork.
You’ll also need to add a bleed to your cover artwork, which allows background elements and color to extend past the page (trim) edge, making for a more seamless printed result. In InDesign, go to File > Document Setup to add a bleed width to your artwork.
Consider also the expected spine width of your cover, which will have a knock-on effect on the overall width of the cover artwork (which includes the back cover, spine and front cover, from left to right). You can work out the width of the spine once you know the final page count of your book and the paper stock the inside pages will be printed on (which will affect how bulky the book is, and therefore how wide the spine is).
Looking for a more in-depth walk-through on how to create a book cover? This book cover design course shows you how to comprehensively design a cover for a paperback book, from setting up the artwork all the way through to exporting the design for professional printing.
If you want your book to reach more readers, you’ll need a professional cover design. Learn how to make one in our short course, How to Design a Book Cover.
5. For the Front Cover, Focus on Balance, Impact, and Legibility
When designing your front cover, it’s a good tip to let yourself be creative and experiment with different layouts, styles, and themes. The more eye-catching and imaginative you can make your book cover, the better!
However, you do tend to find that covers still follow some rules of layout. After all, you will always need to include some essential information, including the book title and author name. The publisher might also want to include a review or short blurb on the front of the book.
Some cover designers choose to make a feature of the title, creating covers which prioritise typographic design. Alternatively, a single strong photo or graphic can be the dominant feature, with type taking a secondary role.
Above all, you want to foster balance on your cover, and because covers tend to be relatively small it usually looks best if either type or graphic are highlighted more than the other. This also contributes to the improved legibility of the cover, which is also incredibly important when a cover is viewed from a distance away.
This tutorial shows you how to create a cover design which balances an absorbing image with legible text:
Who knew you could create Photoshop-standard effects in Adobe InDesign? Learn how to recreate this dramatic image-inside-image effect, and give your book…
6. Use the Back Cover to Seal the Deal
While the front cover should be designed to advertise the book and provoke an immediate reaction from a reader, the back cover should be used to ‘seal the deal’, providing more enticing information about the book.
Here is the place to include a blurb (a short, interesting summary of the narrative), and possibly reviews (it goes without saying to only include positive ones!).
You will also need to place a barcode (use a barcode generator once you have an ISBN to hand) and optional pricing information on the back cover too. The publisher may also want to include their logo and website, which is usually placed at the bottom of the back cover.
Readers won’t always come into contact with your book through looking at the front cover. The sheer volume of books in stores can mean retailers can choose to stack your book alongside thousands of other competing titles, with only the spine visible. So this small area of spine can spell the difference between someone picking up your book or dismissing it in an instant.
Take the time to consider the design of your spine. You can lift elements from the front cover, such as the title and author name, but you can also add extra quirky details.
In this example, I designed a vintage-inspired cover for a book of fairy tales. The artwork on the front cover is intricate and fantastical, and I wanted to translate this mood to the spine of the book.
The spine has trailing vines and a rose detail, which frame the script type and make the spine just as romantic and ethereal as the front cover.
To celebrate the start of our Fairy Tale Week here at Envato Tuts+, I’ll show you how to create a cover design for a book of fairy tales with a…
8. Export Your Cover for Printing
When you’ve finished the artwork for your cover, you’ll need to export your design as a press-ready PDF file to be printed.
To do this, head up to File > Export in InDesign, and choose Adobe PDF (Print) from the Format menu. Choose Press Quality from the Preset options to ensure your artwork is exported at very high quality.
Top tip: The cover should be exported as one whole image (including back cover, front cover, and spine).
Find out more about the essentials of preparing your book artwork for print with this must-read tutorial:
Your layouts might be tip-top and your typography skills may well be 'awesome’, but all of these skills will mean next-to-nothing if the printed result comes…
Take Your Publishing Design Skills to the Next Level…
Still unsure about how to start creating your own book templates? A downloadable InDesign template is a sensible place to get started, and can be great for boosting your confidence when you’re dipping a toe into book design.
In this tutorial I’ll show you how to create a striking cover as well as creative page layouts for a children’s book (in this case a modernized version of…
If you’re looking to design your own children’s book, this tutorial will show you how to create a high-quality template for the cover and inside pages, and…
Redesigning covers for classic and beloved novels is big business in publishing. A well-tuned redesign can help a book reach new audiences across different…
In this tutorial, you’ll learn how to set up the artwork for a clothbound book cover in Adobe InDesign and Adobe Illustrator, and look at how to maximise the…
In this article, you’ll learn how to make a book cover. Here, you’ll pick up tips on how to make a book in InDesign and create your own InDesign book template, from using InDesign templates to putting together your cover artwork.
If you’re looking to self-publish your own books and sell them online, or you are making your first steps into professional cover design for clients, this guide will introduce you to the essentials of creating book cover templates.
Read on to discover eight key steps for helping you create a book cover design that’s guaranteed to draw in readers.
1. Pick Your Software Wisely
If you’re dipping a toe into the publishing design world, it can be tricky to know which software you should use to create your book cover.
You can use almost any design software to create a cover, but some programs are more specialised for creating professional-quality covers.
Adobe Photoshop isn’t suited for creating inside layouts, but it works perfectly well for creating covers, which are drafted as one page (with the back cover, spine and front cover as one image).
Professional cover designers tend to opt for publishing software as standard, as these tend to give you more control over print specs and typography. Adobe InDesign is the most popular choice, with QuarkXPress a good, if more simplified, alternative.
With Affinity Publisher’s full launch just around the corner as well, this is likely to be a good-value alternative for cover designers in the future.
Perhaps a client has given you an unusual brief, and you’ve got no idea where to start! In this series of Quick Tips I’ll share a couple of common design…
Adobe InDesign has long been the market leader in publishing software. But rival layout design programs are starting to make waves in the market, with…
If you’re a beginner to Adobe InDesign, it can be intimidating knowing how to get started and what tasks the software is suitable for. Here, you’ll find a…
Ever wanted to easily convert your InDesign layouts to eBooks? With the right know-how, it’s super-simple to do. In this tutorial we’ll look at three…
2. Make a Confident Start With a Book Cover Template
If you don’t know how to make a book in InDesign, starting with a downloadable InDesign template can be a sensible and reassuring place to begin designing your cover. Ready-made InDesign book templates can be downloaded from sites like GraphicRiver and can be updated with your own content.
By adapting an existing template, you can learn more about cover design by observing the work a designer has put into a template. Look at how the document has been set up in InDesign to pick up tips for designing your own covers in the future.
Go to File > Document Setup to view the page size and bleed specs, and Layout > Margins and Columns will show you more details about how the cover has been structured. Has the designer included a flexible spine? Noting these key details will help you understand how professional cover designers work and give you pointers for your own custom book covers.
Maker apps like Placeit can also provide a helpful solution for new cover designers wanting to build confidence. In these apps, you can choose an existing cover design and adapt it quickly, tailoring the size for multiple print formats or adapting it as an eBook cover.
Launch your next eBook with a helpful book cover maker. Find your favorite designs with this amazing list of resources from Placeit and Envato Elements.
Ready to take the next step and create a cover in InDesign? Check out these book cover templates which are quick and easy to customize with your own text and images:
Book cover design is one of the most creative areas of print design. Why? Compared to more commercial print media, like flyers and business cards, book covers are intrinsically linked to art—the connection between a book and a potential reader is emotionally charged.
Although we are told not to judge a book by its cover, we can’t help doing just that when we browse a bookshelf. By making your cover as creative and striking as possible, you can hope to win the hearts and minds of your readership and convert browsing to sales.
Professional cover designers know the power of treating a cover like an art canvas. So look to inspirational sources like the fantastic Book Cover Archive and Pinterest to really get your creative juices flowing.
Book Cover ArchiveBy clicking on cover designs which catch your eye on Pinterest, you can browse hundreds of related images, which might spark your next cover idea.
It’s also important to not allow your creativity to outpace your judgement about making the cover genre- and audience-appropriate.
So crime thrillers have a certain design language (large sans serif fonts in punchy colors like red and blue), as do historical romance novels (which tend towards script fonts and pastel colors).
If you’re self-publishing an eBook, it pays to be aware of the sorts of design styles which are trending on eBook stores, like the Kindle Store and Google Play.
Do your research by browsing trending cover designs on the Kindle Store.
Check out these tutorials and courses which show you how to design covers tailored to specific audiences, from young adults to thriller fans:
Do you want to know how to create a fantastic children’s book cover? Our new course, Designing Covers for Children’s Books, will teach you the essential…
Becoming a self-published author is no mean feat. On top of coming up with a great idea, creating an engaging plot and inventing memorable characters, you…
Walk into any bookshop and you’ll notice that each genre of fiction has its own general ‘style’ for cover designs. Though each cover is different, elements…
Young Adult Fiction is an ever-growing sector of the publishing industry, and a popular genre for self-publishers. Here, we’ll look at how handwritten…
4. Get the Essentials Right
When you start to design your book cover, you should take a bit of time to carefully prepare your artwork before you begin designing.
Carefully consider page size, bleed and guides before you put together your cover artwork in InDesign.
Consider the format and size of the cover—will you print the book as a paperback (softcover) or hardback, or create a digital eBook? Do you have a standard size in mind such as Pocket Book, Demy, or Royal? Look up industry-recommended book sizes, and don’t be tempted to stray from the norm.
Top tip: If you want to adjust the size of your cover artwork without starting over in a new document, you can use the Free Transform Tool (E) in InDesign to scale the artwork.
You’ll also need to add a bleed to your cover artwork, which allows background elements and color to extend past the page (trim) edge, making for a more seamless printed result. In InDesign, go to File > Document Setup to add a bleed width to your artwork.
Consider also the expected spine width of your cover, which will have a knock-on effect on the overall width of the cover artwork (which includes the back cover, spine and front cover, from left to right). You can work out the width of the spine once you know the final page count of your book and the paper stock the inside pages will be printed on (which will affect how bulky the book is, and therefore how wide the spine is).
Looking for a more in-depth walk-through on how to create a book cover? This book cover design course shows you how to comprehensively design a cover for a paperback book, from setting up the artwork all the way through to exporting the design for professional printing.
If you want your book to reach more readers, you’ll need a professional cover design. Learn how to make one in our short course, How to Design a Book Cover.
5. For the Front Cover, Focus on Balance, Impact, and Legibility
When designing your front cover, it’s a good tip to let yourself be creative and experiment with different layouts, styles, and themes. The more eye-catching and imaginative you can make your book cover, the better!
However, you do tend to find that covers still follow some rules of layout. After all, you will always need to include some essential information, including the book title and author name. The publisher might also want to include a review or short blurb on the front of the book.
Some cover designers choose to make a feature of the title, creating covers which prioritise typographic design. Alternatively, a single strong photo or graphic can be the dominant feature, with type taking a secondary role.
Above all, you want to foster balance on your cover, and because covers tend to be relatively small it usually looks best if either type or graphic are highlighted more than the other. This also contributes to the improved legibility of the cover, which is also incredibly important when a cover is viewed from a distance away.
This tutorial shows you how to create a cover design which balances an absorbing image with legible text:
Who knew you could create Photoshop-standard effects in Adobe InDesign? Learn how to recreate this dramatic image-inside-image effect, and give your book…
6. Use the Back Cover to Seal the Deal
While the front cover should be designed to advertise the book and provoke an immediate reaction from a reader, the back cover should be used to ‘seal the deal’, providing more enticing information about the book.
Here is the place to include a blurb (a short, interesting summary of the narrative), and possibly reviews (it goes without saying to only include positive ones!).
You will also need to place a barcode (use a barcode generator once you have an ISBN to hand) and optional pricing information on the back cover too. The publisher may also want to include their logo and website, which is usually placed at the bottom of the back cover.
Readers won’t always come into contact with your book through looking at the front cover. The sheer volume of books in stores can mean retailers can choose to stack your book alongside thousands of other competing titles, with only the spine visible. So this small area of spine can spell the difference between someone picking up your book or dismissing it in an instant.
Take the time to consider the design of your spine. You can lift elements from the front cover, such as the title and author name, but you can also add extra quirky details.
In this example, I designed a vintage-inspired cover for a book of fairy tales. The artwork on the front cover is intricate and fantastical, and I wanted to translate this mood to the spine of the book.
The spine has trailing vines and a rose detail, which frame the script type and make the spine just as romantic and ethereal as the front cover.
To celebrate the start of our Fairy Tale Week here at Envato Tuts+, I’ll show you how to create a cover design for a book of fairy tales with a…
8. Export Your Cover for Printing
When you’ve finished the artwork for your cover, you’ll need to export your design as a press-ready PDF file to be printed.
To do this, head up to File > Export in InDesign, and choose Adobe PDF (Print) from the Format menu. Choose Press Quality from the Preset options to ensure your artwork is exported at very high quality.
Top tip: The cover should be exported as one whole image (including back cover, front cover, and spine).
Find out more about the essentials of preparing your book artwork for print with this must-read tutorial:
Your layouts might be tip-top and your typography skills may well be 'awesome’, but all of these skills will mean next-to-nothing if the printed result comes…
Take Your Publishing Design Skills to the Next Level…
Still unsure about how to start creating your own book templates? A downloadable InDesign template is a sensible place to get started, and can be great for boosting your confidence when you’re dipping a toe into book design.
In this tutorial I’ll show you how to create a striking cover as well as creative page layouts for a children’s book (in this case a modernized version of…
If you’re looking to design your own children’s book, this tutorial will show you how to create a high-quality template for the cover and inside pages, and…
Redesigning covers for classic and beloved novels is big business in publishing. A well-tuned redesign can help a book reach new audiences across different…
In this tutorial, you’ll learn how to set up the artwork for a clothbound book cover in Adobe InDesign and Adobe Illustrator, and look at how to maximise the…
In this article, you’ll learn how to make a book cover. Here, you’ll pick up tips on how to make a book in InDesign and create your own InDesign book template, from using InDesign templates to putting together your cover artwork.
If you’re looking to self-publish your own books and sell them online, or you are making your first steps into professional cover design for clients, this guide will introduce you to the essentials of creating book cover templates.
Read on to discover eight key steps for helping you create a book cover design that’s guaranteed to draw in readers.
1. Pick Your Software Wisely
If you’re dipping a toe into the publishing design world, it can be tricky to know which software you should use to create your book cover.
You can use almost any design software to create a cover, but some programs are more specialised for creating professional-quality covers.
Adobe Photoshop isn’t suited for creating inside layouts, but it works perfectly well for creating covers, which are drafted as one page (with the back cover, spine and front cover as one image).
Professional cover designers tend to opt for publishing software as standard, as these tend to give you more control over print specs and typography. Adobe InDesign is the most popular choice, with QuarkXPress a good, if more simplified, alternative.
With Affinity Publisher’s full launch just around the corner as well, this is likely to be a good-value alternative for cover designers in the future.
Perhaps a client has given you an unusual brief, and you’ve got no idea where to start! In this series of Quick Tips I’ll share a couple of common design…
Adobe InDesign has long been the market leader in publishing software. But rival layout design programs are starting to make waves in the market, with…
If you’re a beginner to Adobe InDesign, it can be intimidating knowing how to get started and what tasks the software is suitable for. Here, you’ll find a…
Ever wanted to easily convert your InDesign layouts to eBooks? With the right know-how, it’s super-simple to do. In this tutorial we’ll look at three…
2. Make a Confident Start With a Book Cover Template
If you don’t know how to make a book in InDesign, starting with a downloadable InDesign template can be a sensible and reassuring place to begin designing your cover. Ready-made InDesign book templates can be downloaded from sites like GraphicRiver and can be updated with your own content.
By adapting an existing template, you can learn more about cover design by observing the work a designer has put into a template. Look at how the document has been set up in InDesign to pick up tips for designing your own covers in the future.
Go to File > Document Setup to view the page size and bleed specs, and Layout > Margins and Columns will show you more details about how the cover has been structured. Has the designer included a flexible spine? Noting these key details will help you understand how professional cover designers work and give you pointers for your own custom book covers.
Maker apps like Placeit can also provide a helpful solution for new cover designers wanting to build confidence. In these apps, you can choose an existing cover design and adapt it quickly, tailoring the size for multiple print formats or adapting it as an eBook cover.
Launch your next eBook with a helpful book cover maker. Find your favorite designs with this amazing list of resources from Placeit and Envato Elements.
Ready to take the next step and create a cover in InDesign? Check out these book cover templates which are quick and easy to customize with your own text and images:
Book cover design is one of the most creative areas of print design. Why? Compared to more commercial print media, like flyers and business cards, book covers are intrinsically linked to art—the connection between a book and a potential reader is emotionally charged.
Although we are told not to judge a book by its cover, we can’t help doing just that when we browse a bookshelf. By making your cover as creative and striking as possible, you can hope to win the hearts and minds of your readership and convert browsing to sales.
Professional cover designers know the power of treating a cover like an art canvas. So look to inspirational sources like the fantastic Book Cover Archive and Pinterest to really get your creative juices flowing.
Book Cover ArchiveBy clicking on cover designs which catch your eye on Pinterest, you can browse hundreds of related images, which might spark your next cover idea.
It’s also important to not allow your creativity to outpace your judgement about making the cover genre- and audience-appropriate.
So crime thrillers have a certain design language (large sans serif fonts in punchy colors like red and blue), as do historical romance novels (which tend towards script fonts and pastel colors).
If you’re self-publishing an eBook, it pays to be aware of the sorts of design styles which are trending on eBook stores, like the Kindle Store and Google Play.
Do your research by browsing trending cover designs on the Kindle Store.
Check out these tutorials and courses which show you how to design covers tailored to specific audiences, from young adults to thriller fans:
Do you want to know how to create a fantastic children’s book cover? Our new course, Designing Covers for Children’s Books, will teach you the essential…
Becoming a self-published author is no mean feat. On top of coming up with a great idea, creating an engaging plot and inventing memorable characters, you…
Walk into any bookshop and you’ll notice that each genre of fiction has its own general ‘style’ for cover designs. Though each cover is different, elements…
Young Adult Fiction is an ever-growing sector of the publishing industry, and a popular genre for self-publishers. Here, we’ll look at how handwritten…
4. Get the Essentials Right
When you start to design your book cover, you should take a bit of time to carefully prepare your artwork before you begin designing.
Carefully consider page size, bleed and guides before you put together your cover artwork in InDesign.
Consider the format and size of the cover—will you print the book as a paperback (softcover) or hardback, or create a digital eBook? Do you have a standard size in mind such as Pocket Book, Demy, or Royal? Look up industry-recommended book sizes, and don’t be tempted to stray from the norm.
Top tip: If you want to adjust the size of your cover artwork without starting over in a new document, you can use the Free Transform Tool (E) in InDesign to scale the artwork.
You’ll also need to add a bleed to your cover artwork, which allows background elements and color to extend past the page (trim) edge, making for a more seamless printed result. In InDesign, go to File > Document Setup to add a bleed width to your artwork.
Consider also the expected spine width of your cover, which will have a knock-on effect on the overall width of the cover artwork (which includes the back cover, spine and front cover, from left to right). You can work out the width of the spine once you know the final page count of your book and the paper stock the inside pages will be printed on (which will affect how bulky the book is, and therefore how wide the spine is).
Looking for a more in-depth walk-through on how to create a book cover? This book cover design course shows you how to comprehensively design a cover for a paperback book, from setting up the artwork all the way through to exporting the design for professional printing.
If you want your book to reach more readers, you’ll need a professional cover design. Learn how to make one in our short course, How to Design a Book Cover.
5. For the Front Cover, Focus on Balance, Impact, and Legibility
When designing your front cover, it’s a good tip to let yourself be creative and experiment with different layouts, styles, and themes. The more eye-catching and imaginative you can make your book cover, the better!
However, you do tend to find that covers still follow some rules of layout. After all, you will always need to include some essential information, including the book title and author name. The publisher might also want to include a review or short blurb on the front of the book.
Some cover designers choose to make a feature of the title, creating covers which prioritise typographic design. Alternatively, a single strong photo or graphic can be the dominant feature, with type taking a secondary role.
Above all, you want to foster balance on your cover, and because covers tend to be relatively small it usually looks best if either type or graphic are highlighted more than the other. This also contributes to the improved legibility of the cover, which is also incredibly important when a cover is viewed from a distance away.
This tutorial shows you how to create a cover design which balances an absorbing image with legible text:
Who knew you could create Photoshop-standard effects in Adobe InDesign? Learn how to recreate this dramatic image-inside-image effect, and give your book…
6. Use the Back Cover to Seal the Deal
While the front cover should be designed to advertise the book and provoke an immediate reaction from a reader, the back cover should be used to ‘seal the deal’, providing more enticing information about the book.
Here is the place to include a blurb (a short, interesting summary of the narrative), and possibly reviews (it goes without saying to only include positive ones!).
You will also need to place a barcode (use a barcode generator once you have an ISBN to hand) and optional pricing information on the back cover too. The publisher may also want to include their logo and website, which is usually placed at the bottom of the back cover.
Readers won’t always come into contact with your book through looking at the front cover. The sheer volume of books in stores can mean retailers can choose to stack your book alongside thousands of other competing titles, with only the spine visible. So this small area of spine can spell the difference between someone picking up your book or dismissing it in an instant.
Take the time to consider the design of your spine. You can lift elements from the front cover, such as the title and author name, but you can also add extra quirky details.
In this example, I designed a vintage-inspired cover for a book of fairy tales. The artwork on the front cover is intricate and fantastical, and I wanted to translate this mood to the spine of the book.
The spine has trailing vines and a rose detail, which frame the script type and make the spine just as romantic and ethereal as the front cover.
To celebrate the start of our Fairy Tale Week here at Envato Tuts+, I’ll show you how to create a cover design for a book of fairy tales with a…
8. Export Your Cover for Printing
When you’ve finished the artwork for your cover, you’ll need to export your design as a press-ready PDF file to be printed.
To do this, head up to File > Export in InDesign, and choose Adobe PDF (Print) from the Format menu. Choose Press Quality from the Preset options to ensure your artwork is exported at very high quality.
Top tip: The cover should be exported as one whole image (including back cover, front cover, and spine).
Find out more about the essentials of preparing your book artwork for print with this must-read tutorial:
Your layouts might be tip-top and your typography skills may well be 'awesome’, but all of these skills will mean next-to-nothing if the printed result comes…
Take Your Publishing Design Skills to the Next Level…
Still unsure about how to start creating your own book templates? A downloadable InDesign template is a sensible place to get started, and can be great for boosting your confidence when you’re dipping a toe into book design.
In this tutorial I’ll show you how to create a striking cover as well as creative page layouts for a children’s book (in this case a modernized version of…
If you’re looking to design your own children’s book, this tutorial will show you how to create a high-quality template for the cover and inside pages, and…
Redesigning covers for classic and beloved novels is big business in publishing. A well-tuned redesign can help a book reach new audiences across different…
In this tutorial, you’ll learn how to set up the artwork for a clothbound book cover in Adobe InDesign and Adobe Illustrator, and look at how to maximise the…
In this article, you’ll learn how to make a book cover. Here, you’ll pick up tips on how to make a book in InDesign and create your own InDesign book template, from using InDesign templates to putting together your cover artwork.
If you’re looking to self-publish your own books and sell them online, or you are making your first steps into professional cover design for clients, this guide will introduce you to the essentials of creating book cover templates.
Read on to discover eight key steps for helping you create a book cover design that’s guaranteed to draw in readers.
1. Pick Your Software Wisely
If you’re dipping a toe into the publishing design world, it can be tricky to know which software you should use to create your book cover.
You can use almost any design software to create a cover, but some programs are more specialised for creating professional-quality covers.
Adobe Photoshop isn’t suited for creating inside layouts, but it works perfectly well for creating covers, which are drafted as one page (with the back cover, spine and front cover as one image).
Professional cover designers tend to opt for publishing software as standard, as these tend to give you more control over print specs and typography. Adobe InDesign is the most popular choice, with QuarkXPress a good, if more simplified, alternative.
With Affinity Publisher’s full launch just around the corner as well, this is likely to be a good-value alternative for cover designers in the future.
Perhaps a client has given you an unusual brief, and you’ve got no idea where to start! In this series of Quick Tips I’ll share a couple of common design…
Adobe InDesign has long been the market leader in publishing software. But rival layout design programs are starting to make waves in the market, with…
If you’re a beginner to Adobe InDesign, it can be intimidating knowing how to get started and what tasks the software is suitable for. Here, you’ll find a…
Ever wanted to easily convert your InDesign layouts to eBooks? With the right know-how, it’s super-simple to do. In this tutorial we’ll look at three…
2. Make a Confident Start With a Book Cover Template
If you don’t know how to make a book in InDesign, starting with a downloadable InDesign template can be a sensible and reassuring place to begin designing your cover. Ready-made InDesign book templates can be downloaded from sites like GraphicRiver and can be updated with your own content.
By adapting an existing template, you can learn more about cover design by observing the work a designer has put into a template. Look at how the document has been set up in InDesign to pick up tips for designing your own covers in the future.
Go to File > Document Setup to view the page size and bleed specs, and Layout > Margins and Columns will show you more details about how the cover has been structured. Has the designer included a flexible spine? Noting these key details will help you understand how professional cover designers work and give you pointers for your own custom book covers.
Maker apps like Placeit can also provide a helpful solution for new cover designers wanting to build confidence. In these apps, you can choose an existing cover design and adapt it quickly, tailoring the size for multiple print formats or adapting it as an eBook cover.
Launch your next eBook with a helpful book cover maker. Find your favorite designs with this amazing list of resources from Placeit and Envato Elements.
Ready to take the next step and create a cover in InDesign? Check out these book cover templates which are quick and easy to customize with your own text and images:
Book cover design is one of the most creative areas of print design. Why? Compared to more commercial print media, like flyers and business cards, book covers are intrinsically linked to art—the connection between a book and a potential reader is emotionally charged.
Although we are told not to judge a book by its cover, we can’t help doing just that when we browse a bookshelf. By making your cover as creative and striking as possible, you can hope to win the hearts and minds of your readership and convert browsing to sales.
Professional cover designers know the power of treating a cover like an art canvas. So look to inspirational sources like the fantastic Book Cover Archive and Pinterest to really get your creative juices flowing.
Book Cover ArchiveBy clicking on cover designs which catch your eye on Pinterest, you can browse hundreds of related images, which might spark your next cover idea.
It’s also important to not allow your creativity to outpace your judgement about making the cover genre- and audience-appropriate.
So crime thrillers have a certain design language (large sans serif fonts in punchy colors like red and blue), as do historical romance novels (which tend towards script fonts and pastel colors).
If you’re self-publishing an eBook, it pays to be aware of the sorts of design styles which are trending on eBook stores, like the Kindle Store and Google Play.
Do your research by browsing trending cover designs on the Kindle Store.
Check out these tutorials and courses which show you how to design covers tailored to specific audiences, from young adults to thriller fans:
Do you want to know how to create a fantastic children’s book cover? Our new course, Designing Covers for Children’s Books, will teach you the essential…
Becoming a self-published author is no mean feat. On top of coming up with a great idea, creating an engaging plot and inventing memorable characters, you…
Walk into any bookshop and you’ll notice that each genre of fiction has its own general ‘style’ for cover designs. Though each cover is different, elements…
Young Adult Fiction is an ever-growing sector of the publishing industry, and a popular genre for self-publishers. Here, we’ll look at how handwritten…
4. Get the Essentials Right
When you start to design your book cover, you should take a bit of time to carefully prepare your artwork before you begin designing.
Carefully consider page size, bleed and guides before you put together your cover artwork in InDesign.
Consider the format and size of the cover—will you print the book as a paperback (softcover) or hardback, or create a digital eBook? Do you have a standard size in mind such as Pocket Book, Demy, or Royal? Look up industry-recommended book sizes, and don’t be tempted to stray from the norm.
Top tip: If you want to adjust the size of your cover artwork without starting over in a new document, you can use the Free Transform Tool (E) in InDesign to scale the artwork.
You’ll also need to add a bleed to your cover artwork, which allows background elements and color to extend past the page (trim) edge, making for a more seamless printed result. In InDesign, go to File > Document Setup to add a bleed width to your artwork.
Consider also the expected spine width of your cover, which will have a knock-on effect on the overall width of the cover artwork (which includes the back cover, spine and front cover, from left to right). You can work out the width of the spine once you know the final page count of your book and the paper stock the inside pages will be printed on (which will affect how bulky the book is, and therefore how wide the spine is).
Looking for a more in-depth walk-through on how to create a book cover? This book cover design course shows you how to comprehensively design a cover for a paperback book, from setting up the artwork all the way through to exporting the design for professional printing.
If you want your book to reach more readers, you’ll need a professional cover design. Learn how to make one in our short course, How to Design a Book Cover.
5. For the Front Cover, Focus on Balance, Impact, and Legibility
When designing your front cover, it’s a good tip to let yourself be creative and experiment with different layouts, styles, and themes. The more eye-catching and imaginative you can make your book cover, the better!
However, you do tend to find that covers still follow some rules of layout. After all, you will always need to include some essential information, including the book title and author name. The publisher might also want to include a review or short blurb on the front of the book.
Some cover designers choose to make a feature of the title, creating covers which prioritise typographic design. Alternatively, a single strong photo or graphic can be the dominant feature, with type taking a secondary role.
Above all, you want to foster balance on your cover, and because covers tend to be relatively small it usually looks best if either type or graphic are highlighted more than the other. This also contributes to the improved legibility of the cover, which is also incredibly important when a cover is viewed from a distance away.
This tutorial shows you how to create a cover design which balances an absorbing image with legible text:
Who knew you could create Photoshop-standard effects in Adobe InDesign? Learn how to recreate this dramatic image-inside-image effect, and give your book…
6. Use the Back Cover to Seal the Deal
While the front cover should be designed to advertise the book and provoke an immediate reaction from a reader, the back cover should be used to ‘seal the deal’, providing more enticing information about the book.
Here is the place to include a blurb (a short, interesting summary of the narrative), and possibly reviews (it goes without saying to only include positive ones!).
You will also need to place a barcode (use a barcode generator once you have an ISBN to hand) and optional pricing information on the back cover too. The publisher may also want to include their logo and website, which is usually placed at the bottom of the back cover.
Readers won’t always come into contact with your book through looking at the front cover. The sheer volume of books in stores can mean retailers can choose to stack your book alongside thousands of other competing titles, with only the spine visible. So this small area of spine can spell the difference between someone picking up your book or dismissing it in an instant.
Take the time to consider the design of your spine. You can lift elements from the front cover, such as the title and author name, but you can also add extra quirky details.
In this example, I designed a vintage-inspired cover for a book of fairy tales. The artwork on the front cover is intricate and fantastical, and I wanted to translate this mood to the spine of the book.
The spine has trailing vines and a rose detail, which frame the script type and make the spine just as romantic and ethereal as the front cover.
To celebrate the start of our Fairy Tale Week here at Envato Tuts+, I’ll show you how to create a cover design for a book of fairy tales with a…
8. Export Your Cover for Printing
When you’ve finished the artwork for your cover, you’ll need to export your design as a press-ready PDF file to be printed.
To do this, head up to File > Export in InDesign, and choose Adobe PDF (Print) from the Format menu. Choose Press Quality from the Preset options to ensure your artwork is exported at very high quality.
Top tip: The cover should be exported as one whole image (including back cover, front cover, and spine).
Find out more about the essentials of preparing your book artwork for print with this must-read tutorial:
Your layouts might be tip-top and your typography skills may well be 'awesome’, but all of these skills will mean next-to-nothing if the printed result comes…
Take Your Publishing Design Skills to the Next Level…
Still unsure about how to start creating your own book templates? A downloadable InDesign template is a sensible place to get started, and can be great for boosting your confidence when you’re dipping a toe into book design.
In this tutorial I’ll show you how to create a striking cover as well as creative page layouts for a children’s book (in this case a modernized version of…
If you’re looking to design your own children’s book, this tutorial will show you how to create a high-quality template for the cover and inside pages, and…
Redesigning covers for classic and beloved novels is big business in publishing. A well-tuned redesign can help a book reach new audiences across different…
In this tutorial, you’ll learn how to set up the artwork for a clothbound book cover in Adobe InDesign and Adobe Illustrator, and look at how to maximise the…
Agregator najlepszych postów o designie, webdesignie, cssie i Internecie