How to Create an Ice Text Effect in Adobe InDesign

Post pobrano z: How to Create an Ice Text Effect in Adobe InDesign

Final product image
What You’ll Be Creating

In this short tutorial you’ll learn how to create an icy effect which you can apply to any text. Guaranteed to give your designs an instant wintry vibe, this is also a quick introduction to InDesign effects for beginners.

If you want to add a unique touch to your text effect, you can easily switch up the font to create a very different look. Head over to GraphicRiver or Envato Elements to source fab fonts for your next project. 

Ready to create our icy effect? Let’s get started!

What You’ll Need to Create Your Frozen Effect

As well as having access to Adobe InDesign, you’ll also need to download the following images and font files to create your effect:

* If you’d like to use a different font for your text effect, go ahead!

1. How to Create a Frozen Backdrop for Your Text Effect

Step 1

Open up InDesign and go to File > New > Document. You can create the type effect at any size you wish, but here I’m going to set up an A3 landscape page with the Intent set to Print.

Once you’ve set up the specs for your document, go ahead and click OK

Expand the Layers panel (Window > Layers) and double-click on the Layer 1 name. In the Options window, change the name to Background and click OK.

background layer

Click on the Create New Layer button at the bottom of the panel and rename the new layer Typography. Finally, create a third layer and name it Texture

Lock both the Texture and Typography layers, clicking on the Background layer to activate it. 

layers

Step 2

Take the Rectangle Frame Tool (F) and drag across the whole page. Go to File > Place and choose the ice background image you downloaded earlier. Click Open and allow it to fill up the whole frame. 

ice background

Step 3

Expand the Swatches panel (Window > Color > Swatches) and choose New Color Swatch from the panel’s top-right drop-down menu. 

Name the swatch Blue and set the levels to C=60 M=26 Y=9 K=0. Click Add and then OK.

blue swatch

Use the Rectangle Tool (M) to create a rectangle shape that extends across the whole page and past the left and right edges, as shown below. Set the Fill to Blue

blue fill shape

With the rectangle selected, go to Object > Effects > Transparency. Set the Mode to Multiply and reduce the Opacity to 25%.

multiply effect

Click on Gradient Feather at the bottom of the panel’s left-hand menu. Set the Type to Radial, and allow the gradient to move from a paler center to darker outer edges, before clicking OK to exit.

gradient

2. How to Create Your Icy Text Effect

Step 1

Lock the Background layer and unlock the layer above, Typography.

Take the Type Tool (T) and drag onto the center of the page, before typing in the text you want to apply the effect to. 

From the Character panel (Window > Type & Tables > Character) or the Controls panel at the top of the workspace, set the Font to Charlevoix Pro (or a font of your choice) and make the Font Size big and generous. 

character panel

Step 2

Make sure you are completely happy with the formatting of your text, because we’ll be vectorising the design before we apply the effects to it. You don’t have to do this, but it can be easier to move the text around and play with the scale of the design once it’s vectorised. 

To vectorise the text, go to Type > Create Outlines

outlined text

Edit > Copy the vectorised text, and Edit > Paste a copy onto the pasteboard. We’ll come back to this later, in Step 6.

From the Swatches panel, set the Fill of the vectorised text to [None], and then go to File > Place. Navigate to the same ice background image you used earlier, and Open, allowing it to fill up the text shape. 

image fill

Step 3

Now you’re ready to start building up effects on your text, such as shadowing and 3D elements.

With the text shape selected, go to Object > Effects > Outer Glow. With the Mode set to Normal, bring the Opacity down to about 40%. Set the Technique to Precise, Size to about 0.7 in, Noise to about 15%, and Spread to about 40%. 

Tweak the levels of each setting individually until you have a nice diffuse glow around the edge of the text.

effect color

Step 4

Click on Bevel and Emboss in the Effect window’s left-hand menu. Set the Style to Inner Bevel and Size to about 0.4 in. Set the Technique to Smooth and Soften to about 0.2 in. Increase the Depth to 100%.

Adjust the Shading options to create a subtle shadow. For the Shadow color, click on the colored square and choose your Blue swatch. 

bevel

Click OK to exit the Effects window. 

effects

Step 5

Create a new CMYK swatch, C=94 M=69 Y=27 K=11, and name it Dark Blue. 

swatch options

Lock the Typography layer and unlock the layer above, Texture

Step 6

Select the copy of the vectorised text which you placed earlier onto the pasteboard (see Step 2, above), and Edit > Copy, Edit > Paste it, moving the new copy on top of the text sitting on the page. 

Go to File > Place and choose the ice texture image you downloaded earlier. Click Open and allow the texture to fill up the vector.

texture layer

Step 7

With the vector selected, go to Object > Effects > Transparency. Set the Mode to Overlay and Opacity to 80%.

overlay

Click on Inner Shadow in the window’s menu, and set the Mode to Darken and Effect Color to Dark Blue (click on the colored square to edit this). Increase the Opacity to 100%. 

From the Options section at the bottom, increase the Size to about 0.2 in and Choke to about 30%. 

effect color

Click OK to exit. 

Step 8

We can deepen the engraved shadow effect of the text by bringing over the vector copy still sitting on the pasteboard and laying it over the top of the other text vectors. Set the Fill to Dark Blue. 

blue overlay

Go to Object > Effects > Transparency and set the Mode to Overlay.

transparency

Then click on Gradient Feather and add a Linear 90 degree gradient, going from darker at the top to lighter towards the bottom of the text. 

gradient

Click OK to exit the window. 

Conclusion: Your Finished Ice Text Effect

Your type effect’s looking awesome—great job! You can now incorporate it into another layout or simply enjoy it as it is. 

You can find more awesome fonts for creating type effects over on GraphicRiver and Envato Elements.

final effect

How to Create a Frozen Winter Adobe Photoshop Effect Action

Post pobrano z: How to Create a Frozen Winter Adobe Photoshop Effect Action

Final product image
What You’ll Be Creating

In this tutorial, you will learn how to turn your photos into frozen
winter images inspired by white walkers from the Game of Thrones TV series. I
will try to explain everything in so much detail that everyone can do
it, even those who have just opened Photoshop for the first time.

The
effect shown above is the one I will show you how to create here in
this tutorial. If you would like to create the effect shown below, a
more advanced effect with animated snow and mist, and just using a
single click, then check out my Snow Walker Photoshop Action.

Snow Walker Photoshop Action

What You’ll Need

To recreate the design above, you will need the following photo:

1. Let’s Get Started

First, open the photo that you want to work with. To open your photo, go to File > Open, choose your photo, and click Open. Now, before we get started, just check a couple of things:

  1. Your photo should be in RGB Color mode, 8 Bits/Channel. To check this, go to Image > Mode.
  2. For best results, your photo size should be 2000–4000 px wide/high. To check this, go to Image > Image Size.
  3. Your photo should be the Background layer. If it is not, go to Layer > New > Background from Layer.
Checking image size and mode

2. How to Select the Subject

Step 1

In this section we are going to make a selection of our subject and copy the subject to a separate layer. Select the Magic Wand Tool (W), set the Tolerance to 32, and click once on the white background to make a selection of it. Then press Control-Shift-I on your keyboard to invert the selection and get a selection around the subject.

Make selection around subject

Step 2

Now go to Select > Modify > Smooth and set the Sample Radius to 5 px. Next, go to Select > Modify > Contract and set Contract By to 3 px. Finally, go to Select > Modify > Feather and set Feather Radius to 2 px.

Modifying selection

Step 3

Press Control-J on your keyboard to create a new layer using a selection, and name this new layer Subject.

Creating new layer using selection

3. How to Make the Eyes Glow

Step 1

In this section, we are going to change the eye color and make the eyes glow. Go to Layer > New > Layer to create a new layer and name it Temp.

Creating a new layer

Step 2

Now choose the Brush Tool (B), pick a soft brush, and brush over the iris of both eyes. The color doesn’t matter.

Brushing over eyes

Step 3

Control-click on this layer thumbnail to make a selection of it, and then select the Subject layer and press Control-J on your keyboard to create a new layer using the selection. After that, Right-click on the Temp layer and choose Delete Layer to delete it.

Creating new layer using selection

Step 4

Now go to Image > Adjustment > Hue/Saturation, check the Colorize option, and set Hue to 206, Saturation to 82 and Lightness to 21 as shown below:

Adjusting hue and saturation

Step 5

Change the Blending Mode of this layer to Linear Dodge, set the Opacity to 59%, and name it Eyes_Glow_1.

Changing the blending mode and opacity

Step 6

Now go to Layer > Layer Mask > Reveal All to create a blank layer mask. Then set the foreground color to #000000, choose the Brush Tool (B), pick a soft brush, and brush over the pupils of both eyes.

Adding layer mask

Step 7

Select the Subject layer, go to Layer > New > Layer to create a new layer, and name it Eyes_Glow_2.

Creating a new layer

Step 8

Set the foreground color to #808080, choose the Brush Tool (B), pick a soft brush, and brush over both eyes of your subject.

Brushing over eyes

Step 9

Now go to Image > Adjustment > Hue/Saturation, check the Colorize option, and set Hue to 206, Saturation to 82 and Lightness to 21 as shown below:

Adjusting hue and saturation

Step 10

Change the Blending Mode of this layer to Color.

Changing the blending mode

Step 11

Now press Control-J on your keyboard to duplicate the current layer, name this new layer Eyes_Glow_3, and drag it just above the Subject layer.

Duplicating layer

Step 12

Choose the Lasso Tool (L) and make a selection around the left eye of the subject. Right-click anywhere inside the canvas, choose Free Transform, and set the Width of the layer to 200% and the Height to 400%, as shown below:

Transforming the layer

Step 13

Now press Control-D on your keyboard to deselect. Then choose the Lasso Tool (L), make a selection around the right eye of the subject, Right-click anywhere inside the canvas, choose Free Transform, and set the Width of the layer to 200% and the Height to 400%, as shown below:

Transforming the layer

Step 14

Press Control-D on your keyboard to deselect, and then go to Filter > Blur > Gaussian Blur and set the Radius to 50 px as shown below:

Adding gaussian blur filter

Step 15

Now set the Opacity of this layer to 84% and then Shift-click on the Eyes_Glow_1 layer to select all glow layers at once. After that, go to Layer > New > Group from Layers to create a new group from the selected layers and name it Eyes Glow.

Creating a new group from layers

4. How to Create the Background and Texture

Step 1

In this section, we are going to create the background and also add some texture. Select the Background layer and go to Layer > New Fill Layer > Solid Color to create a new solid color fill layer, name it Background Color, and set the color to #000000 as shown below:

Creating solid color fill layer

Step 2

Now we are going to add a small light source behind the subject. Press Control-J on your keyboard to duplicate the current layer, and name this new layer Middle Light.

Duplicating layer

Step 3

Right-click on this layer, choose Blending Options, check Gradient Overlay, and use the settings below:

Adding layer style

Step 4

Now set the Opacity of this layer to 20%.

Changing the opacity

Step 5

Go to Layer > New > Layer to create a new layer and name it Background Texture.

Creating a new layer

Step 6

Now press D on your keyboard to reset the swatches and go to Filter > Render > Clouds.

Adding clouds filter

Step 7

Press Control-T on your keyboard and set the Width and Height of the layer to 200% as shown below:

Transforming the layer

Step 8

Now go to Image > Adjustments > Levels and enter the settings below:

Adjusting levels

Step 9

Set the Opacity of this layer to 25%.

Changing the opacity

5. How to Blend the Subject

Step 1

In this section, we are going to blend our subject more with the background. Select the Subject layer and go to Layer > Layer Mask > Reveal All to add a blank layer mask.

Adding layer mask

Step 2

Now set the foreground color to #000000, choose the Brush Tool (B), pick a small soft brush, and brush over the white areas that are left from the background.

Brushing into mask

Step 3

Pick a large soft brush and brush over the bottom area of the subject to fade it.

Brushing into mask

6. How to Create Snow and Mist

Step 1

In this section, we are going to create snow and mist. Go to Layer > New > Layer to create a new layer, name it Snow_1, and drag it to the top of the layers in the Layers panel.

Creating a new layer

Step 2

Now set the foreground color to #000000, go to Edit > Fill, and set Contents to Foreground Color, Mode to Normal, and Opacity to 100%.

Filling layer with foreground color

Step 3

Go to Filter > Noise > Add Noise, and set the Amount to 100% and Distribution to Uniform. Check the Monochromatic option, and then go to Filter > Blur > Gaussian Blur and set the Radius to 2 px as shown below:

Adding noise and gaussian blur filter

Step 4

Now go to Image > Adjustments > Curves and use the settings below:

Adjusting curves

Step 5

Press Control-T on your keyboard and set the Width and Height of the layer to 200% as shown below:

Transforming the layer

Step 6

Now go to Filter > Blur > Motion Blur, and set Angle to 45 and Distance to 10 as shown below:

Adding motion blur filter

Step 7

Set the Blending Mode of this layer to Screen.

Changing the blending mode

Step 8

Now go to Layer > New > Layer to create a new layer, name it Snow_2, and drag it just below the Snow_1 layer in the Layers panel.

Creating a new layer

Step 9

Set the foreground color to #000000, go to Edit > Fill, and set Contents to Foreground Color, Mode to Normal and Opacity to 100% as shown below:

Filling layer with foreground color

Step 10

Go to Filter > Noise > Add Noise, and set the Amount to 100% and Distribution to Uniform. Check the Monochromatic option, and then go to Filter > Blur > Gaussian Blur and set the Radius to 2 px as shown below:

Adding noise and gaussian blur filters

Step 11

Now go to Image > Adjustments > Curves and use the settings below:

Adjusting curves

Step 12

Press Control-T on your keyboard and set the Width and Height of the layer to 200% as shown below:

Transforming the layer

Step 13

Now press Control-A on your keyboard to make a selection of the canvas and go to Layer > Layer Mask > Reveal Selection to add a layer mask that reveals the selected area of the layer.

Adding layer mask

Step 14

Right-click on the layer mask and choose Apply Layer Mask. Then press Control-T on your keyboard and set the Width and Height of the layer to 500% as shown below:

Transforming the layer

Step 15

Now go to Filter > Blur > Motion Blur, and the set Angle to 60 and Distance to 50 as shown below:

Adding motion blur filter

Step 16

Change the Blending Mode of this layer to Screen. Then go to Layer > Layer Mask > Reveal All to add a blank layer mask. After that, press D on your keyboard to reset the swatches and X to exchange them, and then go to Filter > Render > Clouds.

Adding layer mask

Step 17

Now go to Image > Auto Tone, and then go to Image > Adjustments > Levels and enter the settings below:

Adjusting levels

Step 18

Inside the Properties panel, set the Density of the layer mask to 60%.

Changing layer mask density

Step 19

Now we are going to do the same for the other snow layer. Select the Snow_1 layer, go to Layer > Layer Mask > Reveal All to add a blank layer mask, and then go to Filter > Render > Clouds.

Adding layer mask

Step 20

Now go to Image > Auto Tone, and then go to Image > Adjustments > Levels and enter the settings below:

Adjusting levels

Step 21

Inside the Properties panel, set the Density of the layer mask to 60%.

Changing layer mask density

Step 22

Now we are going to create some mist. Go to Layer > New > Layer to create a new layer, name it Snow Mist, and drag it just below the Snow_2 layer in the Layers panel.

Creating a new layer

Step 23

Press D on your keyboard to reset the swatches and go to Filter > Render > Clouds.

Adding clouds filter

Step 24

Now press Control-T on your keyboard and set the Width and Height of the layer to 200% as shown below:

Transforming the layer

Step 25

Change the Blending Mode of this layer to Screen and set the Opacity to 45%.

Changing the blending mode and opacity

Step 26

Now go to Layer > Layer Mask > Reveal All to add a blank layer mask. Then set the foreground color to #000000, choose the Brush Tool (B), pick a soft brush, and brush over the face of your subject to remove the mist from this area.

Brushing into mask

Step 27

Inside the Properties panel, set the Density of the layer mask to 80%.

Changing layer mask density

7. How to Make the Final Adjustments

Step 1

In this section, we are going to make the final adjustments to the design. Select the Snow_1 layer and go to Layer > New Adjustment Layer > Color Balance to create a new color balance adjustment layer, and name it Color Look.

Creating new color balance adjustment layer

Step 2

Now Double-click on this layer thumbnail and in the Properties panel, enter the settings below:

Adjusting color balance

Step 3

Go to Layer > New Adjustment Layer > Vibrance/Saturation to create a new vibrance/saturation adjustment layer and name it Overall Vibrance/Saturation.

Creating new vibrancesaturation layer

Step 4

Now Double-click on this layer thumbnail and in the Properties panel, enter the settings below:

Adjusting vibrance and saturation

Step 5

Control-click on the Eyes_Glow_2 layer thumbnail to make a selection of that layer, set the foreground color to #000000, go to Edit > Fill, and set Contents to Foreground Color, Blending to Normal, and Opacity to 100% as shown below:

Filling layer with foreground color

Step 6

Now press D on your keyboard to reset the swatches and X to exchange them. Then go to Layer > New Adjustment Layer > Gradient Map to create a new gradient map adjustment layer and name it Overall Contrast.

Creating new gradient map adjustment layer

Step 7

Change the Blending Mode of this layer to Soft Light and set the Opacity to 40%.

Changing the blending mode and opacity

Step 8

Now press Control-Alt-Shift-E on your keyboard to make a screenshot, and then Control-Shift-U to desaturate this layer. After that, go to Filter > Other > High Pass and set the Radius to 2 px as shown below:

Adding high pass filter

Step 9

Change the Blending Mode of this layer to Hard Light and name it Overall Sharpening.

Changing the blending mode

You Made It!

Congratulations, you have succeeded! Here is our final result:

Final result

If you would like to create the effect shown below, a
more advanced effect with animated snow and mist, and just using a
single click, then check out my Snow Walker Photoshop Action.

The action works so that you just fill in your subject with a color and play the
action, and the action will do everything for you, giving you fully
layered and customizable results.

The action comes with a detailed video tutorial that demonstrates how to use and customize the results to get the most out of the effect. 


How to Create a Set of Halloween Icons in Adobe Illustrator

Post pobrano z: How to Create a Set of Halloween Icons in Adobe Illustrator

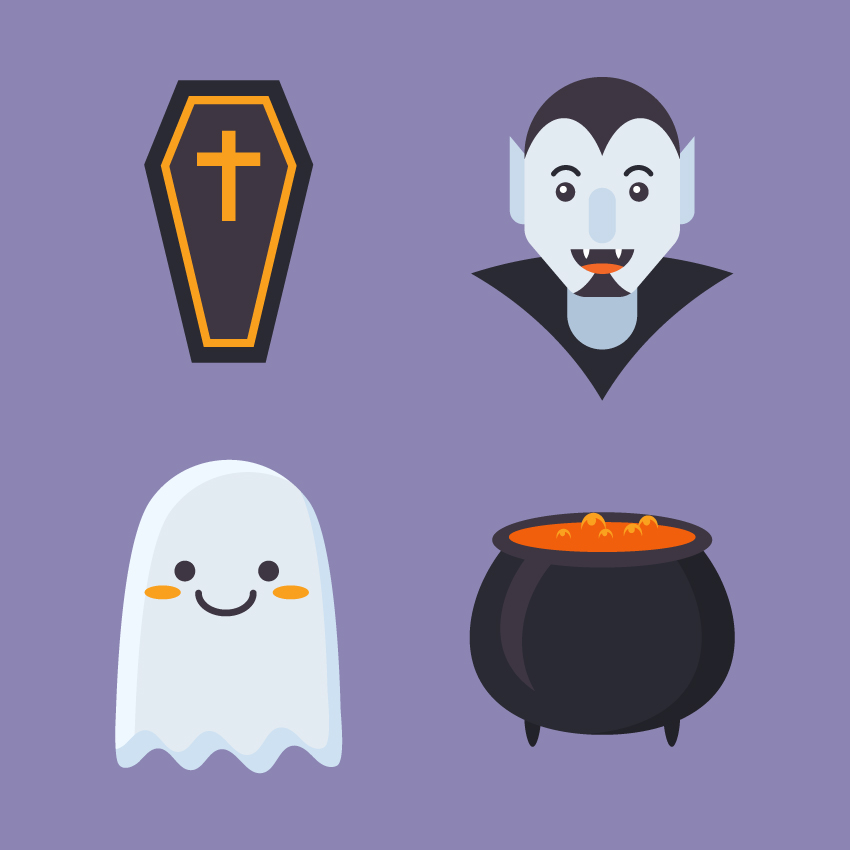
Final product image
What You’ll Be Creating

In this tutorial we’ll go through a fun and simple process to create a set of flat Halloween icons, using simple geometric shapes, the Shape Builder Tool, and various Warp effects to modify and transform the elements.

If you want to check out the source file and see how the icons are made, you can always get the full set of Flat Halloween Icons at Envato Elements. As a bonus, you’ll get additional icons in this expanded collection for your personal or commercial use!

1. How to Make a Magic Cauldron Icon

Step 1

Start by making a 120 x 30 px dark-purple oval using the Ellipse Tool (L). Create a smaller 100 x 17 px oval on top of it and fill it with orange.

make two ellipses

Step 2

Now let’s make the body of the cauldron. Make a 140 x 140 px dark-purple circle. Select its side anchor points with the Direct Selection Tool (A) and drag them down a bit to make the bottom of the cauldron flatter.

Take the Eraser Tool (Shift-E), hold down Alt, and erase the top part of the circle, making it hidden beneath the top ellipses.

make a circle body of the cauldron

Step 3

Let’s add some details. Copy (Control-C) the body of the cauldron and Paste in Front (Control-F). Move the top copy to the left a bit and make the bottom copy darker.

Select both copies and take the Shape Builder Tool (Shift-M). Hold down Alt and click the unwanted piece on the left to delete it.

Great! Now we have only a crescent shape left.

add shadow

Step 4

Create another crescent shape using the same technique and make it smaller. Fill it with lighter purple to make a highlight on the surface of the cauldron.

add a highlight

Step 5

Let’s create a pair of legs. Use the Ellipse Tool (L) to make a 9 x 20 px dark-purple oval. Take the Direct Selection Tool (A) and move its side anchor points up to make the shape more pointed.

create leg from the ellipse

Step 6

Duplicate the leg to the opposite side of the cauldron.

add second leg

Step 7

Now we’ll make a simple bubble. Create an orange circle, Copy it, and Paste in Front (Control-C > Control-F). Move the top copy down a bit and fill the circle behind it with lighter orange color.

Finally, use the Shape Builder Tool (Shift-M) while holding Alt to delete the unwanted piece at the bottom.

Finish off the bubble by adding a small light-orange circle for the highlight.

make a bubble from circles

Step 8

Now we can Group (Control-G) all the pieces of the bubble and speckle the bubbles on top of the orange liquid in the cauldron. Change their size and position to make it look more natural.

add bubbles to the surface of the liquid

Step 9

And that’s it for our magic cauldron! Let’s move on to the next icon.

the cauldron icon is finished

2. How to Design a Cartoon Coffin Icon

Step 1

Take the Rectangle Tool (M) and start with a 55 x 155 px dark-purple rectangle. Go to Object > Path > Add Anchor Points to add a point in the middle of each side. We will need only the left and the right one.

make a base from rectangle

Step 2

Select the left anchor point with the Direct Selection Tool (A) and hit the Enter key to open the Move options window.

Set the Horizontal Position value to -15 px and Vertical to 0 px.

Click OK to move the point 15 px to the left.

move the left point to the left

Step 3

Now let’s move the other point in the opposite direction. This time set the Horizontal value to 15 px, Vertical value to 0 px.

move the right point to the right

Step 4

Let’s make the bottom edge of the coffin narrower. Select its bottom left anchor point with the Direct Selection Tool (A) and open the Move window. Set the Horizontal value to 10 px, Vertical to 0 px.

Do the same for the opposite side, but set the Horizontal value to -10 px.

make the bottom narrower

Step 5

Keeping the shape selected, go to Object > Path > Offset Path and set the Offset value to -7 px.

Make the color of the top shape lighter.

use offset path function

Step 6

Duplicate (Control-C > Control-F) the top shape and set its Fill color to None.

Apply a bright orange Stroke and open the Stroke panel (Window > Stroke). Set the Weight of the line to 4 pt and Align Stroke to Inside.

add an orange stroke

Step 7

Take the Rectangle Tool (M) and make a 7 x 50 px orange shape. Add a 33 x 7 px rectangle on top of it to make a cross.

And there we have it! Our coffin icon is finished. Let’s move on!

make a cross from rectangles

3. How to Draw a Cute Ghost Icon

Step 1

Start by creating the body of our ghost from a 90 x 165 px light-blue rectangle.

Select its bottom left anchor point and use the Move function to move it 20 px to the left. The do the same for the bottom right anchor point and move it in the opposite direction, making the bottom edge wider.

make a body from rectangle

Step 2

Now select both top anchor points and make the top of the body rounded with the Live Corners feature by dragging the circle markers down. You can also adjust the radius manually by setting the Corners value to 50 px in the control panel on top.

make the head rounded

Step 3

Let’s make the bottom part wavy. Grab the Scissors Tool (C) and click the bottom left and right anchor points to split the shape. Now the horizontal bottom line is separated from the rest of the body.

split the bottom edge with the scissors tool

Step 4

Keeping the line selected, go to Effect > Distort & Transform > Zig Zag.

Set the following Options:

  • Size to 6 px
  • Absolute
  • Ridges per Segment to 5
  • Points to Smooth

And click OK.

Go to Object > Expand Appearance to apply the effect.

apply Zig Zag effect

Step 5

Use the Lasso Tool (Q) to select the bottom left anchor point of the body together with the left side of the wave. Click the right mouse button and Join the points. Repeat the same for the opposite bottom points to unite the shape.

Join the points

Step 6

Now we can Convert selected anchor points to smooth, using the Convert function in the control panel on top.

Use the Direct Selection Tool (A) to move some anchor handles, making the shape more balanced and smooth.

make the shape smoother

Step 7

Let’s add details. Duplicate the shape and move the top copy down and to the right. Use the Shape Builder Tool (Shift-M) while holding down the Alt key to delete the unwanted piece. Use the remaining piece to make a highlight.

Create a subtle shadow at the bottom of the ghost, using the same technique.

add shadow and highlight

Step 8

Now let’s add some facial features to our ghostly fellow. Use the Ellipse Tool (L) to make a pair of 11 x 11 px dark-purple circles for the eyes.

add the eyes

Step 9

Add a larger ellipse for the mouth right in the center of the face. Take the Scissors Tool (C) and click both side anchor points to split the ellipse.

Delete its top half, leaving only the bottom arc to form a smile. Set the Weight to 3 pt and Cap to Round Cap in the Stroke panel.

make a mouth from ellipse

Step 10

Finish the ghost by adding two orange ovals on the cheeks.

There we have it! Let’s make our last icon!

the ghost icon is finished

4. How to Create a Flat Vampire Icon

Step 1

Let’s use a character from another tutorial as a base for our scary Dracula. I choose a construction worker flat avatar to make this transformation. You can either create it following Part 1, Step 1 and onwards of this descriptive tutorial:

Or go ahead and get the full set of Flat Profession Avatars from Envato Elements or Graphic River. 

Let’s right click on the icon, Release Clipping Mask, and delete the circle base and the shadow.

use the worker icon for tranformation

Step 2

Delete the clothes and some unneeded facial features. Select the bottom part of the neck using the Direct Selection Tool (A) and make it rounded with the help of the Live Corners function:

delete the unneeded parts

Step 3

Now let’s recolor the skin of our character to give him a pale vampiric look. Fill the elements of the head with pale-blue tints and make his eyes and eyebrows dark.

recolor the face

Step 4

Already looks scary enough! Let’s add a mouth. Make a 35 x 23 px circle and split it using the Scissors Tool (C).

make a mouth from ellipse

Step 5

Take the Ellipse Tool (L) and make two 5 x 10 px white ovals for the fangs. Select the bottom points and Convert selected anchor points to corner from the control panel on top to make the fangs sharp.

make fangs from ellipses

Step 6

Add an orange oval for the tongue. Select all the elements of the mouth and take the Shape Builder Tool (Shift-M). Hold down Alt and click the unneeded pieces to delete them.

add a tongue and delete the unneeded pieces

Step 7

Let’s add a hairdo and a small stylish beard. 

Duplicate the face shape. Take the Ellipse Tool (L) and place two large ellipses so that they cover the face, making the ellipses overlap. The uncovered parts of the face will form the hair. Now we can delete the unwanted pieces using the Shape Builder Tool (Shift-M) and fill the hair parts with dark color.

make a hair and a beard from ellipses

Step 8

We also need to change the shape of the ears. First of all, make the top of the ear squared either by dragging the markers of the Live Corners up or by setting the Corners value to 0 px in the control panel on top.

Then select the top left corner with the Direct Selection Tool (A) and drag it up, making the ear pointed.

change the shape of the ears

Step 9

Let’s add a final touch to our vampire: a high collar. Take the Polygon Tool and single-click anywhere on the Artboard to open the options window. Set the Sides value to 3 and create a dark-purple triangle, rotating it upside down.

Keeping the shape selected, go to Effect > Warp > Arc and set the Horizontal Bend value to 20%. Click OK and Object > Expand Appearance to apply the effect.

make a collar from a triangle

Step 10

And there we have it! Our vampire icon is ready!

vampire icon is ready

 Boo! Have A Spooky Halloween!

Great work! Now we’re ready for Halloween with our set of creepily cute flat icons! I hope you’ve enjoyed following this tutorial and got inspired by its simple and fun techniques.

Flat Halloween Icons are finished

Don’t forget to check out the expanded set of Flat Halloween Icons that you can get at Envato Elements for your personal or commercial use.

Getting The House Ready For The Holidays

Post pobrano z: Getting The House Ready For The Holidays

The fall is upon the calendar and the holidays are nearly here. From the home decorators perspective, Halloween is nearly here followed by Thanksgiving in November, with Christmas and New Year’s Eve right around the corner. It’s a time where most homes transcend into holiday spirit before hosting a gathering after gathering with friends and family. The fall can also be a busy time for remodelling and DIY projects as school is back in session and the holiday’s fast approach. Many homeowners put off housework and preparation all year until the fall hits and its time to finish the basement for your cousins to stay in during Christmas. Finding inspiration isn’t hard after all, you can search online for kitchen remodel ideas, check out different home and living blogs for ways to transform your living space into more functional rooms, or see the annual issues of craft magazines for all the holiday decoration trends. Here are some ideas for each holiday as you enter the crazy season at home! 

Halloween

Halloween seems to be a real feast of famine situation when it comes to enthusiasm and decoration. Some homes turn into borderline theme parks with bones, pumpkins, witches, and ghosts where many just light a candle or maybe change nothing at all. If you get a little creative you can join the ranks of the Halloween diehards without much work. If you are going for terrifying, a simple way to show your guts is to take old clothes, rags, and bedding to a pair of scissors and get them all tattered and dirty. Next, you can add some red dye or food coloring all over them in a splatter to give the scary sense of Freddy or Jason running through the neighborhood. Spreading out some of these ragged clothes on Halloween night will surely bring an element of gore to your yard. 

Photo by Drew Hays on Unsplash

Thanksgiving

In early November Thanksgiving is on everybody’s mind, one of the most popular holidays in America and a source of great inspiration. One of the hallmarks of Thanksgiving is the colors of red, yellow, and orange. When the weather is turning towards winter and all the leaves are changing colors outside you only see these colors so this year invite them into your home. Shopping for anything these colors is a great way to bring the season into your home. Just finding online shops with sales and deals on shipping can have new decor at your home weeks before the holiday without forcing you to leave home at all. Finding towels, blankets, and even bedding like https://www.designerliving.com/products/duvet-covers/c106 can be super easy and affordable. Embrace the color because a few weeks after you will look out the window and see nothing but snow! 

Photo by Simon Maage on Unsplash

Christmas

The 25th of December is one of the most celebrated holidays in the world and traditionally the one which gets the largest decorating budget in time and money. A Christmas decor hallmark is the tree, which can be covered in ornaments and lights any way you see fit. A newer trend has actually become planting a tree outside your home, decorating with the family, and letting it live long beyond that one Christmas season. It is a way to celebrate the holiday without cutting down a fresh tree to do so and year after year your family will have that tree as a memory of a past Christmas. 

Photo by Arun Kuchibhotla on Unsplash

New Year’s Eve

The turning over of the calendar is best celebrated by opulence and luxury. If you happen to find yourself throwing a New Year’s Eve party, this is the time to go big! If you are a woman get a sparkly dress and a man can match in a white tuxedo. As for the decorator, think Great Gatsby! Getting your home dressed up in glitz and glamour is the perfect setting for New Year’s Eve. Champagne and loud music are sure to bring a crowd to your home for fun long after the ball drops. 

Photo by Josh Boot on Unsplash

Featured image by Denise Johnson on Unsplash

Fenty Beauty: Fenty Beauty by Rihanna

Post pobrano z: Fenty Beauty: Fenty Beauty by Rihanna

Media
Fenty Beauty

Fenty’s Playground invited Rihanna’s navy of fans and influencers to join her in an electrifying live immersive experience to produce the beauty film together, and in real-time. The launch event has since generated a whopping 1.1 billion impressions on social media.

The film of the experience shows the complete takeover of Madrid’s central Callao Square, orchestrated by experiential design agency Wildbytes. Wildbytes harnessed cutting-edge technology to create the unforgettable multi-sensorial experience and an instantaneous, high-end fashion film.

Advertising Agency:Wildbytes, New York, USA
Production Company:Wildbytes
Set Design:Wildbytes
Project Director:Julio Obelleiro
Creative Director:Casilda Sánchez
Art Director:Guillem Castellvi
Production Director:Laia Zanon
Technical Production:Andrés Yves
Space Designer:María López
Film Director:Ginesta Guindal

Burger King: Zombie Whopper

Post pobrano z: Burger King: Zombie Whopper

Film
Burger King

Advertising Agency:Buzzman, Paris, France
President:Georges Mohammed-Cherif
Executive Creative Director:Georges Mohammed-Cherif
Vicepresident:Thomas Granger
Managing Director:Julien Levilain
Creative Director:Jean-Christophe Royer
Art Directors:Mickael Krikorian, Victor Sidoroff, Steven Daout
Copywriters:Mickael Krikorian, Victor Sidoroff, Steven Daout
Account Director:Pierre Guengant
Account Manager:Loïc Coelho
Account Executive:Clémence Gateau
Account Executive Assistant:Antoine Boizeau
Strategic Planner:Clément Scherrer
Head Of Social Media:Julien Scaglione
Social Media Mangers:Marie Le Scao, Elise Lassimoulie
Head Of Pr:Amélie Juillet
Communication:Amélie Juillet
Pr:Suzanne Langlais, Julie Claeyman
Communication Assistants:Suzanne Langlais, Julie Claeyman
Head Of Tv Production:Vanessa Barbel
Tv Production:Assya Mediouni
Tv Production Assistant:May Pham
Production:HVH Productions
Post Producer:HVH Productions
Post Production:HVH Productions
Sound Production:Claire Paillot, Octopus
Director:Boris Vassallo
Producer:Rodolphe Hesseman

Agregator najlepszych postów o designie, webdesignie, cssie i Internecie