Envato Tuts+ Community Challenge: Created by You, June 2017 Edition

Post pobrano z: Envato Tuts+ Community Challenge: Created by You, June 2017 Edition

Welcome to our monthly feature of fantastic tutorial results created by
you, the Envato Tuts+ community! Every day, visitors like you take the
time not only to read our tutorials but also to try them out. This is an
assortment of those comment submissions found throughout the Design
& Illustration section. Check out this set of results and join in
for the next roundup, published next month!

Vector Tutorial Results

Taken from the
comments section of your favorite tutorials, these first pieces are an
assortment of results created with vector drawing programs. Check out
these amazing results!

How to Create a Tropical Bungalow on a Palm Beach in Adobe Illustrator

Ilia Dov created this vibrant Tropical Bungalow from a tutorial by . She commented:

Thanks for an awesome tutorial! I really enjoyed making that one.

Tropical Bungalow Illustration Illustrator Tutorial

How to Create a Bodega Shop Illustration in Adobe Illustrator

Inspired by this Bodega Illustration from instructor , Arjen van der Velde recreated the illustration perfectly, commenting:

Thank you for this tutorial!

Bodega Shop Illustration Adobe Illustrator Tutorial

How to Create a Road Text Effect in Adobe Illustrator

Lwardi Abdo achieved success from this awesome Road Text Effect tutorial by . He commented:

This was an amazing tutorial! As a beginner I enjoyed learning new tricks. Thanks for sharing Andrei, here is my result applied to the word, „Nascar.”

Road Text Effect Adobe Illustrator Tutorial

How to Create a Space Observatory Badge in Adobe Illustrator

User Kinzee_fr created an awesome result inspired by this Space Badge tutorial by , commenting:

Here it is. Well, it has some flaws but I tried my best! Thanks for the great tutorial.

Space Badge Adobe Illustrator Tutorial

Create a 3D Paper Bird With Geometric Shapes in Adobe Illustrator

Shamus Tobin created a lovely Paper Bird inspired by a tutorial from . He commented:

Here’s a humming bird from my yard.

Paper Bird Adobe Illustrator Tutorial

Create Detailed Tulips With Gradient Mesh, Without the Mesh Tool in Illustrator

Camila Fedarkova just loved this Tulip Gradient Mesh tutorial from . She commented:

Thank you for this great tutorial! It’s very easy to follow, even for beginners like myself!

Tulip Illustration Adobe Illustrator Mesh Tool

How to Create a Unicorn Illustration in Adobe Illustrator

Anna did a wonderful job with this Unicorn Illustration from . She commented:

You are such a great teacher! All your tutorials are easy to do and are full of useful advice. Please keep it up! Thank you!

Unicorn Illustration Adobe Illustrator Tutorial

How to Create a Super Kawaii Collage in Adobe Illustrator

Dolphin Trang achieved amazing results with this Super Kawaii Collage from . She commented:

Thank you so much! This was very useful. Here’s my result.

Kawaii Fruit Collage Adobe Illustrator Tutorial

How to Design a Naw-Rúz Floral Card in Adobe Illustrator

Captivated by this Naw-Rúz Floral Card from , Dilara Isis Yavuz created a fantastic card of her own. She said:

Inspired by your tutorial, I created a Pokemon-themed spring postcard!

Naw-Rz Floral Card Illustrator Tutorial

How to Create a Stylish Deer With Brushes and Graphic Styles in Adobe Illustrator

Christopher Hoffmann Jacob did an incredible job with this Stylish Deer tutorial from . He commented:

Great tutorial! I will be using the tips for sure, but I need some more practice because I’m a little rusty!

Stylish Deer Illustration Adobe Illustrator Tutorial

Adobe Photoshop Tutorial Results

Let’s
take a look at this next set of results inspired by Adobe Photoshop
tutorials published here on Envato Tuts+. Contributions range from photo
effects to icons and more! Check out these wicked results below!

How to Create a Fur Action Text Effect in Adobe Photoshop

Hiba recreated this Fur Text Effect from perfectly! They commented:

Thank you very much, this is my result.

Fur Text Effect Adobe Photoshop Tutorial

Learn How to Paint a Realistic Nose in Adobe Photoshop

User SZoeter achieved an amazing result with this Realistic Nose Painting tutorial from , commenting

Nice tutorial! Here’s my result!

Paint a Realistic Nose in Adobe Photoshop

How to Add Texture to a Flat Illustration in Adobe Photoshop

Aisha Khan created her own refreshing Flat Drink Illustration with help from a tutorial by . She commented:

Thank you so much for your tutorial. It really helped me improve my Photoshop skills. I really love your work and I hope to use more of these techniques in making works of my own.

Flat Lemon Drink Illustration Photoshop Tutorial

Create a Funny Surreal Underground Scene With Adobe Photoshop

User bao007fei just loved this Surreal Underground Scene from instructor , commenting:

Amazing tutorial! Love you Jenny Le!

Surreal Underground Manipulation Photoshop Tutorial

Quick Tip: Create a Glass Text Effect in Photoshop Using Layer Styles

Naveed Mirza achieved beautiful success with this Glass Text Effect from . He commented:

Thanks, I love this!

Glass Text Effect Photoshop Tutorial

How to Create an Energetic Paint Splashing Effect in Adobe Photoshop

Franck Beaume did a job well done with this Paint Splashing Effect from instructor . He commented:

Thanks Melody for this great tutorial. Very inspiring and well explained. I could not miss the opportunity to use one of my favorite techniques, so here’s my version. Best regards.

Paint Splashing Shoe Effect Photoshop Tutorial

How to Create a Cute Baby Dragon Photo Manipulation in Adobe Photoshop

Liya Rybakova created her own adorable Baby Dragon Photo Manipulation from a tutorial by . She commented simply:

Thank you!

Dragon Photo Manipulation Photoshop Tutorial

Design Tutorial Results

These final
pieces are inspired by an assorted of design tutorials that don’t quite
fit the previous categories. They include everything from print design
to drawing and more! Enjoy these beautiful pieces created by the
community below!

How to Draw a T-Rex Dinosaur

Atka Kaa created a ferocious T-Rex Dinosaur Illustration from a thorough tutorial by , commenting:

Thanks. It was a bit difficult for me, really. His legs are not very good.

T-Rex Dinosaur Drawing Tutorial

How to Create a Vintage Wedding Invitation in Adobe InDesign

Jael did a superb job with this Wedding Invitation tutorial from and commented:

Thanks Grace, I decided to use a different font!

Wedding Invitaion Adobe InDesign Tutorial

Cartoon Fundamentals: How to Draw a Cartoon Body

Spencer Price showed off his amazing talent using this Cartoon Fundamentals tutorial from . He said:

Stumbled across these tutorials, and I have to say, I love them. Thanks for sharing your talent with others. You helped me come up with this one. Here’s my attempt.

How to Draw a Cartoon Body Tutorial Result

How to Be Involved in the Next Showcase

Have
you created a piece based on one of our tutorials here in the Design
& Illustration section of Envato Tuts+? We’re keen for you to share
your results with us! Check out the general guidelines below to join in
with our community:

  • Your artwork should be similar in some
    way to the tutorial that you followed or that inspired it. The aim of
    these showcases is to share what readers have created after following
    the tutorial.
  • Comment on the tutorial you used, attaching an
    image of your result. We’re keen on all levels of ability: from beginner
    to advanced!
  • Include a comment about your result, yourself, or your process. We like knowing about you and what you’re sharing.
  • Share
    the tutorial when you share that artwork elsewhere on the web. If
    you’ve posted your piece on sites like Facebook, Tumblr or Behance, link
    back to the tutorial so that other users know your source and can join
    in on the fun.

Thanks to everyone who was highlighted above for sharing your results with the Envato Tuts+ community. We look forward
to checking out your brilliant versions of our tutorials in the near
future, and welcome users new and old to participate in upcoming
showcases.

Win $250 in Envato Market Credits!

Jump over to the Envato community forums to show off your creation from one of the many Tuts+ tutorials. Read more about it over here.

How to Create 'Eid Mubarak’ Money Cards for Kids in Adobe Illustrator

Post pobrano z: How to Create 'Eid Mubarak’ Money Cards for Kids in Adobe Illustrator

Final product image
What You’ll Be Creating

Money cards are a fabulous idea to present the spirit of Eid and to make giving money to others a little bit more special.

Handing out money or gift cards to children is a common Eid tradition. For a fun way to take it up a notch, in this tutorial we will learn to custom make money cards, by using basic Illustrator tools and some handy shortcuts.

You can find many Eid-themed graphics and templates over on GraphicRiver.

1. How to Set Up the File

Step 1

To begin, sketch out your concept.

The sketch below is the concept I had in mind: two card designs, one for girls and the other for boys. There will be a cutout along the arms to slip the money through.

Sketch your concept, scan it, and save as JPG, to upload it onto Adobe Illustrator.

If you are short on time, you can always head over to GraphicRiver to find a selection of illustrated graphics to use.

fitr Eid card sketch concept

Step 2

Open Adobe Illustrator CC. Let’s set up a New Document (File > New or Command-N).

For this project, use the following settings:

Select Print. 

Preset Details: Eid_Money_Cards

  • Number of Artboards: 1
  • Width: 10 cm
  • Height: 15 cm
  • Units: Centimeters

And click Create.

adobe illustrator create new document

Step 3

Place one side of the sketch onto the Artboard.

Place (Command-Shift-P) and drag the image bounding box to take its place on the artboard. Open the Layers panel: Window > Layers.

Open the sub-menu of the Layers panel:

  1. NameSketch
  2. Select Lock
  3. Dim Images to: 20%
  4. OK

Create New Layer, on top of the ’Sketch’, and name it ’Outline’File > Save (Command-S).

illustrator layers lock sketch dim images

2. How to Create the Borders & Artwork Outlines

Step 1

We begin by laying out our card’s border.

Select the Pen Tool (P), with a Fill of null and black Stroke of 1 pt, and draw half the border.

  1. Then, with the object selected, select the Reflect Tool (O), which is located under the Rotate Tool in the Tools panel.
  2. Click on the center edge of the object to set one point
    of the axis
    . Hold down OptionAlt and click to set.
 pen too reflect panel axis point

Step 2

Next we need to join the borders to create one compound shape, and create a border outline.

Select both borders with the Direct Selection Tool (V). Open the Pathfinder panel: Window > Pathfinder. Select Unite to create a compound shape.

window pathfinder panel create compound shape

After creating our compound shape, with the border selected, we need to create the inner and outer border lining.

First, to create the outer border:

From the Main Menu: Object > Path > Offset Path:

  • Set Offset at 0.2cm
  • Joins: Miter
  • Check Preview, to view
  • OK.
Object Path Offset border

Second, create the inner border:

Select the original border, with the Selection Tool (V).

Main Menu: Object > Path > Offset Path. To offset inwards, use the minus sign (-), set the Offset to -0.35 cm, and click OK.

Path Offset border illustrator

Step 3

Let’s continue by drawing the other symmetrical elements within our design, like the head features and body.

Use the Pen Tool (P), with a black Stroke of 1 pt, and freehand draw half the head, Taqiyah (Islamic Prayer Head Wear), the eye outline, eyebrow, ear and body shape.

Pen tool draw elements

Then select the Ellipse Tool (L) and draw in the pupils and cheeks, as well as the neck area.

Ellipse Tool Pen tool draw

Step 4

Let’s mirror the illustrated parts.

  1. Select the head, Taqiyah Cap, eye, eyebrow, cheeks, ear and body shapes.
  2. Select the Reflect Tool (O), from the Tools panel.
  3. Set the light blue, Reflect axis point, on the edge, as shown.
  4. Hold down Option-Alt, and click to reflect the objects.
select objects reflect shapes mirror axis point

Then we need to select each shape and its respective reflection and Unite them, using the Unite option from the Pathfinder panel to create a single compound shape.

pathfinder panel unite object compound join

Last, select the body shape with the inner border lining and Minus Front, from the Pathfinder panel, so it lines up along the edges.

minus front pathfinder panel compound subtract

Step 5

Next we need to add in the text, but by drawing it.

Instead of working with Arabic fonts and getting lost in letters and rigid-looking font styles, I prefer to draw in the text, for a more personal feel.

Select the Blob Brush Tool (Shift-B) from the Tools panel. The Blob Brush is similar to a thick pen. Select a black Stroke, no Fill. Set the blob size you want to draw the text with, and draw in the text.

  • A shortcut to manage Blob Brush Tool size: Click the left square bracket key ([) to shrink the brush size and the right square bracket (]) to enlarge.
  • Select a smaller blob brush, to add in the Arabic pronunciation marks.
  • You can use the Eraser Tool (Shift-E) to erase any mistakes with the blob shapes, if needed.
blob brush tool draw arabic font

Step 6

Now that the initial basics are laid out, we need to duplicate the artboard for the girl money-card, since they both share similar borders and features.

Select the boy’s Taqiyah Cap, and Lock it using the Command-2 shortcut, so it’s not duplicated with the Artboard.

From the Main Menu: File > Document Setup.

The Document Setup dialog box will open.

Select Edit Artboards.

Hold down the ShiftAlt keys and drag our Artboard onto the girl card sketch, to duplicate it.

duplicate artboard elements vector illustration

Step 7

The girl is wearing a dress, so we need to adjust her outline and widen the bottom part to form a dress.

Select the Direct Selection Tool (A), select each anchor point separately, hold the Shift key down to constrain movement to a 90° angle, and drag along, as so.

Direct selection tool anchor point

Step 8

Let’s fill in the remaining details, using some basic tools.

First use the Pen Tool (P), with a Fill to null and black Stroke of 1 pt, and trace in the main line work, as so:

Pen tool adobe illustrator trace illustration

Step 9

Lock (Command-2) everything except the ears, head hair, and borders.

adobe illustrator lock elements

What we will do is duplicate our elements to create a color fill layer.

In the Layers panel sub-menu, select Duplicate 'Outlines’.

Layers panel duplicate options outline layer

This will create the layer ’Outline Copy’ over the ’Outlines’ layer.

  1. Position the ’Outline Copy’ under the ’Outlines’ layer, for us to create our fills under the line work.
  2. Rename 'Outline Copy’ to ’Fill’.
  3. Lock the ’Outlines’ layer.
  4. File > Save (Command-S), to save your Illustrator file.
vector tutorial duplicate layers file color

Step 10

In the ’Fill’ layer, let’s give a color fill to the unlocked shapes.

You may need to Arrange objects, as you color along. Use the following shortcuts:

  • Arrange > Bring to Front (Command-Shift-])
  • Arrange > Bring Forward (Command-])
  • Arrange > Send Backward (Command-[)
  • Arrange > Send to Back (Command-Shift-[)
color backgrounds fills arrange elements

Unlock All (Command-Option-2) the rest of our elements. Give each one a color Fill of your choice.

unlock elements color fills strokes

Step 11

Next, with the Selection Tool (V), select the lines that have no fills and Delete, since they will not need a fill.

Selection Objects tutorial eid money card illustrator

Lock the ’Fill’ layer, and Unlock 'Outlines’ layer.

Unlock All (Command-Option-2) elements within the Outlines’ layer.

Delete all elements whose outlines we don’t need, like the ears, cheeks, hair, patterns, etc. I left a few, as shown below.

dlete linework artwork  fill eid mubarak money cards

Step 12

Open the Stroke panel (Window > Stroke), and alter the stroke width of the remaining black strokes to create variance in the artwork.

stroke panel variation color linework eid

Next we need to combine the head outline with the body.

Select both the head and body shape of the boy with the Selection Tool (V), and from the Pathfinder panel, Minus Front to subtract from the shape area.

Selection tool Pathfinder panel minus front subtract

Repeat the same steps, with the girl’s head and body shapes.

Then select the Scissors Tool (C) to cut the away the top anchor points that meet with the boy’s cap and head as well as the girl’s hair and head.

 Scissor tool cut anchor point Pathfinder panel minus front

3. How to Add Detail & Flair to the Illustration

Step 1

Let’s start by coloring in our black strokes.

color strokes ramadan eid fitr

Unlock the 'Fill’ layer, and color in all the shapes and arrange the artwork elements so they look harmonious together.

color strokes arrange shapes eid mubarak

Step 2

Let’s create the moon crescent for our background.

Make sure you are on the ’Fill’ layer. Select the Ellipse Tool (L), with a black Stroke, and Fill null. Draw two ellipses, overlapping each other.

ellipse create crecent moon background

Next, select both ellipses, and from the Pathfinder panel, Minus Front to subtract from the shape area, and you’ve got yourself a moon!

Give it a yellowish color Fill and place it somewhere on the background setting.

Create another crescent for the girl’s background.

color fill moon crescent minus front pathfinder

Step 3

Let’s add stars!

Select the Star Tool under the Rectangle Tool menu, and select a yellowish fill.

  • Drag until the star is the desired size.
  • You can drag the pointer to rotate the star.
  • A cool trick is to press the Up Arrow and Down Arrow to add and
    decrease points of the star!

Draw stars on both card backgrounds.

star tool draw stars yellow

Step 4

Next, we need to create small starlight points.

Select the Blob Brush Tool (Shift-B), from the Tools panel.

Chose light and dark blue stroke colors, for the boy’s background, and draw in blob points of various sizes.

  • Remember the shortcut to manage the size of the Blob Brush: Click the left square bracket key ([) to shrink the brush size and the right square bracket (]) to enlarge.

Repeat the process with the girl’s card background, but use white and dark green strokes.

blob brush tool strokes color starlight

Step 5

For the final touches, we need to add lighter tones of highlights to some of the elements to give it some pizzazz.

Continue to use the Blob Brush Tool (Shift-B), using a light blue stroke color, and draw in the boy’s thobe (dress) neck tie, and place some highlights on his thobe, a pattern on his hat, and highlights on his face.

Blob Brush Tool add detail

Step 6

Again, use the Blob Brush Tool (Shift-B), and draw in light tone highlights on the girl’s hair and a pattern on the dress. You can even throw in some lip color.

Blob Brush Tool Shift-B highlights

Step 7

Finally, from the Layers panel, trash the ’Sketch’ layer. File > Save (Command-S) the file.

Print it out on nice semi-glossy thick paper, cut the borders and cut along the outer lining of the arms, and slide the Eid gift money through, and you are done!

Hand out the holiday treats to all the little ones for the Eid holiday.

You can even make them more personalized by writing their names on each card!

Eid Mubarak! Our Colorful Eid Money-Card Illustrations Are Finished!

Great job! I hope you enjoyed the tutorial, and don’t forget to share your results!

For more fun tutorials like this one, check out my tutorials via my profile (Miss ChatZ) on Envato Tuts+. Have a wonderful Eid!

print money card ramadan eid mubarak fitr kids misschatz

21 Slick Soccer Logos

Post pobrano z: 21 Slick Soccer Logos

There’s no arguing that soccer (or football, depending where you are in the world) is the most popular and most most interesting sport worldwide. It’s actually quote incredible. It’s not just good entertainment; it also has a remarkable ability to bring people, and nations together. It gives people a common interest and platform to engage. Are you convinced yet? If not, here are some quick facts about soccer!

  • There are 32 panels on a traditional soccer ball, one for each country in Europe.
  • A soccer field is called a “pitch” because every regulation field is pitched?—?or sloped?—?5 degrees upwards from one end to the other. The teams switch sides after each half so each team has to play slightly uphill for half the match.
  • The original World Cup was made of papier-mâché, but it had to be replaced after the heavy rains of the 1950 World Cup.
  • Soccer balls are slightly oval-shaped. But the checkered board pattern creates an illusion of a perfect sphere.
  • A professional soccer player runs 48 kilometers, or 3.9 miles, in an average soccer game.
  • Soccer was illegal in Mississippi until 1991.
  • Pelé played one preseason game as a punter with the New Orleans Saints in 1981 before deciding to leave camp. His only punt traveled 54 yards.

[Source:Medium]

I’ve gone ahead and put together a collection of 21 slick soccer logos for your enjoyment and inspiration! Enjoy!


Credit:Saurabh Ananth

Credit:Arkadiusz P?atek

Credit:Andrew Brynjulson

Credit:Mateusz Wawrzyniak

Credit:Rob Gill

Credit:Brian McDonaugh

Credit:Ivan Nikoli?

Credit:Travis Hitchcock

Credit:Victor Namba

Credit:Ben Keogh

Credit:Alan Barba

Credit:Dimitris Chatzelas

Credit:Stephen Dyson

Credit:Ben Peddycord

Credit:Logo machine

Credit:Phantom Points Creative

Credit:Steve Ridgway

Credit:Domivakero

Credit:Michael Powers

Credit:Michele Greco

Credit:Jose Balsalobre


23 Alternative Beach Photos

Post pobrano z: 23 Alternative Beach Photos

There’s nothing like a good beach day; catching rays and swimming in the ocean! It also just so happens that the beach makes for some very picturesque photos, especially when paired with some fog or popping colors. Rather then focus on the classic tropical beach shot, I’ve decided to focus more on the ‘alternative’ shots. To see what I mean, feel free to scroll though the collection below of 23 alternative beach photos that I’ve put together for your enjoyment and inspiration! Enjoy!

Credit to respective artists.


Credit:Lukas Furlan

Credit:Lukas Furlan

Credit:Rob de Winter

Credit:David Behar

Credit:Pawel Tomaszewicz

Credit:Dean West & Glenn Bowman

Credit:David Behar

Credit:David Behar

Credit:David Behar

Credit:David Behar

Credit:Katarina Kokalj

Credit:David Behar

Credit:Leo Caillard

Credit:FAVRE LUDWIG

Credit:David Behar

Credit:David Behar

Credit:David Behar

Credit:David Behar

Credit:Tiago Marques

Credit:steinerb3a9

Credit:Jan Erik Waider

Credit:Mikel Macua

Credit:Bernd Walz


The Constructivist: play with architecture

Post pobrano z: The Constructivist: play with architecture
first image of the post

When you think of the ugly architecture that thrived in Soviet-era Eastern Europe, “playful” is probably not the first word that comes to mind.

Zupagrafika decided that commie blocks could be fun, and released a book, “The Constructivist”, that lets you play with cutouts of Eastern blocks. The Polish design studio sells the book on its online shop.

10 gorgeous business cards for your inspiration

Post pobrano z: 10 gorgeous business cards for your inspiration
first image of the post

A collection of great business cards that could inspire you when designing your next card.

1. Moxie Tuesday

A square-shaped business card with recycled paper and good use of textures. Designed by Jana Neil.

2. Handmade card

A folded business card that took a lot of time and effort. Totally worth it though. Design by Jorge Alvarez.

3. Wooden business cards

Business cards made with duplexed wood veneer + letterpressed metallic ink on paper with laser etching on both sides. Design by Mackey Saturday.

4. Tom Lane

Business cards that look like playing cards. Design by Tom Lane.

5. Busy Building Things

A nice card with a custom shape and a powerful message. Designed by Andrew Power.

6. Yoga Mat Business Card

A business card designed to look like the main item required to go do yoga in a gym. Designer unknown.

7. Football coach business card

A very creative business card for a football coach. One side of the card looks like a football field plan and allows to scribble some strategy. Design by Bravo Company.

8. Bag Tag

A cool business card designed to look like a bag tag. Designed for Promptt.

9. Typographic card

A businn card that mixes many fonts and does it well. Design by Nothing Something.

10. Longshots sports bar

What would be better than a beer shape for a sports bar business card?

A Pretty Good SVG Icon System

Post pobrano z: A Pretty Good SVG Icon System

I’ve long advocated SVG icon systems. Still do. To name a few benefits: vector-based icons look great in a high pixel density world, SVG offers lots of design control, and they are predictable and performant.

I’ve also often advocated for a SVG icon system that is based on <symbol>s (an „SVG sprite”) and the <use> element for placing them. I’ve changed my mind a little. I don’t think that is a bad way to go, really, but there is certainly a simpler (and perhaps a little better) way to go.

Just include the icons inline.

That’s it. Sorry if you were hoping for something fancier.

Like this:

<button>
  <svg class="icon icon-cart" viewBox="0 0 100 100" aria-hidden="true">
    <!-- all your hot svg action, like: -->
    <path d=" ... " />
  </svg>
  Add to Cart
</button>

Or perhaps more practically, with your server-side include of choice:

<button>
  <?php include("/icons/icon-cart.svg"); ?>
  Add to Cart
</button>

Like I said:

<?php include "icon.svg
<% render "icon.svg"
<Icon icon="icon"
{% include "icon.svg"

Putting right into markup is a pretty 👍 icon system.

— Chris Coyier (@chriscoyier) May 31, 2017

Advantage #1: No Build Process

You need no fancy tooling to make this work. Your folder full of SVG icons remain a folder full of SVG icons. You’ll probably want to optimize them, but that’s about it.

Advantage #2: No Shadow DOM Weirdness

SVG icons included as a <use> reference have a shadow DOM boundary.

Showing the Shadow DOM boundry in Chrome DevTools

This can easily cause confusion. For example:

var playButton = document.querySelector("#play-button-shape");

playButton.addEventListener("click", function() {
  alert("test");
});

That’s not going to work. You’d be targetting the path in the <symbol>, which doesn’t really do anything, and the click handler is kinda lost in the cloning. You’d have to attach a handler like that to the parent , like #play-button.

Likewise, a CSS selector like:

.button #play-button-shape {

}

Will not select anything, as there is a Shadow DOM boundry between those two things.

When you just drop inline SVG right into place, there is no Shadow DOM boundry.

Advantage #3: Only the Icons You Need

With a <use>/<symbol> system, you have this SVG sprite that is likely included on every page, whether or not they are all used on any given page or not. When you just include inline SVG, the only icons on the page are the ones you are actually using.

I listed that as advantage, but it sorta could go either way. To be fair, it’s possible to cache an SVG sprite (e.g. Ajax for it and inject onto page), which could be pretty efficient.

@Real_CSS_Tricks how cache-friendly is SVG <use>? #SVG #CSS

— Samia Ruponti (@Snowbell1992) June 7, 2017

That’s a bit of a trick question. <use> itself doesn’t have anything to do with caching, it’s about where the SVG is that the <use> is referencing. If the sprite is Ajax’d for, it could be cached. If the sprite is just part of the HTML already, that HTML can be cached. Or the <use> can point to an external file, and that can be cached. That’s pretty tempting, but…

Advantage #4: No cross-browser support concerns

No IE or Edge browser can do this:

<use xlink:href="/icons/sprite.svg#icon-cart" />

That is, link to the icon via a relative file path. The only way it works in Microsoft land is to reference an ID to SVG on the same page. There are work arounds for this, such as Ajaxing for the sprite and dumping it onto the page, or libraries like SVG for Everybody that detects browser support and Ajaxs for the bit of SVG it needs and injects it if necessary.

Minor Potential Downside: Bloat of HTML Cache

If you end up going the sprite route, as I said, it’s tempting to want to link to the sprite with a relative path to take advantage of caching. But Microsoft browsers kill that, so you have the choice between:

  1. A JavaScript solution, like Ajaxing for the whole sprite and injecting it, or a polyfill.
  2. Dumping the sprite into the HTML server-side.

I find myself doing #2 more often, because #1 ends up with async loading icons and that feels janky. But going with #2 means „bloated” HTML cache, meaning that you have this sprite being cached over and over and over on each unique HTML page, which isn’t very efficient.

The same can be said for directly inlining SVG.


Conclusion and TLDR: Because of the simplicity, advantages, and only minor downsides, I suspect directly inlining SVG icons will become the most popular way of handling an SVG icon system.


A Pretty Good SVG Icon System is a post from CSS-Tricks

Creating a Design System Process with UXPin

Post pobrano z: Creating a Design System Process with UXPin

There’s never a better time to work in software. Developers and designers are among the most desired people on the market. Companies all over the world seem to have a never-ending thirst for software experts. In 2003 the U.S. Bureau of Labor Statistics estimated the number of software engineers working in the US to be 677,900 people. In 2016, this number increased over 5× to 3,870,000.

At the same time, design teams grew faster than software development. In the last 5 years, the design-developer ratio increased by an average of 2.5×. These changes put enormous pressure on designers and developers to take on more projects while delivering higher quality faster. But the challenge is that software development doesn’t scale easily.

Scaling through hiring, without first putting standards in place, doesn’t usually end well. With every new hire, the technical and design debt increases. New ideas for color palettes, typography, patterns, code standards or even frameworks appear in the product, increasing the inconsistency and maintenance cost.

Creating a design systems process is one of the best ways to prevent this problem.

The Era of Systems

For faster and more consistent product development, companies all over the world, including such giants as Salesforce, IBM, Airbnb or Microsoft, started to invest in Design Systems.

Unlike past approaches to setting up standards in software development (pattern libraries, style guides…), design systems are not a static deliverable created from months of work. In fact, design systems are not a deliverable at all – they’re a new process of building software.

What is a Design System?

A design system reflects the truth about the standard experience in a given organization. It’s both trustworthy documentation and a modular toolkit for designers and developers.

Design systems adapt naturally to changes in the product and sync design and code for an easier way to create consistent experiences.

The Toolset for the new Era

Over a year ago, the team at UXPin started our user research. After 40+ interviews with design and engineering leaders and a survey of 3,100+ designers and developers, we’ve concluded traditional design tools aren’t good enough to serve this new reality.

They’re too fragmented, disconnected, and unfocused. Design system tools must be a complete hub for design and development.

We’ve summed up the research with simple rules for our first release of UXPin Systems:

  • Dynamic environment, not static documentation
  • Actionable system, not a reference document
  • Connection between design and development, not just a library of design patterns

With these principles in mind, we released the first design system platform on June 13th 2017.

Step by Step in UXPin: Creating a Design System Process

Using our internal design system as an example, let’s explore how to create the foundation for your design system:

  • Color Palette and Text Styles
  • Assets (logos, icons)
  • Design Patterns
  • Development Documentation

Important disclaimer: All the following examples were created within UXPin only, but the UXPin Design Systems solution also supports Sketch.

1. Create an Actionable Library of Styles

Start with the most prevalent pieces of any design: text styles and a color palette.

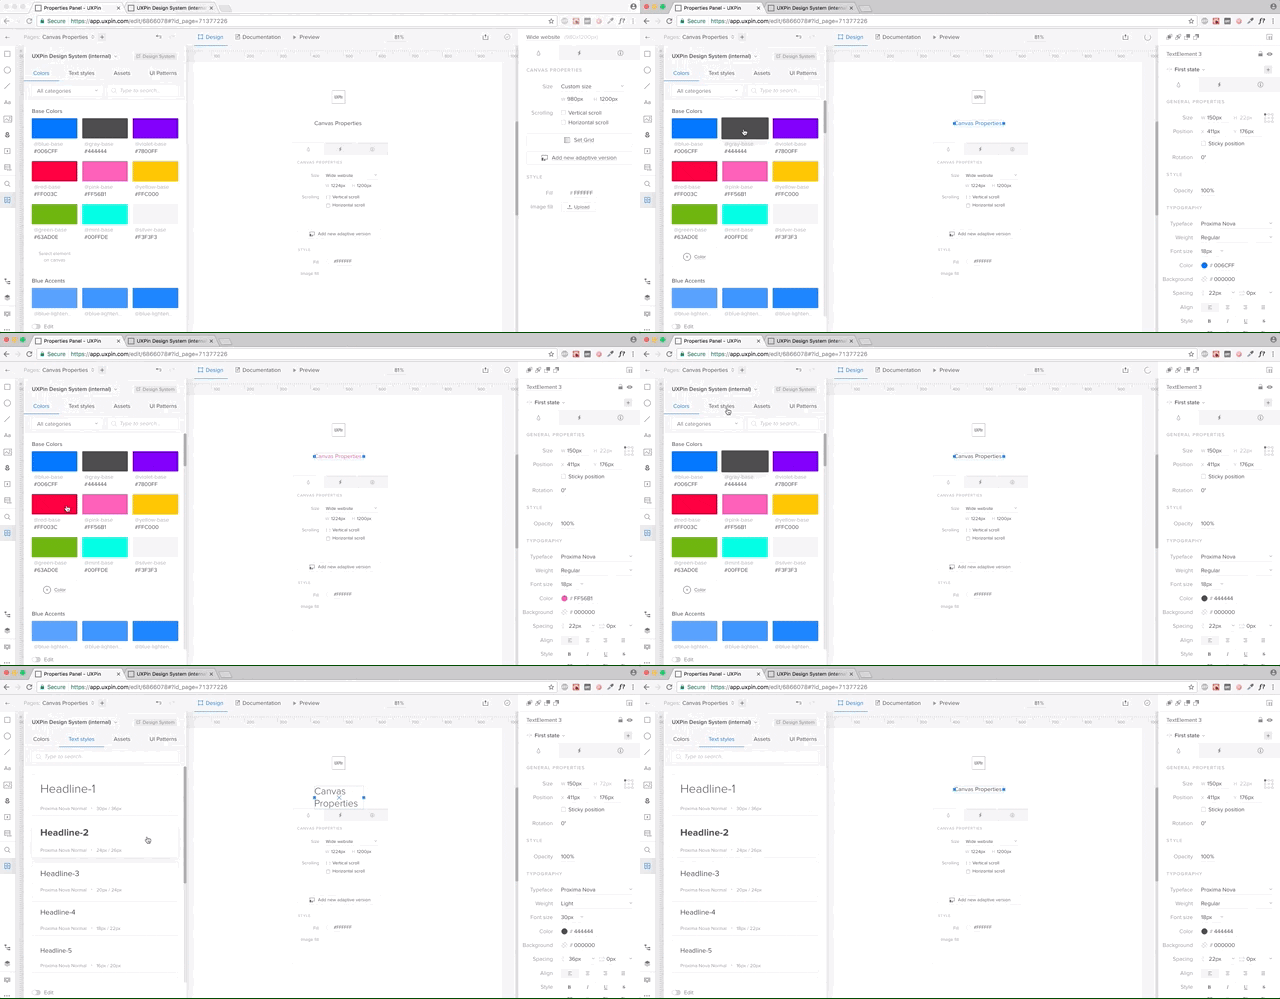
In UXPin, both color palette and text styles can be pulled directly from design projects and saved in a shared Design Systems library (an actionable toolkit that’s always synced with design system). Your entire team will always have access to approved styling, minimizing the temptation of introducing yet another typeface or shade of gray.

To add every color or text style, simply select layers in Sketch or UXPin and UXPin will pull the right styling and add it to the system.

All these styles always stay in sync with the library in UXPin or Sketch, which makes for a living system (not just static documentation).

2. Create an Actionable Library of Assets

Just like colors and text styles, you can save all your graphic design assets in UXPin Systems.

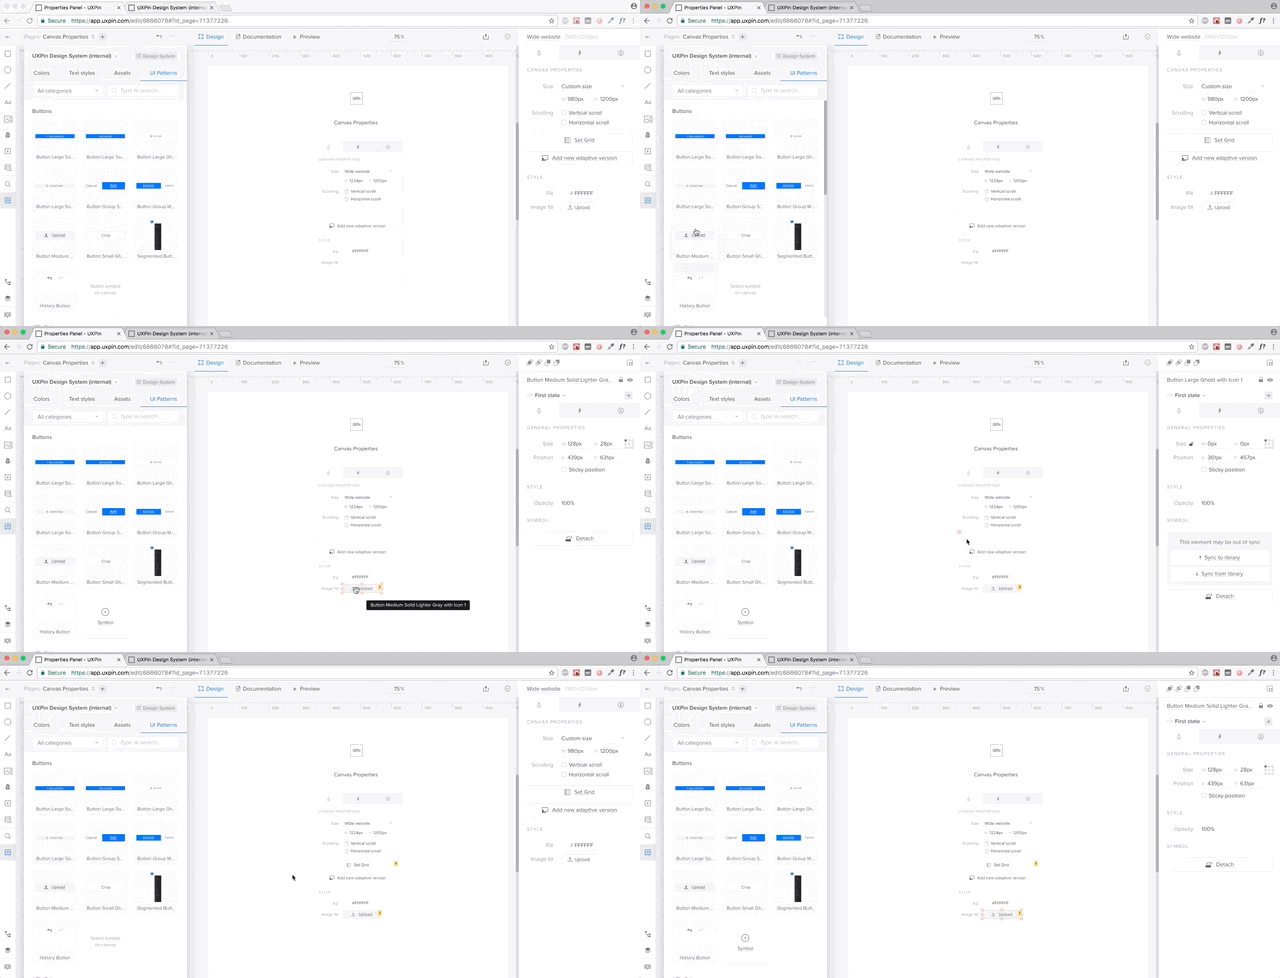
Think logos, approved stock photos, or icon libraries. You can save all these in the Design Systems Library, which stays in sync with the Design System and your entire team. One library, directly in your tools and always in sync.

3. Create an Actionable Library of Patterns

You can also save your design patterns in UXPin. All your symbols from UXPin and Sketch can be saved in a Design Systems Library. UXPin symbols can be interactive and animated, so you don’t have to recreate interactions every single time.

Symbols in both UXPin and Sketch have overriding abilities, so you don’t have to worry about your patterns being used in multiple places with different copy. UXPin allows you to adjust the copy however you want and sync everything with the library whenever you’re ready.

It’s a powerful tool to manage all your shared design patterns.

4. Generate a System and Keep it in Sync

Having a library of shared assets is great, but it’s definitely not enough to solve the problem of scaling software development.

Most solutions stop here and don’t move towards development. We’ve decided to go all the way.

In UXPin Systems all the colors, text styles, assets, and patterns become a living system with one click. Just go into the Design Systems tab in UXPin Dashboard, select your library, and it comes to life.

A new documentation page is automatically created and always stays in sync with your library. If you add a new pattern or a color, it automatically appears in your design system.

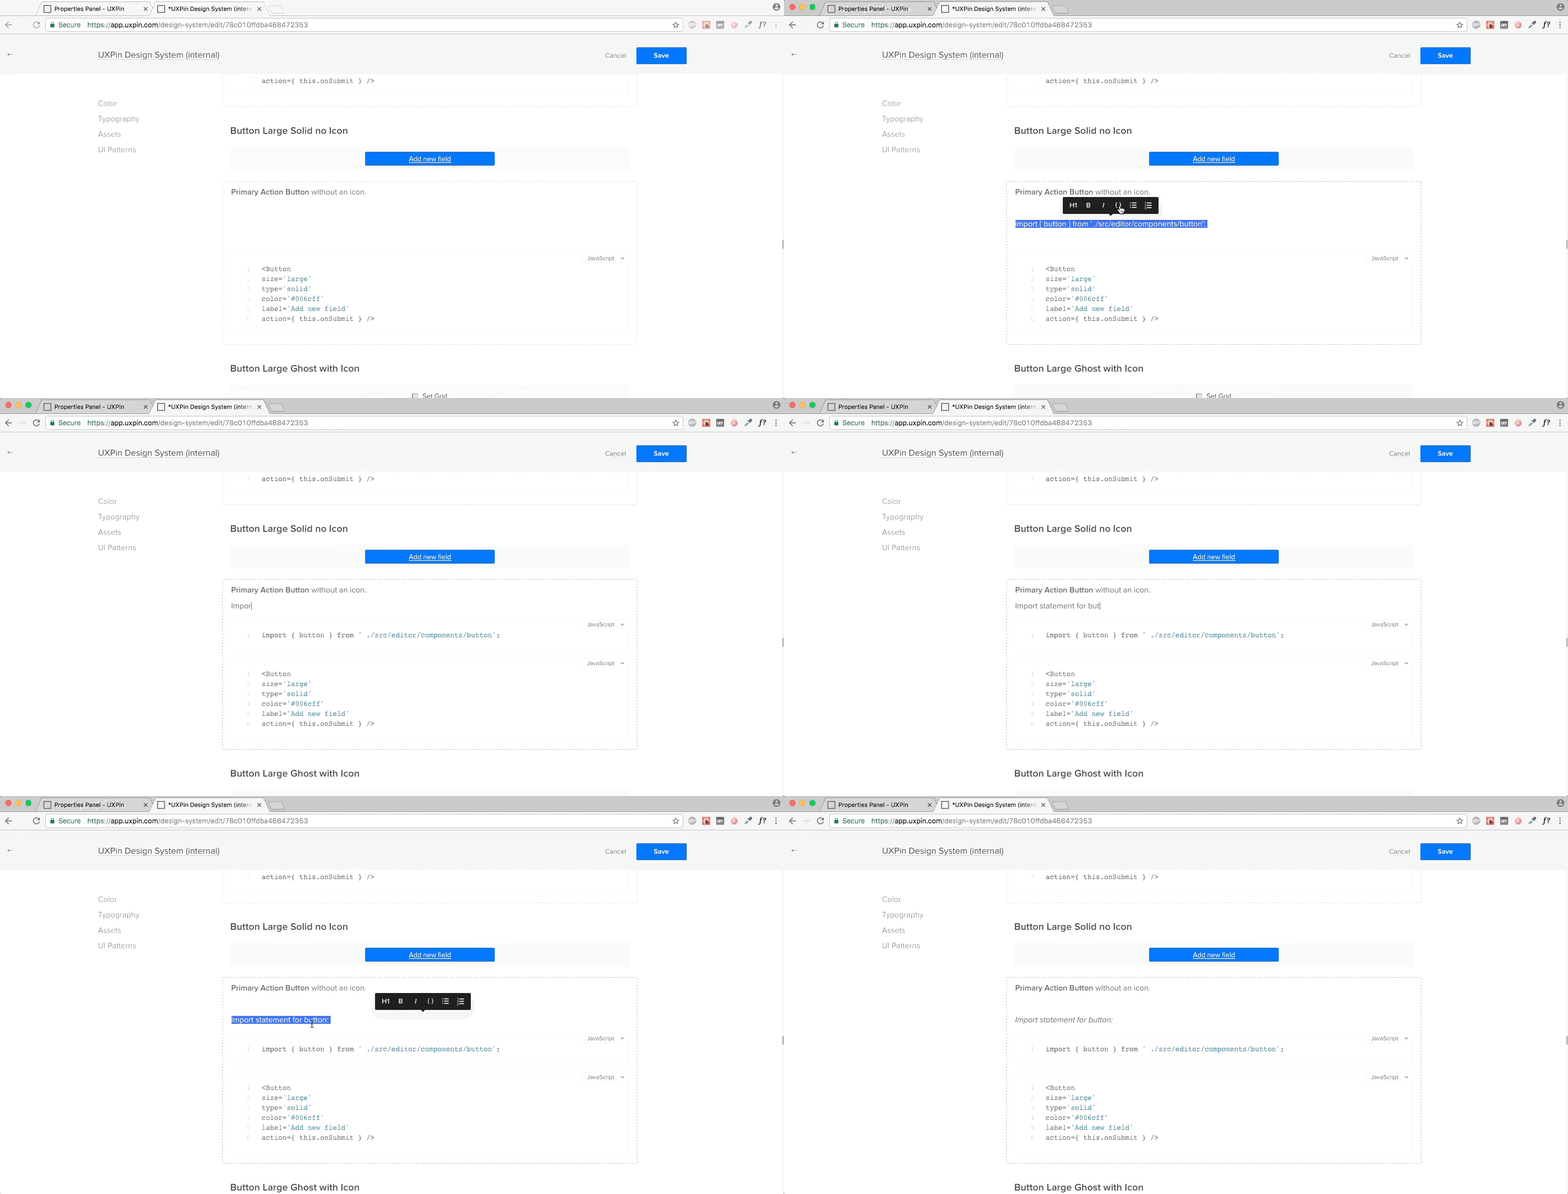
5. Add Documentation for Developers

Once you’ve generated your system, you can add documentation, including code snippets to any element. The documentation editor makes it very straightforward to document your system.

Again, the documentation is immediately available to your team.

6. Make Documentation Actionable

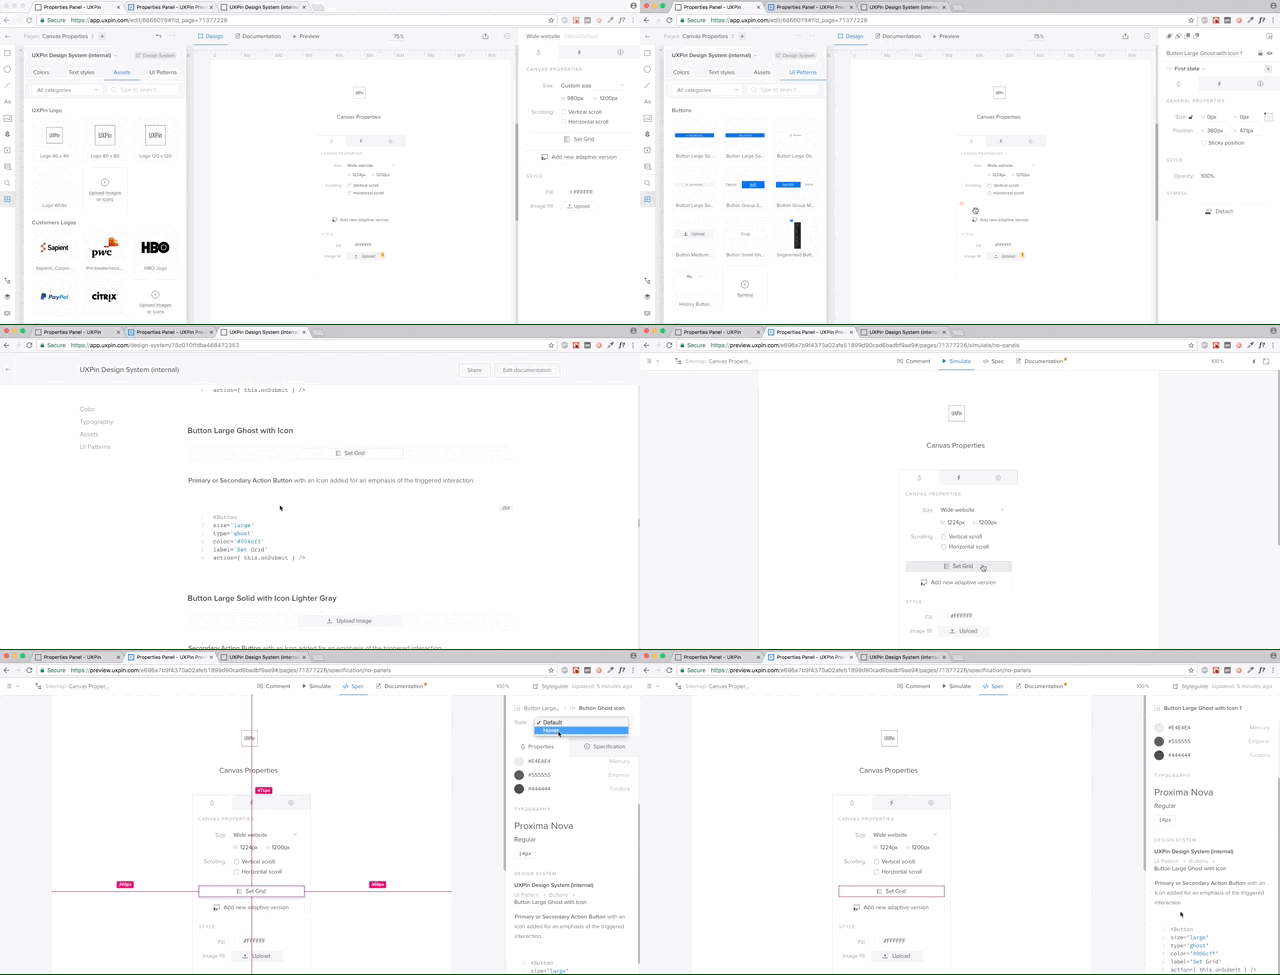
Design system documentation shouldn’t just be a reference document. It needs to be where the action is: in the design projects themselves.

With UXPin, documentation from the design system follows the elements in any project.

If you’re working on yet another sign-up form, once you drop in the symbols from the library, UXPin automatically generates full documentation for developers – including all the information coming from the design system (full markup, information about imports, and names of JavaScript components, etc).

The First Complete Solution

Needless to say, I’m extremely proud of our focus on design systems as the heart of a better software development process. Of course, this is just a beginning.

If you’d like to try out UXPin for yourself, you can go ahead and start a free trial.


Creating a Design System Process with UXPin is a post from CSS-Tricks

Form Validation Part 1: Constraint Validation in HTML

Post pobrano z: Form Validation Part 1: Constraint Validation in HTML

Most JavaScript form validation libraries are large, and often require other libraries like jQuery. For example, MailChimp’s embeddable form includes a 140kb validation file (minified). It includes the entire jQuery library, a third-party form validation plugin, and some custom MailChimp code. In fact, that setup is what inspired this new series about modern form validation. What new tools do we have these days for form validation? What is possible? What is still needed?

In this series, I’m going to show you two lightweight ways to validate forms on the front end. Both take advantage of newer web APIs. I’m also going to teach you how to push browser support for these APIs back to IE9 (which provides you with coverage for 99.6% of all web traffic worldwide).

Finally, we’ll take a look at MailChimp’s sign-up form, and provide the same experience with 28× (2,800%) less code.

It’s worth mentioning that front-end form validation can be bypassed. You should always validate your code on the server, too.

Alright, let’s get started!

Article Series:

  1. Constraint Validation in HTML (You are here!)
  2. The Constraint Validation API in JavaScript (Coming Soon!)
  3. A Validity State API Polyfil (Coming Soon!)l
  4. Validating the MailChimp Subscribe Form (Coming Soon!)

The Incredibly Easy Way: Constraint Validation

Through a combination of semantic input types (for example, <input type="email">) and validation attributes (such as required and pattern), browsers can natively validate form inputs and alert users when they’re doing it wrong.

Support for the various input types and attributes varies wildly from browser to browser, but I’ll provide some tricks and workarounds to maximize browser compatibility.

Basic Text Validation

Let’s say you have a text field that is required for a user to fill out before the form can be submitted. Add the required attribute, and supporting browsers will both alert users who don’t fill it out and refuse to let them submit the form.

<input type="text" required>
A required text input in Chrome.

Do you need the response to be a minimum or maximum number of characters? Use minlength and maxlength to enforce those rules. This example requires a value to be between 3 and 12 characters in length.

<input type="text" minlength="3" maxlength="12">
Error message for the wrong number of characters in Firefox.

The pattern attribute let’s you run regex validations against input values. If you, for example, required passwords to contain at least 1 uppercase character, 1 lowercase character, and 1 number, the browser can validate that for you.

<input type="password" pattern="^(?=.*\d)(?=.*[a-z])(?=.*[A-Z])(?!.*\s).*$" required>
Wrong format error message in Safari.

If you provide a title attribute with the pattern, the title value will be included with any error message if the pattern doesn’t match.

<input type="password" pattern="^(?=.*\d)(?=.*[a-z])(?=.*[A-Z])(?!.*\s).*$" title="Please include at least 1 uppercase character, 1 lowercase character, and 1 number." required>
Wrong format message in Opera, with title text explaining RegEx.

You can even combine it with minlength and (as seems to be the case with banks, maxlength) to enforce a minimum or maximum length.

<input type="password" minlength="8" pattern="^(?=.*\d)(?=.*[a-z])(?=.*[A-Z])(?!.*\s).*$" title="Please include at least 1 uppercase character, 1 lowercase character, and 1 number." required>

See the Pen Form Validation: Basic Text by Chris Ferdinandi (@cferdinandi) on CodePen.

Validating Numbers

The number input type only accepts numbers. Browsers will either refuse to accept letters and other characters, or alert users if they use them. Browser support for input[type="number"] varies, but you can supply a pattern as a fallback.

<input type="number" pattern="[-+]?[0-9]">

By default, the number input type allows only whole numbers.

You can allow floats (numbers with decimals) with the step attribute. This tells the browser what numeric interval to accept. It can be any numeric value (example, 0.1 ), or any if you want to allow any number.

You should also modify your pattern to allow decimals.

<input type="number" step="any" pattern="[-+]?[0-9]*[.,]?[0-9]+">

If the numbers should value between a set of values, the browser can validate those with the min and max attributes. You should also modify your pattern to match. For example, if a number has to be between 3 and 42, you would do this:

<input type="number" min="3" max="42" pattern="[3-42]">

See the Pen Form Validation: Numbers by Chris Ferdinandi (@cferdinandi) on CodePen.

Validating Email Addresses and URLs

The email input type will alert users if the supplied email address is invalid. Like with the number input type, you should supply a pattern for browsers that don’t support this input type.

Email validation regex patterns are a hotly debated issue. I tested a ton of them specifically looking for ones that met RFC822 specs. The one used below, by Richard Willis, was the best one I found.

<input type="email" pattern="^([^\x00-\x20\x22\x28\x29\x2c\x2e\x3a-\x3c\x3e\x40\x5b-\x5d\x7f-\xff]+|\x22([^\x0d\x22\x5c\x80-\xff]|\x5c[\x00-\x7f])*\x22)(\x2e([^\x00-\x20\x22\x28\x29\x2c\x2e\x3a-\x3c\x3e\x40\x5b-\x5d\x7f-\xff]+|\x22([^\x0d\x22\x5c\x80-\xff]|\x5c[\x00-\x7f])*\x22))*\x40([^\x00-\x20\x22\x28\x29\x2c\x2e\x3a-\x3c\x3e\x40\x5b-\x5d\x7f-\xff]+|\x5b([^\x0d\x5b-\x5d\x80-\xff]|\x5c[\x00-\x7f])*\x5d)(\x2e([^\x00-\x20\x22\x28\x29\x2c\x2e\x3a-\x3c\x3e\x40\x5b-\x5d\x7f-\xff]+|\x5b([^\x0d\x5b-\x5d\x80-\xff]|\x5c[\x00-\x7f])*\x5d))*$">

One „gotcha” with the the email input type is that it allows email addresses without a TLD (the „example.com” part of „email@example.com”). This is because RFC822, the standard for email addresses, allows for localhost emails which don’t need one.

If you want to require a TLD (and you likely do), you can modify the pattern to force a domain extension like so:

<input type="email" title="The domain portion of the email address is invalid (the portion after the @)." pattern="^([^\x00-\x20\x22\x28\x29\x2c\x2e\x3a-\x3c\x3e\x40\x5b-\x5d\x7f-\xff]+|\x22([^\x0d\x22\x5c\x80-\xff]|\x5c[\x00-\x7f])*\x22)(\x2e([^\x00-\x20\x22\x28\x29\x2c\x2e\x3a-\x3c\x3e\x40\x5b-\x5d\x7f-\xff]+|\x22([^\x0d\x22\x5c\x80-\xff]|\x5c[\x00-\x7f])*\x22))*\x40([^\x00-\x20\x22\x28\x29\x2c\x2e\x3a-\x3c\x3e\x40\x5b-\x5d\x7f-\xff]+|\x5b([^\x0d\x5b-\x5d\x80-\xff]|\x5c[\x00-\x7f])*\x5d)(\x2e([^\x00-\x20\x22\x28\x29\x2c\x2e\x3a-\x3c\x3e\x40\x5b-\x5d\x7f-\xff]+|\x5b([^\x0d\x5b-\x5d\x80-\xff]|\x5c[\x00-\x7f])*\x5d))*(\.\w{2,})+$">

Similarly, the url input type will alert users if the supplied value is not a valid URL. Once again, you should supply a pattern for browsers that don’t support this input type. The one included below was adapted from a project by Diego Perini, and is the most robust I’ve encountered.

<input type="url" pattern="^(?:(?:https?|HTTPS?|ftp|FTP):\/\/)(?:\S+(?::\S*)?@)?(?:(?!(?:10|127)(?:\.\d{1,3}){3})(?!(?:169\.254|192\.168)(?:\.\d{1,3}){2})(?!172\.(?:1[6-9]|2\d|3[0-1])(?:\.\d{1,3}){2})(?:[1-9]\d?|1\d\d|2[01]\d|22[0-3])(?:\.(?:1?\d{1,2}|2[0-4]\d|25[0-5])){2}(?:\.(?:[1-9]\d?|1\d\d|2[0-4]\d|25[0-4]))|(?:(?:[a-zA-Z\u00a1-\uffff0-9]-*)*[a-zA-Z\u00a1-\uffff0-9]+)(?:\.(?:[a-zA-Z\u00a1-\uffff0-9]-*)*[a-zA-Z\u00a1-\uffff0-9]+)*)(?::\d{2,5})?(?:[\/?#]\S*)?$">

Like the email attribute, url does not require a TLD. If you don’t want to allow for localhost URLs, you can update the pattern to check for a TLD, like this.

<input type="url" title="The URL is a missing a TLD (for example, .com)." pattern="^(?:(?:https?|HTTPS?|ftp|FTP):\/\/)(?:\S+(?::\S*)?@)?(?:(?!(?:10|127)(?:\.\d{1,3}){3})(?!(?:169\.254|192\.168)(?:\.\d{1,3}){2})(?!172\.(?:1[6-9]|2\d|3[0-1])(?:\.\d{1,3}){2})(?:[1-9]\d?|1\d\d|2[01]\d|22[0-3])(?:\.(?:1?\d{1,2}|2[0-4]\d|25[0-5])){2}(?:\.(?:[1-9]\d?|1\d\d|2[0-4]\d|25[0-4]))|(?:(?:[a-zA-Z\u00a1-\uffff0-9]-*)*[a-zA-Z\u00a1-\uffff0-9]+)(?:\.(?:[a-zA-Z\u00a1-\uffff0-9]-*)*[a-zA-Z\u00a1-\uffff0-9]+)*(?:\.(?:[a-zA-Z\u00a1-\uffff]{2,}))\.?)(?::\d{2,5})?(?:[/?#]\S*)?$">

See the Pen Form Validation: Email & URLs by Chris Ferdinandi (@cferdinandi) on CodePen.

Validating Dates

There are a few really awesome input types that not only validate dates but also provide native date pickers. Unfortunately, Chrome and Mobile Safari are the only two browsers that implement it. (I’ve been waiting years for Firefox to adopt this feature!) Other browsers just display it as a text field.

As always, we can provide a pattern to catch browsers that don’t support it.
The date input type is for standard day/month/year dates.

<input type="date" pattern="(?:19|20)[0-9]{2}-(?:(?:0[1-9]|1[0-2])-(?:0[1-9]|1[0-9]|2[0-9])|(?:(?!02)(?:0[1-9]|1[0-2])-(?:30))|(?:(?:0[13578]|1[02])-31))">

In supporting browsers, the selected date is displayed like this: MM/DD/YYYY. But the value is actually in this format: YYYY-MM-DD.

You should provide guidance to users of unsupported browsers about this format—something like, „Please use the YYYY-MM-DD format.” However, you don’t want people visiting with Chrome or Mobile Safari to see this since that’s not the format they’ll see, which is confusing.

See the Pen Form Validation: Dates by Chris Ferdinandi (@cferdinandi) on CodePen.

A Simple Feature Test

We can write a simple feature test to check for support, though. We’ll create an input[type="date"] element, add a value that’s not a valid date, and then see if the browser sanitizes it or not. You can then hide the descriptive text for browsers that support the date input type.

<label for="date">Date <span class="description-date">YYYY-MM-DDD</span></label>
<input type="date" id="date" pattern="(?:19|20)[0-9]{2}-(?:(?:0[1-9]|1[0-2])-(?:0[1-9]|1[0-9]|2[0-9])|(?:(?!02)(?:0[1-9]|1[0-2])-(?:30))|(?:(?:0[13578]|1[02])-31))">

<script>
  var isDateSupported = function () {
      var input = document.createElement('input');
      var value = 'a';
      input.setAttribute('type', 'date');
      input.setAttribute('value', value);
      return (input.value !== value);
  };

  if (isDateSupported()) {
      document.documentElement.className += ' supports-date';
  }
</scipt>

<style>
  .supports-date .description-date {
      display: none;
  }
</style>

See the Pen Form Validation: Dates with a Feature Test by Chris Ferdinandi (@cferdinandi) on CodePen.

Other Date Types

The time input type let’s visitors select a time, while the month input type let’s them choose from a month/year picker. Once again, we’ll include a pattern for non-supporting browsers.

<input type="time" pattern="(0[0-9]|1[0-9]|2[0-3])(:[0-5][0-9])">
<input type="month" pattern="(?:19|20)[0-9]{2}-(?:(?:0[1-9]|1[0-2]))">

The time input displays time in 12-hour am/pm format, but the value is 24-hour military time. The month input is displayed as May 2017 in supporting browsers, but the value is in YYYY-MM format.

Just like with input[type="date"], you should provide a pattern description that’s hidden in supporting browsers.

See the Pen Form Validation: Add `novalidate` programatically by Chris Ferdinandi (@cferdinandi) on CodePen.

This seems super easy. What’s the catch?

While the Constraint Validation API is easy and light-weight, it does have some drawbacks.

You can style fields that have errors on them with the :invalid pseudo-selector, but you can’t style the error messages themselves.

Behavior is also inconsistent across browsers. Chrome doesn’t display any errors until you try to submit the form. Firefox displays a red border when the field loses focus, but only displays error messages on hover (whereas WebKit browsers keep the errors persistent).

User studies from Christian Holst and Luke Wroblewski (separately) found that displaying an error when the user leaves a field, and keeping that error persistent until the issue is fixed, provided the best and fastest user experience. Bonus CSS tip: style invalid selectors only when they arern’t currently being edited with :not(:focus):invalid { }.

Unfortunately, none of the browsers behave exactly this way by default.

In the next article in this series, I’ll show you how to use the native Constraint Validation API to bolt-in our desired UX with some lightweight JavaScript. No third-party library required!

Article Series:

  1. Constraint Validation in HTML (You are here!)
  2. The Constraint Validation API in JavaScript (Coming Soon!)
  3. A Validity State API Polyfil (Coming Soon!)l
  4. Validating the MailChimp Subscribe Form (Coming Soon!)

Form Validation Part 1: Constraint Validation in HTML is a post from CSS-Tricks

How to Create a Vector T-Shirt Template and Apply a Pattern to It With Adobe Illustrator

Post pobrano z: How to Create a Vector T-Shirt Template and Apply a Pattern to It With Adobe Illustrator

Final product image
What You’ll Be Creating

In this tutorial, you will learn how to use the Mesh Tool in Adobe Illustrator to create a vector T-shirt!

If you want to skip the tutorial and just use this shirt with lots of other awesome designs, purchase the Collection of Various Soccer Jerseys from GraphicRiver!

Collection of Various Soccer Jerseys

1. How to Draw a T-Shirt With the Mesh Tool

Step 1

Let’s learn how to use the Mesh Tool while creating a photo-realistic T-shirt!

Begin by drawing the shape of half of a shirt with the Pen Tool (P). Fill it in with #FDFDFD.

Create a copy of the shape! Put it aside—we will need it later.

Let’s start using a Mesh! Take the Mesh Tool (U) and start creating a Mesh grid on the object by placing nodes. Afterwards, select the nodes on the top left edge of the shirt and change their color to #D5D5D5.

Add some more nodes, as indicated in the screenshot below, and color the bottom two-thirds of the shirt with #F1F1F1.

see above

Step 2

Continue similarly, now using these colors:

  1. #DFDFDF
  2. #B7B7B7
  3. #7E7E7E
shadow on the left side

Step 3

Create more shadows and folds in this step, using these colors:

  1. #7E7E7E
  2. #B4B4B4
  3. #C9C9C9
folds on the left middle

Step 4

Add some more Mesh nodes and apply the final colors:

  1. #AAAAAA
  2. #DADADA
  3. #D1D1D1
more folds now on the bottom

Step 5

Add a final fold with #BCBCBC and now create a reflected copy of the object by right-clicking, and then choosing Transform > Reflect.

Choose Vertical reflection and click Copy instead of OK.

Put the two copies together as well as you can—make sure the mesh nodes in the middle line up. You can Group both objects (Control-G) for ease of use.

see above

Step 6

Next, let’s draw the sleeves! Draw an outline and save a copy for later. Continue using the Mesh Tool (U) with these colors:

  1. #DCDCDC
  2. #949494
  3. #FCFCFC
dark on the right white on the left and create folds

Step 7

Apply finishing touches to the sleeve with:

  1. #F4F4F4
  2. #606060
  3. #FBFBFB
create more folds with white highlights

Step 8

Draw the inside of the shirt with these colors:

  1. #A6A6A6
  2. #676767
  3. #8D8D8D

Save a copy of the outline of the shape!

grey with darker on the edges

Step 9

Draw some more folds with:

  1. #898989
  2. #919191
  3. #B7B7B7
single fold in the middle

Step 10

Draw the outline of the shape and save a copy of it for later.

Finish off the shirt by coloring its collar using these:

  1. #F4F4F4
  2. #D0D0D0
  3. #DDDDDD
  4. #CECECE
collar with dark on the edges

Step 11

Now, put all the elements together! (Create the second sleeve by recreating Step 5).

Our shirt is done!

put it together

2. How to Apply a Pattern to the Shirt

Step 1

Draw a sample pattern made with red (#E81010) stripes on a white background. You can use any other pattern you want!

see above

Step 2

Grab the copy of the outline we made back in Step 1, create a reflected copy and, using the Pathfinder panel, Unite both shapes into one.

see above

Step 3

Place the pattern we made before over the top of the white shape. Select both and, after right-clicking, choose Make Clipping Mask.

see above

Step 4

Grab the other copies of outlines we made in the previous section of the tutorial and add them to our shirt pattern. You can Group them.

Next, take the Mesh T-shirt and, in the Transparency panel, change the Transparency mode to Multiply. Place the Mesh T-shirt over the top of the pattern and it’s ready!

see above

Step 5

Our T-shirt with the pattern is done! You can apply any other pattern you’d like in exactly the same fashion.

result

Awesome Work, You’re Now Done!

What now? You can try any of my other tutorials from my profile, or check out my portfolio on GraphicRiver, as well as the original shirts collection we recreated in this tutorial.

I hope you enjoyed the tutorial, and I’ll be extremely happy to see your results in the comments below!

Collection of Various Soccer Jerseys

Agregator najlepszych postów o designie, webdesignie, cssie i Internecie