How to Create a Colorful Salad Plate in Adobe Illustrator

Post pobrano z: How to Create a Colorful Salad Plate in Adobe Illustrator

Final product image
What You’ll Be Creating

In
this new tutorial you will learn how to draw a colorful salad on a
plate, but let’s choose a different angle because that means more fun.
At the beginning, we will create a simple plate, and after that it’s
time to get creative in arranging the ingredients of this salad:
rocket leaves, pieces of red and yellow peppers, onion rings, tasty
slices of tomatoes, radishes, and black olives. At the end, it’s all
about the shadows in order to give it a more realistic look. Let’s
start the fun!

If
you are hungry for more food icons or vector icons in general, then
run over to GraphicRiver and you’ll surely find what are you looking
for there. 

1. How
to Create a New Document 

Launch
Illustrator
and
go to
File
> New
to
open a blank document. Type a name for your file, set up the
dimensions, and then select
Pixels
as
Units
and
RGB
as
Color
Mode
.
Make sure that
Align
New Objects to Pixel Grid
is
not checked.

Next,
go to
Edit
> Preferences > General
and
set the
Keyboard
Increment
to
1
px
and
while there, go to
Units
to
make sure they are set as in the following image. I usually work with
these settings, and they will help you throughout the drawing process.

how to open a new illustrator document

2. How
to Draw a Simple Plate

Step
1

Let’s
start with an ellipse about 610 x 75 px Filled with the Linear Gradient shown (1). Next, draw another ellipse slightly bigger only
at the bottom and send it behind the first (2).

how to draw the plate shape

Step
2

To
create the center of the plate, draw a new ellipse about 480 x 58 px
(1). Now, select the first ellipse and Copy and Paste in Place
(Shift-Control-V)
in order to make a copy of it (2). While this copy
(the black ellipse) and the red ellipse stay selected, press
Intersect in the Pathfinder panel. Fill the new shape with the Linear Gradient shown (3).

how to create the inside of the plate

Step
3

Grab
the Pen Tool (P) and draw a shape like the one below. The important part is
the curve at the bottom which is a bit lower than the rest of the
ellipses and creates the thin border. Use the Gradient shown and then
send this shape behind everything. 

how to create a thin edge on plate

Step
4

Next,
draw the bottom of the plate like in the following image. Use the Gradient shown and then send this shape behind everything. 

how to draw the depth of the plate

Step
5

Draw
another shape like earlier, where the bottom curve is a bit lower than
the rest of the plate, in order to create a darker thin border

(1).

Continue
with the last ellipse at the bottom of the plate about 280 x 58 px Filled with the Linear Gradient shown, and then send it behind
everything (2). 

how to draw the bottom of the plate

Step
6

To
add a highlight on the bottom of the plate, draw a very thin shape
with the Pen Tool (P) following the bottom edge, and Fill it with the Linear Gradient shown.

add highlight on the bottom of the plate

Step
7

Now,
follow the outer edge of the plate and draw two new thin shapes as
shown. After that, the plate is ready, and you can see the final result
in the image below (3).

add details on the edges of the plate

3. How to Draw the Rocket Leaf (Arugula)

It’s
time to draw the components of this tasty salad, and the first
ingredient is rocket, also known as arugula. Take the Pen Tool (P) and draw a leaf shape similar to the one below. Once you are happy with the shape, Fill it with the Linear Gradient shown (1).

Next,
draw a thin shape through the middle of the leaf and Fill it with the Gradient
shown (2).

That’s
it! The leaf is ready. Group (Control-G) the two shapes and name the
group “rocket”.

how to draw vector rocket arugula

4. How
to Draw the Onion Ring

Step
1

Use
the Ellipse Tool (L) to draw two shapes and arrange them as shown in the
next image (1). The size is not important because you will scale all of the ingredients later anyway. While the two ellipses stay
selected, go to Object > Compound Path > Make (Control-8) and Fill the resulting shape with a pale purple (2).

Select
the ring and then Copy and Paste in Back (Control-B) to make a copy
of it. Move this copy 2-3 px downwards with the help of the Down
Arrow
key on your keyboard (3). 

Select the original ring again and
then Copy and Paste in Place (Shift-Control-V) to make another copy
of it. Having this new copy of the ring selected along with the black
ring, press Minus Front in the Pathfinder panel. Send the resulting
two shapes in the back (4) and Fill them with the two shades of
purple shown (5).

how to draw a vector onion ring

Step
2

The
onion ring is ready. You can create another version, but this is
optional. Just make a Copy of the onion ring and then use only two out of the
three shades of purple. 

Group (Control-G) the shapes and name the groups “onion ring 1” and “onion ring 2”.

how to create a second onion ring

5. How
to Draw the Piece of Red Pepper

Step
1

Next
on the list of ingredients is the red pepper. Draw a shape similar to
the one below with the help of the Pen Tool (P) and
use red as the Fill color (1). While this shape stays selected, go to
Object > Transform > Scale, type 105% in the Scale field, and
then hit Copy. As a result, you will get a slightly bigger shape. Use
a darker shade of red to Fill it and send it behind the first (2).

Grab
the Pen Tool (P) again and draw a new shape in front of the two Filled with a lighter shade of red (3). Fix the ends of the pepper if
necessary and align the points with the Direct Selection Tool (A).
The piece of red pepper is ready now (4).

how to draw a piece of red pepper

Step
2

This
step is optional, but if you want more color in your salad, you can
create a piece of yellow pepper. Simply make a Copy of the red
pepper and replace the Fill colors.

Group
(Control-G)
the shapes and name the groups “red pepper” and
yellow pepper”.

how to create a piece of yellow pepper

6. How
to Draw the Slice of Tomato

Step
1

Use
the Pen Tool (P) to draw the tomato slice and Fill it with a dark
shade of red. While the shape stays selected, add a New Fill in the
Appearance panel above the first and use an orangey-red color. Select this
Fill attribute, go to Effect > Distort & Transform >
Transform
and apply the settings shown. As a result, you will get the
darker edge at the bottom of the slice.

how to draw the slice of tomato

Step
2

Next,
draw a similar but smaller shape on top and Fill it with red. Add a
New Fill below the first and use a darker shade of orange. With this
Fill
attribute selected in the Appearance panel, go to Effect >
Distort & Transform > Transform
and apply a 1 px Vertical
Move
.

how to draw the pulp of the tomato slice

Step
3

Take
the Pen Tool (P) again and draw a shape like the one in the next image, Filled
with dark orange (1). Continue with a similar shape but slightly
smaller, filled with white. Set the Blending Mode to Soft Light (2).
You can see the result in the image below (3).

how to draw the center of the tomato slice

Step
4

For
the seed of the tomato, you need two tear-drop shapes. Fill the
bigger one with dark orange and the smaller one with yellow. Group
(Control-G)
the two shapes and Multiply to obtain more seeds; then Rotate and arrange them on the tomato slice.

how to draw the seeds of tomato

Step
5

Now,
draw a curved path next to the bottom edge of the slice (1). Give it
a 5 pt red Stroke; then go to Effect > Blur > Gaussian Blur and
apply a Radius of 2 px. Reduce the Opacity to 70% (2).

Select
the slice shape and then Copy and Paste in Place (Shift-Control-V) in
order to make a copy of it in front of everything. Set this copy to
stroke-none and fill-none. Now, select the curved path along with the
copy of the slice and go to Object > Clipping Mask > Make
(Control-7)
. Name the resulting group “tomato slice” and you are
done (3). You can see the final result in the image below (4).

add detail on the pulp of tomato

7. How
to Draw the Slice of Radish

Use
the Pen Tool (P) to draw the slice shape, and after that, draw a
similar shape but bigger only at the bottom in the back (2).

Select
the blue shape and then Copy and Paste in Place (Shift-Control-V) to
make a copy of it in front of everything. Having this copy selected
along with the orange shape, press Minus Front in the Pathfinder
panel. As a result, you will get the shape at the bottom as the skin
of the radish (3). Fill the two shapes with the Radial Gradients
shown, Group (Control-G) them, and the slice of radish is ready (4). 

how to draw the slice of radish

8. How
to Draw the Black Olive

The
olive is pretty easy, and you only need two shapes: a 50 x 38 px
ellipse (1) and the highlight shape on the upper left side (2). Fill
them with the Radial Gradients shown; then Group (Control-G) them, and
you can see the final result in the image below (3).

how to draw a vector black olive

9. How
to Compose the Salad

Step
1

First,
select the “plate” group and Rotate it as shown in the following
image to make things more interesting. And now, it’s finally time to
compose the delicious salad. Grab the “rocket” group and make a
few copies. Arrange them as shown below, or you can put your
creativity to the test.

There
are plenty of shadows in this salad, and you can choose to add them at
the end once you see the final picture, but that might be a bit
overwhelming because there are so many components involved. In order
to make things easier to understand, I will show you the settings
for the Drop Shadow effect as we go along. The settings are slightly
different from step to step because they depend on the position of
each ingredient.

Some
of the ingredients don’t even need a shadow. From the three rocket
leaves in the image below, only one has the Drop Shadow effect
applied because the other two will be covered with the rest of the
ingredients by the end so it’s not really necessary. 

arrange the first rocket leaves on plate

Step
2

Next,
grab the “red pepper” group and move it on the plate. Apply the
Drop Shadow effect to create a shadow. The same thing goes for the
yellow pepper” group.

It
looks weird for the moment, but at the end we’ll use a Mask to hide
the ingredients that go over the edge of the plate.

arrange red and yellow pepper on plate

Step
3

Duplicate and arrange more rocket leaves. For the leaves that are up in the
air, you don’t need to apply the Drop Shadow effect because the
shadow should exist only on the plate and not outside and around the
plate.

arrange more rocket leaves on plate

Step
4

Next,
put an olive on the plate and apply the Drop Shadow effect. 

Also, put
an onion ring and a yellow pepper on the left side but without the
shadow this time, because they go over the edge of the plate. We will
create more detailed shadows later in the tutorial for ingredients
like these.

arrange a black olive and onion on plate

Step
5

Following
the technique explained in the previous steps, place more leaves and
other ingredients on your plate. 

arrange other salad ingredients on plate

Step
6

Arrange
another piece of red pepper, another slice of tomato, more olives and
another copy of the onion ring plus a bunch of leaves in between and
on top, as many as you want.

In
the image below, you can see the Drop Shadow settings for the onion
ring on the right side and for the rocket leaf on top of it. 

Don’t
add a shadow under the slices of tomato because we’ll take care of that
later in the tutorial. 

arrange more salad ingredients on plate

Step
7

It’s
time to arrange a few radish slices. Scale them so they are not the
same size because that is more natural. Add more leaves on top and
start to go upwards with the ingredients.

arrange radish slices on plate

Step
8

Add
another piece of yellow pepper and another slice of tomato up in the
air between the leaves. 
The
last two ingredients are the red pepper and another onion ring. 

arrange salad ingredients up in the air

10. How
to Add Shadows Between the Ingredients

Step
1

If
you are happy with your salad and the position of each ingredient, you
can now add more detailed shadows between them for a realistic
look.

Focus
on the slices of tomato and draw a path following the bottom edge,
one for each slice that you have. Give them a 3 pt black Stroke and
then apply a 3 px Gaussian Blur. After you are done, send each path
right behind the corresponding slice of tomato. 

create shadow under the tomato slices

Step
2

Now,
focus on the ingredients that are up in the air and especially on the
areas where they overlap because you need a shadow there. Take your
time, zoom in as much as you need, and draw a small path where two
ingredients are overlapping following their contour, but don’t go over
the edges (into the white background). You can see a few examples in
the close-ups. The more paths you draw, the more detailed and
realistic your salad will be.

Select
a 2 pt black Stroke for all these paths and apply a 2 px Gaussian
Blur
. Some of them are at 100% Opacity, and some of them are at 75%
Opacity
, depending on the area and the colors. Don’t forget to move
each path between the two ingredients that are overlapping in the
Layers panel because the correct order is very important in this case.

create shadow between salad ingredients

11. How
to Clean Up the Edge of the Plate

Step
1

Select
the ellipse from the inside of the plate and then Copy and Paste in
Place (Shift-Control-V)
in order to make a copy of it in front of
everything (1). Grab the Scissors Tool (C) and click on the two end
points of this copy to cut the shape in two and keep only the half in
front (2). Use the Pen Tool (P) to close this path and create a new
shape around the salad (3). 

how to create the mask shape

Step
2

Set
the shape from the previous step to StrokeNone and Fill-None. Now,
select all the ingredients of the salad along with this shape and go to Object >
Clipping Mask > Make (Control-7)
. Now, the front side of the plate
is clean, as it should be.

how to mask the salad ingredients

Step
3

If
you want to add a leaf that goes over the edge of the plate for a
more realistic look then now is the time to do it, outside the mask.
Arrange it in the desired place and then apply the Drop Shadow
effect. 

add rocket leaf on the edge of plate

12. How
to Add Highlights on the Salad

Focus
on one of the tomato slices and draw two short paths as shown in the next
image. Stroke them with the Black Blend Art Brush from another
tutorial of mine dedicated to Blending Brushes and how useful they are: How to Create a Set of
Multi-Use Blend Brushes
. I use these brushes all the time to add
highlights and details in my drawings. Set the color as
indicated and set the Stroke Weight to 0.75 pt. Keep the bigger path at
100% Opacity but for the shorter path reduce the Opacity to 50% to
make it more discreet.

Do
the same thing for the rest of the tomatoes to make them shinier.
You can also do this for the other ingredients if you want but for
me, this was enough. 

how to add highlights on tomato slices

13. How
to Create the Shadow Under the Plate

Step
1

Use
the Pen Tool (P) to draw a shape like in the next image on a New Layer behind the plate, and give it a white Fill. Continue with a
similar but smaller shape Filled with light gray and set it to 75%
Opacity

draw first two shadow shapes under the plate

Step
2

Draw
another ellipse under the bottom of the plate and Fill it with gray.
The last ellipse is much smaller and filled with a darker gray.

draw last two shadow shapes under the plate

Step
3

While
the four shapes stay selected, go to Object > Blend > Blend
Options
and choose 50 Specified Steps. Hit OK; then go back to Object
> Blend > Make (Alt-Control-B)
.

Set
the resulting blend group to Blending Mode Multiply and reduce the
Opacity to 75%, but this depends on the color of your background. 

blend shadow shapes under the plate

Congratulations!
You’re Done

The colorful salad on the plate is ready now. Grab a fork!

Let
me know if you enjoyed this tutorial, and don’t forget to share an
image of your recreation with us if you decide to have fun with it. I would love to see it.

salad plate vector illustration adobe illustrator tutorial

How to Create a Color Dust Action in Adobe Photoshop

Post pobrano z: How to Create a Color Dust Action in Adobe Photoshop

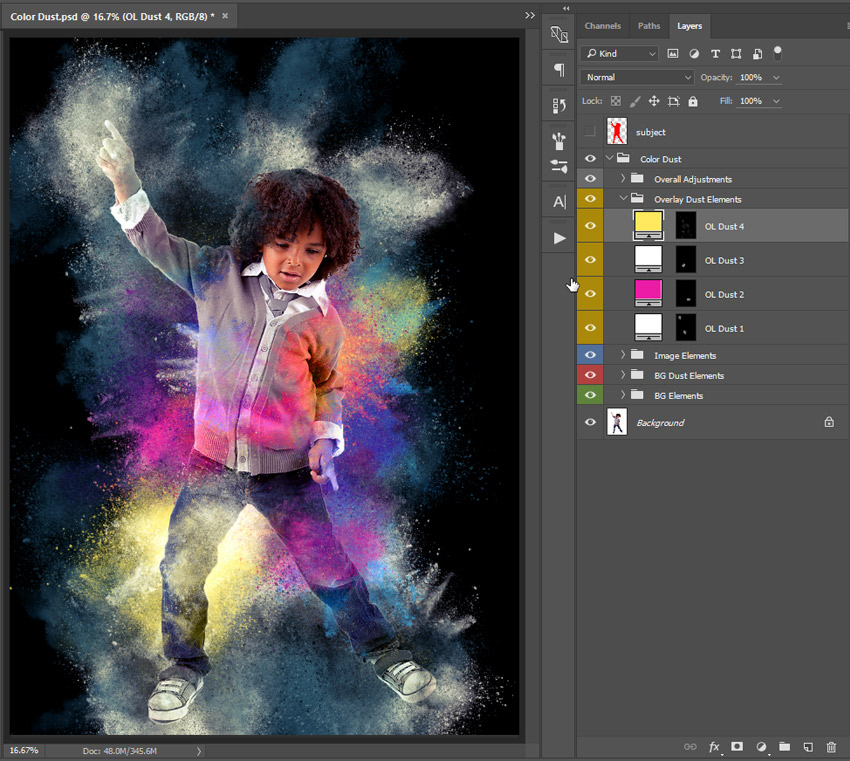
Final product image
What You’ll Be Creating

In this tutorial, I’ll show you how to create a color dust explosion effect on any photo. At the end of the tutorial, you’ll have an action which will automate the entire process with a single click.

I’ll try to explain everything in much detail so that everyone can follow along, even if this is your first time with Photoshop.

The action we’ll be creating is part of the Color Dust Photoshop Action. Feel free to gather more inspiration from the amazing Photoshop Actions on GraphicRiver. You can also check out the Animated Color Dust Photoshop Action which will create an animated GIF from your image.

Animated Color Dust Photoshop Action

The complete action has the following additional features: 

  • Greater control over dust elements.
  • Three predefined background options.
  • Ten preset color looks and additional color adjustments.
  • Additional dust elements are also included.
  • Animated version contains options to generate animated GIF images with variable frame rates and sizes.

Here, we’ll only create the static color dust effect and apply the default color look.

Tutorial Assets

The following resources are needed for the tutorial:

1. How to Set Up Your Document

Step 1

First, open the photo on which you want to work. To open your photo, go to File > Open, choose your photo, and click Open. Now, before we get started, we need to check a few things:

  1. Your photo should be in RGB Color mode and 8 Bits/Channel. To check this, go to Image > Mode.
  2. Your photo should be the Background layer. If it is not, go to Layer > New > Background from Layer.
  3. Click the fly-out list of the Layers panel and click Panel Options…. Make sure that both Use Default Masks on Fill Layers and Add „copy” to Copied Layers and Groups are checked.
Color Dust photoshop action document pre-requirements

Step 2

The effect works best with images of size 2500–4000 px width. If your image is smaller, increase it by going to Image > Image Size. You can always reduce it to your original size after the effect has been applied.

Current image is set to a width of 3500 px

2. How to Load the Brushes

Step 1

Go to Edit > Presets > Preset Manager… In the Preset Manager window, select Preset Type: Brushes and click Load…

Browse and select the Color Dust Brushes.atn file that came with the downloadable attachment. Then, click Done.

Load Color Dust Brushes

Step 2

Press B on the keyboard to select the Brush Tool. Make sure both Opacity and Flow are set to 100%.

Set both brush opacity and flow to 100 percent

3. How to Make the Effect Area Layers

Add a New Layer above the Background layer. Name the new layer subject.

Now, make a Selection around your main subject. You can also choose the Brush Tool (B) and brush over your photo using a Hard Round Brush.

Select your subject area and fill it with color

4. How to Start Recording the Action

Step 1

Now, let’s start preparing the base for our action. We’ll put it in a separate set for easier management. 

Go to Window > Actions or press F9 on the keyboard to open up the Actions panel. Then, click the Create new set icon, name the set Color Dust Photoshop Action, and click OK. We’ll place the action inside this set.

Create a new set called Color Dust Photoshop Action

Step 2

Click the Create new action icon and name it Color Dust.

Click Record to start recording all the subsequent steps in Photoshop.

Create a new action called Color Dust and start recording

From this point onwards, everything you do will be recorded, so please be careful and keep an eye on the Actions panel. If you make a mistake, click the Stop playing/recording icon, and Delete the unnecessary step from the Color Dust action. Then click the Begin recording icon again to continue. The last thing you’d want is to have a messy action filled with unwanted steps.

5. How to Create the Background

Step 1

Select the Background layer, and hide the subject layer by toggling the eyeball icon off. Then, press D on the keyboard to reset swatches.

Select the Background layer and hide the subject layer

Step 2

Go to Layer > New Fill Layer > Solid Color Name it BG Color, enter the hex color code #ffffff, and click OK.

Create a Solid Color Fill layer with hex color code ffffff

Step 3

Press Control-G to add the BG Color layer in a new Group. Then, go to Layer > Rename Group… and rename the group Color Dust. We’ll add all our further layers into this group to keep everything organized.

Add layers into the Color Dust group

Step 4

Select the subject layer, right-click on the layer thumbnail, and select Select Pixels. Then select the Background layer and press Control-J to Copy the selection into a New Layer.

Create a New Layer, rename it Base Image, and drag it above the BG Color layer (inside the Color Dust group).

Create the Base Image layer and re-position it

Step 5

Create a New Layer and name it temp-sub.

Again, select the subject layer, right-click on the layer thumbnail, and select Select Pixels. Go to Select > Modify > Smooth…, enter Sample Radius: 50 pixels and click OK.

Then, select the temp-sub layer and press Alt-Delete or to Fill the selection with the Foreground Color.

Press Control-D to deselect the current selection.

Hide the temp-sub layer by toggling the eyeball icon off.

Select pixels from the subject layer and smooth by 50 pixels

6. How to Create the Emitter Guide Layers

Step 1

Select the Base Image layer. Create a New Layer and name it emitter-1

Select the temp-sub layer, right-click on the layer thumbnail, and select Select Pixels.

Select the emitter-1 layer. Press M on the keyboard to select the Rectangular Marquee Tool. Then, right-click on the image and select Make Work Path…. Enter Tolerance: 3.0 pixels and click OK.

Make work path from selection with tolerance 3 pixels

Step 2

Press B on the keyboard to select the Brush Tool. Expand the brush selector drop-down menu and select the br-color-dust-emitter-1 brush. Make sure both the Opacity and Flow are set to 100%.

Select the br-color-dust-emitter-1 brush

Step 3

Press P on the keyboard to select the Pen Tool.

Then, right-click on the image and select Stroke Path… Make sure Simulate Pressure is not checked. Click OK.

Again, right-click on the image with the Pen Tool and select Delete Path.

Stroke path without Simulate Pressure

Step 4

Now, your image should look like below.

Image with emitter-1

Hide the emitter-1 layer by toggling the eyeball icon off.

Step 5

Create a New Layer and name it emitter-2.

Select the temp-sub layer, right-click on the layer thumbnail, and select Select Pixels.

Select the emitter-2 layer and go to Select > Transform Selection.

Keep Reference point location at Center, enter Width: 50%Height: 1%, and click the Tick button on the top toolbar or press Enter to confirm.

Scale the selection with width 50 percent and height 1 percent

Step 6

Press M on the keyboard to select the Rectangular Marquee Tool. Then, right-click on the image and select Make Work Path…. Enter Tolerance: 3.0 pixels and click OK.

Press B on the keyboard to select the Brush Tool. Expand the brush selector drop-down menu and select the br-color-dust-emitter-2 brush. Make sure both the Opacity and Flow are set to 100%.

Select the br-color-dust-emitter-2 brush

Step 7

Now Stroke the path with the selected brush. Your image should look like below.

Image with emitter-2

Hide the emitter-2 layer by toggling the eyeball icon off.

Step 8

Create a New Layer and name it emitter-3.

Select the temp-sub layer, right-click on the layer thumbnail, and select Select Pixels.

Select the emitter-3 layer and go to Select > Transform Selection. Keep Reference point location at Top-Right, enter Width: 40%Height: 40%, and click the Tick button on the top toolbar or press Enter to confirm.

Scale the selection

Again, go to Select > Transform Selection.

Keep Reference point location at Bottom-Left, enter Width: 1%Height: 1%, and click the Tick button on the top toolbar or press Enter to confirm.

Scale the selection again

Step 9

Make a path from the selection and Stroke it with the selected brush. Your image should look like below.

Image with emitter-3

Hide the emitter-3 layer by toggling the eyeball icon off.

Step 10

Create a New Layer and name it emitter-4.

Select the temp-sub layer, right-click on the layer thumbnail, and select Select Pixels.

Select the emitter-4 layer and go to Select > Transform Selection.

Keep Reference point location at Bottom-Left, enter Width: 30%Height: 30%, and click the Tick button on the top toolbar or press Enter to confirm.

Scale the selection with width 30 percent height 30 percent

Again, go to Select > Transform Selection.

Keep Reference point location at Top-Right, enter Width: 1%Height: 1%, and click the Tick button on the top toolbar or press Enter to confirm.

Scale the selection with width 1 percent height 1 percent

Step 11

Make a path from the selection and Stroke it with the selected brush. Your image should look like below.

Image with emitter-4

Hide the emitter-4 layer by toggling the eyeball icon off.

Step 12

Create a New Layer and name it emitter-5.

Select the temp-sub layer, right-click on the layer thumbnail, and select Select Pixels.

Select the emitter-5 layer and go to Select > Transform Selection.

Keep Reference point location at Bottom-Right, enter Width: 30%Height: 30%, and click the Tick button on the top toolbar or press Enter to confirm.

Scale the selection with width 30 percent height 30 percent

Again, go to Select > Transform Selection.

Keep Reference point location at Top-Left, enter Width: 1%Height: 1%, and click the Tick button on the top toolbar or press Enter to confirm.

Scale the selection with width 1 percent height 1 percent

Step 13

Make a path from the selection and Stroke it with the selected brush. Your image should look like below.

Image with emitter-5

Hide the emitter-5 layer by toggling the eyeball icon off.

Step 14

Create a New Layer and name it emitter-6.

Select the temp-sub layer, right-click on the layer thumbnail, and select Select Pixels.

Select the emitter-6 layer and go to Select > Transform Selection.

Keep Reference point location at Top-Left, enter Width: 40%Height: 40%, and click the Tick button on the top toolbar or press Enter to confirm.

Scale the selection with width 40 percent height 40 percent

Again, go to Select > Transform Selection.

Keep Reference point location at Bottom-Right, enter Width: 1%Height: 1%, and click the Tick button on the top toolbar or press Enter to confirm.

Scale the selection with width 1 percent height 1 percent

Step 15

Again, make a path from the selection and Stroke it with the selected brush. Your image should look like below.

Image with emitter-6

Hide the emitter-6 layer by toggling the eyeball icon off.

Step 16

Select the emitter-1 layer. Hold Shift and select the emitter-6 layer. Press Control-J to Duplicate all selected layers.

Show the emitter-1 copyemitter-2 copyemitter-3 copyemitter-4 copyemitter-5 copy and emitter-6 copy by toggling the eyeball icons on.

Show the copies of the emitter layers

Step 17

Press Control-E to Merge the selected layers. Go to Layer > Rename Layer… and rename it emitter-7.

Now, your image should look like below.

Image with emitter-7

Hide the emitter-7 layer by toggling the eyeball icon off.

Copy of the emitter layers merged into the emitter-7 layer

7. How to Create the Background Color Dust

Step 1

Select the BG Color layer.

Go to Layer > New Fill Layer > Solid Color. Name it BG Fill Dust 1, enter the hex color code #000000, and click OK.

Create a Solid Color Fill layer with hex color code 000000

Step 2

Go to Layer > Layer Mask > Delete.

Again, go to Layer > Layer Mask > Hide All.

Now, go to Layer > Layer Mask > Unlink.

Hide the BG Fill Dust 1 layer with a black layer mask

Step 3

Press B on the keyboard to select the Brush Tool. Expand the brush selector drop-down menu and select the br-color-dust-4c brush. Make sure both the Opacity and Flow are set to 100%.

Select the br-color-dust-4c brush

Step 4

Select the emitter-7 layer, right-click on the layer thumbnail, and select Select Pixels.

Select pixels of the emitter-7 layer

Step 5

Select the BG Fill Dust 1 layer icon. Then, select the layer mask (this is to make sure that the layer mask is always selected at this step).

Press D on the keyboard to reset swatches. Make sure your Foreground Color is white while the layer mask is selected.

Select the layer mask of the BG Fill Dust 1 layer

Step 6

Press M on the keyboard to select the Rectangular Marquee Tool. Then, right-click on the image and select Make Work Path…. Enter Tolerance: 3.0 pixels and click OK.

Make path from the selection with tolerance of 3 pixels

Step 7

Press P on the keyboard to select the Pen Tool.

Then, right-click on the image and select Stroke Path…. Make sure Simulate Pressure is not checked. Click OK.

Again, right-click on the image with the Pen Tool and select Delete Path.

Stroke path without Simulate Pressure

Step 8

Now, your image should look like below.

Effect with the BG Fill Dust 1 layer

Step 9

Go to Layer > New Fill Layer > Solid Color. Name it BG Fill Dust 2, enter the hex color code #000000, and click OK.

Create a Solid Color Fill layer with hex color code 000000

Step 10

Repeat Step 2 for the BG Fill Dust 2 layer.

Press B on the keyboard to select the Brush Tool. Expand the brush selector drop-down menu and select the br-color-dust-3d brush. Make sure both the Opacity and Flow are set to 100%.

Select the br-color-dust-3d brush

Step 11

Select the emitter-7 layer, right-click on the layer thumbnail, and select Select Pixels.

Select the BG Fill Dust 2 layer icon. Then, select the layer mask (this is to make sure that the layer mask is always selected at this step).

Select the layer mask of the BG Fill Dust 2 layer

Step 12

Then make a path from the selection and Stroke the path with the selected brush.

Now, your image should look like below.

Effect with the BG Fill Dust 2 layer

Step 13

Go to Layer > New Fill Layer > Solid Color. Name it BG Dust 1, enter the hex colour code #00ce7e, and click OK.

Create a Solid Color Fill layer with hex color code 00ce7e

Step 14

Repeat Step 2 for the BG Dust 1 layer.

Press B on the keyboard to select the Brush Tool. Expand the brush selector drop-down menu and select the br-color-dust-1 brush. Make sure both the Opacity and Flow are set to 100%.

Select the br-color-dust-1 brush

Step 15

Select the emitter-1 layer, right-click on the layer thumbnail, and select Select Pixels.

Select the BG Dust 1 layer icon. Then, select the layer mask (this is to make sure that the layer mask is always selected at this step).

Select the layer mask of the BG Dust 1 layer

Step 16

Then make a path from the selection and Stroke the path with the selected brush.

Now, your image should look like below.

Effect with the BG Dust 1 layer

Step 17

Go to Layer > New Fill Layer > Solid Color. Name it BG Dust 1 Col 2, enter the hex colour code #0db9ea, and click OK.

Create a Solid Color Fill layer with hex color code 0db9ea

Step 18

Repeat Step 2 for the BG Dust 1 Col 2 layer.

Go to Layer > Create Clipping Mask to add the BG Dust 1 Col 2 layer as a Clipping Mask to the BG Dust 1 layer.

Layer structure after adding clipping mask

Step 19

Press B on the keyboard to select the Brush Tool. Expand the brush selector drop-down menu and select the br-color-dust-4c brush. Make sure both the Opacity and Flow are set to 100%.

Select the emitter-7 layer, right-click on the layer thumbnail, and select Select Pixels.

Select the BG Dust 1 Col 2 layer icon. Then, select the layer mask (this is to make sure that the layer mask is always selected at this step).

Just like before, make a path from the selection and Stroke the path with the selected brush.

Press Control-I to Invert the layer mask color.

Now, your image should look like below.

Image after applying effect on the BG Dust 1 Col 2 layer

Step 20

Go to Layer > New Fill Layer > Solid Color. Name it BG Dust 2, enter the hex color code #ef16a5, and click OK.

Create a Solid Color Fill layer with hex color code ef16a5

Step 21

Repeat Step 2 for the BG Dust 2 layer.

Press B on the keyboard to select the Brush Tool. Expand the brush selector drop-down menu and select the br-color-dust-2 brush. Make sure both the Opacity and Flow are set to 100%.

Select the br-color-dust-2 brush

Step 22

Select the emitter-3 layer, right-click on the layer thumbnail, and select Select Pixels.

Select the BG Dust 2 layer icon. Then, select the layer mask (this is to make sure that the layer mask is always selected at this step).

Then make a path from the selection and Stroke the path with the selected brush.

Now, your image should look like below.

Image after applying effect on the BG Dust 2 layer

Step 23

Go to Layer > New Fill Layer > Solid Color. Name it BG Dust 3, enter the hex color code #ffea5a, and click OK.

Create a Solid Color Fill layer with hex color code ffea5a

Step 24

Repeat Step 2 for the BG Dust 3 layer.

Press B on the keyboard to select the Brush Tool. Expand the brush selector drop-down menu and select the br-color-dust-4a brush. Make sure both the Opacity and Flow are set to 100%.

Select the br-color-dust-4a brush

Step 25

Select the emitter-3 layer, right-click on the layer thumbnail, and select Select Pixels.

Select the BG Dust 3 layer icon. Then, select the layer mask (this is to make sure that the layer mask is always selected at this step).

Then, make a path from the current selection. Press P on the keyboard to select the Pen Tool.

Then, right-click on the image and select Stroke Path…. Make sure Simulate Pressure is not checked. Click OK.

Again, right-click on the image and select Stroke Path…. Make sure Simulate Pressure is not checked. Click OK.

Now, your image should look like below.

Image after applying effect on the BG Dust 3 layer

Step 26

Press B on the keyboard to select the Brush Tool. Expand the brush selector drop-down menu and select the br-color-dust-3d brush. Make sure both the Opacity and Flow are set to 100%.

Press P on the keyboard to select the Pen Tool.

Then, right-click on the image and select Stroke Path…. Make sure Simulate Pressure is not checked. Click OK.

Again, right-click on the image and select Stroke Path…. Make sure Simulate Pressure is not checked. Click OK.

Again, right-click on the image and select Stroke Path…. Make sure Simulate Pressure is not checked. Click OK.

Now, right-click on the image with the Pen Tool and select Delete Path.

Now, your image should look like below.

Image after applying effect on the BG Dust 3 layer

Step 27

Select the emitter-4 layer, right-click on the layer thumbnail, and select Select Pixels.

Select the BG Dust 3 layer icon. Then, select the layer mask (this is to make sure that the layer mask is always selected at this step).

Then make a path from the current selection. Press P on the keyboard to select the Pen Tool.

Then, right-click on the image and select Stroke Path…. Make sure Simulate Pressure is not checked. Click OK.

Again, right-click on the image and select Stroke Path…. Make sure Simulate Pressure is not checked. Click OK.

Now, your image should look like below.

Image after applying effect on the BG Dust 3 layer

Step 28

Press B on the keyboard to select the Brush Tool. Expand the brush selector drop-down menu and select the br-color-dust-4a brush. Make sure both the Opacity and Flow are set to 100%.

Press P on the keyboard to select the Pen Tool.

Then, right-click on the image and select Stroke Path…. Make sure Simulate Pressure is not checked. Click OK.

Again, right-click on the image and select Stroke Path…. Make sure Simulate Pressure is not checked. Click OK.

Again, right-click on the image and select Stroke Path…. Make sure Simulate Pressure is not checked. Click OK.

Now, right-click on the image with the Pen Tool and select Delete Path.

Now, your image should look like below.

Image after applying effect on the BG Dust 3 layer

Step 29

Go to Layer > New Fill Layer > Solid Color. Name it BG Dust 4, enter the hex color code #0df0ed, and click OK.

Create a Solid Color Fill layer with hex color code 0df0ed

Step 30

Repeat Step 2 for the BG Dust 4 layer.

Press B on the keyboard to select the Brush Tool. Expand the brush selector drop-down menu and select the br-color-dust-3c brush. Make sure both the Opacity and Flow are set to 100%.

Select the br-color-dust-3c brush

Step 31

Select the emitter-5 layer, right-click on the layer thumbnail, and select Select Pixels.

Select the BG Dust 4 layer icon. Then, select the layer mask (this is to make sure that the layer mask is always selected at this step).

Then make a path from the selection and Stroke the path with the selected brush.

Now, your image should look like below.

Image after applying effect on the BG Dust 4 layer

Step 32

Go to Layer > New Fill Layer > Solid Color. Name it BG Dust 5, enter the hex colour code #eb18a8, and click OK.

Create a Solid Color Fill layer with hex color code eb18a8

Step 33

Repeat Step 2 for the BG Dust 5 layer.

Press B on the keyboard to select the Brush Tool. Expand the brush selector drop-down menu and select the br-color-dust-4a brush. Make sure both the Opacity and Flow are set to 100%.

Select the emitter-2 layer, right-click on the layer thumbnail, and select Select Pixels.

Select the BG Dust 5 layer icon. Then, select the layer mask (this is to make sure that the layer mask is always selected at this step).

Then make a path from the selection and Stroke the path with the selected brush.

Change the Blending Mode of the layer to Darken.

Now, your image should look like below.

Image after applying effect on the BG Dust 5 layer

Step 34

Go to Layer > New Fill Layer > Solid Color. Name it BG Dust 6, enter the hex color code #0db9ea, and click OK.

Create a Solid Color Fill layer with hex color code 0db9ea

Step 35

Repeat Step 2 for the BG Dust 6 layer.

Press B on the keyboard to select the Brush Tool. Expand the brush selector drop-down menu and select the br-color-dust-3a brush. Make sure both the Opacity and Flow are set to 100%.

Select the emitter-4 layer, right-click on the layer thumbnail, and select Select Pixels.

Select the BG Dust 6 layer icon. Then, select the layer mask (this is to make sure that the layer mask is always selected at this step).

Then make a path from the selection and Stroke the path with the selected brush.

Now, your image should look like below.

Image after applying effect on the BG Dust 6 layer

Step 36

Press B on the keyboard to select the Brush Tool. Expand the brush selector drop-down menu and select the br-color-dust-3b brush. Make sure both the Opacity and Flow are set to 100%.

Select the emitter-6 layer, right-click on the layer thumbnail, and select Select Pixels.

Select the BG Dust 6 layer icon. Then, select the layer mask (this is to make sure that the layer mask is always selected at this step).

Then make a path from the selection and Stroke the path with the selected brush.

Now, your image should look like below.

Image after applying effect on the BG Dust 6 layer

Your BG Dust layers should look like below.

BG Dust layers

8. How to Create the Overlay Color Dust

Step 1

Select the Base Image layer.

Go to Layer > New Fill Layer > Solid Color. Name it OL Dust 1, enter the hex color code #00ce7e, and click OK.

Create a Solid Color Fill layer with hex color code 00ce7e

Step 2

Go to Layer > Layer Mask > Delete.

Again, go to Layer > Layer Mask > Hide All.

Now, go to Layer > Layer Mask > Unlink.

Hide the OL Dust 1 layer with a black layer mask

Step 3

Press B on the keyboard to select the Brush Tool. Expand the brush selector drop-down menu and select the br-color-dust-4b brush. Make sure both the Opacity and Flow are set to 100%.

Select the br-color-dust-4b brush

Step 4

Select the temp-sub layer, right-click on the layer thumbnail, and select Select Pixels.

Right-click on the layer thumbnail of the temp-sub layer and select Select Pixels

Step 5

Select the OL Dust 1 layer icon. Then, select the layer mask (this is to make sure that the layer mask is always selected at this step).

Press D on the keyboard to reset swatches. Make sure your Foreground Color is white while the layer mask is selected.

Select the layer mask of the OL Dust 1 layer and reset swatches

Step 6

Press M on the keyboard to select the Rectangular Marquee Tool. Then, right-click on the image and select Make Work Path…. Enter Tolerance: 3.0 pixels and click OK.

Make work path

Step 7

Press P on the keyboard to select the Pen Tool.

Then, right-click on the image and select Stroke Path…. Make sure Simulate Pressure is not checked. Click OK.

Again, right-click on the image with the Pen Tool and select Delete Path.

Stroke path without Simulate Pressure

Step 8

Now, your image should look like below.

Image after applying effect on the OL Dust 1 layer

Step 9

Go to Layer > New Fill Layer > Solid Color. Name it OL Dust 2, enter the hex color code #eb18a8, and click OK.

Create a Solid Color Fill layer with hex color code eb18a8

Step 10

Repeat Step 2 for the OL Dust 2 layer.

Select the emitter-5 layer, right-click on the layer thumbnail, and select Select Pixels.

Select the OL Dust 2 layer icon. Then, select the layer mask (this is to make sure that the layer mask is always selected at this step).

Then make a path from the selection and Stroke the path with the selected brush.

Now, your image should look like below.

Image after applying effect on the OL Dust 2 layer

Step 11

Go to Layer > New Fill Layer > Solid Color. Name it OL Dust 3, enter the hex color code #0db9ea, and click OK.

Create a Solid Color Fill layer with hex color code 0db9ea

Step 12

Repeat Step 2 for the OL Dust 3 layer.

Select the emitter-4 layer, right-click on the layer thumbnail, and select Select Pixels.

Select the OL Dust 3 layer icon. Then, select the layer mask (this is to make sure that the layer mask is always selected at this step).

Then make a path from the selection and Stroke the path with the selected brush.

Now, your image should look like below.

Image after applying effect on the OL Dust 2 layer

Step 13

Go to Layer > New Fill Layer > Solid Color. Name it OL Dust 4, enter the hex colour code #ffea5a, and click OK.

Create a Solid Color Fill layer with hex color code ffea5a

Step 14

Repeat Step 2 for the OL Dust 4 layer.

Press B on the keyboard to select the Brush Tool. Expand the brush selector drop-down menu and select the br-color-dust-5 brush. Make sure both the Opacity and Flow are set to 100%.

Select the br-color-dust-5 brush

Step 15

Select the emitter-7 layer, right-click on the layer thumbnail, and select Select Pixels.

Select the OL Dust 4 layer icon. Then, select the layer mask (this is to make sure that the layer mask is always selected at this step).

Then make a path from the current selection.

Press P on the keyboard to select the Pen Tool.

Then, right-click on the image and select Stroke Path…. Make sure Simulate Pressure is not checked. Click OK.

Again, right-click on the image and select Stroke Path…. Make sure Simulate Pressure is not checked. Click OK.

Now, right-click on the image with the Pen Tool and select Delete Path.

Now, your image should look like below.

Image after applying effect on the OL Dust 4 layer

Your layers structure should look like below.

Layers structure after adding the OL Dust layers

9. How to Make Image Adjustments

Step 1

Select the Base Image layer and press Control-J to Duplicate it.

Go to Layer > Rename Layer… and rename it Overlay Image. Change the Blending Mode of the Overlay Image layer to Luminosity.

Go to Layer > Layer Mask > Hide All. Select the Base Image layer and go to Layer > Layer Mask > Reveal All.

Base Image and Overlay Image layers

Step 2

Select the emitter-7 layer, right-click on the layer thumbnail, and select Select Pixels.

Press B on the keyboard to select the Brush Tool. Expand the brush selector drop-down menu and select the br-color-dust-3e brush. Make sure both the Opacity and Flow are set to 100%.

Select the br-color-dust-3e brush

Step 3

Press M on the keyboard to select the Rectangular Marquee Tool. Then, right-click on the image and select Make Work Path…. Enter Tolerance: 3.0 pixels and click OK.

Select the layer thumbnail of the Base Image layer and then select its Layer Mask. This is to make sure that the layer mask always gets selected at this point.

Press D on the keyboard to reset swatches. Then, press X on the keyboard to switch swatches and set your Foreground Color as Black.

Press P on the keyboard to select the Pen Tool.

Then, right-click on the image and select Stroke Path…. Make sure Simulate Pressure is not checked. Click OK.

Again, right-click on the image and select Stroke Path…. Make sure Simulate Pressure is not checked. Click OK.

Again, right-click on the image and select Stroke Path…. Make sure Simulate Pressure is not checked. Click OK.

Now, your image should look like below.

Image after applying effect on the Base Image layer

Step 4

Select the layer thumbnail of the Overlay Image layer and then select its layer mask. This is to make sure that the layer mask always gets selected at this point.

Press D on the keyboard to reset swatches and set your Foreground Color as White.

Press P on the keyboard to select the Pen Tool.

Then, right-click on the image and select Stroke Path…. Make sure Simulate Pressure is not checked. Click OK.

Again, right-click on the image and select Stroke Path…. Make sure Simulate Pressure is not checked. Click OK.

Now, right-click on the image and select Delete Path.

Your image and layers structure should look like below.

Image after applying effect on the Overlay Image layer
Layers structure image adjustment layers

10. How to Make Additional Adjustments

Step 1

Select the OL Dust 4 layer.

Go to Layer > New Adjustment Layer > Levels… and name it Overall Levels.

Enter the following input levels – Shadow input level: 20 and Highlight input level: 245.

Levels adjustment layer

Step 2

Go to Layer > New Adjustment Layer > Curves… and name it Overall Curves.

Select the Blue channel and enter the following values.

Curves adjustment layer

Now, your image and layers structure should look like below.

Image after applying the Overall Adjustment layers
Layers structure

11. How to Tidy Up Your Groups

In the next steps, we’ll organize the layers into logical groups and color code them for ease of use.

Step 1

Select the temp-sub layer. Hold Shift and select the emitter-1 layer.

Press Delete on the keyboard to delete all eight selected layers.

Layers structure after clean-up

Step 2

Select the Overall Levels layer, hold Shift and select the Overall Curves layer.

Press Control-G to Group the layers. Go to Layer > Rename Group… and rename it as Overall Adjustments.

Right-click on the Overall Adjustments group and select Slot Color: Gray.

Overall Adjustments group

Step 3

Select the OL Dust 4 layer, hold Shift and select the OL Dust 1 layer.

Press Control-G to Group the layers. Go to Layer > Rename Group… and rename it as Overlay Dust Elements.

Right-click on the Overlay Dust Elements group and select Slot Color: Yellow.

Overlay Dust Elements group

Step 4

Select the Overlay Image layer, hold Shift and select the Base Image layer.

Press Control-G to Group the layers. Go to Layer > Rename Group… and rename it as Image Elements.

Right-click on the Image Elements group and select Slot Color: Blue.

Image Elements group

Step 5

Select the BG Dust 6 layer, hold Shift and select the BG Dust 1 layer.

Press Control-G to Group the layers. Go to Layer > Rename Group… and rename it BG Dust Elements.

Right-click on the BG Dust Elements group and select Slot Color: Red.

BG Dust Elements group

Step 6

Select the BG Fill Dust 2 layer, hold Shift and select the BG Color layer.

Press Control-G to Group the layers. Go to Layer > Rename Group… and rename it BG Elements.

Right-click on the BG Elements group and select Slot Color: Green.

BG Elements group

12. How to Finish Recording the Action

Stop recording by clicking the Stop button.

Click the Stop button to stop action recording

13. How to Customize Your Result

Now, I’ll show you how to change the color of the dust elements.

Step 1

Double-click on the BG Color layer thumbnail and enter the hex color code #000000. Click OK.

Double-click on the BG Fill Dust 1 layer thumbnail and enter the hex color code #ffffff. Click OK.

Double-click on the BG Fill Dust 2 layer thumbnail and enter the hex color code #ffffff. Click OK.

Modify background color

Step 2

Double-click on the BG Dust 1 layer thumbnail and enter the hex color code #000000. Click OK.

Double-click on the BG Dust 1 Col 2 layer thumbnail and enter the hex color code #436c78. Click OK.

Double-click on the BG Dust 2 layer thumbnail and enter the hex color code #38b2ff. Click OK.

Double-click on the BG Dust 3 layer thumbnail and enter the hex color code #ffea5a. Click OK.

Double-click on the BG Dust 4 layer thumbnail and enter the hex color code #49b0ff. Click OK.

Double-click on the BG Dust 5 layer thumbnail and enter the hex color code #eb18a8. Click OK.

Double-click on the BG Dust 6 layer thumbnail and enter the hex color code #ffffff. Click OK.

Modify background dust element color

Step 3

Double-click on the OL Dust 1 layer thumbnail and enter the hex color code #ffffff. Click OK.

Double-click on the OL Dust 2 layer thumbnail and enter the hex color code #eb18a8. Click OK.

Double-click on the OL Dust 3 layer thumbnail and enter the hex color code #ffffff. Click OK.

Double-click on the OL Dust 4 layer thumbnail and enter the hex color code #ffea5a. Click OK.

Modify overlay dust element color

This is what we’ll get.

Modified dust color

Feel free to experiment with different colors. You can also select the Layer mask of any color dust layer and press Control-T to bring up the Free Transform tool. Then, you can resize and rotate the elements.

Awesome, You’ve Done It!

Here is your final result!

You can now apply the effect onto any other image. Open the image, select Color Dust Photoshop Action, and click Play from the Actions panel.

Things to remember before playing the action:

  • Make sure that you have installed the Brush.
  • Make sure that the Brush Opacity and Flow are set to 100%, like step 2 – How to Load the Brushes.
  • Make sure you have created the subject layer, made a selection of your main subject and filled it with any color, just like Step 1 of 3 – How to Make the Effect Area Layers.
  • Make sure the width of the image is set between 2500-4000 pixels, like Step 2 of 1 – How to Set Up Your Document.
  • Make sure Use Default Masks on Fill Layers and Add „copy” to Copied Layers and Groups are checked under Panel Options…, like Step 1 of 1 – How to Set Up Your Document.

We have reached the end of the tutorial. Here you’ve learned how to
add a color dust explosion effect on any photo and also automate it in a
one-click Photoshop action.

I hope you’ve enjoyed this tutorial and found it helpful. Feel free to leave your comments below, and thanks for reading.

Color Dust Photoshop Action Tutorial

Leroy Merlin: The Host

Post pobrano z: Leroy Merlin: The Host

Media, Direct Marketing, Online
Leroy Merlin

Thanks to the partnership with HomeAway, Leroy Merlin chose holiday homes with negative reviews and transformed them in new showrooms for its products helping hosts to rent them more easily. This way Leroy Merlin’s logo became a guarantee of quality and style.

Advertising Agency:Publicis, Milan, Italy
Global Chief Creative Officer:Bruno Bertelli
Executive Creative Director:Cristiana Boccassini
Creative Director:Emanuele Viora, Francesco Epifani
Digital Creative Director:Massimo Guerci
Creative Supervisor:Enrico Bellini
Copywriter:Mattia Basti
Digital Art Director:Giorgio Lucchetti
Account:Simona Coletta, Fabiola Miccone, Arianna Di Marco
Senior Strategic Planner:Guglielmo Pezzino, Mattia Bellomo
Project Manager:Sara Vignolo
Tv Producer:Maria Vittoria Ceresoli
Production Company:Ascent
Director:Valerio Rufo
Executive Producer:Christian Scacco
Producer:Leonardo Godano
Architects:Triplan

Digital Dreaming – 5 Hot Trends in the Mobile App World

Post pobrano z: Digital Dreaming – 5 Hot Trends in the Mobile App World
first image of the post


Source: Shutterstock

You can see it everywhere: Heads buried in their mobile devices, completely oblivious to the world around them. Sitting in their cars, staring down while the light has already turned green, with their kid looking up at them forlornly, waiting to be pushed on the swing, or as you dive out of the way before getting barreled over on the footpath. We are utterly obsessed with our phones, often to the exclusion of everything else that is going on in the world. Time on mobile devices comprises 65% of all time spent consuming digital media. That’s a huge proportion, and it’s getting bigger. It’s no wonder that apps are such huge business, with legions of companies competing for all that attention. Today we’ll look at a few prominent ways in which app developers are vying for that decisive edge.

Augmented Reality (AR)

AR has been hot ever since Pokemon Go took the world by storm. Digital minds all over the world have since been experimenting with new and exciting ways to AR-infused apps to the marked. One app developer in Melbourne devised a way to assist travelers to get their luggage and to their gate in unfamiliar airports. Another company in New York devised a slick app that allows you to superimpose tattoo designs on your body through your phone’s camera so you can see what it will look like before taking the plunge. Whatever the application, the potential for this amazing technology is limited only by our imaginations.

Wearable Technology

Technologies that can be worn on the body have enormous power to integrate with mobile and desktop apps. Fitbit is a great example of this and has been a great success that has spawned numerous copycat products. Breakthrough technologies such as Apple Watch and Google Glass have underwhelmed commercially and in terms of winning hearts and minds. However, it is almost certainly just a matter of time in until someone gets the right recipe.

Instant Apps

It’s Murphy’s law of Apps. You download a seemingly amazing app that promises to be your next best friend, only to have it sit on your device unopened and unloved for months. Eventually, you delete it, casting it into digital oblivion. Then, the very next day you encounter precisely the situation in which you could have used the app, and you curse in frustration. Instant apps promise to change all this. Rather than clutter your device with a million apps that you rarely if ever use, instant apps can be accessed instantly from the Cloud, without downloading or installation.

Artificial Intelligence (AI)

AI is one of those controversial topics that is at once exciting and yet downright scary. The specter of machines that can learn how to think like us and take over the world might be the stuff of science fiction. However, with AI started to take over people’s jobs, predict our online behaviors and outsmart human hackers, it is clear that we need to think very carefully about how we use this sensitive technology. Like most things, there is plenty of opportunity to use it to better our lives. AI applications that understand how kids learn and tailor educational programs to their individual needs are just one way that we can harness AI to make a positive impact.

Internet of Things

Ever since Mark Zuckerberg announced that he would build an app to interface with the bot that pretty much controls his entire house, the world has realized that IoT is not just a catchy buzzword. We can expect to see the intersection between those ubiquitous icons on our phones and the things that we use every day continue to grow.

We’d love to hear what you think are some other exciting trends that will impact the mobile technology world!

Production Progressive Web Apps with JavaScript Frameworks

Post pobrano z: Production Progressive Web Apps with JavaScript Frameworks

This last week at Google I/O, Addy Osmani announced some amazing developer resources for creating Progressive Web Applications (PWAs) that prioritize performance with JavaScript Frameworks.

This was truly a team effort- a lot of people worked on these projects to get them going, and it’s a really valuable contribution to the community. A lot of people want better performance for their framework of choice but can’t get buy-in for time and resources to devote to this kind of endeavor. The ability to start with a baseline of high performance and good lighthouse scores is incredibly valuable, allowing developers to enjoy both the productivity and ergonomics of exciting frameworks, without sacrificing speed and user experience.

Here are some of the highlights!

Addy created a site to explore some of the templates that they built out with the different PWA solutions, as a successor to the very popular TodoMVC, called HN PWA. You can explore all of the demos and the GitHub repo here. He then went through some major company implementations of each of the frameworks rebuilt as PWAs. Throughout a lot of the case studies that Addy features, the heavy-hitters in building for better web experiences lied in link rel=preload, requestIdleCallback(), and HTTP2 Server Push. There were many mentions the PRPL pattern, in essence prioritizing what you’re going to use first, by Pushing critical resources for the initial URL route, Rendering the initial route, Pre-caching remaining routes, and Lazy-loading and create remaining routes on demand. A lot of the performance wins were framed within the ability to be interactive on mobile within 5 seconds and trying to lower the overhead of the framework itself so that you had more time in that 5 seconds for your own application code.

React

React announced that Create React App will now be a PWA by default! This is a big win here. They now employ service workers with an offline-first caching strategy, code-splitting with dynamic import(), helpful overlays for errors, and it gives you 1.5s of headroom for your application code. More information on the release here.

Preact

Now has a CLI! Announced at the event, this is a pretty amazing development worth playing around with. You can find the project here. Among other really nice features you can read through in the readme, it has a 100/100 Lighthouse score out of the box, as well as a whopping 3s of headroom to work on your own application code.

If you’re not familiar with Preact, it’s an extremely fast 3kb React alternative with the same API, including the use of components & virtual DOM. It’s similar to React, but the small filesize is central to the software design. The only caveat mentioned is that due to its emphasis on slim builds, there may be offerings in the React ecosystem that still need work for seamless integration. That said, Preact was the clear winner in performance here, so I wouldn’t be surprised to see the community rally around this solution.

Vue

Vue announced a PWA template, offered directly from Vue-cli, which you can access easily with vue init pwa.

vue init pwa from within vue-cli

Among a lot of great offerings, it gives you two 2s of headroom for application code on mobile, code-splitting with dynamic import(), service worker for offline caching, and JS chunks are preloaded or prefetched.

If you’re not familiar with Vue, I’ve written up a guide here. I think Vue is an amazing piece of software, and the ability to strike all of the lighthouse credentials out of the gate is pretty incredible. This workflow makes it so easy to create beautiful and complex apps.

There are many more details that I didn’t get to in this post, and Addy is a great speaker. He even created a video game for his talk. It’s a worthwhile watch the whole way through, you can view it here:


Production Progressive Web Apps with JavaScript Frameworks is a post from CSS-Tricks

A Unified Styling Language

Post pobrano z: A Unified Styling Language

This article by Mark Dalgleish will go down as one of the most important front-end development articles of 2017.

It’s about the hot topic that is „CSS in JavaScript”. Mark walks us through how that’s actually not a simple and singular idea, but a continuum of concepts and implementations. There are lots of projects that all approach it in different ways. It’s likely that the best ways are the projects that actually generate real CSS. These things are a far cry from „inline styles”.

Regular ol’ CSS isn’t going anywhere, but these CSS in JS ideas aren’t either. There is some serious benefits to them for a lot of projects. Scoped styles preventing styling mistakes. Performance gains through critical styles. Only shipping the minimum amount of styles needed. Stylesheets that nobody is afraid of and don’t become the proverbial „append only” stylesheets. Not to mention that if you are going to be styling in a JavaScript environment, you get the possibility of dynamic styles and porting those styles to other platforms and such.

Direct Link to ArticlePermalink


A Unified Styling Language is a post from CSS-Tricks

Snap Animation States

Post pobrano z: Snap Animation States

There are many ways to make icons for a website. Inline SVG is scalable, easy to modify with CSS, and can even be animated. If you’re interested in learning more about the merits of using inline SVG, I recommend reading Inline SVG vs Icon Fonts. With ever increasing browser support, there’s never been a better time to start working with SVGs. Snap Animation States is a JavaScript plugin built around Snap.svg to help create and extend icon libraries with scaleable, editable SVG icons. Snap Animation States makes it easy to load and animate those SVGs with a simple schema.

Getting Started

Lets start with a basic SVG hamburger menu. This one was made using Affinity Designer, but there are many other free (Inkscape) and paid for (Adobe Illustrator) options available for making vector images.

<svg width="100%" height="100%" viewBox="0 0 65 60" style="fill-rule:evenodd;clip-rule:evenodd;stroke-linejoin:square;stroke-miterlimit:1.5;"  fill="none" stroke="#000" stroke-width="10">
   <g>
      <path class="hamburger-top" d="m 5,10 55,0" />
      <path class="hamburger-middle" d="m 5,30 55,0" />
   </g>
   <path class="hamburger-bottom" d="m 5,50 55,0" />
</svg>

Although this is a pretty basic SVG, it still takes up multiple lines in an HTML document. This can be a pain to write if you want to use the SVG in multiple locations across several different web pages. And what if you have to modify your SVG? Then you’re scrambling to remember all the places you used the SVG so you can update it. It’s not very clean or reusable. This is what Snap Animation States is all about solving.

Let’s continue to use the same SVG, but this time we’ll use the plugin to load it to the DOM. The schema for the plugin requires at least two properties: selector: ".some-css-selector", and svg: "svg string". Check out the following demo:

See the Pen Lydgoo by Briant Diehl (@bkdiehl) on CodePen.

You’ll notice in the Pen above that I call icon-hamburger just like I would call a font icon. Just remember that the selector property needs a CSS selector as its value.

There’s more we can do since this plugin is an extension of Snap.svg, a JavaScript library used to create and animate SVGs. So let’s see what’s needed to give this hamburger icon some basic animation.

When I created my SVG, I added classes to the elements I knew I would be animating.

<g>
   <path class="hamburger-top" d="m 5,10 55,0" />
   <path class="hamburger-middle" d="m 5,30 55,0" />
</g>
<path class="hamburger-bottom" d="m 5,50 55,0" />

In my schema, I can start to include the properties needed for animation, and I start by giving it transitionTime: 250. The transition time is applied to each step in the transform chain and can be overridden later by an individual transform.

Now it’s time to include my animation states. I start by setting the property states:{}. The property names for this object should correlate to the state the animation will lead to. In this case I’m going to name my properties open and closed. The property values for this object are arrays of transform objects. So far, the additions to the schema should look like this:

transitionTime: 250,
states: {
  open:[],
  closed: []
}

Next, we need to include the transform objects that define how the SVG elements are to be transformed.

open:[
  { id: "top-lower", element: ".hamburger-top", y:20 },
  { id: "bottom-raise", element: ".hamburger-bottom", y:-20 },
  { waitFor: "top-lower", element: "g", r:45 },
  { waitFor: "bottom-raise", element: ".hamburger-bottom", r:-45},
]

Each transform object has either an id, a waitFor, or a combination of the two. Each id needs to be unique. Objects with an id represent a link in a chain of animations. waitFor always needs to reference a link id that precedes it. In this case there’s an object with id:"top-lower" and an object with waitFor:"top-lower". When the animation starts, id:top-lower will be the first link in the chain, and it will run for 250ms. When it has finished, waitFor:"top-lower" will run for 250ms.

Every transform object must reference an element. The element value can be either a css selector or a direct element reference. For example, one element property has the value of "g" referencing the <g> element in the SVG, while another has the value of ".hamburger-bottom", referencing the class I added to the <path> element.

Now that we know the order of animation and the elements that need to be transformed, we just need to define the transform objects. For those of you unfamiliar with how SVG transforms work, you could start with Transforms on SVG Elements. Otherwise, simply put, imagine that the SVG element you are manipulating starts at the points [0, 0] on an x/y axis. Something else to remember is that x goes left to right, while y goes from top to bottom. In the example above, we see:

{ id: "top-lower", element: ".hamburger-top", y:20 },

This transform object is referring to the top line of the hamburger menu. y: 20 is telling the plugin that, starting at the element’s point of origin [0, 0], I want to move the top line down 20px. The reverse is true for:

{ id: "bottom-raise", element: ".hamburger-bottom", y:-20 },

Here I’m telling the plugin to move my element up by 20px. The same principle applies to the rotations:

{ waitFor: "top-lower", element: "g", r:45 },
{ waitFor: "bottom-raise", element: ".hamburger-bottom", r:-45}

The element that’s being rotated starts at a rotation of 0 degrees. r: 45 is telling the plugin to rotate from 0 degrees to 45 degrees and vice versa for r: -45.

Our second state in the states object looks like this:

closed: [
  { id: "top-angle", element: "g", r: 0 },
  { id: "bottom-angle", element: ".hamburger-bottom", r: 0 },                   
  { waitFor: "top-angle", element: ".hamburger-top", y: 0 },
  { waitFor: "bottom-angle", element: ".hamburger-bottom", y: 0 }
]

You’ll notice that for all of the elements being transformed, their y and r values are set to 0. This is because this state’s purpose is to return the SVG elements to their original state. Since 0 was the point of origin, we’re just performing a transform on each of the elements that will return them to their origin.

We’re almost done. Now that the animation states are defined, I have to decide what’s going to initiate these animations. This requires one more property on the schema: events. events takes an array of objects, since you may want to initiate your animation with more than one event. For the hamburger icon, it’s going to look like this:

events: [
  { event: "click", state: ["open", "closed"] }
]

The object in the array may include the following properties:

  1. event: designed to listen for javascript events. The hamburger icon listens for a 'click’ event on <i class="icon-hamburger"</i> since that’s what the selector in the schema references.
  2. state: takes either a string or an array. If the state here is "open", then when <i class="icon-hamburger"></i> is clicked, only the „open” animation would run on a click event. Since the value of state is an array, the click event will actually toggle between the „open” and „closed” animations. The array is only designed to take two values and enable toggling.
  3. The last property is optional: selector. By default this value is your schema selector + „animate”. In this case it would be icon-hamburger-animate. You can change the selector if you want by declaring it here. It’s purpose is to enable the javascript events to be tied to either a parent or sibling element of your SVG. For example, if I had an SVG that I wanted to animate inside of a button when the button was clicked, I would need to do this:
<button class="icon-hamburger-animate">
  <i class="icon-hamburger"></i>
</button>

Whew, we made it. Now it’s time to see the final product.

See the Pen bWwQJZ by Briant Diehl (@bkdiehl) on CodePen.

Was it worth it? You may be thinking, that’s a lot of work to just have a single icon. And I would agree with you. Which is why I created a Gulp plugin to help with the heavy lifting.

Gulp Animation States

So far, we have a single icon that we can use wherever I’ve included the schema. Ideally, the schema for icon-hamburger would be saved to a js file that gets bundled up and included site-wide, which means that I could call icon-hamburger wherever I want. What if this js file was autogenerated and contained the schema and plugin call for as many SVG icons as you had access to? You could have easy access library of SVG icons! That’s the purpose of Gulp Animation States. Make sure to check out the documentation here.

Let’s begin with the file structure. Say I went to IcoMoon and generated all the SVG files I needed for my new project. I would want to drop all these newly generated files into a folder in my project. Let’s call that folder `svg`. My file structure would look something like this:

svg
|-- icon-folder.svg
|-- icon-hamburger.svg
|-- icon-mic.svg
|-- icon-wall.svg
|-- icon-wrench.svg

Using Gulp Animation States I can combine all the SVG files in my `svg` folder into a single js file with the selector for each icon set according to the file name of the SVG. The file contents would look something like this:

var iconFolder = {"selector": ".icon-folder","svg": "<svg>Content</svg>"};
SnapStates(iconFolder);
var iconHamburger= {"selector": ".icon-hamburger","svg": "<svg>Content</svg>"};
SnapStates(iconHamburger);
var iconMic= {"selector": ".icon-mic","svg": "<svg>Content</svg>"};
SnapStates(iconMic);
var iconWall= {"selector": ".icon-wall","svg": "<svg>Content</svg>"};
SnapStates(iconWall);
var iconWrench= {"selector": ".icon-wrench","svg": "<svg>Content</svg>"};
SnapStates(iconWrench);

This file could be bundled up with the rest of a website’s key JavaScript, enabling SVG icon usage wherever it’s wanted. But what about the animations? How do they get included in this JavaScript file?

We already have the animation for the hamburger icon, so we’ll use that. In the `svg` folder, we need to create a new file called `icon-hamburger.js`. Note that it has the same name as it’s corresponding SVG file. Here is the new file structure:

svg
|-- icon-folder.svg
|-- icon-hamburger.svg
|-- icon-hamburger.js
|-- icon-mic.svg
|-- icon-wall.svg
|-- icon-wrench.svg

And the contents of `icon-hamburger.js` would be:

{
  transitionTime: 250,
  states: {
    open:[
      { id: "top-lower", element: ".hamburger-top", y:20 },
      { id: "bottom-raise", element: ".hamburger-bottom", y:-20 },
      { waitFor: "top-lower", element: "g", r:45 },
      { waitFor: "top-lower", element: ".hamburger-bottom", r:-45},
    ],
    closed: [
      { id: "top-angle", element: "g", r: 0 },
      { id: "bottom-angle", element: ".hamburger-bottom", r: 0 },                   
      { waitFor: "top-angle", element: ".hamburger-top", y: 0 },
      { waitFor: "bottom-angle", element: ".hamburger-bottom", y: 0 },
    ]
  },
  events: [
    { event: "click", state: ["open", "closed"] }
  ]
}

The Gulp plugin will look for js files with the same name as the SVG file it’s creating a schema for. Demonstrating the output again with the animation states:

var iconFolder = {"selector": ".icon-folder","svg": "<svg>Content</svg>"};
SnapStates(iconFolder);
var iconHamburger= {"selector": ".icon-hamburger","svg": "<svg>Content</svg>", "transitionTime":250,"states":{"open":[{"id":"top-lower","element":".hamburger-top","y":20},{"id":"bottom-raise","element":".hamburger-bottom","y":-20},{"waitFor":"top-lower","element":"g","r":45},{"waitFor":"top-lower","element":".hamburger-bottom","r":-45}],"closed":[{"id":"top-angle","element":"g","r":0},{"id":"bottom-angle","element":".hamburger-bottom","r":0},{"waitFor":"top-angle","element":".hamburger-top","y":0},{"waitFor":"bottom-angle","element":".hamburger-bottom","y":0}]},"events":[{"event":"click","state":["open","closed"]}};
SnapStates(iconHamburger);
var iconMic= {"selector": ".icon-mic","svg": "<svg>Content</svg>"};
SnapStates(iconMic);
var iconWall= {"selector": ".icon-wall","svg": "<svg>Content</svg>"};
SnapStates(iconWall);
var iconWrench= {"selector": ".icon-wrench","svg": "<svg>Content</svg>"};
SnapStates(iconWrench);

Using Gulp Animation States, you manage to retain smaller, bite-sized files that you can easily edit when you need to change something. Those bite-sized pieces compile nicely into a single file that can be bundled with other key components of your site, allowing quick and easy calls to include an SVG in your HTML document.

Further Examples

The hamburger icon was fairly simple, so let’s look at a few more complex icons. We’ll start with a speaker icon.

See the Pen WjoOoy by Briant Diehl (@bkdiehl) on CodePen.

You’ll notice that, overall, the schema is mostly the same. You’ll notice the property easing is new. easing has a default value of easeinout. Besides that, the only changes worth noticing are in my transform objects.

{ id: "waveline1", element: ".wave-line-1", x:-10, s:0.1, attr:{ opacity:.8 }, transitionTime: 250 },
{ id: "waveline2", element: ".wave-line-2", x:-16, s:0.1, attr:{ opacity:.8 }, transitionTime: 300 },
{ id: "waveline3", element: ".wave-line-3", x:-22, s:0.1, attr:{ opacity:.8 }, transitionTime: 350 }

s is for scale, and just like in css, an object’s scale always starts at 1. The attr property allows you to modify any attribute on an SVG element, in this case, the opacity. Finally, remember in the beginning of the article how I mentioned that transitionTime can be overridden by an individual transform? Well, here is how it’s done. I didn’t even declare transitionTime in the main schema. That’s because I wanted each transform to have a unique transition time.

Next, let’s look at a line drawing animation.

See the Pen OmbxVV by Briant Diehl (@bkdiehl) on CodePen.

The first major difference I want you to see is that I’m not declaring svg in the schema. The SVG is inside the <i class="icon-new-document"></i>. This is mostly for demo purposes, so as not to bloat the schema that I want you to be viewing. However, the plugin does allow for this functionality. The use case is for those users who only have a few SVG icons that they need in their document and don’t want to use the gulp plugin.

The transform objects are what I really want to focus on here. There’s a lot of new stuff going on here.

{ id: 'line1-init', element: ".new-document-line1", drawPath: { min: 25, max: 75 }, transitionTime: { min: 500, max: 1000 }, repeat: {times:1} },        
{ id: 'line2-init', element: ".new-document-line2", drawPath: { min: 25, max: 75 }, transitionTime: { min: 500, max: 1000 }, repeat: {times:1} },
{ id: 'line3-init', element: ".new-document-line3", drawPath: { min: 25, max: 75 }, transitionTime: { min: 500, max: 1000 }, repeat: {times:1} },
{ id: 'line4-init', element: ".new-document-line4", drawPath: { min: 25, max: 75 }, transitionTime: { min: 500, max: 1000 }, repeat: {times:1} },
{ id: 'line5-init', element: ".new-document-line5", drawPath: { min: 25, max: 75 }, transitionTime: { min: 500, max: 1000 }, repeat: {times:1} },
{ waitFor: 'line1-init', element: ".new-document-line1", drawPath: 100, transitionTime: { min: 500, max: 1000 } },
{ waitFor: 'line2-init', element: ".new-document-line2", drawPath: 100, transitionTime: { min: 500, max: 1000 } },
{ waitFor: 'line3-init', element: ".new-document-line3", drawPath: 100, transitionTime: { min: 500, max: 1000 } },
{ waitFor: 'line4-init', element: ".new-document-line4", drawPath: 100, transitionTime: { min: 500, max: 1000 } },
{ waitFor: 'line5-init', element: ".new-document-line5", drawPath: 100, transitionTime: { min: 500, max: 1000 } },

If you’ve looked at the Pen, you’ll have noticed that hovering over the new document icon causes the lines to shrink and grow. Each of those lines is a path, and a path can be drawn. The first transform object above includes drawPath. drawpath takes either a number or an object with properties min and max. The number represents a percentage. Let’s say that the transform object had drawPath: 0. That would mean that I want the current path to be drawn to 0% of its length. The transform object really has drawPath: { min: 25, max: 75 }. When the value of drawpath is an object, I’m telling my plugin that I want the path to be drawn to a random percentage between the min and the max. In this case it would be a random number between 25 and 75. If you hover over the icon again, you can see that the line length changes each time the animation occurs. The same principle of setting a random number with min and max applies to transitionTime.

The last newcomer to this animation schema is repeat. repeat takes an object with four valid properties.

  1. loop: takes a Boolean value. If set to true, the animation and all of the transforms further down the chain will repeat until told otherwise. In order to break out of a loop you must either set a loopDuration or change to another animation state.
  2. loopDuration: takes an integer. If I set loop to true and loopDuration to 5000, then the animation chain will repeat itself for 5000ms. If the duration of the animation loop isn’t exactly 5000ms, then the loop will continue its final animation past the set time.
  3. times: takes an integer. If I set times to 2, then my animation will run a total of 3 times. Once because the animation always runs at least once and then 2 more times.
  4. delay: takes an integer. Represents the amount of time you want between the end of the animation and the beginning of the repeat loop.

Next, I want to illustrate a longer animation chain.

See the Pen KmNXdW by Briant Diehl (@bkdiehl) on CodePen.

Take a look at the shake state. The first and last transform objects have either an id or a waitFor property. Every other transform object has both an id and a waitFor property.

shake: [
  { id: "shake-right", element: '.wrench', r: 10 },
  { id: "shake-left", waitFor: 'shake-right', element: '.wrench', r: -10 },
  { id: "back-to-right", waitFor: 'shake-left', element: '.wrench', r: 10 },
  { id: "back-to-left", waitFor: 'back-to-right', element: '.wrench', r: -10 },
  { waitFor: 'back-to-left', element: '.wrench', r: 0 }
]

Each of the three middle transform objects is referencing the id of the preceding transform object with their waitFor. The first animation starts a chain that leads to the reset value r:0 at the very end.

Finally, I want to demonstrate how we would draw lines by setting stroke-dashoffset and stroke-dasharray.

See the Pen rmWzyW by Briant Diehl (@bkdiehl) on CodePen.

First, I want you to notice that on many of my path elements that I include stroke-dashoffset:1000; stroke-dasharray:1000, 1000;

<path class="right-upper-branch" d="M45.998,21.196C43.207,23.292 44.195,27.857 47.629,28.59C48.006,28.671 48.399,28.699 48.784,28.672C49.659,28.611 50.276,28.34 50.994,27.849C51.413,27.563 51.839,27.05 52.092,26.616C53.906,23.507 50.981,19.611 47.489,20.486C46.946,20.622 46.446,20.86 45.998,21.196L41.015,14.571" style="fill:none;stroke:#fff;stroke-width:1.7px;stroke-dashoffset:1000; stroke-dasharray:1000, 1000;"/>

For a more detailed explanation of stroke-dasharray, view stroke-dasharray. For my purposes, let’s say that stroke-dasharray is basically setting the length of the path that I don’t want to show. Now, my path certainly isn’t 1000px long. It’s a bit of an exaggeration, but it’s an exaggeration that makes sure that no portion of my path is shown prematurely. The path is drawn to completion in the following transform.

{ id:["right-upper-branch", 600], element: ".right-upper-branch", drawPath:100  },

When I set drawPath back to 0 it will adjust the stroke-dasharray and stroke-dashoffset accordingly. The last thing I want to point out about this line is the id. It’s an array instead of a string. The first value in the array is the name of the id. The second value will always be an integer representing a timeout. If I only used this transform object in the animation I would only see a path being drawn 600ms after the mouseover event.

For more examples and further documentation you can check out my demo page.

Conclusion

There may be many of you that are still on the fence about whether switching your icon system to something new is a good thing. There are pros and cons to the different icon systems currently available. I’ve tried to create a simple way for you to make the move to SVG icons. I hope you find it useful.


Snap Animation States is a post from CSS-Tricks

Agregator najlepszych postów o designie, webdesignie, cssie i Internecie