Post pobrano z: Netflix “Five Came Back” Main Titles

Post pobrano z: Netflix “Five Came Back” Main Titles
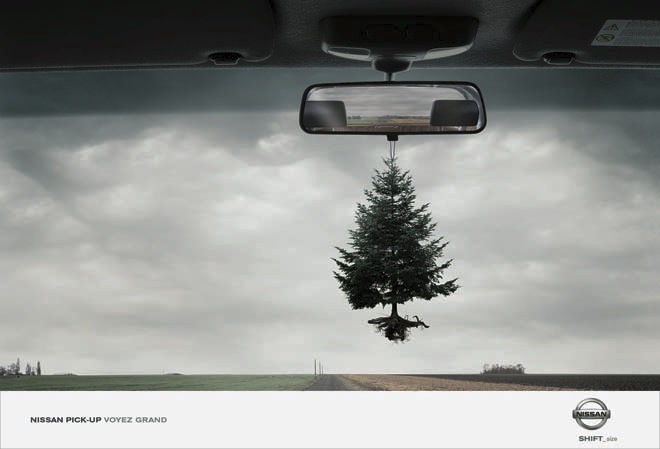
Post pobrano z: Life size magic tree / Une idée un peu trop rétro?
 |
 |
| THE ORIGINAL? Nissan Pick-Up – 2005 Source : French Art Directors Club Agency : TBWA G1 Paris (France) |
LESS ORIGINAL Toyota Tacoma – 2017 Source : Coloribus Agency : DOM 360 (USA) |
Post pobrano z: An Open Discussion About Art and Mental Health
Artists are masochists. We revel in the beauty of pain more than any other profession in the world. It’s an experience we create for our viewers that is almost palpable. And it is in this experience that we connect to each other, creating everlasting bonds with our audience.
Some of the world’s greatest artists have documented their own struggles with mental health. From depression and anxiety to a wide range of psychological disorders, these are all real themes that will always remain in art.

So why does pain make for some of the best art ever created? Let’s explore this topic, as I dive a little into some art history while featuring the work of a few of today’s talented artists.
From mouse pads to laptop skins and even desktop wallpapers, it’s safe to say that The Starry Night is one of the most widely known and reproduced works of art. But did you know that its beloved creator, Vincent van Gogh, struggled with depression and psychotic episodes for most of his life?

In fact, The Starry Night was created after a massive breakdown where he mutilated his own ear. He admitted himself to the Saint-Paul de Mausole asylum where he would later create the famous painting from his bedroom window.
But to him, the painting was a failure.
Today, it is estimated to be worth well over $100 million, and yet Van Gogh died poor.
Many artists today struggle with this profound realization. Must we die in order for our art to live? It’s a thought that weighs heavy on our hearts because it mixes our passion and sense of purpose with our ability to take care of basic human needs.
The world doesn’t make it easy to be an artist. It never has. And yet, we prevail. Despite the naysayers and nonbelievers, artists are still changing the lives of people around them with their beautiful creations.
But even with their never ending persistence, many artists find it hard to making a living through their work, often taking little to no pay at all. This can, in turn, lead to mental health problems or intensify an ongoing battle if you’re not able to seek treatment.
That leads me to wonder… could we have saved Vincent van Gogh, and the many artists like him, by making art a more sustainable profession? And can art be a guiding light to understanding more mental health problems?
This inner battle of being overwhelmed when things get too tough is perfectly depicted in Burn Out, an illustration by artist Thomas Gutteridge.

Thomas writes:
I’ve seen firsthand the struggle of depression of one of my closest friends and it has really left an impression on me on how fragile the mind is. I created a piece that wasn’t a cliche of a struggle against yourself, but rather something that we could all easily relate to, having had those times when it all gets to be too much. Every thought and emotion cannot be contained and we all experience these moments in one way or another.
Depression is a serious condition that many face. And artist Yi Pan illustrates the dangers of this illness in her work, Holding onto Depression.

The setup for this piece is actually from a story about Aladdin where he ventures into an underground castle to retrieve a magical lamp, only to get diverted by an evil treasure. Riddled with greed, he picks up the treasure and the castle collapses. Yi shaped her symbolization of depression around this story, saying:
A hand holds the poison diamond
within a dark atmosphere, indicating that people’s hearts erode and
become vulnerable if they can’t let the sorrow go.
Once a person finally seeks help, it becomes a juggle to retain treatment. And with the ever growing addictions associated with common pharmaceutical drugs, it often seems as if they’re exchanging one illness for another.
Dutch artist and designer Van Lieshout Vl does a wonderful job of shedding light on this topic with her piece, Mandala of Pills.

She writes:
I’m currently working on several pieces with medicine on them. A mandala, or „wheel of life” is used for ritual ceremonies. It has a geometric pattern that depicts the cosmos and symbolizes the quest for inner peace and mental stability.
Medication is at odds with this idea; the naive look of this mandala shows how easily we ignore the fact that pills are not as innocent as they seem to be.
After experiencing the frustrations of a creative block, Damir Martic painted Soul Alchemy, a painting depicting his own battle with anxiety and depression.
Damir said:
Feeling alone and lost, I forced myself to create anything. This is nothing like a self portrait, but rather a portrait of my soul.
A soul that is looking for peace, and a soul that is full of fears but still hoping for
the best. For the first time I can say out loud that I am an artist, and I was born to create and express my emotions.
But to do this I have to be my own best friend first. And even if I fall many times I have to keep going, not just for
me but for people I love. Just keep going, and do the best you can.

But taking care of mental health concerns as a community also means that you’re working towards a more peaceful nation.
Shattering
Inner Journeys by Tayfun Pekdemir is a series of paintings that
studies the psychological phenomena behind wars and destruction. He
notes:
Each society has a different way of evaluating types of
aggression due to cultural differences. Supported by arguments of some
personality theories and social
psychology, this study discusses the reasons why the aggressive nature of man leads to wars and destruction, and tries to find responses as to how phenomena such as peace and tolerance can finally emerge.

Frida Kahlo became my „art idol” at 13. Her work is not for the faint of heart, as it depicts her struggles with physical and mental health as well as a failing marriage to a fellow artist.
Even so, I connected to her then and still do today. I grew up surrounded by the beauty of eastern Long Island, NY, in a low-income household plagued with substance and domestic abuse. Art, for me, became my therapy long before I ever imagined it as a career.
So in homage to Frida, I’ve painted several self-portraits throughout my life depicting my various experiences. In one painting, I’ll Save You, I illustrate my own struggles with mental health and loneliness. Since I often depict myself as a sailboat, the painting becomes a two-part self-portrait, where the theme symbolizes, in a sense, that I must save myself.

Despite the sad undertones, I find art to be incredibly cathartic, allowing me to fully process my experiences in a healthier, more productive manner.
But when I think of my own journey, I am reminded of many artists with similar struggles. One of our very own instructors here at Envato Tuts+, Marinke Slump, also known as Wink, documented her battle with Asperger’s Syndrome and depression. Unfortunately, she lost her battle to the disease when she took her own life in June 2015.

Marinke often shared how the art of crocheting saved her life, and I think this idea is true for many artists. But her story, just like Vincent van Gogh’s, shows us how important it is to bring mental health awareness to the forefront of our discussions.
One of the best ways you can support the efforts towards mental health awareness is by creating art, of course!
Artist Dina Blokhina created this mock cover for The New York Times, stating:
Emotions, such as sadness, are just as beautiful and valuable as our positive experiences. This image invites the viewer to put him or herself in the same position,
facing an invisible struggle.
I
am a strong advocate for ending social stigmas against mental illness.
Thus, I painted this piece in honor of mental health awareness.

Dedicated to bringing out a meaningful experience behind this year’s 36 Days of Type, graphic designer Debarpan Das created a list of Alphabetical Disorders featuring artwork with themes of different mental health illnesses. He said:
It all started with this one idea that I had for the letter 'M’ when I
saw some kids playing on swings. I could instantly relate it to a
problem that I had as a teenager and I still suffer from, mood swings.
What I realized later was that it’s such a common problem that if I made
an illustration of it, a lot of people would actually connect to it. So
then I went on and made a list of all the common problems that I faced
as a teenager and what I had seen my younger roommate go through in the
past few years.

To highlight the ever-growing concerns of the mental health of youth today, Mariana Ikuta created this beautiful comic titled Self Zine.
She explains:
It is incredibly difficult not to become entangled in our impossible beauty standards and the subconscious necessity to fit in. We need to learn how to love ourselves as a whole and to not judge
people around us so harshly. I feel that, with support, we can grow our self-confidence, and maybe
the struggles of not loving ourselves might be a little bit
less common.

Some of the world’s most beautiful artworks are rooted in tragedy. Art remains a cathartic medium that allows us to process our emotions, but it is still very important to take care of yourself.
I’ll end with this piece, Take Care of Your Head, from artist Theo Payne, who writes:
Mental health isn’t a finite accomplishment. Sure, you can reach a place where you feel good, but it takes work to keep yourself there.

Nurture your mind like a farmer would take care of his garden. So if you or someone you know is struggling with mental health issues, please seek out professional help as soon as possible.
I’d also like to extend a warm thank you to all of the artists who were kind enough to lend me their art for this article. Feel free to check out their work by browsing their incredible portfolios below.

Post pobrano z: Using Fetch
Whenever we send or retrieve information with JavaScript, we initiate a thing known as an Ajax call. Ajax is a technique to send and retrieve information behind the scenes without needing to refresh the page. It allows browsers to send and retrieve information, then do things with what it gets back, like add or change HTML on the page.
Let’s take a look at the history of that and then bring ourselves up-to-date.
Another note here, we’re going to be using ES6 syntax for all the demos in this article.
A few years ago, the easiest way to initiate an Ajax call was through the use of jQuery’s ajax method:
$.ajax('some-url', {
  success: (data) => { /* do something with the data */ },
  error: (err) => { /* do something when an error happens */}
});
We could do Ajax without jQuery, but we had to write an XMLHttpRequest, which is pretty complicated.
Thankfully, browsers nowadays have improved so much that they support the Fetch API, which is a modern way to Ajax without helper libraries like jQuery or Axios. In this article, I’ll show you how to use Fetch to handle both success and errors.
Let’s get support out of the way first.
Green indicates full support at the version listed (and above). Yellow indicates partial support. Red indicates no support. See Caniuse for full browser support details.
| Chrome | Opera | Firefox | IE | Edge | Safari |
|---|---|---|---|---|---|
| 42 | 29 | 39 | No | 14 | 10.1 |
| iOS Safari | Opera Mobile | Opera Mini | Android | Android Chrome | Android Firefox |
|---|---|---|---|---|---|
| 10.3 | 37 | No | 56 | 57 | 52 |
Support for Fetch is pretty good! All major browsers (with the exception of Opera Mini and old IE) support it natively, which means you can safely use it in your projects. If you need support anywhere it isn’t natively supported, you can always depend on this handy polyfill.
Getting data with Fetch is easy. You just need to provide Fetch with the resource you’re trying to fetch (so meta!).
Let’s say we’re trying to get a list of Chris’ repositories on Github. According to Github’s API, we need to make a get request for api.github.com/users/chriscoyier/repos.
This would be the fetch request:
fetch('https://api.github.com/users/chriscoyier/repos');So simple! What’s next?
Fetch returns a Promise, which is a way to handle asynchronous operations without the need for a callback.
To do something after the resource is fetched, you write it in a .then call:
fetch('https://api.github.com/users/chriscoyier/repos')
  .then(response => {/* do something */})
If this is your first encounter with Fetch, you’ll likely be surprised by the response Fetch returns. If you console.log the response, you’ll get the following information:
{
  body: ReadableStream
  bodyUsed: false
  headers: Headers
  ok : true
  redirected : false
  status : 200
  statusText : "OK"
  type : "cors"
  url : "http://some-website.com/some-url"
  __proto__ : Response
}
Here, you can see that Fetch returns a response that tells you the status of the request. We can see that the request is successful (ok is true and status is 200), but a list of Chris’ repos isn’t present anywhere!
Turns out, what we requested from Github is hidden in body as a readable stream. We need to call an appropriate method to convert this readable stream into data we can consume.
Since we’re working with GitHub, we know the response is JSON. We can call response.json to convert the data.
There are other methods to deal with different types of response. If you’re requesting an XML file, then you should call response.text. If you’re requesting an image, you call response.blob.
All these conversion methods (response.json et all) returns another Promise, so we can get the data we wanted with yet another .then call.
fetch('https://api.github.com/users/chriscoyier/repos')
  .then(response => response.json())
  .then(data => {
    // Here's a list of repos!
    console.log(data)
  });
Phew! That’s all you need to do to get data with Fetch! Short and simple, isn’t it? 🙂
Next, let’s take a look at sending some data with Fetch.
Sending data with Fetch is pretty simple as well. You just need to configure your fetch request with three options.
fetch('some-url', options);The first option you need to set is your request method to post, put or del. Fetch automatically sets the method to get if you leave it out, which is why getting a resource takes lesser steps.
The second option is to set your headers. Since we’re primarily sending JSON data in this day and age, we need to set Content-Type to be application/json.
The third option is to set a body that contains JSON content. Since JSON content is required, you often need to call JSON.stringify when you set the body.
In practice, a post request with these three options looks like:
let content = {some: 'content'};

// The actual fetch request
fetch('some-url', {
  method: 'post',
  headers: {
    'Content-Type': 'application/json'
  },
  body: JSON.stringify(content)
})
// .then()...
For the sharp-eyed, you’ll notice there’s some boilerplate code for every post, put or del request. Ideally, we can reuse our headers and call JSON.stringify on the content before sending since we already know we’re sending JSON data.
But even with the boilerplate code, Fetch is still pretty nice for sending any request.
Handling errors with Fetch, however, isn’t as straightforward as handling success messages. You’ll see why in a moment.
Although we always hope for Ajax requests to be successful, they can fail. There are many reasons why requests may fail, including but not limited to the following:
Things aren’t going to be pretty if your request fails. Just imagine a scenario you tried to buy something online. An error occured, but it remains unhandled by the people who coded the website. As a result, after clicking buy, nothing moves. The page just hangs there… You have no idea if anything happened. Did your card go through? 😱.
Now, let’s try to fetch a non-existent error and learn how to handle errors with Fetch. For this example, let’s say we misspelled chriscoyier as chrissycoyier
// Fetching chrissycoyier's repos instead of chriscoyier's repos
fetch('https://api.github.com/users/chrissycoyier/repos')
We already know we should get an error since there’s no chrissycoyier on Github. To handle errors in promises, we use a catch call.
Given what we know now, you’ll probably come up with this code:
fetch('https://api.github.com/users/chrissycoyier/repos')
  .then(response => response.json())
  .then(data => console.log('data is', data))
  .catch(error => console.log('error is', error));
Fire your fetch request. This is what you’ll get:

Why did our second .then call execute? Aren’t promises supposed to handle errors with .catch? Horrible! 😱😱😱
If you console.log the response now, you’ll see slightly different values:
{
  body: ReadableStream
  bodyUsed: true
  headers: Headers
  ok: false // Response is not ok
  redirected: false
  status: 404 // HTTP status is 404.
  statusText: "Not Found" // Request not found
  type: "cors"
  url: "https://api.github.com/users/chrissycoyier/repos"
}
Most of the response remain the same, except ok, status and statusText. As expected, we didn’t find chrissycoyier on Github.
This response tells us Fetch doesn’t care whether your AJAX request succeeded. It only cares about sending a request and receiving a response from the server, which means we need to throw an error if the request failed.
Hence, the initial then call needs to be rewritten such that it only calls response.json if the request succeeded. The easiest way to do so to check if the response is ok.
fetch('some-url')
  .then(response => {
    if (response.ok) {
      return response.json()
    } else {
      // Find some way to get to execute .catch()
    }
  });
Once we know the request is unsuccessful, we can either throw an Error or reject a Promise to activate the catch call.
// throwing an Error
else {
  throw new Error('something went wrong!')
}

// rejecting a Promise
else {
  return Promise.reject('something went wrong!')
}
Choose either one, because they both activate the .catch call.
Here, I choose to use Promise.reject because it’s easier to implement. Errors are cool too, but they’re harder to implement, and the only benefit of an Error is a stack trace, which would be non-existent in a Fetch request anyway.
So, the code looks like this so far:
fetch('https://api.github.com/users/chrissycoyier/repos')
  .then(response => {
    if (response.ok) {
      return response.json()
    } else {
      return Promise.reject('something went wrong!')
    }
  })
  .then(data => console.log('data is', data))
  .catch(error => console.log('error is', error));
This is great. We’re getting somewhere since we now have a way to handle errors.
But rejecting the promise (or throwing an Error) with a generic message isn’t good enough. We won’t be able to know what went wrong. I’m pretty sure you don’t want to be on the receiving end for an error like this…

What went wrong? Did the server time out? Was my connection cut? There’s no way for me to know! What we need is a way to tell what’s wrong with the request so we can handle it appropriately.
Let’s take a look at the response again and see what we can do:
{
  body: ReadableStream
  bodyUsed: true
  headers: Headers
  ok: false // Response is not ok
  redirected: false
  status: 404 // HTTP status is 404.
  statusText: "Not Found" // Request not found
  type: "cors"
  url: "https://api.github.com/users/chrissycoyier/repos"
}
Okay great. In this case, we know the resource is non-existent. We can return a 404 status or Not Found status text and we’ll know what to do with it.
To get status and statusText into the .catch call, we can reject a JavaScript object:
fetch('some-url')
  .then(response => {
    if (response.ok) {
      return response.json()
    } else {
      return Promise.reject({
        status: response.status,
        statusText: response.statusText
      })
    }
  })
  .catch(error => {
    if (error.status === 404) {
      // do something about 404
    }
  })
Now we’re getting somewhere again! Yay! 😄.
Let’s make this better! 😏.
The above error handling method is good enough for certain HTTP statuses which doesn’t require further explanation, like:
But it’s not good enough for this particular badass:
What constitutes bad request? It can be a whole slew of things! For example, Stripe returns 400 if the request is missing a required parameter.

It’s not enough to just tell our .catch statement there’s a bad request. We need more information to tell what’s missing. Did your user forget their first name? Email? Or maybe their credit card information? We won’t know!
Ideally, in such cases, your server would return an object, telling you what happened together with the failed request. If you use Node and Express, such a response can look like this.
res.status(400).send({
  err: 'no first name'
})
Here, we can’t reject a Promise in the initial .then call because the error object from the server can only be read after response.json.
The solution is to return a promise that contains two then calls. This way, we can first read what’s in response.json, then decide what to do with it.
Here’s what the code looks like:
fetch('some-error')
  .then(handleResponse)

function handleResponse(response) {
  return response.json()
    .then(json => {
      if (response.ok) {
        return json
      } else {
        return Promise.reject(json)
      }
    })
}
Let’s break the code down. First, we call response.json to read the json data the server sent. Since, response.json returns a Promise, we can immediately call .then to read what’s in it.
We want to call this second .then within the first .then because we still need to access response.ok to determine if the response was successful.
If you want to send the status and statusText along with the json into .catch, you can combine them into one object with Object.assign().
let error = Object.assign({}, json, {
  status: response.status,
  statusText: response.statusText
})
return Promise.reject(error)
With this new handleResponse function, you get to write your code this way, and your data gets passed into .then and .catch automatically
fetch('some-url')
  .then(handleResponse)
  .then(data => console.log(data))
  .catch(error => console.log(error))
Unfortunately, we’re not done with handling the response just yet 🙁
So far, we’ve only touched on handling JSON responses with Fetch. This already solves 90% of use cases since APIs return JSON nowadays.
What about the other 10%?
Let’s say you received an XML response with the above code. Immediately, you’ll get an error in your catch statement that says:

This is because XML isn’t JSON. We simply can’t return response.json. Instead, we need to return response.text. To do so, we need to check for the content type by accessing the response headers:
.then(response => {
  let contentType = response.headers.get('content-type')

  if (contentType.includes('application/json')) {
    return response.json()
    // ...
  }

  else if (contentType.includes('text/html')) {
    return response.text()
    // ...
  }

  else {
    // Handle other responses accordingly...
  }
});
Wondering why you’ll ever get an XML response?
Well, I encountered it when I tried using ExpressJWT to handle authentication on my server. At that time, I didn’t know you can send JSON as a response, so I left it as its default, XML. This is just one of the many unexpected possibilities you’ll encounter. Want another? Try fetching some-url 🙂
Anyway, here’s the entire code we’ve covered so far:
fetch('some-url')
  .then(handleResponse)
  .then(data => console.log(data))
  .then(error => console.log(error))

function handleResponse (response) {
  let contentType = response.headers.get('content-type')
  if (contentType.includes('application/json')) {
    return handleJSONResponse(response)
  } else if (contentType.includes('text/html')) {
    return handleTextResponse(response)
  } else {
    // Other response types as necessary. I haven't found a need for them yet though.
    throw new Error(`Sorry, content-type ${contentType} not supported`)
  }
}

function handleJSONResponse (response) {
  return response.json()
    .then(json => {
      if (response.ok) {
        return json
      } else {
        return Promise.reject(Object.assign({}, json, {
          status: response.status
          statusText: response.statusText
        }))
      }
    })
}
function handleTextResponse (response) {
  return response.text()
    .then(text => {
      if (response.ok) {
        return json
      } else {
        return Promise.reject({
          status: response.status,
          statusText: response.statusText,
          err: text
        })
      }
    })
}
It’s a lot of code to write/copy and paste into if you use Fetch. Since I use Fetch heavily in my projects, I create a library around Fetch that does exactly what I described in this article (plus a little more).
zlFetch is a library that abstracts away the handleResponse function so you can skip ahead to and handle both your data and errors without worrying about the response.
A typical zlFetch look like this:
zlFetch('some-url', options)
  .then(data => console.log(data))
  .catch(error => console.log(error));
To use zlFetch, you first have to install it.
npm install zl-fetch --saveThen, you’ll import it into your code. (Take note of default if you aren’t importing with ES6 imports). If you need a polyfill, make sure you import it before adding zlFetch.
// Polyfills (if needed)
require('isomorphic-fetch') // or whatwg-fetch or node-fetch if you prefer

// ES6 Imports
import zlFetch from 'zl-fetch';

// CommonJS Imports
const zlFetch = require('zl-fetch');
zlFetch does a bit more than removing the need to handle a Fetch response. It also helps you send JSON data without needing to write headers or converting your body to JSON.
The below the functions do the same thing. zlFetch adds a Content-Type and converts your content into JSON under the hood.
let content = {some: 'content'}

// Post request with fetch
fetch('some-url', {
  method: 'post',
  headers: {'Content-Type': 'application/json'}
  body: JSON.stringify(content)
});

// Post request with zlFetch
zlFetch('some-url', {
  method: 'post',
  body: content
});
zlFetch also makes authentication with JSON Web Tokens easy.
The standard practice for authentication is to add an Authorization key in the headers. The contents of this Authorization key is set to Bearer your-token-here. zlFetch helps to create this field if you add a token option.
So, the following two pieces of code are equivalent.
let token = 'someToken'
zlFetch('some-url', {
  headers: {
    Authorization: `Bearer ${token}`
  }
});

// Authentication with JSON Web Tokens with zlFetch
zlFetch('some-url', {token});
That’s all zlFetch does. It’s just a convenient wrapper function that helps you write less code whenever you use Fetch. Do check out zlFetch if you find it interesting. Otherwise, feel free to roll your own!
Here’s a Pen for playing around with zlFetch:
See the Pen zlFetch demo by Zell Liew (@zellwk) on CodePen.
Fetch is a piece of amazing technology that makes sending and receiving data a cinch. We no longer need to write XHR requests manually or depend on larger libraries like jQuery.
Although Fetch is awesome, error handling with Fetch isn’t straightforward. Before you can handle errors properly, you need quite a bit of boilerplate code to pass information go to your .catch call.
With zlFetch (and the info presented in this article), there’s no reason why we can’t handle errors properly anymore. Go out there and put some fun into your error messages too 🙂
By the way, if you liked this post, you may also like other front-end-related articles I write on my blog. Feel free to pop by and ask any questions you have. I’ll get back to you as soon as I can.
Using Fetch is a post from CSS-Tricks
Post pobrano z: Focus Styles on Non-Interactive Elements?
Last month, Heather Migliorisi looked at the accessibility of Smooth Scrolling. In order to do smooth scrolling, you:
Stopping the browser default behavior is the part that is problematic for accessibility. No longer does the #jump link move focus to element the #jump link pointed to. So Heather added a #4: move focus to the element the #jump link pointed to.
But moving focus through JavaScript isn’t possible on every element. Sometimes you need to force that element to be focusable, which she did through setting tabindex="-1".
We since updated our snippet to do this more-accessible handling of focus. Since then, we’ve heard from quite a few folks about a new side effect to the updated snippet:

After the smooth scrolling, the headers that were scrolled to now have the default blue glowing outline that links have by default. Even if we don’t always love the blue glowing outline (the style varies by user agent, it might be a dotted outline, for example) we know better to remove it.
There is even a website dedicated to that sentiment:

You can change the focus style if you like, but it’s good accessibility to have a distinct focus style for elements that are in focus. I can even imagine an argument for leaving the focus styles alone.
Headers aren’t focusable elements.
They aren’t „interactive” elements. We aren’t used to seeing focus styles on non-interactive elements. But now, all the sudden, because we used a smooth scrolling technique from the internet, we’re getting them. That tabindex="-1" technique to allow focus is causing it.
I reached out to Heather to ask her about this.
The
:focusstyling for headings and other non-interactive elements can be removed/left off. It’s really up to the folks behind the creative site if they want it or not there. In some cases, I’ve removed it, in others I’ve styled it. It just depends.
To my surprise, it’s OK to remove focus styles in the case that the element you’re force-focusing isn’t interactive. That last point is important, and Heather clarified:
As long as the headings are not links… 😉
So if you really hated the focus styles, you could do:
h1:focus,
h2:focus,
h3:focus,
h4:focus,
h5:focus,
h6:focus {
  outline: 0;
}
You’re safe there. Even in the cases of <a><h3></h3></a> or <h3><a></a></h3>, the link still has focus styles.
Jump links can point to any element, and there are lots of non-focusable-by-default elements. Another classic technique in this situation is the „yellow fade” technique. Let’s say instead of linking to headers, we were linking to <section>s. When any section comes into focus, we could style it like this:
section:focus {
  outline: 0;
  animation: yellowFade 3s forwards;
}
@keyframes yellowFade {
  from { background: lightYellow; }
  to   { background: white; }
}
Which gives us:

Which is an adaptation of something that was often used for :target.
Focus Styles on Non-Interactive Elements? is a post from CSS-Tricks
Post pobrano z: How to Create a Bodega Shop Illustration in Adobe Illustrator

In this tutorial we will create a complete shop with all the details, in addition to some shrubs and a street with its lampposts, using the most basic shapes and tools of Adobe Illustrator.
Find more inspiration for your vector illustrations over on GraphicRiver.
Press Control-N to make a New Document. Set the Units to Pixels, and enter 800 x 600 for the width and height of the document. Then in the Advanced options, select RGB, Screen (72 ppi), and make sure to uncheck the Align New Objects to Pixel Grid box before clicking OK.
Go to the Preferences (Control-K) and enter 1 px for the Keyboard increment. Press OK.
You can activate the Info panel (Window > Info) in order to have a preview of the size and position of your shapes. Remember to set the measuring unit to Pixels from Edit > Preferences > Units. This will greatly increase the speed of your work.

We’ll start with the road and the sidewalk of our shop.
Start by creating an 800 x 120 px rectangle using the Rectangle Tool (M). Use #706B79 as the fill color.
Now create the sidewalk using one 704 x 10 px rectangle (#A8A5AA) and one 704 x 6 px rectangle (#706B79).

Now for the most time-consuming step, the store.
Start by creating the shop floor. Create a 314 x 7 px rectangle (#9D9588) with the Rectangle Tool (M).
Then create a column using a 36 x 256 px rectangle (#E9E7DC) and add details with two 22 x 53 px rectangles (#F9F6E6) and a 22 x 125 px rectangle (#F9F6E6). Set Inverted Round corners with a 5 px radius from the Transform panel.

Now duplicate the internal forms of the column twice (Control-C followed by Control-F) and move them 2 px downwards with the keyboard’s arrow keys. Apply Minus Front from the Pathfinder panel to every copy.
Change the fill color to #D6D4C3. Group the column together (Control-G) and duplicate it (Control-C > Control-F) at the other end.

Let’s create the door using a 90 x 180 px rectangle (#EAAB61). Then add another 62 x 34 px rectangle (#DB9747) and create a shadow by duplicating twice (Control-C followed by Control-F). Move the last copy 4 px downwards and 4 px to the right.
Set Minus Front from the Pathfinder panel.

Create the door’s window using a 62 x 112 px rectangle (#78C4ED). Now add a 5 x 112 px rectangle (#64ABD5) to act as a shadow.
Now create a pair of rectangles (#FFFFFF) and rotate them 45º with the Rotate Tool (R). Set a 30% Opacity in the top bar and with the Shape Builder Tool (Shift-M) remove the remaining forms.

Now, create a sign using a 30 x 20 px rectangle (#FFFFFF). Add two 2 x 18 px rectangles (#EAAB61), rotate them until they have a 45º angle using the Rotate Tool (R), and place them under the sign (right click > Arrange > Send Backward).
Then create a 6 x 6 px ellipse (#FFFFFF) using the Ellipse Tool (L). Draw two rectangles (#F7DDC0) on the sign.
Group the sign (Control-G) and duplicate it (Control-C > Control-F). Use #64ABD5 as fill color for the copy, move it 2 px downwards and to the right, and then send it behind the sign (Control-[).

Now create the handle using a 7 x 7 px ellipse (#BB7B33).
Now add a 224 x 27 px rectangle (#EAAB61) for the wall of the store and a 224 x 153 px rectangle (#78C4ED) for the window.
Duplicate the rectangle of the wall twice (Control-C followed by Control-F), and move the second copy 3 px downwards and 3 px to the right. Set Minus Front from the Pathfinder panel. Change the fill color to #DB9747.

Create some setoffs in the wall with a 3 x 16 px rectangle and a 61 x 3 px rectangle (#DB9747), grouping them together (Control-G) to form an inverted L. Then duplicate it twice (Control-C > Control-F).

We will create some details in the window. Take the Pen Tool (P) and draw the top of a bar using the fill color #6BAFE2.
Then draw the seat’s shadows and some glasses on the table using the fill color #5789C3. Round the seats’ corners using Live Corners with the Direct Selection Tool (A).

Now create the lamps using one 2 x 44 px rectangle (#5789C3) and one 22 x 12 px rectangle (#5789C3). Move the upper nodes of the last rectangle inwards by 4 px with the Direct Selection Tool (A).
Add an 8 x 8 px ellipse (#5789C3) under the hood of the lamp and group everything together (Control-G). Duplicate it (Control-C > Control-F) and place them far from each other.

Add reflections on the window, drawing three rectangles with the Rectangle Tool (M). Use #FFFFFF as the fill color and set a 30% Opacity in the top bar.
Rotate the rectangles 45° and use the Shape Builder Tool (Shift-M) to remove the rest of the form of the window.

Now add the window divisions using one 7 x 180 px rectangle, one 217 x 7 px rectangle, and one 7 x 146 px rectangle. Use #F9F6E6 as the fill color.
Then add two 4 x 146 px rectangles (#64ABD5) and place them under the reflections (Control-[) as shown in the image below.

In this step we will create the blind. To do this, create a 24.15 x 74 px rectangle (#EAAB61) and round its lower corners. Duplicate the rectangle (Control-C > Control-F) three times and alternate the use of the fill color #EDEEF0.

Now draw a rectangle (#EAAB61) one-third away from the lower part of the blind and remove the remaining shape with the Shape Builder Tool (Shift-M). Set the Blending Mode to Multiply and the Opacity to 35% using the Appearance panel.
Add a 314 x 4 px rectangle (#FFFDEF) in the fold of the blind, and from the Appearance panel set the Blending Mode to Soft Light and the Opacity to 50%. Group everything together (Control-G) and duplicate it (Control-C > Control-F).

Send the blind copy backwards (Control-[) and apply the fill color #000000. Set the Opacity to 10% in the top bar.
Move the copy downwards just once by pressing the Shift key.

Add a lintel by creating a 314 x 34 px rectangle (#E9E1C4). Then create a 296 x 168 px rectangle (#D6D0B5) and set Inverted Round corners with a 4 px radius from the Transform panel.
Afterwards, duplicate it twice (Control-C followed by Control-F) and move the last copy 2 px downwards. Then apply Minus Front with the previous copy using the Pathfinder panel. Use #C2BCA4 as the fill color.

Create a 314 x 35 px rectangle (#D6D0B5) over the lintel. Then create a 4 x 28 px rectangle (#C2BCA4) and round the lower corners.
Duplicate it and place it at the other end of the lintel. Select both rectangles and go to Object > Blend > Make to merge. Then establish a 40 step separation from Object > Blend > Blend Options.

Make some shadows on the columns using two 36 x 4 px rectangles (#D6D4C3). Afterwards, add a 314 x 7 px rectangle (#C2BCA4) above the lintel, and set the Blending Mode to Multiply with a 40% Opacity using the Appearance panel.

Let’s finish the roof, using a 405 x 27 px rectangle (#F9F6E6). Then, add one 351 x 14 px rectangle (#D6D0B5) and one 351 x 4 px rectangle (#C2BCA4). Finally, add a 360 x 7 px rectangle (#F9F6E6).

Create some bushes with two 54 x 54 px ellipses and use #7FBB86 and #68A96A as the fill colors. Then, duplicate the bushes (Control-C > Control-F) and place the copy at the other end.
Be sure to place them behind the shop (Shift-Control-[).

In this step, we are going to create the lampposts on the street. To do this, use an 18 x 18 px rectangle (#7C7C7C) and move the upper nodes 2 px inwards with the Direct Selection Tool (A).
Then add a 7 x 194 px rectangle (#6B6B6B) and move the upper nodes 2 px inwards. Afterwards, draw a rectangle at the top and delete the rest with the Shape Builder Tool (Shift-M).

Now create a 26 x 3 px rectangle (#6B6B6B) over the post and a 36 x 3 px rectangle (#6B6B6B) above the last rectangle. Create a 3 x 26 px rectangle and place it in the middle, make a copy (#424242) and change its height to 4 px in the Transform panel.
Then take the Pen Tool (P) and draw a trapezoid for the lamp using the fill color #F2F2F2. Place it below the rectangle (Control-[).

Create a 36 x 3 px rectangle (#6B6B6B) and place it in the middle of the lamp. Use the Shape Builder Tool (Shift-M) to remove the ends with the shape of the lamp.
Now create a 26 x 26 px ellipse (#7C7C7C) and remove the lower node. Place it on the top of the lamp. Group the lamppost together (Control-G), duplicate it (Control-C > Control-F), and place it at the other end of the store.

To finish, let’s create the sky. Create an 800 x 600 px rectangle (#80C3EA) and send it to the back of the canvas (Object > Arrange > Send to Back).

The result is commendable! Congratulations on reaching this point. I hope you enjoyed it as much as I did and that you have learnt a lot. I’ll be watching the comments!


Post pobrano z: Shutterstock editor: designing has never been so easy
“A picture is worth a thousand words”, this idiom coming from the newspaper era has never been so true. In a world where social media is so prominent, the volume of information has drastically increased, and the readers attention span has decreased proportionally.
Creating powerful pictures has never been so important, which is good news for designers and imaging professionals. This means that everybody needs to find a way to share images that will catch their friends and followers attention on various social networks.
You can now rejoice, as Shutterstock recently released an impressive tool that makes image editing easier than ever. Create messages for social media, ads that grab everybody’s attention, all that quicker than ever. Let’s take a look at the features of the editor.
Good app design is probably the core feature of Shutterstock’s online photo editor. The flawless is the feature that sets the image editor from its competitor that have been around for a while. You can personalize anything in your images, crop, add texts, logos, or create shapes. There are also some cool photo filters that you can add to your photo to make them even more special.

Finding source images for your social media updates is often more time-consuming than it should. You need to fire up your browser, do a search, sign in to your account if you have one, or even sign up for a new account.
With Shutterstock Editor, this is made much faster. You can search for photos right into your editor, and start working on your image right away. Obviously, the photos will be taken from Shutterstock’s gigantic image database. One more good reason to choose to work with Shutterstock Editor.

To create professional designs very quickly, using templates is the way to go. Shutterstock anticipated on this need and provides you with stunning templates that will make you more productive than ever.

Thanks to a flexible workflow, Shutterstock Editor makes saving your work on the go and sharing it seamless. This makes it perfect for marketing people and community managers.