Post pobrano z: Coppel Buen Fin

Post pobrano z: Coppel Buen Fin
Post pobrano z: How to Create Flat Design Headphones in Adobe Illustrator

I love headphones, and this tutorial is inspired by the Audiotechnica M50X. As you’ll see, we’ll be creating this with basic shapes in Adobe Illustrator. So if you’re a lover of headphones and good music, this tutorial is for you!
Get inspiration from the many flat design vector illustrations over on GraphicRiver.
Let’s start!
Press Control-N to make a New Document. Set the Units to Pixels, and enter 800 x 600 for the width and height of the document. Then in the Advanced options, select RGB, Screen (72 ppi), and make sure to activate the Align New Objects to Pixel Grid box before clicking OK.
Activate the Grid (View > Show Grid) and Snap to Grid (View > Snap to Grid). You’ll need a grid every 10 px, so simply press Control-K to go to Preferences, and in Guides & Grid set Gridline every to 10 and Subdivisions to 4. Don’t worry—the grid will help you work in an easy way, and it can also be enabled or disabled by pressing the keyboard shortcut Control-„.
You can activate the Info panel (Window > Info) in order to have a preview of the size and position of your shapes. Remember to set the measuring unit to Pixels from Edit > Preferences > Units. This will greatly increase the speed of your work.

First things first—let’s start with one earpad so we can
duplicate it and then create the headband for our headphones. Make sure to turn on the Grid so that you can work with greater precision and ease.
Start by creating the earpad with a 46 x 132 px rectangle using the
Rectangle Tool (M). Select #84EDFF as the fill color and no color for the stroke fill.
In the Transform panel, enter 14 px as the right-side corner
radius and 2 px as the left-side corner radius.
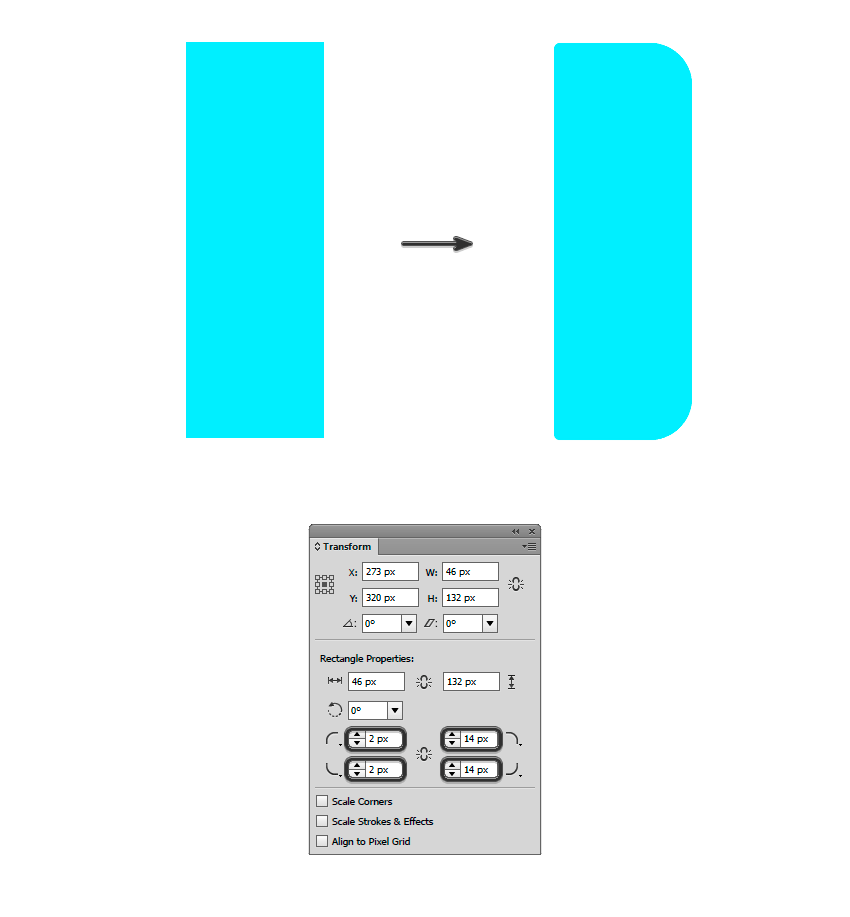
Duplicate the rectangle (Control-C > Control-F)
and change its Width to 36 px with the Selection Tool (V). Select #40BDD1 as the fill color and change the right-side corner radius to 10 px.

Duplicate the last rectangle (Control-C > Control-F) and change its Width to 24 px. Select #47D2E9 as the fill color and change the left-side corner radius to 6 px.

Next to the earpad, create the speaker base
using a 4 x 128 px rectangle, and use #5B5B5F as the fill color; then set the right-side corner radius to 2 px.

Now create the housing using a 24 x 80 px rectangle. Select #363434 as the fill color and change
the left-side corner radius to 2 px.

Add some depth to the housing duplicating
(Control-C > Control-F) the previous rectangle and changing its Height to 58 px.
Change the fill color to #3B3939.

Repeat the previous step and change the
rectangle’s Height to 50 px. Change the fill color to #444242.

Now create the support for the speaker’s hinge
using a 20 x 16 px rectangle. Select #4D4A4A as the fill color and change the left side radius to 8 px.
Duplicate the rectangle (Control-C > Control-F)
and move 2 px downwards using the arrow of your keyboard. Change the fill color
to #3B3B3B and send it backwards
(Object > Arrange > Send Backward).

Create a 8 x 42 px rectangle for the small headband on the speaker/housing.
Set the lower corner radius to 4 px and select #5B5B5F as the fill color.
Duplicate it (Control-C > Control-F) and change
the fill color to #3B3B3B. Move the rectangle
downwards 2 px, and send it backwards (Object > Arrange > Send Backward).

Continue with the small headband using a 8 x 10
px rectangle. Select #444242 as the fill color and place
the rectangle as shown in the image below.

Now create a hinge using a 16 x 16 px ellipse
with the Ellipse Tool (L). Select #5B5B5F as the fill color and place the ellipse as shown in the image below.
Duplicate the ellipse and change its size to
12 x 12 px from the Transform panel. Change the fill color to #444242.

Continue drawing the headband’s support using
a 16 x 18 px rectangle. Change the fill color to #444242. Select chamfer corners for the lower corners and set the
radius to 4 px. Send the rectangle to the back (Object > Arrange > Send
to Back).

Create a new 12 x 20 px rectangle, and select #5B5B5F as the fill color. Set the lower corner’s radius to 6 px.
Duplicate (Control-C > Control-F) the rectangle
and change the fill color to #3B3B3B. Send it backwards
(Object > Arrange > Send to Back) and move it downwards 2 px.

Create two rectangles, one of 4 x 26 px (#D8D9DD) for
the headband strap, and another one of 12 x 20 px (#5B5B5F) as the strap support.
Duplicate the first rectangle (Control-C > Control-F) and change its Height to 2 px. Change the fill color to #AEADB3.
Select everything and group it together
(Control-G).

Now, we’ll draw our headphones headband. Let’s begin by creating a 252 x 252 px ellipse and selecting 20 px as the stroke width.
Select #84EDFF as the stroke color and delete the ellipse’s lower anchor point with
the Direct Selection Tool (A).
Expand the stroke (Object > Expand…) and
then slightly round the headband’s lower edges with the Direct Selection Tool
(A).

Duplicate the headband (Control-C > Control-F).
Set the scale to 93% (Object > Transform > Scale..). Use #47D2E9 as the fill color.
Move the duplicated headband 6 px downwards, and then select both headbands and remove the lower remaining part with the Shape
Builder Tool (Shift-M).

We are about to finish the headphones!
Now select the left speaker, duplicate it
(Control-C > Control-F) and reflect it vertically (Object > Transform >
Reflect…). Put it just on the right side of the headband.

Now that we have finished the headphones, it’s time to draw the plug cord.
Moving on!
Let’s start with the cable entry in the right
speaker. Draw it using a 14 x 20 px rectangle, and select #2B2A2A as the fill color.
Add another 8 x 16 px rectangle for the cable connector. Use #545252 as the fill color.

Now, draw the cable with the Pen Tool (P), using 4 px as the stroke thickness. Use #47D2E9 as the stroke color.
Round all corners with the Direct Selection
Tool (A). Then expand the stroke shape (Object > Expand…) and press OK.
Turn off Snap to Grid for a moment
(Shift-Control-„) to align the cable with the connector.

Let’s draw the jack using a 8 x 22 px rectangle
and #545252 as the fill color. Add another 2 x 8 px rectangle (#8A8686).
Add a third rectangle, this one of (#B4B5B8) 4 x 20
px, and set 2 px chamfers in the upper corners from the Transform panel.
Finally, add two 4 x2 px rectangles (#8A8686) and
place them over the jack.

And we are done with the plug cord, so now let’s
finish the design by creating a nice background for our headphones.
Let’s start by creating a musical note. To do
this, use a 22 x 12 px rectangle, a 4 x 40 px rectangle and finally a 20 x 20 px
ellipse. Use #003E57 as the fill color.
Link all forms and merge them together using the
Unite button from the Pathfinder panel. Slightly round all corners with the
Direct Selection Tool (A).

Duplicate (Control-C > Control-F) the
musical note four times, and rotate the copies and change their scales using the Selection Tool (V).
Place them as shown in the picture below.
Then group them together and flip them
vertically (Object > Transform > Reflect…) to place them on the right side of the headphone.

Finally, create an 800 x 600 px rectangle, the same
size as the canvas. Apply a radial gradient from the Gradient panel, using the
following fill colors:
#1F3B54#182D40Remember to send the rectangle to the back of
the canvas (right click > Arrange > Send to Back).

Yaaaay! We’re done! You have finished this
amazing headphones illustration! It’s an incredible result, another example
that you can achieve fun illustrations without much difficulty by using basic forms.
I hope you enjoyed this tutorial as much as I
did; hopefully, it was full of new knowledge for you. I’d like to see your
design—I’ll be waiting!


Post pobrano z: Prisoners of the same idea / Niveau originalité, c’est mal barré?
 |
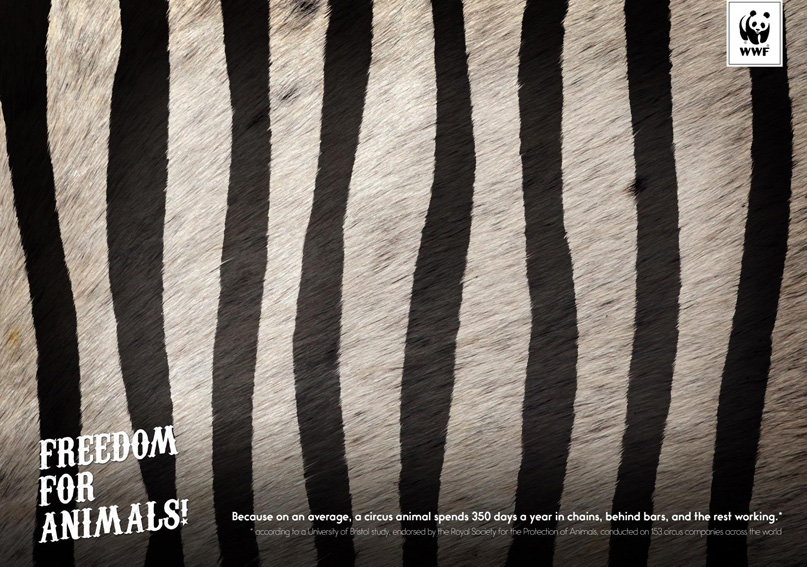 |
| THE ORIGINAL? Noah “A life in prison goes against nature” – 2008 Source : Coloribus Agency : Jung Von Matt Hamburg (Germany) |
LESS ORIGINAL WWF “Freedom for animals” – 2017 Source : Coloribus Agency : Friends\TBWA Bucharest (Romania) |
Post pobrano z: 26 Clean and Green Environmental Logos
We only have one home, protecting it should be of utmost priority! Plenty of companies, NPO’s, and government bodies have set exactly this as their goal and mission. If you’re not convinced, hopefully this will sway you.
[source:Conserve Energy Future.]
In hindsight, we all should be playing our part, but cheers to those who are acting to make a difference.
I’ve put together a collection of 26 clean and green environmental related logos for your inspiration. Enjoy!
Credit to respective artists.
 credit:Alfrey Davilla | vaneltia
 credit:Matt Yow
 credit:Liv Elinor
 credit:Cody Petts
 credit:Isaac Grant
 credit:Breno Bitencourt
 credit:Dimitrije Mikovic
 credit:trinitiff
 credit:Nick Signet
 credit:trinitiff
 credit:Stephen MacEachern
 credit:Matt Cameron
 credit:Nikhil Singh
 credit:Charles Aroutiounian
 credit:Matt Cameron
 credit:Paul J. Bartlett
 credit:Diana Arizmendi
 credit:Becca Dalke
 credit:Tom Frew
 credit:ASK Dziner
 credit:Mohiuddin Parekh
 credit:Jordan Frank
 credit:Carlos Sosa
 credit:Freddy Tejeda
 credit:Sarah Croughwell
 credit:Laura Santos
The thought that our earth is our only option (unless Elon Musk figures our Mars) should be motivation enough to really commit to keeping our home clean. If everyone does their part, we should see a dramatic difference within the near future.
I hope that this collection of environmental related logos has inspired you! Thanks for stopping by!
Post pobrano z: A’ Design Awards & Competition – Call for Entries
For its 2017 edition, A’ Design Award is calling for all talented designers entries. If you think you have design work that may be worthy of an award, you should enter your design here. For years now, this international competition has been rewarding excellency in design and giving exposure to designers from all around the […]
Post pobrano z: What Really Makes a Static Site Generator?
I talk a lot about static site generators, but always about using static site generators. In most cases, it may seem like a black box. I create a template and some Markdown and out comes a fully formed HTML page. Magic!
But what exactly is a static site generator? What goes on inside that black box? What kind of voodoo is this?
In this post, I want to explore all of the parts that make up a static site generator. First, we’ll discuss these in a general fashion, but then we’ll take a closer look at some actual code by delving deep inside HarpJS. So, put your adventurer’s cap on and let’s start exploring.
Why Harp? For two reasons. The first is that HarpJS is, by design, a very simple static site generator. It doesn’t have a lot of the features that might cause us to get lost exploring a more comprehensively full-featured static site generator (like Jekyll for instance). The second, much more practical, reason is that I know JavaScript and don’t know Ruby very well.
The truth is, a static site generator is a pretty simple concept. The key ingredients to a static site generator are typically:
That’s it. If you’re thinking, „Hey… I could build that!” you are probably correct. Things start to get complicated though when you start to expand the functionality, as most static site generators do.
So, let’s look at how Harp handles this.
Let’s look at the basics of how Harp handles the key ingredients described above. Harp offers more than this handful of functionality, but, for the sake of our examination, we’ll stick to those items.
First, let’s discuss the basics of Harp.
Harp supports Jade and EJS (for templating) and Markdown as its lightweight markup language (for content). Note that while Jade is now called Pug, Harp has not officially transitioned in their documentation or code, so we’ll stick with Jade here. Harp also offers support for other preprocessing such as Less, Sass, and Stylus for CSS and CoffeeScript for JavaScript.
By default Harp does not require much in the way of configuration or metadata. It tends to favor convention over configuration. However, it allows for specific metadata and configuration using JSON. It differs from many other static site generators in that file metadata is contained outside of the actual file within a `_data.json` file.
While it is configurable to a degree, Harp has certain established guidelines for how to structure files. For example, in a typical application, the files that are served fall within a public directory. Also, any file or folder prefaced by an underscore will not be served.
Lastly, Harp offers a basic local web server for testing that includes some configurable options. And, of course, it will compile the finished HTML, CSS and JavaScript files for deployment.
Since much of what makes a static site generator are rules and conventions, the code centers around the actual serving and compiling (for the most part). Let’s dig in.
In Harp, serving your project is usually done by executing harp server from the command line. Let’s look at the code for that function:
exports.server = function(dirPath, options, callback){
  var app = connect()
  app.use(middleware.regProjectFinder(dirPath))
  app.use(middleware.setup)
  app.use(middleware.basicAuth)
  app.use(middleware.underscore)
  app.use(middleware.mwl)
  app.use(middleware.static)
  app.use(middleware.poly)
  app.use(middleware.process)
  app.use(middleware.fallback)

  return app.listen(options.port || 9966, options.ip, function(){
    app.projectPath = dirPath
    callback.apply(app, arguments)
  })
}
While the function looks simple, obviously there is a ton going on within middleware that isn’t illustrated here.
The rest of this function opens up a server with the options you specify (if any). Those options include a port, an IP to bind to and a directory. By default the port is 9000 (not 9966 as you might guess by the code), the directory is the current one (i.e. the one Harp is running in) and the IP is 0.0.0.0.
Staying within index.js, let’s take a look at the compile function next.
exports.compile = function(projectPath, outputPath, callback){

  /**
   * Both projectPath and outputPath are optional
   */

  if(!callback){
    callback   = outputPath
    outputPath = "www"
  }

  if(!outputPath){
    outputPath = "www"
  }


  /**
   * Setup all the paths and collect all the data
   */

  try{
    outputPath = path.resolve(projectPath, outputPath)
    var setup  = helpers.setup(projectPath, "production")
    var terra   = terraform.root(setup.publicPath, setup.config.globals)
  }catch(err){
    return callback(err)
  }


  /**
   * Protect the user (as much as possible) from compiling up the tree
   * resulting in the project deleting its own source code.
   */

  if(!helpers.willAllow(projectPath, outputPath)){
    return callback({
      type: "Invalid Output Path",
      message: "Output path cannot be greater then one level up from project path and must be in directory starting with `_` (underscore).",
      projectPath: projectPath,
      outputPath: outputPath
    })
  }


  /**
   * Compile and save file
   */

  var compileFile = function(file, done){
    process.nextTick(function () {
      terra.render(file, function(error, body){
        if(error){
          done(error)
        }else{
          if(body){
            var dest = path.resolve(outputPath, terraform.helpers.outputPath(file))
            fs.mkdirp(path.dirname(dest), function(err){
              fs.writeFile(dest, body, done)
            })
          }else{
            done()
          }
        }
      })
    })
  }

  /**
   * Copy File
   *
   * TODO: reference ignore extensions from a terraform helper.
   */
  var copyFile = function(file, done){
    var ext = path.extname(file)
    if(!terraform.helpers.shouldIgnore(file) && [".jade", ".ejs", ".md", ".styl", ".less", ".scss", ".sass", ".coffee"].indexOf(ext) === -1){
      var localPath = path.resolve(outputPath, file)
      fs.mkdirp(path.dirname(localPath), function(err){
        fs.copy(path.resolve(setup.publicPath, file), localPath, done)
      })
    }else{
      done()
    }
  }

  /**
   * Scan dir, Compile Less and Jade, Copy the others
   */

  helpers.prime(outputPath, { ignore: projectPath }, function(err){
    if(err) console.log(err)

    helpers.ls(setup.publicPath, function(err, results){
      async.each(results, compileFile, function(err){
        if(err){
          callback(err)
        }else{
          async.each(results, copyFile, function(err){
            setup.config['harp_version'] = pkg.version
            delete setup.config.globals
            callback(null, setup.config)
          })
        }
      })
    })
  })

}
The first portion defines the output path as specified by the call to harp compile via the command line (source here). The default, as you can see, is www. The callback is a callback function passed by the command line utility which is not configurable.
The next part starts by calling the setup function in the helpers module. For the sake of brevity, we won’t go into the specific code of the function (feel free to look for yourself), but essentially it reads the site configuration (i.e. harp.json).
You may also notice a call to something called terraform. This will come up again within this function. Terraform is actually a separate project required by Harp that is the basis of its asset pipeline. The asset pipeline is where the hard work of compiling and building the finished site gets done (we’ll look at Terraform code in a little bit).
The next portion of code, as it states, tries to prevent you from specifying an output directory that would inadvertently overwrite your source code (which would be bad as you’d lose any work since your last commit).
The compileFile and copyFile functions are fairly self-explanatory. The compileFile function relies on Terraform to do the actual compilation. Both of these functions drive the prime function which uses a helper function (fs) to walk the directories, compiling or copying files as necessary in the process.
As I discussed, Terraform does the grunt work for compiling the Jade, Markdown, Sass and CoffeeScript into HTML, CSS and JavaScript (and assembling these pieces as defined by Harp). Terraform is made up of a number of files that define its processors for JavaScript, CSS/stylesheets, and templates (which, in this case, includes Markdown).

Within each of these folders is a processors folder that contains the code for each specific processor that Terraform (i.e. Harp) supports. For example, in the templates folder are files that form the basis for compiling EJS, Jade, and Markdown files.

I won’t delve into the code for each of these, but, for the most part, they rely upon external npm modules that handle the supported processor. For example, for Markdown support, it depends upon Marked.
The core logic of Terraform is contained in its render function.
/**
    * Render
    *
    * This is the main method to to render a view. This function is
    * responsible to for figuring out the layout to use and sets the
    * `current` object.
    *
    */

render: function(filePath, locals, callback){

    // get rid of leading slash (windows)
    filePath = filePath.replace(/^\\/g, '')

    // locals are optional
    if(!callback){
    callback = locals
    locals   = {}
    }


    /**
    * We ignore files that start with underscore
    */

    if(helpers.shouldIgnore(filePath)) return callback(null, null)


    /**
    * If template file we need to set current and other locals
    */

    if(helpers.isTemplate(filePath)) {

    /**
        * Current
        */
    locals._ = lodash
    locals.current = helpers.getCurrent(filePath)


    /**
        * Layout Priority:
        *
        *    1. passed into partial() function.
        *    2. in `_data.json` file.
        *    3. default layout.
        *    4. no layout
        */

    // 1. check for layout passed in
    if(!locals.hasOwnProperty('layout')){

        // 2. _data.json layout
        // TODO: Change this lookup relative to path.
        var templateLocals = helpers.walkData(locals.current.path, data)

        if(templateLocals && templateLocals.hasOwnProperty('layout')){
        if(templateLocals['layout'] === false){
            locals['layout'] = null
        } else if(templateLocals['layout'] !== true){

            // relative path
            var dirname = path.dirname(filePath)
            var layoutPriorityList = helpers.buildPriorityList(path.join(dirname, templateLocals['layout'] || ""))

            // absolute path (fallback)
            layoutPriorityList.push(templateLocals['layout'])

            // return first existing file
            // TODO: Throw error if null
            locals['layout'] = helpers.findFirstFile(root, layoutPriorityList)

        }
        }

        // 3. default _layout file
        if(!locals.hasOwnProperty('layout')){
        locals['layout'] = helpers.findDefaultLayout(root, filePath)
        }

        // 4. no layout (do nothing)
    }

    /**
        * TODO: understand again why we are doing this.
        */

    try{
        var error  = null
        var output = template(root, templateObject).partial(filePath, locals)
    }catch(e){
        var error  = e
        var output = null
    }finally{
        callback(error, output)
    }

    }else if(helpers.isStylesheet(filePath)){
    stylesheet(root, filePath, callback)
    }else if(helpers.isJavaScript(filePath)){
    javascript(root, filePath, callback)
    }else{
    callback(null, null)
    }

}
(If you were reading all this code closely, you likely noticed TODO’s, typos, and even a funny „understand again why we are doing this” comment. That’s real life coding!)
The majority of the code in the render function is about handling templates. Things like CoffeeScript and Sass fundamentally render on a one-to-one basis. For example, style.scss will render to style.css. Even if it has includes, that is handled by the renderer. The very end of the render function deals with these types of files.
Layouts in Harp, on the other hand, are nested within each other in a variety of manners that can even depend upon configuration. For example, about.md might be rendered within the default _layout.jade (where, exactly, is determined by the use of != yield within that layout). However, _layout.jade might include multiple other layouts within itself by way of the partial support in Harp.
Partials are a way of splitting up a template into multiple files. They are especially useful for code reuse. For instance, I might put the site header inside a partial. Partials are important for making layouts within a static site generator maintainable but they also add a good deal of complexity to the logic of compiling templates. This complexity is handled within the partial function of the templates processor.
Finally, you could override the default layout by specifying a specific layout or no layout at all for a particular file within the _data.json configuration file. All of these scenarios are handled (and even numbered) within the logic of the render function.
To make this digestible, I’ve skipped over a ton of additional detail. At its core, every static site generator I’ve ever used (and I’ve used a bunch) functions similarly: a set of rules, conventions, and configuration that is run through compilers for the various supported markups. Perhaps that is why there are a ridiculous number of static site generators out there.
That being said, I wouldn’t want to build my own!
If you are interested in learning how to build sites using a static site generator, I’ve authored a report and co-authored a book for O’Reilly that might interest you. My report, simply titled Static Site Generators is free and attempts to establish the history, landscape, and basics behind static site generators.

The book that I co-authored with Raymond Camden is called Working with Static Sites and is available as an early release, but should be available in print soon.
What Really Makes a Static Site Generator? is a post from CSS-Tricks
Post pobrano z: This browser tweak saved 60% of requests to Facebook
Ben Maurer & Nate Schloss:
The browser’s reload button exists to allow the user to get an updated version of the current page. In order to meet this goal, when you reload, browsers revalidate the page that you are currently on, even if that page hasn’t expired yet. However, they also go a step further and revalidate all sub-resources on the page — things like images and JavaScript files.
So even if you’ve set proper expires headers for resources, hitting that reload button (which people must do a ton at Facebook) still requires server round trips to revalidate assets (sometimes).
They worked with Chrome:
After fixing this, Chrome went from having 63% of its requests being conditional to 24% of them being conditional.
And Firefox:
Firefox implemented a proposal from one of our engineers to add a new cache-control header for some resources in order to tell the browser that this resource should never be revalidated.
So if you’re using URLs for assets that never change (if they change, they’ll be at a new URL) in Chrome you’ll benefit automatically, and in Firefox you should use their new header.
Direct Link to Article — Permalink
This browser tweak saved 60% of requests to Facebook is a post from CSS-Tricks
Post pobrano z: Battle of Evony King’s Return
Top Games US ran “The Battle of Evony”, a Super Bowl commercial promoting the mobile game Evony: The King’s Return. George Washington (Aaron Eckhart), King Arthur (Jeffrey Dean Morgan) and Empress Wu Zetian (Fan Bingbing) are brought together from pivotal beginning points in Cornwall, Virginia and Shaanxi in an online two-minute cinematic film, their paths of alliance converging over time in an epic battlefield. The culminating battle was featured in a 30-second ad shown during the third quarter of the Super Bowl on Sunday, February 5th. Eleven additional ads will air later in the year, expanding the story line with forge and broken alliances.

“The Super Bowl is the ultimate test of today’s warriors, so it is a fitting place for us to showcase our free-to-play mobile game, Evony: The Kings Return” said Top Games CEO Lu Lu. “Having such spectacular talent literally leading the charge will help bring the game to life and drive interest.”
The campaign was directed by Henry Hobson of Furlined in stunning locations from New Zealand to Romania. “Being given the opportunity to pit historical figures against each other in a vast world is a hugely exhilarating and creatively rewarding experience,” says Hobson. “The world allowed me to shine a cinematic lens on both character and location, from battlefields to birthplaces, mountain tops to medieval villages. It brought all the areas I love to explore – character, performance, cinematic visuals, storytelling, tension, mood and intrigue – together.”
The Battle of Evony King’s Return campaign was developed at BSSP, San Francisco, by chief creative odficer John Butler, executive creative directors Keith Cartwright and Tom Coates, creative directors Mark Krajan, Chris Toffoli, associate creative directors Sinan Dagli and Luke Zehner, senior art director Lydia Dunay, senior copywriter Nick Zacher, director integrated production Vince Genovese, senior producer Lori Pisani, group account director Cristiano Alburitel, account supervisor Danielle Patipa, account executive Patrick Gregory, business affairs Nihad Peavler.
Filming was shot by director Henry Hobson via Furlined with president Diane Carter, executive producer Ben Davies, producer Aris McGarry and director of photography Alwin Kuchler, production designer Dominic Watkins, storyboard artist Mark Bristol, working with local production companies Goodoil Films and Icon Films.
Typography was by Me&theBootmaker.
Editor was Stewart Reeves at Work Editorial with assistant editor Josh Sasson, producer Lynne Mannino and executive producer Marlo Baird.
Visual effects were produced at Method Studios by VFX supervisor Ben Walsh, producer Mike Zavala, senior executive producer Stephanie Gilgar, CG supervisor Lee Carlton, compositing suprevisor Chris Bankoff, compositing lead Toma Bowen and VFX coordinator Kyle Leonard.
Colorist was Tom Poole at Company 3.
Sound and music were produced at Q Department. Sound was mixed at One Union by Eben Carr.
Music is “Keyboard suite in D minor (HWV 437), Sarabande” by George Frederic Handel.
Post pobrano z: Battle of Evony King’s Return
Top Games US ran “The Battle of Evony”, a Super Bowl commercial promoting the mobile game Evony: The King’s Return. George Washington (Aaron Eckhart), King Arthur (Jeffrey Dean Morgan) and Empress Wu Zetian (Fan Bingbing) are brought together from pivotal beginning points in Cornwall, Virginia and Shaanxi in an online two-minute cinematic film, their paths of alliance converging over time in an epic battlefield. The culminating battle was featured in a 30-second ad shown during the third quarter of the Super Bowl on Sunday, February 5th. Eleven additional ads will air later in the year, expanding the story line with forge and broken alliances.
“The Super Bowl is the ultimate test of today’s warriors, so it is a fitting place for us to showcase our free-to-play mobile game, Evony: The Kings Return” said Top Games CEO Lu Lu. “Having such spectacular talent literally leading the charge will help bring the game to life and drive interest.”
The campaign was directed by Henry Hobson of Furlined in stunning locations from New Zealand to Romania. “Being given the opportunity to pit historical figures against each other in a vast world is a hugely exhilarating and creatively rewarding experience,” says Hobson. “The world allowed me to shine a cinematic lens on both character and location, from battlefields to birthplaces, mountain tops to medieval villages. It brought all the areas I love to explore – character, performance, cinematic visuals, storytelling, tension, mood and intrigue – together.”
The Battle of Evony King’s Return campaign was developed at BSSP, San Francisco, by chief creative odficer John Butler, executive creative directors Keith Cartwright and Tom Coates, creative directors Mark Krajan, Chris Toffoli, associate creative directors Sinan Dagli and Luke Zehner, senior art director Lydia Dunay, senior copywriter Nick Zacher, director integrated production Vince Genovese, senior producer Lori Pisani, group account director Cristiano Alburitel, account supervisor Danielle Patipa, account executive Patrick Gregory, business affairs Nihad Peavler.
Filming was shot by director Henry Hobson via Furlined with president Diane Carter, executive producer Ben Davies, producer Aris McGarry and director of photography Alwin Kuchler, production designer Dominic Watkins, storyboard artist Mark Bristol, working with local production companies Goodoil Films and Icon Films.
Typography was by Me&theBootmaker.
Editor was Stewart Reeves at Work Editorial with assistant editor Josh Sasson, producer Lynne Mannino and executive producer Marlo Baird.
Visual effects were produced at Method Studios by VFX supervisor Ben Walsh, producer Mike Zavala, senior executive producer Stephanie Gilgar, CG supervisor Lee Carlton, compositing suprevisor Chris Bankoff, compositing lead Toma Bowen and VFX coordinator Kyle Leonard.
Colorist was Tom Poole at Company 3.
Sound and music were produced at Q Department. Sound was mixed at One Union by Eben Carr.
Music is “Keyboard suite in D minor (HWV 437), Sarabande” by George Frederic Handel.
Post pobrano z: BBC Education “Every Element of Wonder”

Love the insane amount of detail and variety that went into this BBC spot from Flink. More details on the project page.