How to Create a Grass Action Text Effect in Adobe Photoshop

Post pobrano z: How to Create a Grass Action Text Effect in Adobe Photoshop
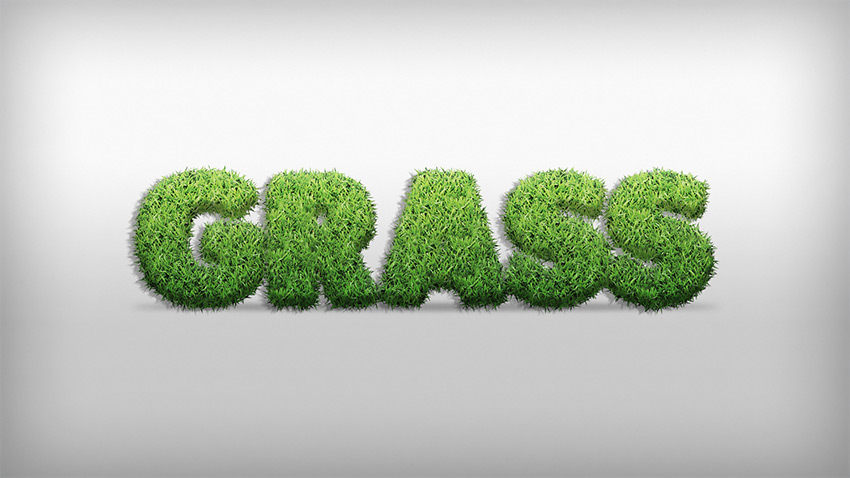
Final product image
What You’ll Be Creating

In this tutorial I will show you how to create a grass action in Adobe Photoshop using two brushes, and a layer style with a grass pattern. At the end of the tutorial you will have an action that lets you perform almost the entire process with a single click.

If you’d like to skip this tutorial but still wish to buy the action, you can head over to GraphicRiver and buy Grass Generator. The complete action has additional features, it works with 72 dpi and 300 dpi, and it also works with shapes.

promo image
Grass Generator

Tutorial Assets

The following assets were used during this tutorial:

1. How to Create the Brushes

Step 1

Open Photoshop and create a new 350 x 460 px document.

Creating a new document

Step 2

Press D on your keyboard to reset the Foreground and Background colors. Then pick the Ellipse Tool (U), and change its mode to shape.

Ellipse tool settings

Step 3

Start by drawing a long and thin oval shape.

Drawing the oval shape

Step 4

Now pick the Convert Point Tool and Control-Click on the center of the shape.

Convert Point Tool

Step 5

Now click on the anchor point at the top to make it pointy. Do the same thing on the anchor point at the bottom.

Converting anchor point

Step 6

Control-Click on the thumbnail of the Ellipse 1 layer to create a selection around the shape. Then go to Edit > Define Brush Preset…, name it Base Brush and click OK.

Creating the brush

Step 7

Pick the Brush Tool (B), and then Right-Click on the document and select the brush that we just created (Base Brush).

Choosing the brush

Step 8

Go to Window > Brush to open the Brush panel. Then set these settings in Brush Tip Shape:

  • Size: 27 px
  • Flip X: Unchecked
  • Flip Y: Unchecked
  • Angle:
  • Roundness: 100%
  • Spacing: 130%
Brush Tip Shape settings

Step 9

Select Shape Dynamics with these settings:

  • Size Jitter: 32%
  • Control: Off
  • Minimum Diameter: 7%
  • Angle Jitter: 35%
  • Control: Off
  • Roundness Jitter: 26%
  • Control: Off
  • Minimum Roundness: 100%
  • Flip X Jitter: Unchecked
  • Flip Y Jitter: Unchecked
  • Brush Projection: Unchecked
Shape Dynamics settings

Step 10

Select Scattering with these settings:

  • Scatter: 62%
  • Both Axes: Unchecked
  • Control: Off
  • Count: 5
  • Count Jitter: 100%
  • Control: Off
Scattering settings

Step 11

Select Color Dynamics with these settings:

  • Apply Per Tip: Checked
  • Foreground/Background Jitter: 100%
  • Control: Off
  • Hue Jitter: 2%
  • Saturation Jitter: 13%
  • Brightness Jitter: 11%
  • Purity: -1%

Color Dynamics makes no difference to the final result of this tutorial, but it’s important if you want to use the brush with other things.

Color Dynamics settings

Step 12

Now click on the icon in the top right corner of the Brush panel and choose New Brush Preset. Then name it Grass Brush 1 and check the Capture Brush Size in Preset box. After that, click OK.

Saving the Brush Preset

Step 13

Now let’s create a new preset. Go back to Brush Tip Shape in the Brush panel and make these changes:

  • Size: 18 px
  • Flip X: Unchecked
  • Flip Y: Unchecked
  • Angle:
  • Roundness: 100%
  • Spacing: 339%
Second Brush Tip Shape settings

Step 14

Don’t change the Shape Dynamics settings; just leave it selected. Then select Scattering and make these changes:

  • Scatter: 50%
  • Both Axes: Unchecked
  • Control: Off
  • Count: 8
  • Count Jitter: 0%
  • Control: Off
Second Scattering settings

Step 15

Leave Color Dynamics selected and save the preset as before, but this time name it Grass Brush 2.

Saving the second Brush Preset

2. How to Create the Text and Install the Pattern

Step 1

Go to File > Open…, and open the background that you downloaded (Background-Grass.jpg). 

Background image

Step 2

Pick the Type Tool (T) and write „GRASS”. Choose the Plump font, and then set the Size to 300 pt.

Type Tool and its settings

Step 3

Go to Edit > Presets > Preset Manager. In the Preset Type, select Patterns, click load…, and choose Grass Pattern.pat. After that, click Done.

Installing the Grass Pattern

3. How to Create the Action

Step 1

Go to Window > Actions to open the Actions panel.

Opening the Actions Panel

Step 2

Let’s create a new set of actions. To do so, click the Create New Set icon, name it Grass Set, and click OK.

Creating a new set of actions

Step 3

Click the Create New Action icon, name it Grass Text, and click Record.

From this point on, everything you do will be recorded, so keep an eye on the Actions panel. If you make a mistake, click the Stop Playing/Recording icon, and delete the unnecessary step from the action Grass Text. Then click the Begin Recording icon to continue.

Creating a new action

Step 4

With the text layer selected, go to Layer > Rename Layer… and rename it 1.

Renaming the text layer

Step 5

Create a new layer by clicking on the Create a New Layer icon, name it Grass 1, and click OK.

Creating a new layer

Step 6

Select the layer 1 and go to Type > Create Work Path.

Creating the work path

Step 7

Now select the layer Grass 1. Then pick the Brush Tool (B) and select the Grass Brush 1 with these settings.

  • Mode: Normal
  • Opacity: 100%
  • Flow: 100%
  • Pen Related Options: Unchecked
Selecting the brush

Step 8

Go to Window > Paths to open the Paths panel. Then right-click the Work Path and choose Stroke Path. Choose Brush with Simulate Pressure unchecked, and then click OK.

Creating the border

Step 9

Select layer 1. Then create a new layer and name it Grass 2.

Creating the second brush layer

Step 10

Now pick the Brush Tool (B) with these settings:

  • Brush: Grass Brush 2
  • Mode: Normal
  • Opacity: 100%
  • Flow: 100%
  • Pen Related Options: Unchecked
Selecting the second brush

Step 11

Go back to the Paths panel. Right-click the Work Path and choose Stroke Path. Just like before, choose Brush with Simulate Pressure unchecked, and then click OK. After that, delete the Work Path.

Creating the second border

Step 12

Now select the layer 1 again. Then hold down the Shift key and click on the layer Grass 1 to select all layers (except the Background layer).

Selecting the layers

Step 13

Right-click on the layer Grass 1 and choose Convert to Smart Object.

Convert to Smart Object

Step 14

Now double-click on the layer Grass 1 to open the Layer Style window. Let’s start with Bevel & Emboss:

  • Style: Inner Bevel
  • Technique: Smooth
  • Depth: 100%
  • Direction: Up
  • Size: 26 px
  • Soften: 0%
  • Use Global Light: Unchecked
  • Angle: 90º
  • Altitude: 30º
  • Gloss Contour: Linear
  • Anti-Aliased: Unchecked
  • Highlight Mode: Screen
  • Highlight Mode Color: #ffffff
  • Highlight Mode Opacity: 16%
  • Shadow Mode: Multiply
  • Shadow Mode Color: #000000
  • Shadow Mode Opacity: 30%
Bevel and Emboss settings

Step 15

Add an Inner Shadow with these settings:

  • Blend Mode: Multiply 
  • Color: #000000
  • Opacity: 22%
  • Use Global Light: Unchecked
  • Angle: -90º
  • Distance: 14 px
  • Choke: 16%
  • Size: 4 px
  • Contour: Linear
  • Anti-aliased: Unchecked
  • Noise: 0%
Inner Shadow settings

Step 16

Add a Gradient Overlay with these settings:

  • Blend Mode: Overlay
  • Dither: Unchecked
  • Opacity: 46%
  • Reverse: Unchecked
  • Style: Linear
  • Align with Layer: Checked
  • Angle: 90º
  • Scale: 89%

Click on the Gradient Bar and make a gradient with these settings:

  • First Stop Color: #000000
  • First Stop Position: 0%
  • Second Stop Color: #FFFB9C
  • Second Stop Position: 100%
Gradient Overlay settings

Step 17

Add a Pattern Overlay with these settings:

  • Blend Mode: Normal
  • Opacity: 100%
  • Pattern: Choose the Grass Pattern that you installed at the beginning of the tutorial.
  • Scale: 25%
  • Link with Layer: Checked
Pattern Overlay settings

Step 18

Add a Drop Shadow with these settings:

  • Blend Mode: Multiply
  • Color: #000000
  • Opacity: 31%
  • Use Global Light: Unchecked
  • Angle: 23º
  • Distance: 12 px
  • Spread: 0%
  • Size: 1 px
  • Contour: Linear
  • Anti-Aliased: Unchecked
  • Noise: 0%
  • Layer Knocks Out Drop Shadow: Checked

After that, click OK.

Drop Shadow settings

Step 19

Rename the layer Grass 1 to Grass Text. After that, click on the Stop Playing/Recording icon in the Actions panel.

Finishing the action

And the result is:

Final Result image

Congratulations, You’re Now Done!

In this tutorial, you learned how to create a grass action in Adobe Photoshop.

We started out by creating our brushes, then we created the text, and while recording an action, we added a border to it using the brushes and a Path, then finally a Layer Style to make it look like grass.

Things to Remember Before Playing the Action:

  • Make sure that you have installed the Pattern.
  • Make sure that the Brush Opacity and Flow are set to 100%.
  • Make sure that you are playing the action with the text layer selected.

To play it, you need to select the action Grass Text and click Play on the Actions panel. I hope you have enjoyed this tutorial, and feel free to leave your comments below. This action we just created is part of Grass Generator

promo image
Grass Generator

Basic Shapes & Path… Never the Twain Shall Meet?

Post pobrano z: Basic Shapes & Path… Never the Twain Shall Meet?

There are some values available in CSS that allow shapes to be drawn. For example, there is a circle() function that is a valid value for a couple of CSS properties. „Drawn” might not be the right word, though. It’s not like in SVG where you can create a <circle> element and it will literally draw a circle.

These shapes in CSS are for other things. Namely: clip-path, which is for making clipping masks, and shape-outside, for flowing text around shapes.

There are some other CSS properties that use SVG-like shapes for doing what they do. For example, offset-path is part of animating elements along vector paths, using the path() function. Paths are awesome. They are the ultimate drawing element, as they can draw anything, and all the other shapes are essentially syntactic sugar for paths.

What are the basic shapes?

There are four basic shapes:

  • polygon()
  • circle()
  • ellipse()
  • inset()

What are paths?

Paths come from SVG. They have a special syntax that allows them to draw anything.

<path d="M 25,100 C 25,150 75,150 75,100 S 100,25 150,75" />
path("M 25,100 C 25,150 75,150 75,100 S 100,25 150,75");

This is where things get kinda weird

  • The clip-path and shape-outside properties can take all the „basic shapes” like circle() and polygon(), but not path().
  • The offset-path properties can take path(), but not the „basic shapes”.
  • You can control the d attribute of a <path> through CSS also, but not the attributes of many other SVG elements.

I’m not really sure why any of this is, and I’m sure things will change in time, but it’s good to know about.

Let’s elaborate.

clip-path allows Basic Shapes (but not path())

Say you wanted to clip square avatars into polygons, for a fun design. You can! The image is might be an HTML element like:

<img src="avatar.jpg" alt="User Avatar" class="avatar">
.avatar {
  clip-path: polygon(0% 5%, 100% 0%, 100% 85%, 65% 80%, 75% 100%, 40% 80%, 0% 75%);
}

See the Pen Clipped Avatars by Chris Coyier (@chriscoyier) on CodePen.

But let’s say you want to clip the avatar like this:

Well, you can’t. Not directly in CSS anyway. Those curves require a path, and clip-path don’t do path. Fortunatly, clip-path does take a url(), which will accept the ID of a <clipPath> element.

See the Pen Clipped Avatars by Chris Coyier (@chriscoyier) on CodePen.

offset-path allows path (but not Basic Shapes)

Say we want to move an object along the outside of that speech bubble shape we just used. The offset-path property is just for that.

<div class="move-me"></div>
.move-me {
  offset-path: path("M100.5,39.47C100.5,58.3,83.36,74,60.58,77.64l16.85,19.9L33.94,76.25C14.47,70.92.5,56.47.5,39.47c0-21.52,22.39-39,50-39S100.5,17.95,100.5,39.47Z");
  animation: move 3s linear infinite;
}
@keyframes move {
  100% { motion-offset: 100%;}
}

See the Pen offset-path on path by Chris Coyier (@chriscoyier) on CodePen.

But what if you want to move the element in a circle? The basic shape version of a circle has a super easy syntax, like circle(50% at 50% 50%); But unfortunately, the basic shapes aren’t supported. The spec allows for them, but they don’t work. It kinda makes sense, because… how would you define which direction to travel?

You can still animate in a circle, because the all-powerful path can draw a circle, like:

.move-me {
  /* a circle */
  offset-path: path("M100,50a50,50,0,1,1-50-50A50,50,0,0,1,100,50Z");
  animation: move 3s linear infinite;
}
@keyframes move {
  100% { motion-offset: 100%;}
}

And those commands dictate a direction naturally. There are also other ways to animate in a circle.

shape-outside allows Basic Shapes (but not path())

Say you wanted to wrap some text around an egg shape, because I dunno, you were setting some text of Alice talking to Humpty Dumpty. The egg shape is a good excuse to use the ellipse() Basic Shape.

<div class="page-wrap">
  <div class="egg"></div>
  <p>"I don't know what you mean by 'glory,'" Alice said.</p>
  <p>Humpty Dumpty smiled contemptuously. "Of course you don't—till I tell you. I meant 'there's a nice knock-down argument for you!'"</p>

 ...
.egg {
  float: left;
  shape-outside: ellipse(120px 160px at 50% 50%);
  width: 280px;
  height: 320px;
}

We’d probably set an identical clip-path (to actually make the egg shape) and colorize it:

See the Pen Shape Outside Egg by Chris Coyier (@chriscoyier) on CodePen.

But what if you wanted to make some text wrap around a curved shape, like shown here in Illustrator:

Text Wrap in Adobe Illustrator

Unfortunately, shape-outside doesn’t take path(), so you can’t. But you kinda can. It does take url(), in which you can use to link to an image (doesn’t even have to be SVG, but SVG makes good sense). The image can have a nice curvy path, like we’re shooting for:

See the Pen Wrap Text Around Curve by Chris Coyier (@chriscoyier) on CodePen.

The url() can even be a data URL. Also note that any element using shape-outside must be floated, a limitation that might be resolved with CSS Exclusions.

<path> takes path()

Here’s one that starts out making logical sense. Say you have a path:

<svg>
 <path d=" ... " />
</svg>

You can change the shape of that path through CSS, say through a hover:

svg:hover path {
  d: path(" ... ");
}

See the Pen Change path on hover by Chris Coyier (@chriscoyier) on CodePen.

You can even transition the shape, if it happens to be path data with the same amount of points.

It does get a bit confusing though. Say you have a <polygon> instead.

<svg>
 <polygon points=" ... " />
</svg>

How do you update it with CSS?

polygon {
  /* Nope */
  points: " ... ";

  /* Nope */
  points: points(" ... ");

  /* Nope */
  points: polygon(" ... ");
}

There isn’t a way, that I know of. Which seems weird as polygon is otherwise supported all over the place. I imagine part of problem is that the polygon() function is different from the points attribute. The polygon() function takes percentages and numbers with units in CSS, whereas the points attribute takes unitless numbers (like everything in SVG). They are different beasts, and that overlap is awkward.

It’s also not that SVG shapes that overlap with Basic Shapes can’t be altered. All of <circle>’s attributes, for example, can be altered with CSS:

svg:hover circle {
  cx: 40;
  cy: 40;
  r: 40;
}

See the Pen Altering Circle Attributes by Chris Coyier (@chriscoyier) on CodePen.

Long story short: there is usually a way to get done what you want to get done, but it’s confusing what is/isn’t supported where.


Basic Shapes & Path… Never the Twain Shall Meet? is a post from CSS-Tricks

How to Create a Vintage Doily Frame With Flowers in Adobe Illustrator

Post pobrano z: How to Create a Vintage Doily Frame With Flowers in Adobe Illustrator

Final product image
What You’ll Be Creating

If you’re into retro flower illustrations, this tutorial will definitely
catch your attention.

Today we’ll create a vintage frame by using basic
shapes, the Warp Tool, and a Scatter Brush. You will learn how to create pansies and the laced doily. In the end, you’ll get a
very romantic illustration!

Have you ever had a chance to visit GraphicRiver? I love their collection of pansies—they are adorable.

1. How to Create the Pansy Flower

Step 1

After creating a New Document 850 x 850 px Width and Height, we will start by drawing the petals for our pansy.

First, we’ll draw an ellipse and then stretch it out as if you were stretching out a piece of pizza dough. Use
the Ellipse Tool (L) to make an ellipse. On the Tools panel (Window
> Tools
), double-click on the Warp Tool (Shift-R)

In the new
dialogue window, enter the options presented below. The Width and Height
on the Global Brush Dimensions can be different from the ones I used. It
depends on the petal size for the one you’re making. Then, click OK

Once
you’ve entered the necessary options, grab the Warp Tool (Shift-R) and
pull the mouse in different directions, as shown by the arrows in the
image below.

the Warp Tool options window
stretching the ellipse and creating the petal

Step 2

Add another darker ellipse on top of the shape you’ve created. Change the
options for the Warp Tool: double-click on the Warp Tool (Shift-R and
Enter
), and in the section for Global Brush Dimension, decrease the Width
and Height values. Then, hit OK. Now, by using the Warp Tool (Shift-R),
stretch this darker ellipse to create the shadow on the petal.

creating the shadow on the petal

Step 3

Let’s continue. Create a violet ellipse and stretch it out again with
the Warp Tool (Shift-R). Don’t worry—it may look weird now, but once we
put everything together, it’ll be cute. Just you wait!

finishinf creating the petal

Step 4

Select all details of the petal and group them together
(right-click > Group). Make two more copies of the petal (Control-C,
Control-V
) and arrange them as shown below.

creating 2nd and 3rd petals

Step 5

To create the fourth petal, make a copy of the first one, and then slightly
expand its size and rotate it to the right. Change the colors of this
petal as shown in the image below. 


The fifth petal peeps shyly from behind, so we’ll place it behind and slightly tilted to the left. This one will have the darkest color.

creating 4th and 5th petals

Step 6

In the middle of the flower, create two yellow circles (Ellipse Tool
(L)
) and stretch them with the Warp Tool (Shift-R) to make the pistil
and stamens for our pansy. Keep up the good work!

creating pistil and stamens

2. How to Create the Leaf

Step 1

This process will be very similar to the way we created the petals.
We’ll start with the Ellipse Tool (L) and draw two ellipses, and then
stretch out both ellipses in different directions by using the Warp Tool
(Shift-R)

When transforming the smaller, darker ellipse, change the
Width and Height in the Warp Tool options (double-click on the Warp Tool and
set the necessary values). Using the changed Warp Options (Shift-R),
warp the smaller ellipse to create a leaf-like shape.

creating the leaf

Step 2

In this step, we will add the veins of the leaf.

Using the Pencil Tool (N), draw a bunch of veins throughout the leaf.
Remember to remove the fill color and choose a dark green stroke color.
Before drawing, be sure to check the Round Cap button on the Stroke
panel. 


When you are done with the lines, expand them. Select
one vein and press Select > Same > Fill color. This will select
all the lines you just outlined. Now go to Object > Expand and hit
OK
. 


Keeping all veins selected, unite them by pressing the Unite button
on the Pathfinder panel (Window > Pathfinder). Still keeping them
selected, make a small touch with the Warp Tool (Shift-R). The veins
will now look more realistic.

creating the veins of the leaf

Step 3

Make another copy of this leaf. You can make a mirror reflection of the
existing one. While keeping the leaf selected, right-click your mouse
and select Transform > Reflect

Once you get a dialogue box, select
Axis Vertical, Angle 90 degrees, and press Copy. Make this copy slightly
smaller. If you want more changes, you can stretch the new one with the
Warp Tool (Shift-R) (optional).

creating another leaf

3. How to Create the Background

Step 1

Let’s make a light cream square for our background. Using the Rectangle
Tool (M)
, click on the artboard and create a square 850 x 850 px with no
stroke and the fill color presented below.

creating the background

Step 2

Draw a circle with the Ellipse Tool (L) while holding the Shift button.
Place this circle in the middle of the square. To do this, open the Align
panel (Window > Align). Set the alignment to Artboard (open the
fly-out menu and go to Show Options if you don’t see the Align To
section shown here), make sure that your shapes are selected, and click
the Horizontal Align Center and Vertical Align Center buttons. In the
end, your circle should be in the middle of the square.

Using the same method, align the square.

creting the background 2

Step 3

In this step, we’ll create a Scatter brush that we can use to make our
doily. Delete the fill color and set the stroke color of your choice.

Using
the Ellipse Tool (L), hold down the Shift key to make one circle with
relatively large stroke weight and no fill. On top of this circle, add a
smaller one with a thinner stroke weight.

To make a copy of the
smaller circle, select it, and then while holding the Shift and Alt keys,
drag it down. Select these two small circles and group them:
right-click > Group

While keeping them selected, press the Rotate
Tool (R)
and the Enter key. In the pop-up window, enter 45 degrees and hit Copy. Press
Control-D and you’ll get a copy of these circles rotated in 45-degree increments. 

Continue pressing Control-D until you get the whole flower
made from small circles and one large circle in the middle. Expand this
image: select all circles and go to Object > Expand.

creating the Scatter brush

Step 4

After expanding the image, the stroke color will automatically change to
the fill color. Change this fill color to white and drag the entire set
of circles to the Brushes panel. Select the Scatter Brush and enter the options for Scatter Brush presented below.

dragging the Scatter brush to the Brushes panel
New Brush options window
Scatter Brush Options window

Step 5

Now we will use this brush to design our doily. Select the white circle
in the middle of the artboard which you created before, and hit the
newly created brush. Tadaa—you just made a doily! You can also change
the stroke Weight on the Stroke panel if you’d like to adjust the size
of the side lace ornaments.

creating the doily lace

4. Place All the Elements Together

Step 1

Now return to your pansy. Make two more copies of it and arrange them together; feel free to change the size.

placing flowers on the background

Step 2

Let’s not forget our leaves! Make as many copies of the leaves as you want
and place them behind the flowers, but over the background. Congratulations!
You’re done!

placing leaves on the background

Awesome Work, You’re Done!

A round of applause for a job well done! I hope you enjoyed learning
some of the processes and shortcuts during the creation of this image in
the Adobe Illustrator. As always, feel free to share your project and
ask questions in the comments section below. Happy designing!

final image

21 Designs Forged By Metal

Post pobrano z: 21 Designs Forged By Metal

Using metal or similar materials for a graphic design project can really produce a stunning end result. I’ve compiled a collection of 21 designs forged by metal; ranging from bionic arms, to metal hearts, to iron typography, to a river of flowing metal.

BUT FIRST, here’s 10 mind blowing facts about metal:

  1. The word ‘metal’ derives from the Greek word ‘metallon,’ which means to mine, excavate or extract from the ground.
  2. 75% of all the elements on the periodic table are metals.
  3. At room temperature, all of the metals are solids except for mercury, which is a liquid.
  4. The most common metal found in the Earth’s crust is aluminum.
  5. Even though aluminum is abundant in the crust, the most abundant element in the entire Earth is iron, which makes up a large part of the Earth’s core.
  6. Alkali metals, such as lithium, sodium, potassium, and rubidium, are so reactive they will ignite and even explode if placed in water.
  7. Noble metals, such as silver, gold, and platinum, resist oxidation and corrosion in moist air.
  8. Metals are elastic or tend to bend rather than break.
  9. Gold was discovered in 6000 BC.
  10. Copper even before that, being discovered in 9000 BC.

[source:chemistry.about]

Enjoy!

Credit to respective artists.


credit:Aleksandr Kuskov

credit:Pavel Zertsikel

credit:Yuriy Romanyk

credit:Sasha Vinogradova

credit:Aleksandr Kuskov

credit:Orlando Arocena

credit:R4dn Studio™

credit:Mohamed Reda

credit:David Brodeur

credit:Creativedash Design Studio

credit:Daniel Shubin

credit:Daniel Shubin

credit:Mohamed El Nagdy

credit:Pamela Campagna

credit:Manuel Creignou

credit:Mansoor Gull

credit:Mohamed Adel

credit:Vladislav Ociacia

credit:Mansoor Gull

credit:Mansoor Gull

credit:Mansoor Gull


Conclusion

I hope that this collection has served as inspiration for your next metal design project! Thanks for stopping by!


Design deals for the week

Post pobrano z: Design deals for the week
first image of the post
Every week, we’ll give you an overview of the best deals for designers, make sure you don’t miss any by subscribing to our deals feed. You can also follow the recently launched website Type Deals if you are looking for free fonts or font deals. 4 Contemporary Font Families from Typesketchbook Make some room in your family because this […]

20 Elegant Wedding Program Templates

Post pobrano z: 20 Elegant Wedding Program Templates

An effective wedding program shows the schedule of your ceremony while adhering to the overall design of your theme. And with premium wedding program templates, you can achieve professional results right at home! Check out this collection of 20 elegant wedding programs to make your special day even better!

20 Stunning Wedding Program Templates

Your wedding day shouldn’t be a time of worry. Take the hassle out of wedding planning with premium-level designs.

Achieve the same high-quality results you would get from any professional by using a pre-made template. Enjoy this collection
of 20 amazing assets curated from GraphicRiver and Envato Elements.

Use these designs to set the pace of your wedding, or enlist the help of a design professional by contacting the good folks at Envato Studio for custom wedding programs.

Rustic Wedding Program

Rustic designs give you that great charm of simplistic elements while elevating your prints with elegance. And in this package, you’ll get access to a lovely rustic design you can print easily at home! Download today to enjoy this high-quality design inspired by the creator’s very own wedding! 

Rustic Wedding Program

Rose Wedding Invitation Set

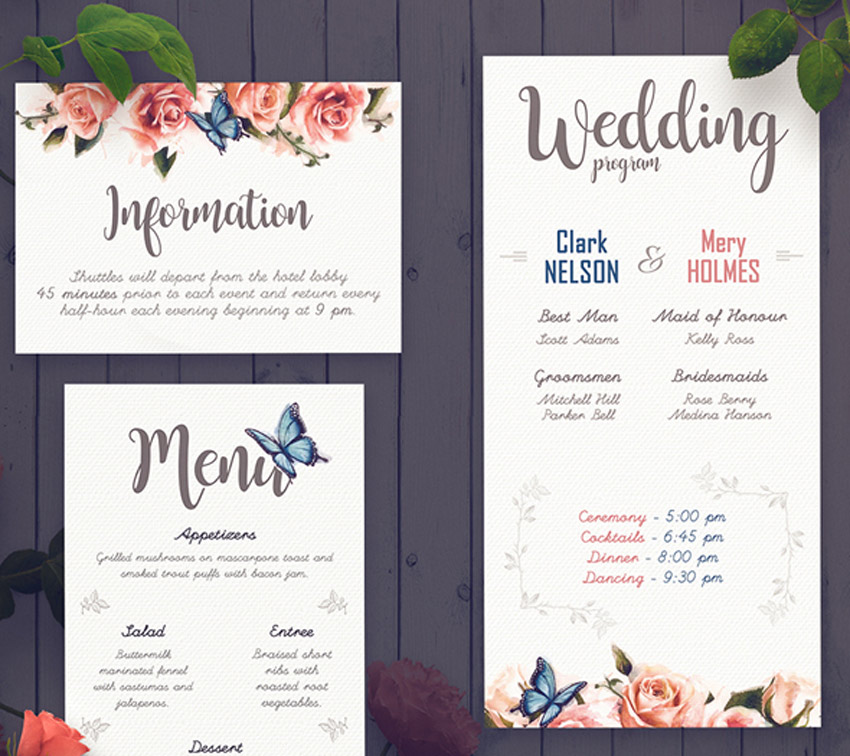
Floral prints always work well with any wedding. And this gorgeous package features five Photoshop files with a unique rose-inspired design. Enjoy access to a charming information card, wedding program, and simplistic menu for a stunning flower-themed wedding.

Rose Wedding Invitation Set

Wedding Invitation Package

Incorporate a sleek, minimalist look into your wedding program design. This package features three fully layered Photoshop files with free fonts already included. Download this set today to get access to a unique design for your special day!

Wedding Invitation Package

Black & White Wedding Invitation Pack

Running short on time? Wedding invitation packs are a great way to get premium level designs with all the resources you need. Easily edit and customize this set, for instance, featuring a charming black and white design and seven unique Photoshop files.

Black  White Wedding Invitation Pack

Burlap and Lace Wedding Invitation Suite Template

Spring and summer are the ideal seasons for any wedding. But beautiful weather can also bring uncomfortable heat. So download this fun package and let your wedding program double as a unique fan, bringing a refreshing breeze to all your wedding guests.

Burlap and Lace Wedding Invitation Suite Template

Wedding Invitation Package – Vintage Old Style

Does your wedding have a vintage theme? Then we’re sure you’ll love this massive wedding invitation pack. Inspired by an old vintage style, this package includes 16 Photoshop files with all the designs you need to celebrate your special day.

Wedding Invitation Package - Vintage Old Style

Confetti Wedding Pack

Bold colors make any wedding stand out! And you can achieve that clean, elegant look with this fun confetti wedding pack. This package features eight total files that are print ready and easily editable. Change any feature you’d like easily with this one-of-a-kind package.

Confetti Wedding Pack

Elegant Wedding Invitation Set

Enjoy the delicate and sublime colors of this elegant wedding invitation set. Included in this remarkable package are several Photoshop files available in both light and dark versions for further customization. Get access to a clean ceremony program, invitation cards, and so much more!

Elegant Wedding Invitation Set

Vintage Glam Wedding Package

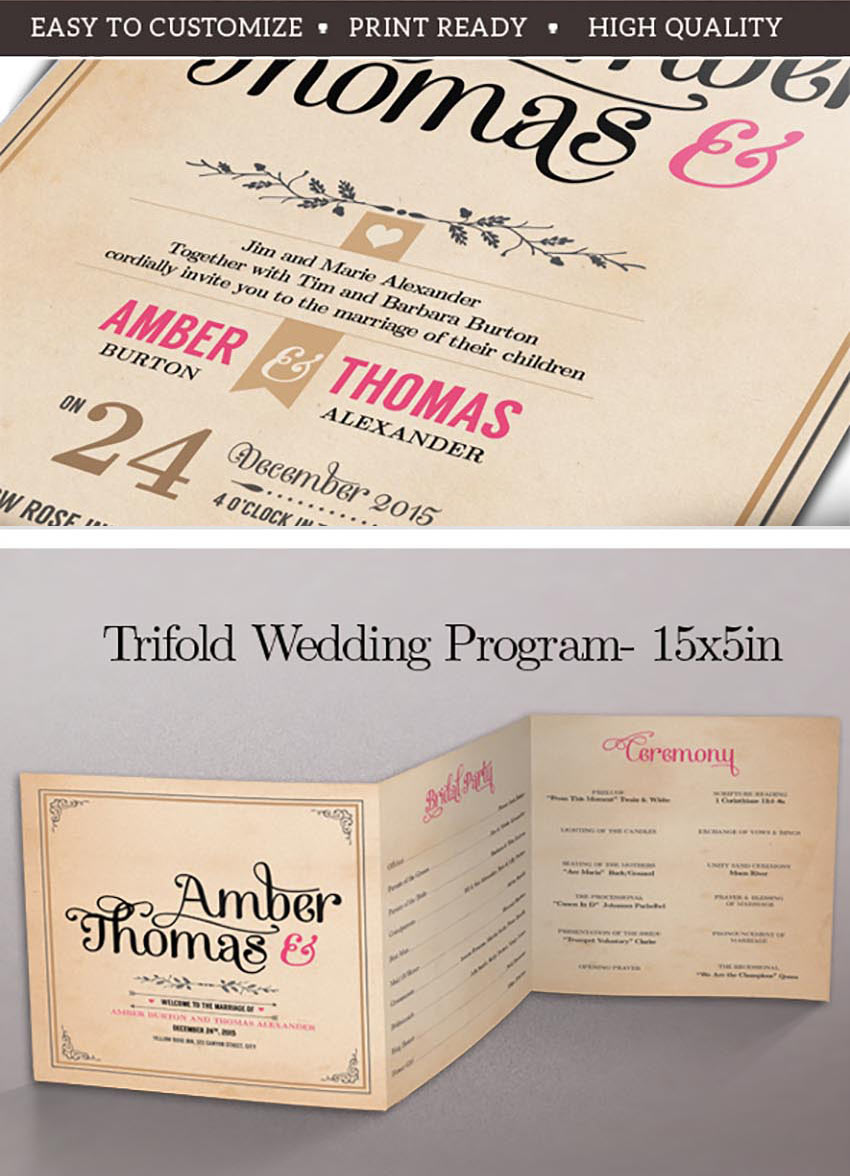
Show off the glamorous style of your wedding with this vintage inspired design. Included in this package are nine different print files with an awesome tri-fold wedding program design that will set your wedding apart from the rest. Download this package today to get access to print-ready, high-quality files.

Vintage Glam Wedding Package

Rustic Floral Wedding Program

Do you love the look of traditional watercolor paintings? Then incorporate that gorgeous fluid look into your wedding designs with this inspiring package. Included in this package are 12 unique items perfectly set up for your invites, wedding program, and more. Download today to also enjoy the free fonts included with this package.

Rustic Floral Wedding Program

Wedding Invitation Stationery – Rose Garden

There are so many aspects to wedding stationery that you can easily forget. So download this complete package featuring over 10 different print files with several color options to choose from. Enjoy this lovely rose-inspired design for an elegant wedding ceremony.

Wedding Invitation Stationery - Rose Garden

Chalkboard Wedding Invitations

Get the elegant look of chalkboard design with this charming invitation package. This package features nine total files with three different color schemes to choose from. Enjoy a bi-folded wedding program that is sure to impress guests by downloading these files today!

Chalkboard Wedding Invitations

Flora – Wedding Pack

Combine your love of traditional paintings and flowers into your special day with this elegant package. This package features 13 files you can easily edit with Adobe InDesign. Some of the designs include basic invitations, a wedding program, and so much more to personalize your wedding with style.

Flora - Wedding Pack

In the Air – Wedding Pack

Walk down the aisle with class with this awesome wedding package. Included in this package are five amazing Photoshop files with a charming heart-themed design. Enjoy an elegant ceremony program, table numbers, and so much more in this awesome set!

In the Air - Wedding Pack

Wedding Package – Watercolor Flower

Customize your theme to fit the spring season with this elegant rose-inspired wedding template package. This package features 11 print-ready files that are easy to customize. Enjoy the colorful watercolor details and elegant free fonts included in this design.

Wedding Invitation Package - Watercolor Flower

Flowery Wedding Program

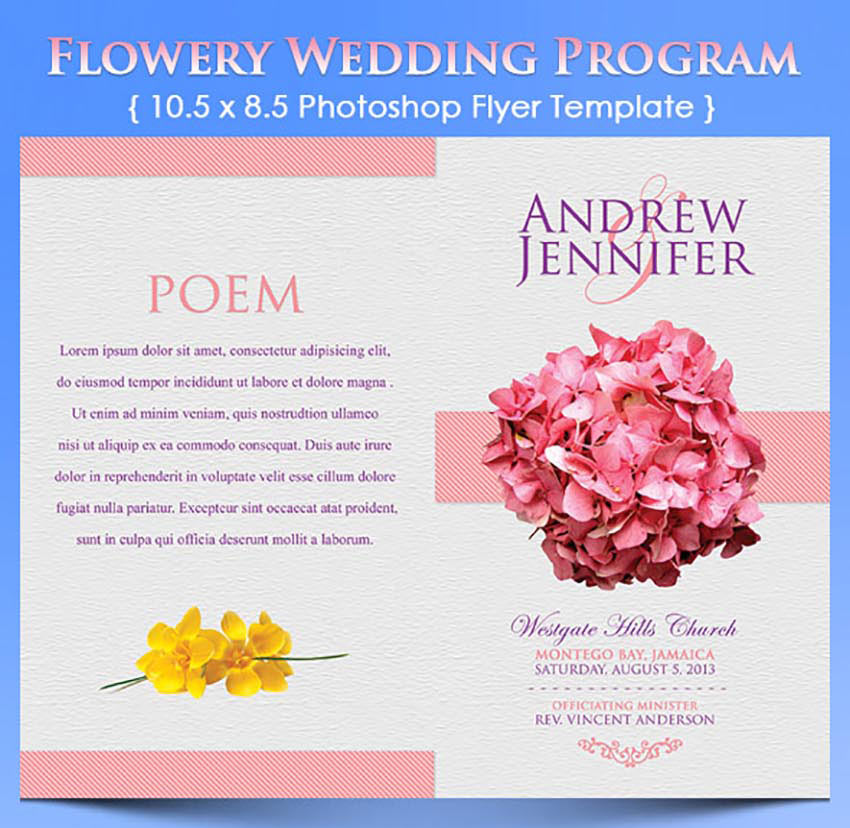
Get ready to throw the bouquet with this flower-inspired wedding program. This template features a 10.5 x 8.5 Photoshop document with plenty of room for your ceremony details. Easy to edit with completely organized layers, this program is simply ready to go!

Flowery Wedding Program

Wedding Template Pack

Template packs provide high-quality designs for all of your wedding needs. And with this package, you’ll get access to four unique items designed for your special day. Created with a lovely lace design, these prints are perfect for incorporating into your wedding ceremony.

Wedding Template Pack

Wedding Program Template Bundle

Need an all-in-one wedding bundle that packs a punch? Then check out this awesome wedding program package. Included in this bundle are four different print files, a clean reception program, and additional designs to make your wedding unique. With four color presets also included, the design possibilities are truly limitless with this amazing package.

Wedding Program Template Bundle

Floral Rustic Wedding Invitation Set

Flowers and vintage design are a perfect match for any wedding theme. And in this package, you can enjoy access to ten unique files including a wonderful ceremony program. Each file is fully layered and editable, and even the banners and flowers can be changed to your specific preferences!

Floral Rustic Wedding Invitation Set

Wedding Invitation & Program Pack

There’s nothing more elegant than a clean black and white design. And this wedding package features 14 awesome Photoshop files with all the necessary prints you need. Included in this set are an invitation card, ceremony program, and so much more!

Wedding Invitation  Program Pack

Conclusion

This list is jam-packed with amazing wedding program resources for the
avid designer familiar with Adobe Photoshop and Illustrator. But with hundreds of wedding program templates
available at your fingertips, chances are we’ve missed a few to add to your
personal collection. If you need a more hands-on approach, however,
consider enlisting the help of a design professional from Envato Studio.

Be sure to browse GraphicRiver and Envato Elements for more resources and let us know your favorites in the comments below!

Snickers Live at Super Bowl with Adam Driver

Post pobrano z: Snickers Live at Super Bowl with Adam Driver

Mars connected the “Not yourself when you’re hungry” theme with Snickers Live, a Super Bowl advertising campaign featuring actor Adam Driver. Adam known for his role as Star Wars villain Kylo Ren, was the lead character in a Western commercial that went wrong. “Hunger was the root cause of an off-the-field fumble during the Snickers live Super Bowl LI commercial last night as Adam Driver missed his mark to begin the spot. The mishap demonstrated once more the effects of what can happen when you’re hungry and off your game.”

Snickers Live Adam Driver commercial

The Snickers Live Buildup

The Snickers Live Super Bowl ad was heralded with a series of curtain openers, with more and more detail on the Showdown, pointing to Adam Driver, other less known actors, stunt horses. Short casting videos feature a horse and a dead cowboy.

The Snickers Live campaign had a 36 hour live stream countdown, with appearances from Adam Driver, Betty White, Tyler Oakley, Kandee Johnson and many more.

The Snickers Live Apology

Allison Miazga-Bedrick, Snickers brand director said, “Just as life often imitates art, hunger got the best of Adam Driver. We recognize the Snickers Live Super Bowl Commercial did not go as planned, so we’re issuing a buy one get one free offer for regular Snickers or Snickers Crisper bars at retailers nationwide to help fans prevent hunger mishaps of their own.”

Adam provided his own apology…

Snickers Live Credits

The Snickers Live campaign was developed at BBDO New York by chief creative officers David Lubars and Greg Hahn, executive creative directors Gianfranco Arena, Peter Kain, creative directors Scott Mahoney and Dan Oliva, head of TV production Devon Clark, music producer Melissa Chester, planner Sean Stogner, director of integrated production David Rolfe, executive director Amy Wertheimer, planning director Annemarie Norris, group account director Susannah Keller, account manager Blake Maraoui, account directors Lisa Piliguian and Tani Corbacho, account executive Dance Fields, and president Kirsten Flanik.

Filming was shot by director Jim Jenkins via O Positive with director of photography Mauro Fiore, executive producers Ralph Laucella, Marc Grill, and producer Blake Morrison.

Editor was Geoff Hounsell at Arcade Edit with executive producer Crissy DeSimone, head of production Kirsten Thon-Webb, senior producer Adam Becht, assistant editors Laura Sanford and Tessa Malsam, managing partner Damian Stevens.

Post production was produced at Squad 47 by executive producer Steve Greenstein.

Sound was designed at One Thousand Birds by producers Andres Velasquez + Andrew Tracy. Music was produced at Emoto by composer John Adair, producers Paul Schultz and Laura Dopp.

Snickers Live at Super Bowl with Adam Driver

Post pobrano z: Snickers Live at Super Bowl with Adam Driver

Mars connected the “Not yourself when you’re hungry” theme with Snickers Live, a Super Bowl advertising campaign featuring actor Adam Driver. Adam known for his role as Star Wars villain Kylo Ren, was the lead character in a Western commercial that went wrong. “Hunger was the root cause of an off-the-field fumble during the Snickers live Super Bowl LI commercial last night as Adam Driver missed his mark to begin the spot. The mishap demonstrated once more the effects of what can happen when you’re hungry and off your game.”

Snickers Live Adam Driver commercial

The Snickers Live Buildup

The Snickers Live Super Bowl ad was heralded with a series of curtain openers, with more and more detail on the Showdown, pointing to Adam Driver, other less known actors, stunt horses. Short casting videos feature a horse and a dead cowboy.

The Snickers Live campaign had a 36 hour live stream countdown, with appearances from Adam Driver, Betty White, Tyler Oakley, Kandee Johnson and many more.

The Snickers Live Apology

Allison Miazga-Bedrick, Snickers brand director said, “Just as life often imitates art, hunger got the best of Adam Driver. We recognize the Snickers Live Super Bowl Commercial did not go as planned, so we’re issuing a buy one get one free offer for regular Snickers or Snickers Crisper bars at retailers nationwide to help fans prevent hunger mishaps of their own.”

Adam provided his own apology…

Snickers Live Credits

The Snickers Live campaign was developed at BBDO New York by chief creative officers David Lubars and Greg Hahn, executive creative directors Gianfranco Arena, Peter Kain, creative directors Scott Mahoney and Dan Oliva, head of TV production Devon Clark, music producer Melissa Chester, planner Sean Stogner, director of integrated production David Rolfe, executive director Amy Wertheimer, planning director Annemarie Norris, group account director Susannah Keller, account manager Blake Maraoui, account directors Lisa Piliguian and Tani Corbacho, account executive Dance Fields, and president Kirsten Flanik.

Filming was shot by director Jim Jenkins via O Positive with director of photography Mauro Fiore, executive producers Ralph Laucella, Marc Grill, and producer Blake Morrison.

Editor was Geoff Hounsell at Arcade Edit with executive producer Crissy DeSimone, head of production Kirsten Thon-Webb, senior producer Adam Becht, assistant editors Laura Sanford and Tessa Malsam, managing partner Damian Stevens.

Post production was produced at Squad 47 by executive producer Steve Greenstein.

Sound was designed at One Thousand Birds by producers Andres Velasquez + Andrew Tracy. Music was produced at Emoto by composer John Adair, producers Paul Schultz and Laura Dopp.

Agregator najlepszych postów o designie, webdesignie, cssie i Internecie