I recently found a solution to dynamically update the color of any product image. So with just one <img> of a product, we can colorize it in different ways to show different color options. We don’t even need any fancy SVG or CSS to get it done!
We’ll be using an image editor (e.g. Photoshop or Sketch) and the image transformation service imgix. (This isn’t a sponsored post and there is no affiliation here — it’s just a technique I want to share.)
I work with a travel software company called CarTrawler on the engineering team, and I recently undertook a project a revamp our car images library that we use to display car rental search results. I wanted to take this opportunity to introduce dynamically colored cars.
We may sometimes load up to 200 different cars at the same time, so speed and performance are key requirements. We also have five different products throughout unique code bases, so avoiding over-engineering is vital to success.
I wanted to be able to dynamically change the color of each of these cars without needing additional front-end changes to the code.
Step 1: The Base Layer
I’m using car photos here, but this technique could be applied to any product. First we need a base layer. This is the default layer we would display without any color and it should look good on its own.
Step 2: The Paint Layer
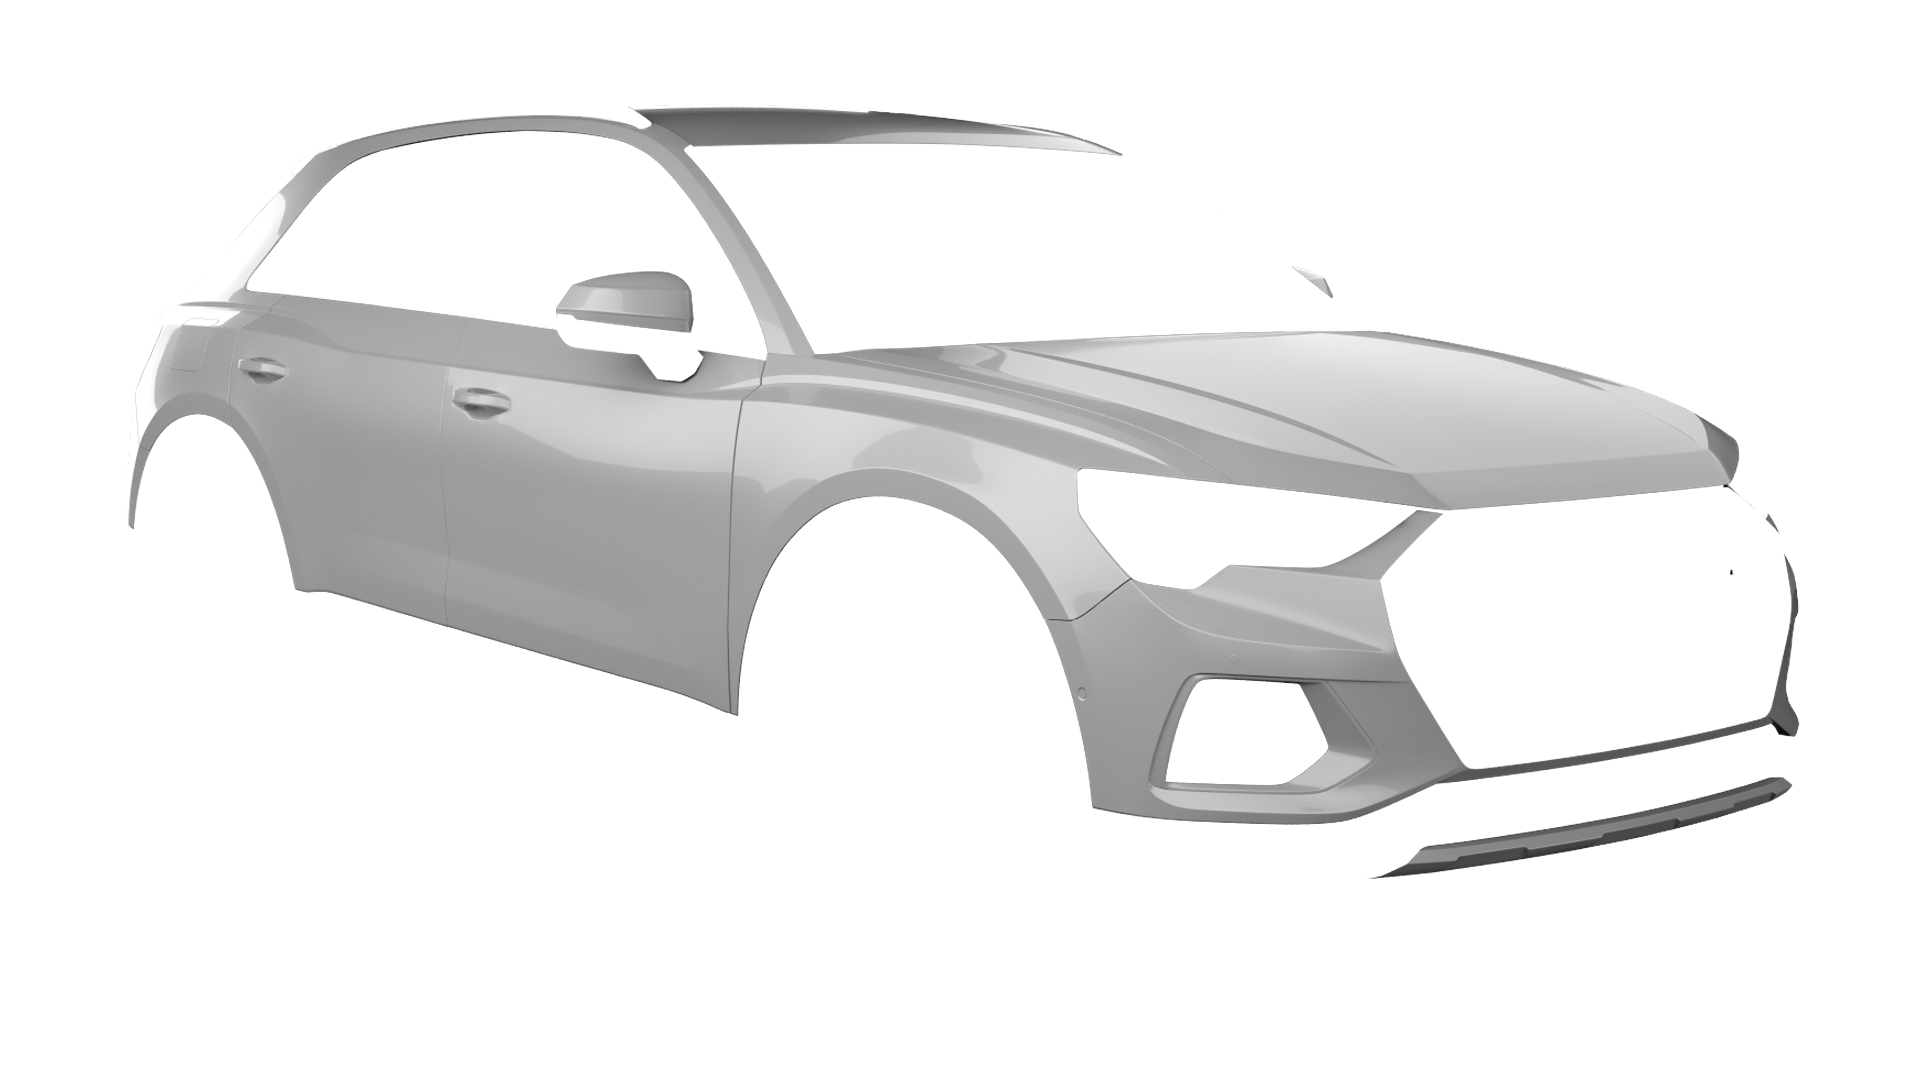
Next we create a paint layer that is the same dimensions as the base layer, but only contains the areas where the colors should change dynamically.
A light color is key for the paint layer. Using white or a light shade of gray gives us a great advantage because we are ultimately “blending” this image with color. Anything darker or in a different hue would make it hard to mix this base color with other colors.
Step 3: Using the imgix API
This is where things get interesting. I’m going to leverage multiple parameters from the imgixAPI. Let’s apply a black to our paint layer.
If you noticed the URL of the image above, you might be wondering: What the heck are all those parameters? The imgix API docs have a lot of great information, so no need to go into greater detail here. But I will explain the parameters I used.
w. The width I want the image to be
bri. Adjusts the brightness level
con. Adjusts the amount of contrast
monochrome. The dynamic hex color
Because we are going to stack our layers via imgix we will need to encode our paint layer. That means replacing some of the characters in the URL with encoded values — like we’d do if we were using inline SVG as a background image in CSS.
That’s it! There are certainly other ways to accomplish the same thing, but this seems so straightforward that it’s worth sharing. There was no need code a bunch of additional functionality. No complex libraries to manage or wrangle. All we need is a couple of images that an online tool will stack and blend for us. Seems like a pretty reasonable solution!
I say „was” because it’s deprecated. It may still „work” (like everybody’s favorite <marquee> in some browsers), but it could stop working anytime, they say. The whole purpose of it was to display text in a monospace font, like the way Teletype machines used to.
Dave used it jokingly the other day.
Per recent events: As you can see by this official transcript, Dave Rupert LLC has done nothing wrong…
<tt> Client: This is the greatest call I've ever been on. Dave Rupert LLC: Definitely and we didn't even do anything illegal or quid pro quo'y. </tt>
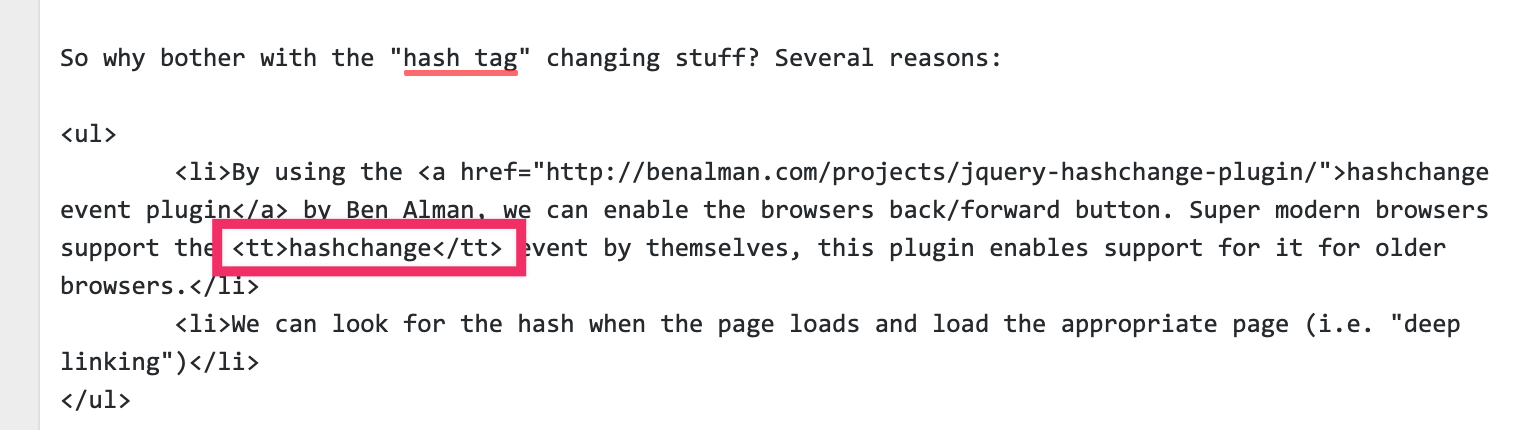
Right here on CSS-Tricks. See, in my early days, I learned about that element and how its job is to set text as monospace. I thought, oh! like code! and then for years that’s how I marked up code on this site. I had never heard of the <code> element! When I did, I switched over to that. But I still haven’t updated every single article from <tt> to <code>. It lingers in articles like this:
I bring this up just because it’s a funny little example of not knowing what you don’t know. It’s worth having a little sympathy for people early in their journey and just doing things that get the job done because that’s all they know. We’ve all been there… and are always still there to some degree.
To bring awareness to the organ donation cause, Capim.ag developed an unprecedented campaign in Stock Car, the biggest Mortorsporst category in Brazil. We transplanted the bonnets of two rival teams: Prati-Donaduzii and Shell V-Power.
To bring awareness to the organ donation cause, Capim.ag developed an unprecedented campaign in Stock Car, the biggest Mortorsporst category in Brazil. We transplanted the bonnets of two rival teams: Prati-Donaduzii and Shell V-Power.
To bring awareness to the organ donation cause, Capim.ag developed an unprecedented campaign in Stock Car, the biggest Mortorsporst category in Brazil. We transplanted the bonnets of two rival teams: Prati-Donaduzii and Shell V-Power.
Always
wanted to create a brush, but never knew exactly how to do it?
Well,
if you love unique creative brushes and you want to learn how to make
a brush in Illustrator, then this tutorial is perfect for you. It will take you through the entire process of drawing, saving, and
applying the brush.
You
will learn how to create a pickle brush and how to save it correctly
as a new pattern brush by following a few tips and tricks that you will
be able to apply to other Adobe Illustrator brushes as well.
And
if you are a fan of the Rick and Morty animated series, we will give
this text effect a unique twist by creating a Pickle Rick Pattern
Brush as well. Both brushes are easy to use, and this fun text effect
will be ready in no time. If you are excited about this, then let’s
start!
Expand
your brushes library by going to GraphicRiver, where you’ll find a great
selection of brushes in various styles, shapes, and themes. Also,
check out the text effects section, where you’ll find plenty of
inspiration and resources for your projects.
1. How
to Open a New Document
Launch Illustrator and
go to File
> New to
open a blank document. Type a name for your file, set the
dimensions, and then select Pixels as Units and RGB as Color
Mode.
Next,
go to Edit
> Preferences > General and
set the Keyboard
Increment to 1
px and,
while there, go to Units to
make sure they are set as in the following image. I usually work with
these settings, and they will help you throughout the drawing process.
2. How
to Create the Basic Pickle Shape
Step
1
Grab
the Rectangle Tool (M), click on your artboard, and enter 44 x 132 px
as the dimensions of the rectangle. Color it with green.
Keep
this shape selected and go to the Transform panel. Enter 20 px in all
four Corner Radius fields in order to create the rounded corners.
Step
2
Copy and Paste
in Front (Control-F)
the rounded rectangle to get a copy of it (the gray shape), and then
move it 7 px to the right by pressing the Right Arrow key on your
keyboard seven times.
Copy and Paste
in Front (Control-F)
the green rounded rectangle again to make another copy. Keep this
copy selected along with the gray copy and press Minus Front on the Pathfinder panel. Color the shape obtained with a darker shade of
green, and this will be the shadow on the left side of the pickle.
Step
3
Now,
we will add a few bumps to create that recognizable pickle
look. Use the Pen Tool (P) to draw a few semicircle shapes on the
edges of the pickle. Make them of different sizes to ensure a more
realistic result for the final Illustrator brush (1).
Now,
select only the pink shapes on the upper right side along with the
green rounded rectangle and press Unite in the Pathfinder panel. I
will name the resulting shape “pickle body” (2).
After
that, select the blue shapes on the left side along with the shadow,
and press Unite on the Pathfinder panel again. I will name the newly
obtained shape “pickle shadow” (3).
Step
4
Select
the two shapes obtained in the previous step and then Copy and Paste
in Front (Control-F)
to make copies of them. Press Unite in the Pathfinder panel to merge
them, and you will get a new pickle shape. Give it a 1 pt
Stroke using black and select the Round Join option in the Stroke panel. I will name this shape “pickle outline”.
Step
5
Next,
take the Pen Tool (P) and draw two curved paths at the top of the
pickle as creases. Give them a 1 pt Stroke using black and Width
Profile 4 in the Stroke panel.
Do
the same thing at the bottom of the pickle and apply the same
settings.
Step
6
Now,
focus on one of the bumps and use the Pen Tool (P) to draw two short
paths as shown in the close-up. Give them a 1 pt Stroke using black
and Width Profile 4 in the Stroke panel.
Do
the same thing for the other bumps in order to add details, but not
necessarily for all of them.
3. How
to Define the Sections of the Pattern Illustrator Brush
Step
1
Creating a brush in Illustrator, especially pattern brushes, can be
easy if you take into consideration the three sections that define a pattern brush: the start, the side, and the end. If we do this ahead of time
and not just at the end, we make the process of saving the brush pain-free once we get to that stage, and we’re less likely to make
mistakes.
Take
the Rectangle Tool (M) and draw an 80 x 136 px rectangle which will
cover the pickle entirely. Leave a little more space on the left side
of the pickle for the shadow. With the rectangle still selected, go
to Object > Path > Split Into Grid and choose 3 Rows. Hit OK
and the rectangle will be divided into three equal parts.
Step
2
Notice
how the separation between the start and the side of the pattern brush
goes through one of the bumps. We don’t want this. It is better to
cut the brush sections between the bumps where the pickle is
straight.
Use
the Direct Selection Tool (A) to select only the points indicated and
move them upwards, right above the bump (2).
Select
the other points indicated and move them a little downwards in order
to make the start and end sections of the brush of about the
same size (3). The side of the brush (the middle part) will be
longer.
4. How
to Add Details to the Pickle Pattern Brush
Step
1
Use
the Pen Tool (P) to draw a path on the right
side of the pickle, as shown in the image below. Give it a 3 pt Stroke using a lighter shade of
green and Width Profile 6 in the Stroke panel. This will create a
main highlight on the pickle.
Step
2
Let’s
add more details. Use the Pen Tool (P) or the Pencil Tool (N) to draw
four random ellipses on the pickle. It’s better to not place them on
the blue lines but only inside the start, side, and end sections of
the brush. Fill them with a slightly darker shade of green and apply a 1 pt black Stroke using Width Profile 6 in the Stroke panel. Two
of the ellipses have no fill color, just the black stroke applied.
Step
3
Still
using the Pen Tool (P) or the Pencil Tool (N), draw a bunch of random
curved paths on the pickle. Give them a 0.5 pt and 0.75 ptStroke using black and Width Profile 1 in the Stroke panel.
Step
4
Zoom
in on one of the paths that you drew in the previous step and draw
a shorter path inside it. Give it a 0.5 pt Stroke using a lighter
shade of green and Width Profile 1 in the Stroke panel.
Repeat
the same thing for two or three more paths in order to add little
highlights on the pickle.
Step
5
Next,
take the Ellipse Tool (L) and draw a few small ellipses of different
sizes in the middle of the pickle. Color them with a darker green
(1).
Draw
more ellipses on the right side of the pickle and color them with a
lighter green (2). You can see the result in the image below (3).
5. How
to Create the Shadow of the Pickle Pattern Brush
Step
1
Select
the “pickle outline” shape and then Copy and Paste in Place
(Shift-Control-V) to make a copy of it. Select a black fill and
reduce the Opacity to 40%; then move it 1 px downward and 2 px to the
left using the Arrow Keys on your keyboard. Send this copy behind
everything by going to Object > Arrange > Send to Back
(Shift-Control-[) (1).
Copy and Paste in Back (Control-B) the first shadow shape to make another
copy. Move it 1 px downward and 2 px to the left using the Arrow keys
on the keyboard again. Keep the black fill color but reduce the Opacity to 25% (2).
Step
2
Copy and Paste in Back (Control-B) the second shadow shape to make a third
copy. Move it 1 px downwards and 2 px to the left; then change the
fill color to dark gray and reduce the Opacity to 15% (3).
Let’s do this one more time. Make a fourth copy of the shadow shape, and this time move it 1 px to the left. Keep the gray fill color but
reduce the Opacity to 5% (4).
Step
3
If
the shadow shapes go over the blue rectangle, use the Direct
Selection Tool (A) to select only the corner points at the bottom and
move them downwards a little. The entire pickle must be inside the
blue sections.
6. How
to Finalize the Pickle Pattern Brush
Step
1
We
are getting closer to saving the new Illustrator Pattern Brush, but we
need to prepare it first by expanding it and making some final adjustments.
Select all the stroked paths next to the outline of the pickle and go to Object > Expand Appearance in order to turn the strokes into fills
(1). Now, select the “pickle outline” and go to Object >
Expand to turn it into a black filled shape (2).
Keep
these resulting shapes selected and press Unite in the Pathfinder panel, followed by Object > Compound Path > Make (Control-8).
This will merge all the shapes into one (3).
Step
2
Now,
select the main highlight path and go to Object > Expand
Appearance. Do the same thing for all the detail paths on the pickle in
order to expand them, and we are ready to save this brush in Illustrator.
7. How
to Save the Pickle Pattern Brush
Step
1
Before
you continue, make a copy of the entire pickle and keep it for later
use.
Illustrator brushes can be tricky to save and may require a few tries until you are happy with the result, but let me show you how easy it is to save this brush.
Select
everything on your artboard and Rotate 90 degrees in the Transform
panel. Group (Control-G) all the shapes that make up the pickle, and
then make two copies behind. You should have three pickles on top
of each other and three blue rectangles.
Step
2
Select
one of the pickles along with the first rectangle and press Crop in
the Pathfinder panel. This will cut the pickle, and you will obtain
the start section of the pattern brush. Drag it into the Swatches panel to save it (1).
Next,
select a copy of the pickle along with the middle rectangle and press Crop again. This will cut the side section of the pattern brush for
us (2). You don’t need to save this one in the Swatches panel.
Select
the second copy of the pickle along with the last rectangle and press Crop again. You will obtain the end section of the pattern brush.
Drag it into the Swatches panel to save it (3).
Step
3
Select
the middle section of the pickle and drag it into the Brushes panel
to save it as a New Pattern Brush. In the Pattern Brush Options window,
this section will automatically appear under the Side Tile (1). Type
a name for the brush, and let’s change some settings.
As
the Start Tile (2), select New Pattern Swatch 1 from the drop-down
options, which is the first section saved in the Swatches panel.
As
the End Tile (3), select New Pattern Swatch 2 from the drop-down
options, which is the last section of the pickle saved in the Swatches panel.
Finally,
under Inner Corner Tile (4), select Auto-Centered. Hit OK and your new Illustrator brush is now saved and ready to use.
Step
4
Let’s
test the newly saved brush. Use the Pen Tool (P) or the Paintbrush
Tool (B) to draw any path on your artboard and give it a 1 pt Stroke
using the Pickle Pattern Brush from the Brushes panel. Fun, right?
8. How
to Create the Face of Pickle Rick
Step
1
Pickle
Rickis
the eccentric scientist Rick Sanchez from the famous animated series
Rick and Morty, who turns himself into a pickle just as he and his
family are about to attend a therapy session.
Let’s
start his face with the eyes. Use the Ellipse Tool (L) to draw two
circles of about 40 x 40 px and arrange them next to each other. Fill
them with the color indicated and also apply a 1 pt black Stroke.
While both circles stay selected, go to Effect > Distort &
Transform > Roughen and apply the settings shown in order to
distort the shapes slightly.
Step
2
Still
using the Ellipse Tool (L), draw a tiny black circle in the center of
each eye as the pupils. Now, take the Pen Tool (P) and draw a curved
path under each eye followed by the nose path. Give them a 1 pt black Stroke and select the Round Cap option in the Stroke panel.
Step
3
Continue
to draw the shape of the mouth filled with dark green. Also apply a 1
pt black Stroke and select the Align Stroke to Outside option in the Stroke panel.
For the tooth, draw a V-like path but rounded at the tip. Give it a pale
green fill color and a 1 pt black Stroke. Follow the shape of the
mouth and draw similar paths next to each other to obtain the
top teeth. Draw and apply the same appearances for the bottom teeth
as well.
Step
4
Next,
draw the shape of the tongue on the right side of the mouth. Fill it
with the color indicated and apply a 1 pt black Stroke.
Select
the shape of the mouth and then Copy and Paste in Place
(Shift-Control-V) to make a copy of it in front of everything. Set
this copy to stroke-none and fill-none. Keep this copy selected along
with the teeth and the tongue, and go to Object > Clipping Mask >
Make (Control-7).
Step
5
Use
the Pen Tool (P) to draw a curved path on each side of the mouth.
Give them a 1 pt black Stroke with the Round Cap option selected in
the Stroke panel (1).
Continue
to draw a C-like shape above the eyes. Give it a blue fill color and
a 1 pt black Stroke (2). The final thing to add is a random shape on
the upper left side filled with bright green (3).
9. How
to Create the Pickle Rick Pattern Brush
Step
1
First,
grab the copy of the pickle that I said to make earlier in the
tutorial (1) and start to remove some of the details on the top half in
order to create an empty area (2).
Now,
grab Rick’s face and go to Object > Expand Appearance followed
by Object > Expand to turn all strokes into fills. Group
(Control-G) all the shapes that make up the face and scale it down
until it fits inside the empty area you just created (3).
When
you are happy with the placement of the face, select only the indicated points of the blue rectangles with the help of the Direct Selection Tool (A) and move
them downwards, until they’re under the mouth. The entire face must be inside
the start section of the brush (4).
Step
2
Let’s
make a few adjustments, and then we are ready to save this pattern
brush next to the other Illustrator brushes.
Focus
on the shadow shape and use the Add Anchor Point Tool (+) to add
three extra points next to the mouth. Switch to the Direct Selection
Tool (A) and modify the shadow a little by moving these points,
following the left side of the mouth (1).
Next,
select the main highlight shape and change the fill color to a darker
shade of green; then make it a little thinner by dragging the
bounding box with the Selection Tool (V).
While
this shape stays selected, grab the Knife and cut the shape following
the right side of the mouth; then move the end points up to the black
outline of the mouth as shown in the close-up (2).
10. How
to Save the Pickle Rick Pattern Brush
Step
1
The process of saving this brush is the same as before. Select
the new pickle along with the blue rectangles and Rotate them 90
degrees in the Transform panel. Make two copies of the pickle behind
so that we have a pickle for each rectangle (1).
Now,
select the pickle along with the first rectangle and press Crop in
the Pathfinder panel. You will obtain the start section of the
pattern brush, which is the head of Pickle Rick. Drag it into the Swatches panel to save it (2).
Follow
the same technique and cut the side section (3) and the end section
of the brush as you did for the first pattern brush earlier in the
tutorial (4).
Step
2
Select
and drag the middle section of the pickle into the Brushes panel to
save it as a New Pattern Brush. Type a name for the brush and notice
that the middle section already appears under the Side Tile (1).
As
the Start Tile (2), select New Pattern Swatch 3 from the drop-down
options, which is the head of Pickle Rick saved earlier.
As
the End Tile (3) select New Pattern Swatch 4, and as the Inner
Corner Tile (4) select Auto-Centered from the options available. Hit OK to save the Pickle Rick Pattern Brush in the Brushes panel.
Step
3
Let’s
test it by applying it to a random path drawn with the Pen Tool (P)
or the Paintbrush Tool (B). Looks great!
11. How
to Create the Pickle Text Effect
Step
1
Now that we have the two Illustrator brushes already saved, here is how to make the text effect quickly and easily.
Use
the Pen Tool (P) or the Pencil Tool (N) to draw paths as letters and compose the
word “PICKLE”. Stroke all of them with the Pickle Pattern Brush
and keep the Stroke Weight at 1 pt. Drag two guide lines above and
under the text effect to make sure the letters are about the same
height, making small adjustments if needed.
Step
2
Replace
one (or more) of the strokes with the Pickle Rick Pattern Brush to make this
text effect more fun.
Step
3
As
an extra touch, you can add a small stem to the pickle letters. Draw
the shape of the stem and color it with the same green as the pickle’s body. Also apply a 2 pt black Stroke using Width Profile 6 in order to maintain the
same outlined style.
The
stem could be a part of the pattern brush if you include it in the Start Tile before saving it, but then all the stroked paths will have
the same stem, and this is not the look we want for the text effect.
In this case, the two stems are just extra additions.
Congratulations!
You’re Done
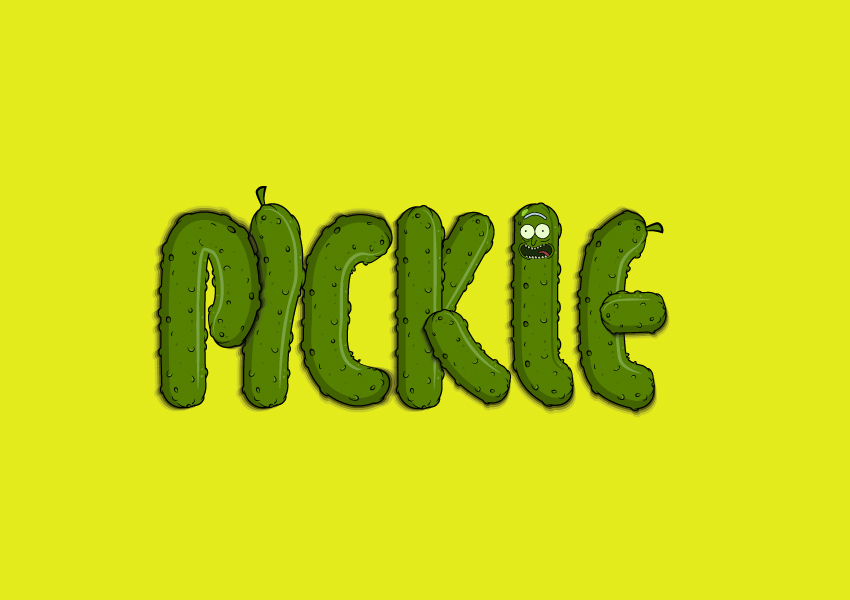
Here
is the final image of the pickle text effect with the face of Pickle Rick as a creative addition. I hope this tutorial was
fun for you and that you learned some new things today. Now you have the
knowledge to make other creative Adobe Illustrator brushes and use
them in your projects.
Don’t
forget to share your recreation of this pickle text effect with us.
We would love to see it.
Expand
Your Text-Effect Designing Skills!
Keep
drawing and learning with these recommended tutorials:
Learn to create a custom paint brush, a scatter brush and a texture brush in Adobe Illustrator, using nothing more than some basic geometric shapes and effects.
Have you always liked to draw using texture or grunge brushes? Why not create your own vector Illustrator brush? What if I’ll tell you that it’s easy and…
Always wondered how to make a watercolor brush in Illustrator, but never knew exactly where to start? Today you’ll learn how easy it is to create a vector…
For all of you sports fans out there, this tutorial will teach you how to create a baseball-inspired text effect. You’ll start by preparing the text, then…
Always
wanted to create a brush, but never knew exactly how to do it?
Well,
if you love unique creative brushes and you want to learn how to make
a brush in Illustrator, then this tutorial is perfect for you. It will take you through the entire process of drawing, saving, and
applying the brush.
You
will learn how to create a pickle brush and how to save it correctly
as a new pattern brush by following a few tips and tricks that you will
be able to apply to other Adobe Illustrator brushes as well.
And
if you are a fan of the Rick and Morty animated series, we will give
this text effect a unique twist by creating a Pickle Rick Pattern
Brush as well. Both brushes are easy to use, and this fun text effect
will be ready in no time. If you are excited about this, then let’s
start!
Expand
your brushes library by going to GraphicRiver, where you’ll find a great
selection of brushes in various styles, shapes, and themes. Also,
check out the text effects section, where you’ll find plenty of
inspiration and resources for your projects.
1. How
to Open a New Document
Launch Illustrator and
go to File
> New to
open a blank document. Type a name for your file, set the
dimensions, and then select Pixels as Units and RGB as Color
Mode.
Next,
go to Edit
> Preferences > General and
set the Keyboard
Increment to 1
px and,
while there, go to Units to
make sure they are set as in the following image. I usually work with
these settings, and they will help you throughout the drawing process.
2. How
to Create the Basic Pickle Shape
Step
1
Grab
the Rectangle Tool (M), click on your artboard, and enter 44 x 132 px
as the dimensions of the rectangle. Color it with green.
Keep
this shape selected and go to the Transform panel. Enter 20 px in all
four Corner Radius fields in order to create the rounded corners.
Step
2
Copy and Paste
in Front (Control-F)
the rounded rectangle to get a copy of it (the gray shape), and then
move it 7 px to the right by pressing the Right Arrow key on your
keyboard seven times.
Copy and Paste
in Front (Control-F)
the green rounded rectangle again to make another copy. Keep this
copy selected along with the gray copy and press Minus Front on the Pathfinder panel. Color the shape obtained with a darker shade of
green, and this will be the shadow on the left side of the pickle.
Step
3
Now,
we will add a few bumps to create that recognizable pickle
look. Use the Pen Tool (P) to draw a few semicircle shapes on the
edges of the pickle. Make them of different sizes to ensure a more
realistic result for the final Illustrator brush (1).
Now,
select only the pink shapes on the upper right side along with the
green rounded rectangle and press Unite in the Pathfinder panel. I
will name the resulting shape “pickle body” (2).
After
that, select the blue shapes on the left side along with the shadow,
and press Unite on the Pathfinder panel again. I will name the newly
obtained shape “pickle shadow” (3).
Step
4
Select
the two shapes obtained in the previous step and then Copy and Paste
in Front (Control-F)
to make copies of them. Press Unite in the Pathfinder panel to merge
them, and you will get a new pickle shape. Give it a 1 pt
Stroke using black and select the Round Join option in the Stroke panel. I will name this shape “pickle outline”.
Step
5
Next,
take the Pen Tool (P) and draw two curved paths at the top of the
pickle as creases. Give them a 1 pt Stroke using black and Width
Profile 4 in the Stroke panel.
Do
the same thing at the bottom of the pickle and apply the same
settings.
Step
6
Now,
focus on one of the bumps and use the Pen Tool (P) to draw two short
paths as shown in the close-up. Give them a 1 pt Stroke using black
and Width Profile 4 in the Stroke panel.
Do
the same thing for the other bumps in order to add details, but not
necessarily for all of them.
3. How
to Define the Sections of the Pattern Illustrator Brush
Step
1
Creating a brush in Illustrator, especially pattern brushes, can be
easy if you take into consideration the three sections that define a pattern brush: the start, the side, and the end. If we do this ahead of time
and not just at the end, we make the process of saving the brush pain-free once we get to that stage, and we’re less likely to make
mistakes.
Take
the Rectangle Tool (M) and draw an 80 x 136 px rectangle which will
cover the pickle entirely. Leave a little more space on the left side
of the pickle for the shadow. With the rectangle still selected, go
to Object > Path > Split Into Grid and choose 3 Rows. Hit OK
and the rectangle will be divided into three equal parts.
Step
2
Notice
how the separation between the start and the side of the pattern brush
goes through one of the bumps. We don’t want this. It is better to
cut the brush sections between the bumps where the pickle is
straight.
Use
the Direct Selection Tool (A) to select only the points indicated and
move them upwards, right above the bump (2).
Select
the other points indicated and move them a little downwards in order
to make the start and end sections of the brush of about the
same size (3). The side of the brush (the middle part) will be
longer.
4. How
to Add Details to the Pickle Pattern Brush
Step
1
Use
the Pen Tool (P) to draw a path on the right
side of the pickle, as shown in the image below. Give it a 3 pt Stroke using a lighter shade of
green and Width Profile 6 in the Stroke panel. This will create a
main highlight on the pickle.
Step
2
Let’s
add more details. Use the Pen Tool (P) or the Pencil Tool (N) to draw
four random ellipses on the pickle. It’s better to not place them on
the blue lines but only inside the start, side, and end sections of
the brush. Fill them with a slightly darker shade of green and apply a 1 pt black Stroke using Width Profile 6 in the Stroke panel. Two
of the ellipses have no fill color, just the black stroke applied.
Step
3
Still
using the Pen Tool (P) or the Pencil Tool (N), draw a bunch of random
curved paths on the pickle. Give them a 0.5 pt and 0.75 ptStroke using black and Width Profile 1 in the Stroke panel.
Step
4
Zoom
in on one of the paths that you drew in the previous step and draw
a shorter path inside it. Give it a 0.5 pt Stroke using a lighter
shade of green and Width Profile 1 in the Stroke panel.
Repeat
the same thing for two or three more paths in order to add little
highlights on the pickle.
Step
5
Next,
take the Ellipse Tool (L) and draw a few small ellipses of different
sizes in the middle of the pickle. Color them with a darker green
(1).
Draw
more ellipses on the right side of the pickle and color them with a
lighter green (2). You can see the result in the image below (3).
5. How
to Create the Shadow of the Pickle Pattern Brush
Step
1
Select
the “pickle outline” shape and then Copy and Paste in Place
(Shift-Control-V) to make a copy of it. Select a black fill and
reduce the Opacity to 40%; then move it 1 px downward and 2 px to the
left using the Arrow Keys on your keyboard. Send this copy behind
everything by going to Object > Arrange > Send to Back
(Shift-Control-[) (1).
Copy and Paste in Back (Control-B) the first shadow shape to make another
copy. Move it 1 px downward and 2 px to the left using the Arrow keys
on the keyboard again. Keep the black fill color but reduce the Opacity to 25% (2).
Step
2
Copy and Paste in Back (Control-B) the second shadow shape to make a third
copy. Move it 1 px downwards and 2 px to the left; then change the
fill color to dark gray and reduce the Opacity to 15% (3).
Let’s do this one more time. Make a fourth copy of the shadow shape, and this time move it 1 px to the left. Keep the gray fill color but
reduce the Opacity to 5% (4).
Step
3
If
the shadow shapes go over the blue rectangle, use the Direct
Selection Tool (A) to select only the corner points at the bottom and
move them downwards a little. The entire pickle must be inside the
blue sections.
6. How
to Finalize the Pickle Pattern Brush
Step
1
We
are getting closer to saving the new Illustrator Pattern Brush, but we
need to prepare it first by expanding it and making some final adjustments.
Select all the stroked paths next to the outline of the pickle and go to Object > Expand Appearance in order to turn the strokes into fills
(1). Now, select the “pickle outline” and go to Object >
Expand to turn it into a black filled shape (2).
Keep
these resulting shapes selected and press Unite in the Pathfinder panel, followed by Object > Compound Path > Make (Control-8).
This will merge all the shapes into one (3).
Step
2
Now,
select the main highlight path and go to Object > Expand
Appearance. Do the same thing for all the detail paths on the pickle in
order to expand them, and we are ready to save this brush in Illustrator.
7. How
to Save the Pickle Pattern Brush
Step
1
Before
you continue, make a copy of the entire pickle and keep it for later
use.
Illustrator brushes can be tricky to save and may require a few tries until you are happy with the result, but let me show you how easy it is to save this brush.
Select
everything on your artboard and Rotate 90 degrees in the Transform
panel. Group (Control-G) all the shapes that make up the pickle, and
then make two copies behind. You should have three pickles on top
of each other and three blue rectangles.
Step
2
Select
one of the pickles along with the first rectangle and press Crop in
the Pathfinder panel. This will cut the pickle, and you will obtain
the start section of the pattern brush. Drag it into the Swatches panel to save it (1).
Next,
select a copy of the pickle along with the middle rectangle and press Crop again. This will cut the side section of the pattern brush for
us (2). You don’t need to save this one in the Swatches panel.
Select
the second copy of the pickle along with the last rectangle and press Crop again. You will obtain the end section of the pattern brush.
Drag it into the Swatches panel to save it (3).
Step
3
Select
the middle section of the pickle and drag it into the Brushes panel
to save it as a New Pattern Brush. In the Pattern Brush Options window,
this section will automatically appear under the Side Tile (1). Type
a name for the brush, and let’s change some settings.
As
the Start Tile (2), select New Pattern Swatch 1 from the drop-down
options, which is the first section saved in the Swatches panel.
As
the End Tile (3), select New Pattern Swatch 2 from the drop-down
options, which is the last section of the pickle saved in the Swatches panel.
Finally,
under Inner Corner Tile (4), select Auto-Centered. Hit OK and your new Illustrator brush is now saved and ready to use.
Step
4
Let’s
test the newly saved brush. Use the Pen Tool (P) or the Paintbrush
Tool (B) to draw any path on your artboard and give it a 1 pt Stroke
using the Pickle Pattern Brush from the Brushes panel. Fun, right?
8. How
to Create the Face of Pickle Rick
Step
1
Pickle
Rickis
the eccentric scientist Rick Sanchez from the famous animated series
Rick and Morty, who turns himself into a pickle just as he and his
family are about to attend a therapy session.
Let’s
start his face with the eyes. Use the Ellipse Tool (L) to draw two
circles of about 40 x 40 px and arrange them next to each other. Fill
them with the color indicated and also apply a 1 pt black Stroke.
While both circles stay selected, go to Effect > Distort &
Transform > Roughen and apply the settings shown in order to
distort the shapes slightly.
Step
2
Still
using the Ellipse Tool (L), draw a tiny black circle in the center of
each eye as the pupils. Now, take the Pen Tool (P) and draw a curved
path under each eye followed by the nose path. Give them a 1 pt black Stroke and select the Round Cap option in the Stroke panel.
Step
3
Continue
to draw the shape of the mouth filled with dark green. Also apply a 1
pt black Stroke and select the Align Stroke to Outside option in the Stroke panel.
For the tooth, draw a V-like path but rounded at the tip. Give it a pale
green fill color and a 1 pt black Stroke. Follow the shape of the
mouth and draw similar paths next to each other to obtain the
top teeth. Draw and apply the same appearances for the bottom teeth
as well.
Step
4
Next,
draw the shape of the tongue on the right side of the mouth. Fill it
with the color indicated and apply a 1 pt black Stroke.
Select
the shape of the mouth and then Copy and Paste in Place
(Shift-Control-V) to make a copy of it in front of everything. Set
this copy to stroke-none and fill-none. Keep this copy selected along
with the teeth and the tongue, and go to Object > Clipping Mask >
Make (Control-7).
Step
5
Use
the Pen Tool (P) to draw a curved path on each side of the mouth.
Give them a 1 pt black Stroke with the Round Cap option selected in
the Stroke panel (1).
Continue
to draw a C-like shape above the eyes. Give it a blue fill color and
a 1 pt black Stroke (2). The final thing to add is a random shape on
the upper left side filled with bright green (3).
9. How
to Create the Pickle Rick Pattern Brush
Step
1
First,
grab the copy of the pickle that I said to make earlier in the
tutorial (1) and start to remove some of the details on the top half in
order to create an empty area (2).
Now,
grab Rick’s face and go to Object > Expand Appearance followed
by Object > Expand to turn all strokes into fills. Group
(Control-G) all the shapes that make up the face and scale it down
until it fits inside the empty area you just created (3).
When
you are happy with the placement of the face, select only the indicated points of the blue rectangles with the help of the Direct Selection Tool (A) and move
them downwards, until they’re under the mouth. The entire face must be inside
the start section of the brush (4).
Step
2
Let’s
make a few adjustments, and then we are ready to save this pattern
brush next to the other Illustrator brushes.
Focus
on the shadow shape and use the Add Anchor Point Tool (+) to add
three extra points next to the mouth. Switch to the Direct Selection
Tool (A) and modify the shadow a little by moving these points,
following the left side of the mouth (1).
Next,
select the main highlight shape and change the fill color to a darker
shade of green; then make it a little thinner by dragging the
bounding box with the Selection Tool (V).
While
this shape stays selected, grab the Knife and cut the shape following
the right side of the mouth; then move the end points up to the black
outline of the mouth as shown in the close-up (2).
10. How
to Save the Pickle Rick Pattern Brush
Step
1
The process of saving this brush is the same as before. Select
the new pickle along with the blue rectangles and Rotate them 90
degrees in the Transform panel. Make two copies of the pickle behind
so that we have a pickle for each rectangle (1).
Now,
select the pickle along with the first rectangle and press Crop in
the Pathfinder panel. You will obtain the start section of the
pattern brush, which is the head of Pickle Rick. Drag it into the Swatches panel to save it (2).
Follow
the same technique and cut the side section (3) and the end section
of the brush as you did for the first pattern brush earlier in the
tutorial (4).
Step
2
Select
and drag the middle section of the pickle into the Brushes panel to
save it as a New Pattern Brush. Type a name for the brush and notice
that the middle section already appears under the Side Tile (1).
As
the Start Tile (2), select New Pattern Swatch 3 from the drop-down
options, which is the head of Pickle Rick saved earlier.
As
the End Tile (3) select New Pattern Swatch 4, and as the Inner
Corner Tile (4) select Auto-Centered from the options available. Hit OK to save the Pickle Rick Pattern Brush in the Brushes panel.
Step
3
Let’s
test it by applying it to a random path drawn with the Pen Tool (P)
or the Paintbrush Tool (B). Looks great!
11. How
to Create the Pickle Text Effect
Step
1
Now that we have the two Illustrator brushes already saved, here is how to make the text effect quickly and easily.
Use
the Pen Tool (P) or the Pencil Tool (N) to draw paths as letters and compose the
word “PICKLE”. Stroke all of them with the Pickle Pattern Brush
and keep the Stroke Weight at 1 pt. Drag two guide lines above and
under the text effect to make sure the letters are about the same
height, making small adjustments if needed.
Step
2
Replace
one (or more) of the strokes with the Pickle Rick Pattern Brush to make this
text effect more fun.
Step
3
As
an extra touch, you can add a small stem to the pickle letters. Draw
the shape of the stem and color it with the same green as the pickle’s body. Also apply a 2 pt black Stroke using Width Profile 6 in order to maintain the
same outlined style.
The
stem could be a part of the pattern brush if you include it in the Start Tile before saving it, but then all the stroked paths will have
the same stem, and this is not the look we want for the text effect.
In this case, the two stems are just extra additions.
Congratulations!
You’re Done
Here
is the final image of the pickle text effect with the face of Pickle Rick as a creative addition. I hope this tutorial was
fun for you and that you learned some new things today. Now you have the
knowledge to make other creative Adobe Illustrator brushes and use
them in your projects.
Don’t
forget to share your recreation of this pickle text effect with us.
We would love to see it.
Expand
Your Text-Effect Designing Skills!
Keep
drawing and learning with these recommended tutorials:
Learn to create a custom paint brush, a scatter brush and a texture brush in Adobe Illustrator, using nothing more than some basic geometric shapes and effects.
Have you always liked to draw using texture or grunge brushes? Why not create your own vector Illustrator brush? What if I’ll tell you that it’s easy and…
Always wondered how to make a watercolor brush in Illustrator, but never knew exactly where to start? Today you’ll learn how easy it is to create a vector…
For all of you sports fans out there, this tutorial will teach you how to create a baseball-inspired text effect. You’ll start by preparing the text, then…
Always
wanted to create a brush, but never knew exactly how to do it?
Well,
if you love unique creative brushes and you want to learn how to make
a brush in Illustrator, then this tutorial is perfect for you. It will take you through the entire process of drawing, saving, and
applying the brush.
You
will learn how to create a pickle brush and how to save it correctly
as a new pattern brush by following a few tips and tricks that you will
be able to apply to other Adobe Illustrator brushes as well.
And
if you are a fan of the Rick and Morty animated series, we will give
this text effect a unique twist by creating a Pickle Rick Pattern
Brush as well. Both brushes are easy to use, and this fun text effect
will be ready in no time. If you are excited about this, then let’s
start!
Expand
your brushes library by going to GraphicRiver, where you’ll find a great
selection of brushes in various styles, shapes, and themes. Also,
check out the text effects section, where you’ll find plenty of
inspiration and resources for your projects.
1. How
to Open a New Document
Launch Illustrator and
go to File
> New to
open a blank document. Type a name for your file, set the
dimensions, and then select Pixels as Units and RGB as Color
Mode.
Next,
go to Edit
> Preferences > General and
set the Keyboard
Increment to 1
px and,
while there, go to Units to
make sure they are set as in the following image. I usually work with
these settings, and they will help you throughout the drawing process.
2. How
to Create the Basic Pickle Shape
Step
1
Grab
the Rectangle Tool (M), click on your artboard, and enter 44 x 132 px
as the dimensions of the rectangle. Color it with green.
Keep
this shape selected and go to the Transform panel. Enter 20 px in all
four Corner Radius fields in order to create the rounded corners.
Step
2
Copy and Paste
in Front (Control-F)
the rounded rectangle to get a copy of it (the gray shape), and then
move it 7 px to the right by pressing the Right Arrow key on your
keyboard seven times.
Copy and Paste
in Front (Control-F)
the green rounded rectangle again to make another copy. Keep this
copy selected along with the gray copy and press Minus Front on the Pathfinder panel. Color the shape obtained with a darker shade of
green, and this will be the shadow on the left side of the pickle.
Step
3
Now,
we will add a few bumps to create that recognizable pickle
look. Use the Pen Tool (P) to draw a few semicircle shapes on the
edges of the pickle. Make them of different sizes to ensure a more
realistic result for the final Illustrator brush (1).
Now,
select only the pink shapes on the upper right side along with the
green rounded rectangle and press Unite in the Pathfinder panel. I
will name the resulting shape “pickle body” (2).
After
that, select the blue shapes on the left side along with the shadow,
and press Unite on the Pathfinder panel again. I will name the newly
obtained shape “pickle shadow” (3).
Step
4
Select
the two shapes obtained in the previous step and then Copy and Paste
in Front (Control-F)
to make copies of them. Press Unite in the Pathfinder panel to merge
them, and you will get a new pickle shape. Give it a 1 pt
Stroke using black and select the Round Join option in the Stroke panel. I will name this shape “pickle outline”.
Step
5
Next,
take the Pen Tool (P) and draw two curved paths at the top of the
pickle as creases. Give them a 1 pt Stroke using black and Width
Profile 4 in the Stroke panel.
Do
the same thing at the bottom of the pickle and apply the same
settings.
Step
6
Now,
focus on one of the bumps and use the Pen Tool (P) to draw two short
paths as shown in the close-up. Give them a 1 pt Stroke using black
and Width Profile 4 in the Stroke panel.
Do
the same thing for the other bumps in order to add details, but not
necessarily for all of them.
3. How
to Define the Sections of the Pattern Illustrator Brush
Step
1
Creating a brush in Illustrator, especially pattern brushes, can be
easy if you take into consideration the three sections that define a pattern brush: the start, the side, and the end. If we do this ahead of time
and not just at the end, we make the process of saving the brush pain-free once we get to that stage, and we’re less likely to make
mistakes.
Take
the Rectangle Tool (M) and draw an 80 x 136 px rectangle which will
cover the pickle entirely. Leave a little more space on the left side
of the pickle for the shadow. With the rectangle still selected, go
to Object > Path > Split Into Grid and choose 3 Rows. Hit OK
and the rectangle will be divided into three equal parts.
Step
2
Notice
how the separation between the start and the side of the pattern brush
goes through one of the bumps. We don’t want this. It is better to
cut the brush sections between the bumps where the pickle is
straight.
Use
the Direct Selection Tool (A) to select only the points indicated and
move them upwards, right above the bump (2).
Select
the other points indicated and move them a little downwards in order
to make the start and end sections of the brush of about the
same size (3). The side of the brush (the middle part) will be
longer.
4. How
to Add Details to the Pickle Pattern Brush
Step
1
Use
the Pen Tool (P) to draw a path on the right
side of the pickle, as shown in the image below. Give it a 3 pt Stroke using a lighter shade of
green and Width Profile 6 in the Stroke panel. This will create a
main highlight on the pickle.
Step
2
Let’s
add more details. Use the Pen Tool (P) or the Pencil Tool (N) to draw
four random ellipses on the pickle. It’s better to not place them on
the blue lines but only inside the start, side, and end sections of
the brush. Fill them with a slightly darker shade of green and apply a 1 pt black Stroke using Width Profile 6 in the Stroke panel. Two
of the ellipses have no fill color, just the black stroke applied.
Step
3
Still
using the Pen Tool (P) or the Pencil Tool (N), draw a bunch of random
curved paths on the pickle. Give them a 0.5 pt and 0.75 ptStroke using black and Width Profile 1 in the Stroke panel.
Step
4
Zoom
in on one of the paths that you drew in the previous step and draw
a shorter path inside it. Give it a 0.5 pt Stroke using a lighter
shade of green and Width Profile 1 in the Stroke panel.
Repeat
the same thing for two or three more paths in order to add little
highlights on the pickle.
Step
5
Next,
take the Ellipse Tool (L) and draw a few small ellipses of different
sizes in the middle of the pickle. Color them with a darker green
(1).
Draw
more ellipses on the right side of the pickle and color them with a
lighter green (2). You can see the result in the image below (3).
5. How
to Create the Shadow of the Pickle Pattern Brush
Step
1
Select
the “pickle outline” shape and then Copy and Paste in Place
(Shift-Control-V) to make a copy of it. Select a black fill and
reduce the Opacity to 40%; then move it 1 px downward and 2 px to the
left using the Arrow Keys on your keyboard. Send this copy behind
everything by going to Object > Arrange > Send to Back
(Shift-Control-[) (1).
Copy and Paste in Back (Control-B) the first shadow shape to make another
copy. Move it 1 px downward and 2 px to the left using the Arrow keys
on the keyboard again. Keep the black fill color but reduce the Opacity to 25% (2).
Step
2
Copy and Paste in Back (Control-B) the second shadow shape to make a third
copy. Move it 1 px downwards and 2 px to the left; then change the
fill color to dark gray and reduce the Opacity to 15% (3).
Let’s do this one more time. Make a fourth copy of the shadow shape, and this time move it 1 px to the left. Keep the gray fill color but
reduce the Opacity to 5% (4).
Step
3
If
the shadow shapes go over the blue rectangle, use the Direct
Selection Tool (A) to select only the corner points at the bottom and
move them downwards a little. The entire pickle must be inside the
blue sections.
6. How
to Finalize the Pickle Pattern Brush
Step
1
We
are getting closer to saving the new Illustrator Pattern Brush, but we
need to prepare it first by expanding it and making some final adjustments.
Select all the stroked paths next to the outline of the pickle and go to Object > Expand Appearance in order to turn the strokes into fills
(1). Now, select the “pickle outline” and go to Object >
Expand to turn it into a black filled shape (2).
Keep
these resulting shapes selected and press Unite in the Pathfinder panel, followed by Object > Compound Path > Make (Control-8).
This will merge all the shapes into one (3).
Step
2
Now,
select the main highlight path and go to Object > Expand
Appearance. Do the same thing for all the detail paths on the pickle in
order to expand them, and we are ready to save this brush in Illustrator.
7. How
to Save the Pickle Pattern Brush
Step
1
Before
you continue, make a copy of the entire pickle and keep it for later
use.
Illustrator brushes can be tricky to save and may require a few tries until you are happy with the result, but let me show you how easy it is to save this brush.
Select
everything on your artboard and Rotate 90 degrees in the Transform
panel. Group (Control-G) all the shapes that make up the pickle, and
then make two copies behind. You should have three pickles on top
of each other and three blue rectangles.
Step
2
Select
one of the pickles along with the first rectangle and press Crop in
the Pathfinder panel. This will cut the pickle, and you will obtain
the start section of the pattern brush. Drag it into the Swatches panel to save it (1).
Next,
select a copy of the pickle along with the middle rectangle and press Crop again. This will cut the side section of the pattern brush for
us (2). You don’t need to save this one in the Swatches panel.
Select
the second copy of the pickle along with the last rectangle and press Crop again. You will obtain the end section of the pattern brush.
Drag it into the Swatches panel to save it (3).
Step
3
Select
the middle section of the pickle and drag it into the Brushes panel
to save it as a New Pattern Brush. In the Pattern Brush Options window,
this section will automatically appear under the Side Tile (1). Type
a name for the brush, and let’s change some settings.
As
the Start Tile (2), select New Pattern Swatch 1 from the drop-down
options, which is the first section saved in the Swatches panel.
As
the End Tile (3), select New Pattern Swatch 2 from the drop-down
options, which is the last section of the pickle saved in the Swatches panel.
Finally,
under Inner Corner Tile (4), select Auto-Centered. Hit OK and your new Illustrator brush is now saved and ready to use.
Step
4
Let’s
test the newly saved brush. Use the Pen Tool (P) or the Paintbrush
Tool (B) to draw any path on your artboard and give it a 1 pt Stroke
using the Pickle Pattern Brush from the Brushes panel. Fun, right?
8. How
to Create the Face of Pickle Rick
Step
1
Pickle
Rickis
the eccentric scientist Rick Sanchez from the famous animated series
Rick and Morty, who turns himself into a pickle just as he and his
family are about to attend a therapy session.
Let’s
start his face with the eyes. Use the Ellipse Tool (L) to draw two
circles of about 40 x 40 px and arrange them next to each other. Fill
them with the color indicated and also apply a 1 pt black Stroke.
While both circles stay selected, go to Effect > Distort &
Transform > Roughen and apply the settings shown in order to
distort the shapes slightly.
Step
2
Still
using the Ellipse Tool (L), draw a tiny black circle in the center of
each eye as the pupils. Now, take the Pen Tool (P) and draw a curved
path under each eye followed by the nose path. Give them a 1 pt black Stroke and select the Round Cap option in the Stroke panel.
Step
3
Continue
to draw the shape of the mouth filled with dark green. Also apply a 1
pt black Stroke and select the Align Stroke to Outside option in the Stroke panel.
For the tooth, draw a V-like path but rounded at the tip. Give it a pale
green fill color and a 1 pt black Stroke. Follow the shape of the
mouth and draw similar paths next to each other to obtain the
top teeth. Draw and apply the same appearances for the bottom teeth
as well.
Step
4
Next,
draw the shape of the tongue on the right side of the mouth. Fill it
with the color indicated and apply a 1 pt black Stroke.
Select
the shape of the mouth and then Copy and Paste in Place
(Shift-Control-V) to make a copy of it in front of everything. Set
this copy to stroke-none and fill-none. Keep this copy selected along
with the teeth and the tongue, and go to Object > Clipping Mask >
Make (Control-7).
Step
5
Use
the Pen Tool (P) to draw a curved path on each side of the mouth.
Give them a 1 pt black Stroke with the Round Cap option selected in
the Stroke panel (1).
Continue
to draw a C-like shape above the eyes. Give it a blue fill color and
a 1 pt black Stroke (2). The final thing to add is a random shape on
the upper left side filled with bright green (3).
9. How
to Create the Pickle Rick Pattern Brush
Step
1
First,
grab the copy of the pickle that I said to make earlier in the
tutorial (1) and start to remove some of the details on the top half in
order to create an empty area (2).
Now,
grab Rick’s face and go to Object > Expand Appearance followed
by Object > Expand to turn all strokes into fills. Group
(Control-G) all the shapes that make up the face and scale it down
until it fits inside the empty area you just created (3).
When
you are happy with the placement of the face, select only the indicated points of the blue rectangles with the help of the Direct Selection Tool (A) and move
them downwards, until they’re under the mouth. The entire face must be inside
the start section of the brush (4).
Step
2
Let’s
make a few adjustments, and then we are ready to save this pattern
brush next to the other Illustrator brushes.
Focus
on the shadow shape and use the Add Anchor Point Tool (+) to add
three extra points next to the mouth. Switch to the Direct Selection
Tool (A) and modify the shadow a little by moving these points,
following the left side of the mouth (1).
Next,
select the main highlight shape and change the fill color to a darker
shade of green; then make it a little thinner by dragging the
bounding box with the Selection Tool (V).
While
this shape stays selected, grab the Knife and cut the shape following
the right side of the mouth; then move the end points up to the black
outline of the mouth as shown in the close-up (2).
10. How
to Save the Pickle Rick Pattern Brush
Step
1
The process of saving this brush is the same as before. Select
the new pickle along with the blue rectangles and Rotate them 90
degrees in the Transform panel. Make two copies of the pickle behind
so that we have a pickle for each rectangle (1).
Now,
select the pickle along with the first rectangle and press Crop in
the Pathfinder panel. You will obtain the start section of the
pattern brush, which is the head of Pickle Rick. Drag it into the Swatches panel to save it (2).
Follow
the same technique and cut the side section (3) and the end section
of the brush as you did for the first pattern brush earlier in the
tutorial (4).
Step
2
Select
and drag the middle section of the pickle into the Brushes panel to
save it as a New Pattern Brush. Type a name for the brush and notice
that the middle section already appears under the Side Tile (1).
As
the Start Tile (2), select New Pattern Swatch 3 from the drop-down
options, which is the head of Pickle Rick saved earlier.
As
the End Tile (3) select New Pattern Swatch 4, and as the Inner
Corner Tile (4) select Auto-Centered from the options available. Hit OK to save the Pickle Rick Pattern Brush in the Brushes panel.
Step
3
Let’s
test it by applying it to a random path drawn with the Pen Tool (P)
or the Paintbrush Tool (B). Looks great!
11. How
to Create the Pickle Text Effect
Step
1
Now that we have the two Illustrator brushes already saved, here is how to make the text effect quickly and easily.
Use
the Pen Tool (P) or the Pencil Tool (N) to draw paths as letters and compose the
word “PICKLE”. Stroke all of them with the Pickle Pattern Brush
and keep the Stroke Weight at 1 pt. Drag two guide lines above and
under the text effect to make sure the letters are about the same
height, making small adjustments if needed.
Step
2
Replace
one (or more) of the strokes with the Pickle Rick Pattern Brush to make this
text effect more fun.
Step
3
As
an extra touch, you can add a small stem to the pickle letters. Draw
the shape of the stem and color it with the same green as the pickle’s body. Also apply a 2 pt black Stroke using Width Profile 6 in order to maintain the
same outlined style.
The
stem could be a part of the pattern brush if you include it in the Start Tile before saving it, but then all the stroked paths will have
the same stem, and this is not the look we want for the text effect.
In this case, the two stems are just extra additions.
Congratulations!
You’re Done
Here
is the final image of the pickle text effect with the face of Pickle Rick as a creative addition. I hope this tutorial was
fun for you and that you learned some new things today. Now you have the
knowledge to make other creative Adobe Illustrator brushes and use
them in your projects.
Don’t
forget to share your recreation of this pickle text effect with us.
We would love to see it.
Expand
Your Text-Effect Designing Skills!
Keep
drawing and learning with these recommended tutorials:
Learn to create a custom paint brush, a scatter brush and a texture brush in Adobe Illustrator, using nothing more than some basic geometric shapes and effects.
Have you always liked to draw using texture or grunge brushes? Why not create your own vector Illustrator brush? What if I’ll tell you that it’s easy and…
Always wondered how to make a watercolor brush in Illustrator, but never knew exactly where to start? Today you’ll learn how easy it is to create a vector…
For all of you sports fans out there, this tutorial will teach you how to create a baseball-inspired text effect. You’ll start by preparing the text, then…
Always
wanted to create a brush, but never knew exactly how to do it?
Well,
if you love unique creative brushes and you want to learn how to make
a brush in Illustrator, then this tutorial is perfect for you. It will take you through the entire process of drawing, saving, and
applying the brush.
You
will learn how to create a pickle brush and how to save it correctly
as a new pattern brush by following a few tips and tricks that you will
be able to apply to other Adobe Illustrator brushes as well.
And
if you are a fan of the Rick and Morty animated series, we will give
this text effect a unique twist by creating a Pickle Rick Pattern
Brush as well. Both brushes are easy to use, and this fun text effect
will be ready in no time. If you are excited about this, then let’s
start!
Expand
your brushes library by going to GraphicRiver, where you’ll find a great
selection of brushes in various styles, shapes, and themes. Also,
check out the text effects section, where you’ll find plenty of
inspiration and resources for your projects.
1. How
to Open a New Document
Launch Illustrator and
go to File
> New to
open a blank document. Type a name for your file, set the
dimensions, and then select Pixels as Units and RGB as Color
Mode.
Next,
go to Edit
> Preferences > General and
set the Keyboard
Increment to 1
px and,
while there, go to Units to
make sure they are set as in the following image. I usually work with
these settings, and they will help you throughout the drawing process.
2. How
to Create the Basic Pickle Shape
Step
1
Grab
the Rectangle Tool (M), click on your artboard, and enter 44 x 132 px
as the dimensions of the rectangle. Color it with green.
Keep
this shape selected and go to the Transform panel. Enter 20 px in all
four Corner Radius fields in order to create the rounded corners.
Step
2
Copy and Paste
in Front (Control-F)
the rounded rectangle to get a copy of it (the gray shape), and then
move it 7 px to the right by pressing the Right Arrow key on your
keyboard seven times.
Copy and Paste
in Front (Control-F)
the green rounded rectangle again to make another copy. Keep this
copy selected along with the gray copy and press Minus Front on the Pathfinder panel. Color the shape obtained with a darker shade of
green, and this will be the shadow on the left side of the pickle.
Step
3
Now,
we will add a few bumps to create that recognizable pickle
look. Use the Pen Tool (P) to draw a few semicircle shapes on the
edges of the pickle. Make them of different sizes to ensure a more
realistic result for the final Illustrator brush (1).
Now,
select only the pink shapes on the upper right side along with the
green rounded rectangle and press Unite in the Pathfinder panel. I
will name the resulting shape “pickle body” (2).
After
that, select the blue shapes on the left side along with the shadow,
and press Unite on the Pathfinder panel again. I will name the newly
obtained shape “pickle shadow” (3).
Step
4
Select
the two shapes obtained in the previous step and then Copy and Paste
in Front (Control-F)
to make copies of them. Press Unite in the Pathfinder panel to merge
them, and you will get a new pickle shape. Give it a 1 pt
Stroke using black and select the Round Join option in the Stroke panel. I will name this shape “pickle outline”.
Step
5
Next,
take the Pen Tool (P) and draw two curved paths at the top of the
pickle as creases. Give them a 1 pt Stroke using black and Width
Profile 4 in the Stroke panel.
Do
the same thing at the bottom of the pickle and apply the same
settings.
Step
6
Now,
focus on one of the bumps and use the Pen Tool (P) to draw two short
paths as shown in the close-up. Give them a 1 pt Stroke using black
and Width Profile 4 in the Stroke panel.
Do
the same thing for the other bumps in order to add details, but not
necessarily for all of them.
3. How
to Define the Sections of the Pattern Illustrator Brush
Step
1
Creating a brush in Illustrator, especially pattern brushes, can be
easy if you take into consideration the three sections that define a pattern brush: the start, the side, and the end. If we do this ahead of time
and not just at the end, we make the process of saving the brush pain-free once we get to that stage, and we’re less likely to make
mistakes.
Take
the Rectangle Tool (M) and draw an 80 x 136 px rectangle which will
cover the pickle entirely. Leave a little more space on the left side
of the pickle for the shadow. With the rectangle still selected, go
to Object > Path > Split Into Grid and choose 3 Rows. Hit OK
and the rectangle will be divided into three equal parts.
Step
2
Notice
how the separation between the start and the side of the pattern brush
goes through one of the bumps. We don’t want this. It is better to
cut the brush sections between the bumps where the pickle is
straight.
Use
the Direct Selection Tool (A) to select only the points indicated and
move them upwards, right above the bump (2).
Select
the other points indicated and move them a little downwards in order
to make the start and end sections of the brush of about the
same size (3). The side of the brush (the middle part) will be
longer.
4. How
to Add Details to the Pickle Pattern Brush
Step
1
Use
the Pen Tool (P) to draw a path on the right
side of the pickle, as shown in the image below. Give it a 3 pt Stroke using a lighter shade of
green and Width Profile 6 in the Stroke panel. This will create a
main highlight on the pickle.
Step
2
Let’s
add more details. Use the Pen Tool (P) or the Pencil Tool (N) to draw
four random ellipses on the pickle. It’s better to not place them on
the blue lines but only inside the start, side, and end sections of
the brush. Fill them with a slightly darker shade of green and apply a 1 pt black Stroke using Width Profile 6 in the Stroke panel. Two
of the ellipses have no fill color, just the black stroke applied.
Step
3
Still
using the Pen Tool (P) or the Pencil Tool (N), draw a bunch of random
curved paths on the pickle. Give them a 0.5 pt and 0.75 ptStroke using black and Width Profile 1 in the Stroke panel.
Step
4
Zoom
in on one of the paths that you drew in the previous step and draw
a shorter path inside it. Give it a 0.5 pt Stroke using a lighter
shade of green and Width Profile 1 in the Stroke panel.
Repeat
the same thing for two or three more paths in order to add little
highlights on the pickle.
Step
5
Next,
take the Ellipse Tool (L) and draw a few small ellipses of different
sizes in the middle of the pickle. Color them with a darker green
(1).
Draw
more ellipses on the right side of the pickle and color them with a
lighter green (2). You can see the result in the image below (3).
5. How
to Create the Shadow of the Pickle Pattern Brush
Step
1
Select
the “pickle outline” shape and then Copy and Paste in Place
(Shift-Control-V) to make a copy of it. Select a black fill and
reduce the Opacity to 40%; then move it 1 px downward and 2 px to the
left using the Arrow Keys on your keyboard. Send this copy behind
everything by going to Object > Arrange > Send to Back
(Shift-Control-[) (1).
Copy and Paste in Back (Control-B) the first shadow shape to make another
copy. Move it 1 px downward and 2 px to the left using the Arrow keys
on the keyboard again. Keep the black fill color but reduce the Opacity to 25% (2).
Step
2
Copy and Paste in Back (Control-B) the second shadow shape to make a third
copy. Move it 1 px downwards and 2 px to the left; then change the
fill color to dark gray and reduce the Opacity to 15% (3).
Let’s do this one more time. Make a fourth copy of the shadow shape, and this time move it 1 px to the left. Keep the gray fill color but
reduce the Opacity to 5% (4).
Step
3
If
the shadow shapes go over the blue rectangle, use the Direct
Selection Tool (A) to select only the corner points at the bottom and
move them downwards a little. The entire pickle must be inside the
blue sections.
6. How
to Finalize the Pickle Pattern Brush
Step
1
We
are getting closer to saving the new Illustrator Pattern Brush, but we
need to prepare it first by expanding it and making some final adjustments.
Select all the stroked paths next to the outline of the pickle and go to Object > Expand Appearance in order to turn the strokes into fills
(1). Now, select the “pickle outline” and go to Object >
Expand to turn it into a black filled shape (2).
Keep
these resulting shapes selected and press Unite in the Pathfinder panel, followed by Object > Compound Path > Make (Control-8).
This will merge all the shapes into one (3).
Step
2
Now,
select the main highlight path and go to Object > Expand
Appearance. Do the same thing for all the detail paths on the pickle in
order to expand them, and we are ready to save this brush in Illustrator.
7. How
to Save the Pickle Pattern Brush
Step
1
Before
you continue, make a copy of the entire pickle and keep it for later
use.
Illustrator brushes can be tricky to save and may require a few tries until you are happy with the result, but let me show you how easy it is to save this brush.
Select
everything on your artboard and Rotate 90 degrees in the Transform
panel. Group (Control-G) all the shapes that make up the pickle, and
then make two copies behind. You should have three pickles on top
of each other and three blue rectangles.
Step
2
Select
one of the pickles along with the first rectangle and press Crop in
the Pathfinder panel. This will cut the pickle, and you will obtain
the start section of the pattern brush. Drag it into the Swatches panel to save it (1).
Next,
select a copy of the pickle along with the middle rectangle and press Crop again. This will cut the side section of the pattern brush for
us (2). You don’t need to save this one in the Swatches panel.
Select
the second copy of the pickle along with the last rectangle and press Crop again. You will obtain the end section of the pattern brush.
Drag it into the Swatches panel to save it (3).
Step
3
Select
the middle section of the pickle and drag it into the Brushes panel
to save it as a New Pattern Brush. In the Pattern Brush Options window,
this section will automatically appear under the Side Tile (1). Type
a name for the brush, and let’s change some settings.
As
the Start Tile (2), select New Pattern Swatch 1 from the drop-down
options, which is the first section saved in the Swatches panel.
As
the End Tile (3), select New Pattern Swatch 2 from the drop-down
options, which is the last section of the pickle saved in the Swatches panel.
Finally,
under Inner Corner Tile (4), select Auto-Centered. Hit OK and your new Illustrator brush is now saved and ready to use.
Step
4
Let’s
test the newly saved brush. Use the Pen Tool (P) or the Paintbrush
Tool (B) to draw any path on your artboard and give it a 1 pt Stroke
using the Pickle Pattern Brush from the Brushes panel. Fun, right?
8. How
to Create the Face of Pickle Rick
Step
1
Pickle
Rickis
the eccentric scientist Rick Sanchez from the famous animated series
Rick and Morty, who turns himself into a pickle just as he and his
family are about to attend a therapy session.
Let’s
start his face with the eyes. Use the Ellipse Tool (L) to draw two
circles of about 40 x 40 px and arrange them next to each other. Fill
them with the color indicated and also apply a 1 pt black Stroke.
While both circles stay selected, go to Effect > Distort &
Transform > Roughen and apply the settings shown in order to
distort the shapes slightly.
Step
2
Still
using the Ellipse Tool (L), draw a tiny black circle in the center of
each eye as the pupils. Now, take the Pen Tool (P) and draw a curved
path under each eye followed by the nose path. Give them a 1 pt black Stroke and select the Round Cap option in the Stroke panel.
Step
3
Continue
to draw the shape of the mouth filled with dark green. Also apply a 1
pt black Stroke and select the Align Stroke to Outside option in the Stroke panel.
For the tooth, draw a V-like path but rounded at the tip. Give it a pale
green fill color and a 1 pt black Stroke. Follow the shape of the
mouth and draw similar paths next to each other to obtain the
top teeth. Draw and apply the same appearances for the bottom teeth
as well.
Step
4
Next,
draw the shape of the tongue on the right side of the mouth. Fill it
with the color indicated and apply a 1 pt black Stroke.
Select
the shape of the mouth and then Copy and Paste in Place
(Shift-Control-V) to make a copy of it in front of everything. Set
this copy to stroke-none and fill-none. Keep this copy selected along
with the teeth and the tongue, and go to Object > Clipping Mask >
Make (Control-7).
Step
5
Use
the Pen Tool (P) to draw a curved path on each side of the mouth.
Give them a 1 pt black Stroke with the Round Cap option selected in
the Stroke panel (1).
Continue
to draw a C-like shape above the eyes. Give it a blue fill color and
a 1 pt black Stroke (2). The final thing to add is a random shape on
the upper left side filled with bright green (3).
9. How
to Create the Pickle Rick Pattern Brush
Step
1
First,
grab the copy of the pickle that I said to make earlier in the
tutorial (1) and start to remove some of the details on the top half in
order to create an empty area (2).
Now,
grab Rick’s face and go to Object > Expand Appearance followed
by Object > Expand to turn all strokes into fills. Group
(Control-G) all the shapes that make up the face and scale it down
until it fits inside the empty area you just created (3).
When
you are happy with the placement of the face, select only the indicated points of the blue rectangles with the help of the Direct Selection Tool (A) and move
them downwards, until they’re under the mouth. The entire face must be inside
the start section of the brush (4).
Step
2
Let’s
make a few adjustments, and then we are ready to save this pattern
brush next to the other Illustrator brushes.
Focus
on the shadow shape and use the Add Anchor Point Tool (+) to add
three extra points next to the mouth. Switch to the Direct Selection
Tool (A) and modify the shadow a little by moving these points,
following the left side of the mouth (1).
Next,
select the main highlight shape and change the fill color to a darker
shade of green; then make it a little thinner by dragging the
bounding box with the Selection Tool (V).
While
this shape stays selected, grab the Knife and cut the shape following
the right side of the mouth; then move the end points up to the black
outline of the mouth as shown in the close-up (2).
10. How
to Save the Pickle Rick Pattern Brush
Step
1
The process of saving this brush is the same as before. Select
the new pickle along with the blue rectangles and Rotate them 90
degrees in the Transform panel. Make two copies of the pickle behind
so that we have a pickle for each rectangle (1).
Now,
select the pickle along with the first rectangle and press Crop in
the Pathfinder panel. You will obtain the start section of the
pattern brush, which is the head of Pickle Rick. Drag it into the Swatches panel to save it (2).
Follow
the same technique and cut the side section (3) and the end section
of the brush as you did for the first pattern brush earlier in the
tutorial (4).
Step
2
Select
and drag the middle section of the pickle into the Brushes panel to
save it as a New Pattern Brush. Type a name for the brush and notice
that the middle section already appears under the Side Tile (1).
As
the Start Tile (2), select New Pattern Swatch 3 from the drop-down
options, which is the head of Pickle Rick saved earlier.
As
the End Tile (3) select New Pattern Swatch 4, and as the Inner
Corner Tile (4) select Auto-Centered from the options available. Hit OK to save the Pickle Rick Pattern Brush in the Brushes panel.
Step
3
Let’s
test it by applying it to a random path drawn with the Pen Tool (P)
or the Paintbrush Tool (B). Looks great!
11. How
to Create the Pickle Text Effect
Step
1
Now that we have the two Illustrator brushes already saved, here is how to make the text effect quickly and easily.
Use
the Pen Tool (P) or the Pencil Tool (N) to draw paths as letters and compose the
word “PICKLE”. Stroke all of them with the Pickle Pattern Brush
and keep the Stroke Weight at 1 pt. Drag two guide lines above and
under the text effect to make sure the letters are about the same
height, making small adjustments if needed.
Step
2
Replace
one (or more) of the strokes with the Pickle Rick Pattern Brush to make this
text effect more fun.
Step
3
As
an extra touch, you can add a small stem to the pickle letters. Draw
the shape of the stem and color it with the same green as the pickle’s body. Also apply a 2 pt black Stroke using Width Profile 6 in order to maintain the
same outlined style.
The
stem could be a part of the pattern brush if you include it in the Start Tile before saving it, but then all the stroked paths will have
the same stem, and this is not the look we want for the text effect.
In this case, the two stems are just extra additions.
Congratulations!
You’re Done
Here
is the final image of the pickle text effect with the face of Pickle Rick as a creative addition. I hope this tutorial was
fun for you and that you learned some new things today. Now you have the
knowledge to make other creative Adobe Illustrator brushes and use
them in your projects.
Don’t
forget to share your recreation of this pickle text effect with us.
We would love to see it.
Expand
Your Text-Effect Designing Skills!
Keep
drawing and learning with these recommended tutorials:
Learn to create a custom paint brush, a scatter brush and a texture brush in Adobe Illustrator, using nothing more than some basic geometric shapes and effects.
Have you always liked to draw using texture or grunge brushes? Why not create your own vector Illustrator brush? What if I’ll tell you that it’s easy and…
Always wondered how to make a watercolor brush in Illustrator, but never knew exactly where to start? Today you’ll learn how easy it is to create a vector…
For all of you sports fans out there, this tutorial will teach you how to create a baseball-inspired text effect. You’ll start by preparing the text, then…
Always
wanted to create a brush, but never knew exactly how to do it?
Well,
if you love unique creative brushes and you want to learn how to make
a brush in Illustrator, then this tutorial is perfect for you. It will take you through the entire process of drawing, saving, and
applying the brush.
You
will learn how to create a pickle brush and how to save it correctly
as a new pattern brush by following a few tips and tricks that you will
be able to apply to other Adobe Illustrator brushes as well.
And
if you are a fan of the Rick and Morty animated series, we will give
this text effect a unique twist by creating a Pickle Rick Pattern
Brush as well. Both brushes are easy to use, and this fun text effect
will be ready in no time. If you are excited about this, then let’s
start!
Expand
your brushes library by going to GraphicRiver, where you’ll find a great
selection of brushes in various styles, shapes, and themes. Also,
check out the text effects section, where you’ll find plenty of
inspiration and resources for your projects.
1. How
to Open a New Document
Launch Illustrator and
go to File
> New to
open a blank document. Type a name for your file, set the
dimensions, and then select Pixels as Units and RGB as Color
Mode.
Next,
go to Edit
> Preferences > General and
set the Keyboard
Increment to 1
px and,
while there, go to Units to
make sure they are set as in the following image. I usually work with
these settings, and they will help you throughout the drawing process.
2. How
to Create the Basic Pickle Shape
Step
1
Grab
the Rectangle Tool (M), click on your artboard, and enter 44 x 132 px
as the dimensions of the rectangle. Color it with green.
Keep
this shape selected and go to the Transform panel. Enter 20 px in all
four Corner Radius fields in order to create the rounded corners.
Step
2
Copy and Paste
in Front (Control-F)
the rounded rectangle to get a copy of it (the gray shape), and then
move it 7 px to the right by pressing the Right Arrow key on your
keyboard seven times.
Copy and Paste
in Front (Control-F)
the green rounded rectangle again to make another copy. Keep this
copy selected along with the gray copy and press Minus Front on the Pathfinder panel. Color the shape obtained with a darker shade of
green, and this will be the shadow on the left side of the pickle.
Step
3
Now,
we will add a few bumps to create that recognizable pickle
look. Use the Pen Tool (P) to draw a few semicircle shapes on the
edges of the pickle. Make them of different sizes to ensure a more
realistic result for the final Illustrator brush (1).
Now,
select only the pink shapes on the upper right side along with the
green rounded rectangle and press Unite in the Pathfinder panel. I
will name the resulting shape “pickle body” (2).
After
that, select the blue shapes on the left side along with the shadow,
and press Unite on the Pathfinder panel again. I will name the newly
obtained shape “pickle shadow” (3).
Step
4
Select
the two shapes obtained in the previous step and then Copy and Paste
in Front (Control-F)
to make copies of them. Press Unite in the Pathfinder panel to merge
them, and you will get a new pickle shape. Give it a 1 pt
Stroke using black and select the Round Join option in the Stroke panel. I will name this shape “pickle outline”.
Step
5
Next,
take the Pen Tool (P) and draw two curved paths at the top of the
pickle as creases. Give them a 1 pt Stroke using black and Width
Profile 4 in the Stroke panel.
Do
the same thing at the bottom of the pickle and apply the same
settings.
Step
6
Now,
focus on one of the bumps and use the Pen Tool (P) to draw two short
paths as shown in the close-up. Give them a 1 pt Stroke using black
and Width Profile 4 in the Stroke panel.
Do
the same thing for the other bumps in order to add details, but not
necessarily for all of them.
3. How
to Define the Sections of the Pattern Illustrator Brush
Step
1
Creating a brush in Illustrator, especially pattern brushes, can be
easy if you take into consideration the three sections that define a pattern brush: the start, the side, and the end. If we do this ahead of time
and not just at the end, we make the process of saving the brush pain-free once we get to that stage, and we’re less likely to make
mistakes.
Take
the Rectangle Tool (M) and draw an 80 x 136 px rectangle which will
cover the pickle entirely. Leave a little more space on the left side
of the pickle for the shadow. With the rectangle still selected, go
to Object > Path > Split Into Grid and choose 3 Rows. Hit OK
and the rectangle will be divided into three equal parts.
Step
2
Notice
how the separation between the start and the side of the pattern brush
goes through one of the bumps. We don’t want this. It is better to
cut the brush sections between the bumps where the pickle is
straight.
Use
the Direct Selection Tool (A) to select only the points indicated and
move them upwards, right above the bump (2).
Select
the other points indicated and move them a little downwards in order
to make the start and end sections of the brush of about the
same size (3). The side of the brush (the middle part) will be
longer.
4. How
to Add Details to the Pickle Pattern Brush
Step
1
Use
the Pen Tool (P) to draw a path on the right
side of the pickle, as shown in the image below. Give it a 3 pt Stroke using a lighter shade of
green and Width Profile 6 in the Stroke panel. This will create a
main highlight on the pickle.
Step
2
Let’s
add more details. Use the Pen Tool (P) or the Pencil Tool (N) to draw
four random ellipses on the pickle. It’s better to not place them on
the blue lines but only inside the start, side, and end sections of
the brush. Fill them with a slightly darker shade of green and apply a 1 pt black Stroke using Width Profile 6 in the Stroke panel. Two
of the ellipses have no fill color, just the black stroke applied.
Step
3
Still
using the Pen Tool (P) or the Pencil Tool (N), draw a bunch of random
curved paths on the pickle. Give them a 0.5 pt and 0.75 ptStroke using black and Width Profile 1 in the Stroke panel.
Step
4
Zoom
in on one of the paths that you drew in the previous step and draw
a shorter path inside it. Give it a 0.5 pt Stroke using a lighter
shade of green and Width Profile 1 in the Stroke panel.
Repeat
the same thing for two or three more paths in order to add little
highlights on the pickle.
Step
5
Next,
take the Ellipse Tool (L) and draw a few small ellipses of different
sizes in the middle of the pickle. Color them with a darker green
(1).
Draw
more ellipses on the right side of the pickle and color them with a
lighter green (2). You can see the result in the image below (3).
5. How
to Create the Shadow of the Pickle Pattern Brush
Step
1
Select
the “pickle outline” shape and then Copy and Paste in Place
(Shift-Control-V) to make a copy of it. Select a black fill and
reduce the Opacity to 40%; then move it 1 px downward and 2 px to the
left using the Arrow Keys on your keyboard. Send this copy behind
everything by going to Object > Arrange > Send to Back
(Shift-Control-[) (1).
Copy and Paste in Back (Control-B) the first shadow shape to make another
copy. Move it 1 px downward and 2 px to the left using the Arrow keys
on the keyboard again. Keep the black fill color but reduce the Opacity to 25% (2).
Step
2
Copy and Paste in Back (Control-B) the second shadow shape to make a third
copy. Move it 1 px downwards and 2 px to the left; then change the
fill color to dark gray and reduce the Opacity to 15% (3).
Let’s do this one more time. Make a fourth copy of the shadow shape, and this time move it 1 px to the left. Keep the gray fill color but
reduce the Opacity to 5% (4).
Step
3
If
the shadow shapes go over the blue rectangle, use the Direct
Selection Tool (A) to select only the corner points at the bottom and
move them downwards a little. The entire pickle must be inside the
blue sections.
6. How
to Finalize the Pickle Pattern Brush
Step
1
We
are getting closer to saving the new Illustrator Pattern Brush, but we
need to prepare it first by expanding it and making some final adjustments.
Select all the stroked paths next to the outline of the pickle and go to Object > Expand Appearance in order to turn the strokes into fills
(1). Now, select the “pickle outline” and go to Object >
Expand to turn it into a black filled shape (2).
Keep
these resulting shapes selected and press Unite in the Pathfinder panel, followed by Object > Compound Path > Make (Control-8).
This will merge all the shapes into one (3).
Step
2
Now,
select the main highlight path and go to Object > Expand
Appearance. Do the same thing for all the detail paths on the pickle in
order to expand them, and we are ready to save this brush in Illustrator.
7. How
to Save the Pickle Pattern Brush
Step
1
Before
you continue, make a copy of the entire pickle and keep it for later
use.
Illustrator brushes can be tricky to save and may require a few tries until you are happy with the result, but let me show you how easy it is to save this brush.
Select
everything on your artboard and Rotate 90 degrees in the Transform
panel. Group (Control-G) all the shapes that make up the pickle, and
then make two copies behind. You should have three pickles on top
of each other and three blue rectangles.
Step
2
Select
one of the pickles along with the first rectangle and press Crop in
the Pathfinder panel. This will cut the pickle, and you will obtain
the start section of the pattern brush. Drag it into the Swatches panel to save it (1).
Next,
select a copy of the pickle along with the middle rectangle and press Crop again. This will cut the side section of the pattern brush for
us (2). You don’t need to save this one in the Swatches panel.
Select
the second copy of the pickle along with the last rectangle and press Crop again. You will obtain the end section of the pattern brush.
Drag it into the Swatches panel to save it (3).
Step
3
Select
the middle section of the pickle and drag it into the Brushes panel
to save it as a New Pattern Brush. In the Pattern Brush Options window,
this section will automatically appear under the Side Tile (1). Type
a name for the brush, and let’s change some settings.
As
the Start Tile (2), select New Pattern Swatch 1 from the drop-down
options, which is the first section saved in the Swatches panel.
As
the End Tile (3), select New Pattern Swatch 2 from the drop-down
options, which is the last section of the pickle saved in the Swatches panel.
Finally,
under Inner Corner Tile (4), select Auto-Centered. Hit OK and your new Illustrator brush is now saved and ready to use.
Step
4
Let’s
test the newly saved brush. Use the Pen Tool (P) or the Paintbrush
Tool (B) to draw any path on your artboard and give it a 1 pt Stroke
using the Pickle Pattern Brush from the Brushes panel. Fun, right?
8. How
to Create the Face of Pickle Rick
Step
1
Pickle
Rickis
the eccentric scientist Rick Sanchez from the famous animated series
Rick and Morty, who turns himself into a pickle just as he and his
family are about to attend a therapy session.
Let’s
start his face with the eyes. Use the Ellipse Tool (L) to draw two
circles of about 40 x 40 px and arrange them next to each other. Fill
them with the color indicated and also apply a 1 pt black Stroke.
While both circles stay selected, go to Effect > Distort &
Transform > Roughen and apply the settings shown in order to
distort the shapes slightly.
Step
2
Still
using the Ellipse Tool (L), draw a tiny black circle in the center of
each eye as the pupils. Now, take the Pen Tool (P) and draw a curved
path under each eye followed by the nose path. Give them a 1 pt black Stroke and select the Round Cap option in the Stroke panel.
Step
3
Continue
to draw the shape of the mouth filled with dark green. Also apply a 1
pt black Stroke and select the Align Stroke to Outside option in the Stroke panel.
For the tooth, draw a V-like path but rounded at the tip. Give it a pale
green fill color and a 1 pt black Stroke. Follow the shape of the
mouth and draw similar paths next to each other to obtain the
top teeth. Draw and apply the same appearances for the bottom teeth
as well.
Step
4
Next,
draw the shape of the tongue on the right side of the mouth. Fill it
with the color indicated and apply a 1 pt black Stroke.
Select
the shape of the mouth and then Copy and Paste in Place
(Shift-Control-V) to make a copy of it in front of everything. Set
this copy to stroke-none and fill-none. Keep this copy selected along
with the teeth and the tongue, and go to Object > Clipping Mask >
Make (Control-7).
Step
5
Use
the Pen Tool (P) to draw a curved path on each side of the mouth.
Give them a 1 pt black Stroke with the Round Cap option selected in
the Stroke panel (1).
Continue
to draw a C-like shape above the eyes. Give it a blue fill color and
a 1 pt black Stroke (2). The final thing to add is a random shape on
the upper left side filled with bright green (3).
9. How
to Create the Pickle Rick Pattern Brush
Step
1
First,
grab the copy of the pickle that I said to make earlier in the
tutorial (1) and start to remove some of the details on the top half in
order to create an empty area (2).
Now,
grab Rick’s face and go to Object > Expand Appearance followed
by Object > Expand to turn all strokes into fills. Group
(Control-G) all the shapes that make up the face and scale it down
until it fits inside the empty area you just created (3).
When
you are happy with the placement of the face, select only the indicated points of the blue rectangles with the help of the Direct Selection Tool (A) and move
them downwards, until they’re under the mouth. The entire face must be inside
the start section of the brush (4).
Step
2
Let’s
make a few adjustments, and then we are ready to save this pattern
brush next to the other Illustrator brushes.
Focus
on the shadow shape and use the Add Anchor Point Tool (+) to add
three extra points next to the mouth. Switch to the Direct Selection
Tool (A) and modify the shadow a little by moving these points,
following the left side of the mouth (1).
Next,
select the main highlight shape and change the fill color to a darker
shade of green; then make it a little thinner by dragging the
bounding box with the Selection Tool (V).
While
this shape stays selected, grab the Knife and cut the shape following
the right side of the mouth; then move the end points up to the black
outline of the mouth as shown in the close-up (2).
10. How
to Save the Pickle Rick Pattern Brush
Step
1
The process of saving this brush is the same as before. Select
the new pickle along with the blue rectangles and Rotate them 90
degrees in the Transform panel. Make two copies of the pickle behind
so that we have a pickle for each rectangle (1).
Now,
select the pickle along with the first rectangle and press Crop in
the Pathfinder panel. You will obtain the start section of the
pattern brush, which is the head of Pickle Rick. Drag it into the Swatches panel to save it (2).
Follow
the same technique and cut the side section (3) and the end section
of the brush as you did for the first pattern brush earlier in the
tutorial (4).
Step
2
Select
and drag the middle section of the pickle into the Brushes panel to
save it as a New Pattern Brush. Type a name for the brush and notice
that the middle section already appears under the Side Tile (1).
As
the Start Tile (2), select New Pattern Swatch 3 from the drop-down
options, which is the head of Pickle Rick saved earlier.
As
the End Tile (3) select New Pattern Swatch 4, and as the Inner
Corner Tile (4) select Auto-Centered from the options available. Hit OK to save the Pickle Rick Pattern Brush in the Brushes panel.
Step
3
Let’s
test it by applying it to a random path drawn with the Pen Tool (P)
or the Paintbrush Tool (B). Looks great!
11. How
to Create the Pickle Text Effect
Step
1
Now that we have the two Illustrator brushes already saved, here is how to make the text effect quickly and easily.
Use
the Pen Tool (P) or the Pencil Tool (N) to draw paths as letters and compose the
word “PICKLE”. Stroke all of them with the Pickle Pattern Brush
and keep the Stroke Weight at 1 pt. Drag two guide lines above and
under the text effect to make sure the letters are about the same
height, making small adjustments if needed.
Step
2
Replace
one (or more) of the strokes with the Pickle Rick Pattern Brush to make this
text effect more fun.
Step
3
As
an extra touch, you can add a small stem to the pickle letters. Draw
the shape of the stem and color it with the same green as the pickle’s body. Also apply a 2 pt black Stroke using Width Profile 6 in order to maintain the
same outlined style.
The
stem could be a part of the pattern brush if you include it in the Start Tile before saving it, but then all the stroked paths will have
the same stem, and this is not the look we want for the text effect.
In this case, the two stems are just extra additions.
Congratulations!
You’re Done
Here
is the final image of the pickle text effect with the face of Pickle Rick as a creative addition. I hope this tutorial was
fun for you and that you learned some new things today. Now you have the
knowledge to make other creative Adobe Illustrator brushes and use
them in your projects.
Don’t
forget to share your recreation of this pickle text effect with us.
We would love to see it.
Expand
Your Text-Effect Designing Skills!
Keep
drawing and learning with these recommended tutorials:
Learn to create a custom paint brush, a scatter brush and a texture brush in Adobe Illustrator, using nothing more than some basic geometric shapes and effects.
Have you always liked to draw using texture or grunge brushes? Why not create your own vector Illustrator brush? What if I’ll tell you that it’s easy and…
Always wondered how to make a watercolor brush in Illustrator, but never knew exactly where to start? Today you’ll learn how easy it is to create a vector…
For all of you sports fans out there, this tutorial will teach you how to create a baseball-inspired text effect. You’ll start by preparing the text, then…